

Grow pineapple chair method 鈥?sounds intriguing, doesn’t it? I know, when I first heard about it, I was instantly hooked! Forget the complicated gardening setups and expensive equipment. This DIY trick is about to revolutionize how you think about growing pineapples, and trust me, it’s easier than you think.
Pineapples, symbols of hospitality and luxury, have a rich history. Originating in South America, they were once so prized that owning one was a status symbol. Now, you can bring a touch of that tropical elegance to your own backyard, balcony, or even your living room! And the best part? You can do it with a simple chair!
Let’s face it, growing pineapples can seem daunting. Many people believe it requires a tropical climate and a green thumb. But what if I told you that you could bypass all that with a clever, space-saving, and surprisingly effective method? That’s where the grow pineapple chair method comes in. This DIY hack is perfect for urban gardeners, apartment dwellers, or anyone who wants to enjoy the sweet taste of homegrown pineapple without the hassle. I’m excited to share this simple yet effective method with you, so you can enjoy fresh pineapples from your own home!
Growing a Pineapple Plant from a Pineapple Top: A Fun DIY Project!
Hey there, fellow plant enthusiasts! Ever wondered if you could grow your own pineapple plant from just the top of a store-bought pineapple? Well, guess what? You absolutely can! It’s a fun, rewarding, and surprisingly easy DIY project. I’ve done it myself, and let me tell you, watching that little pineapple top transform into a thriving plant is incredibly satisfying. So, grab a pineapple, and let’s get started!
Choosing the Right Pineapple
Before we dive into the growing process, it’s crucial to select the right pineapple. This will significantly impact your success rate.
* Look for a healthy pineapple: Choose a pineapple that’s ripe but not overripe. The leaves should be green and vibrant, not brown or wilted. Avoid pineapples with soft spots or bruises.
* Check the crown: The crown (the leafy top) should be firmly attached and have a good amount of healthy-looking leaves. Gently tug on a few leaves; they shouldn’t come off easily.
* Organic is best: While not essential, organic pineapples are often treated with fewer chemicals, which can sometimes hinder root development.
Preparing the Pineapple Top
This is where the magic begins! We need to carefully separate the top from the fruit and prepare it for rooting.
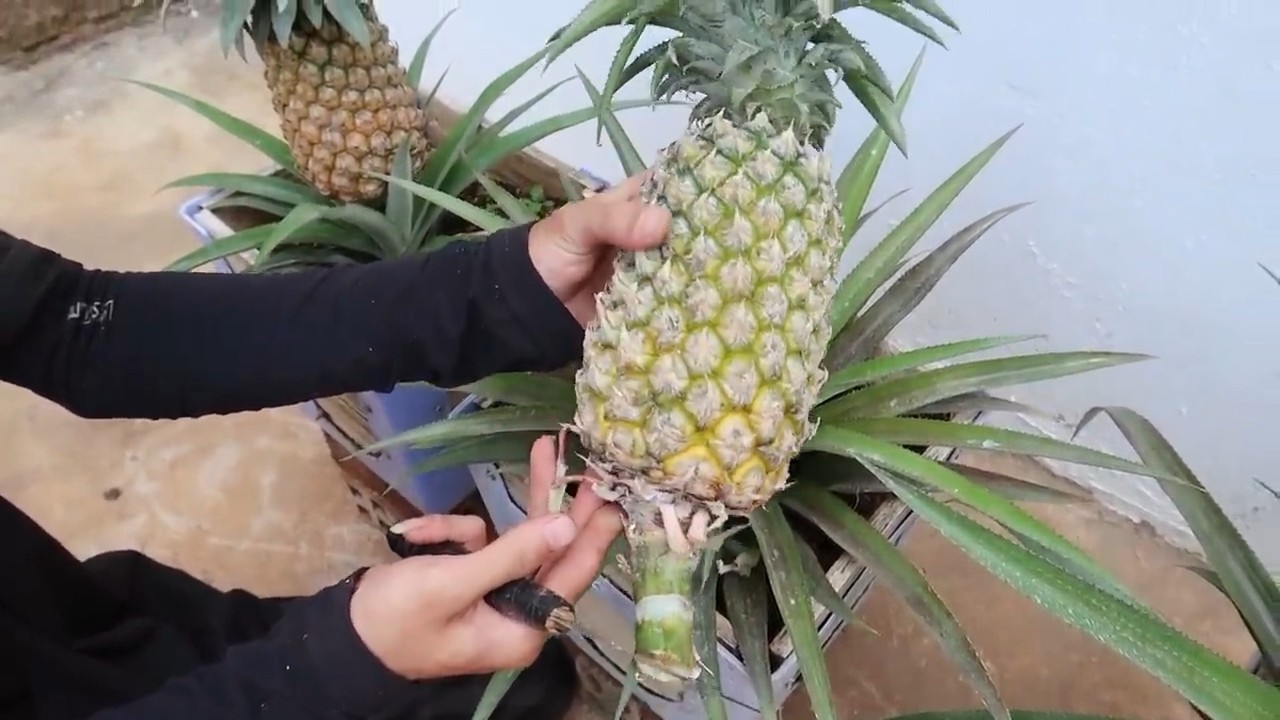
1. Twisting Method: The easiest way to remove the top is by twisting it off. Hold the pineapple firmly in one hand and the crown in the other. Twist the crown until it separates from the fruit. This might require a bit of force, so be careful!
2. Cutting Method (Alternative): If twisting doesn’t work, you can use a sharp knife. Cut the top off, leaving about an inch of fruit attached.
3. Remove Excess Fruit: Whether you twisted or cut, you’ll likely have some fruit attached to the base of the crown. This needs to be removed to prevent rotting. Carefully peel away the remaining fruit, exposing the base of the crown where the roots will emerge. Be gentle to avoid damaging any potential root buds.
4. Remove Lower Leaves: Now, we need to remove the bottom few layers of leaves. This will expose the stem and encourage root growth. Gently peel off the lower leaves, working your way up until you see small brown bumps or root initials. These are where the roots will sprout from.
5. Let it Dry: This is a crucial step! After removing the leaves, let the pineapple top dry out for a few days. This allows the cut end to callous over, preventing rot when you put it in water or soil. Place the pineapple top in a well-ventilated area, away from direct sunlight. I usually leave mine for about 3-7 days.
Rooting the Pineapple Top
There are two main methods for rooting your pineapple top: water rooting and direct planting. I’ve tried both, and I’ll share my experiences with each.
Water Rooting Method
This method allows you to see the roots develop, which can be very rewarding.
1. Prepare a Container: Choose a clear glass or jar that’s wide enough to hold the pineapple top without it tipping over.
2. Add Water: Fill the container with fresh, clean water. Make sure the water level is high enough to cover the exposed stem where you removed the leaves, but not so high that it covers the base of the leaves.
3. Place the Pineapple Top: Carefully place the pineapple top in the water, ensuring that only the stem is submerged.
4. Find a Sunny Spot: Place the container in a warm, sunny location. A windowsill is ideal.
5. Change the Water Regularly: Change the water every few days to prevent algae growth and keep the water fresh.
6. Wait for Roots: Be patient! It can take several weeks for roots to appear. You should start to see small roots emerging from the stem. Once the roots are a few inches long, it’s time to plant your pineapple top in soil.
Direct Planting Method
This method involves planting the pineapple top directly into soil without rooting it in water first.
1. Prepare the Pot: Choose a pot that’s at least 6 inches in diameter. Make sure the pot has drainage holes to prevent waterlogging.
2. Prepare the Soil: Use a well-draining potting mix. A mix of potting soil, perlite, and sand works well.
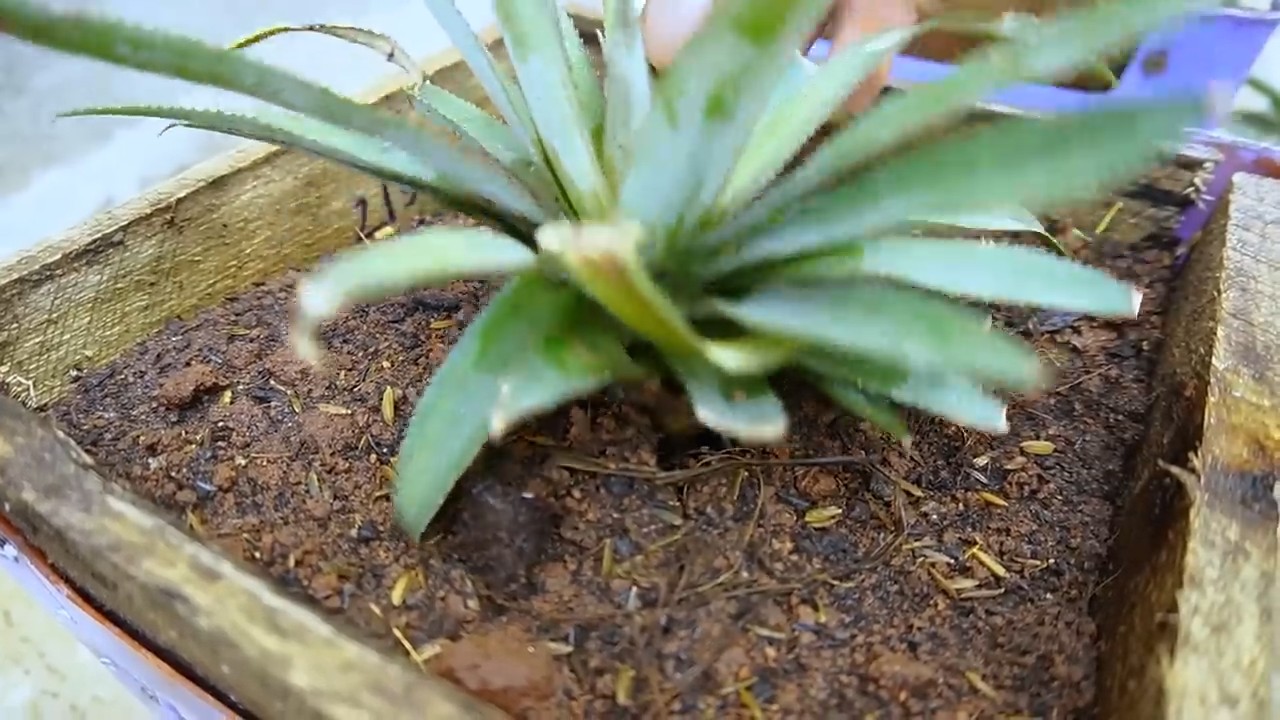
3. Plant the Pineapple Top: Dig a hole in the center of the pot and carefully place the pineapple top in the hole. Make sure the base of the crown is buried in the soil, but the leaves are above the surface.
4. Water Thoroughly: Water the soil thoroughly after planting.
5. Find a Sunny Spot: Place the pot in a warm, sunny location.
6. Keep the Soil Moist: Keep the soil consistently moist, but not soggy. Water when the top inch of soil feels dry to the touch.
Planting Your Rooted Pineapple Top
Whether you rooted your pineapple top in water or planted it directly in soil, eventually, it will need to be transplanted into a larger pot.
1. Choose a Larger Pot: Select a pot that’s at least 10-12 inches in diameter. Pineapples need room to grow.
2. Prepare the Soil: Again, use a well-draining potting mix.
3. Carefully Remove the Pineapple Top: If you rooted it in water, gently remove the pineapple top from the water, being careful not to damage the roots. If you planted it directly in soil, carefully dig around the pineapple top and lift it out of the pot.
4. Plant the Pineapple Top: Dig a hole in the center of the new pot and carefully place the pineapple top in the hole. Make sure the base of the crown is buried in the soil, but the leaves are above the surface.
5. Water Thoroughly: Water the soil thoroughly after planting.
Caring for Your Pineapple Plant
Now that your pineapple plant is potted, it’s time to provide the care it needs to thrive.
* Sunlight: Pineapples need plenty of sunlight, at least 6 hours a day. Place your plant in a sunny location, such as a south-facing window. If you don’t have enough natural light, you can supplement with a grow light.
* Watering: Water your pineapple plant regularly, but don’t overwater. Allow the top inch of soil to dry out between waterings. During the growing season (spring and summer), you may need to water more frequently. In the winter, reduce watering.
* Fertilizing: Feed your pineapple plant with a balanced fertilizer every few months during the growing season. Follow the instructions on the fertilizer label.
* Temperature: Pineapples prefer warm temperatures, between 65掳F and 85掳F. Protect your plant from frost.
* Humidity: Pineapples like humidity. If you live in a dry climate, you can increase humidity by misting the leaves regularly or placing the pot on a tray filled with pebbles and water.
* Pest Control: Keep an eye out for pests, such as mealybugs and spider mites. If you notice any pests, treat your plant with an appropriate insecticide.
Patience is Key!
Growing a pineapple plant from a pineapple top takes time and patience. It can take several years for your plant to produce a pineapple. But don’t get discouraged! Even if your plant doesn’t produce fruit, it’s still a beautiful and unique addition to your indoor garden.
Troubleshooting
* Rotting: If your pineapple top starts to rot, it’s likely due to overwatering or poor drainage. Make sure the soil is well-draining and avoid overwatering.
* Yellowing Leaves: Yellowing leaves can be a sign of overwatering, underwatering, or nutrient deficiency. Adjust your watering schedule and fertilize your plant if necessary.
* Slow Growth: Slow growth can be due to insufficient sunlight, poor soil, or lack of fertilizer. Make sure your plant is getting enough sunlight, use a well-draining potting mix, and fertilize regularly.
My Personal Tips and Tricks
* Use rainwater: I’ve found that using rainwater to water my pineapple plant helps it thrive. Rainwater is naturally soft and contains beneficial nutrients.
* Rotate the plant: Rotate your pineapple plant regularly to ensure that all sides get equal sunlight. This will help it grow evenly.
* Don’t give up! Growing a pineapple plant can be challenging, but it’s also incredibly rewarding. Don’t be afraid to experiment and learn from your mistakes.
Growing a pineapple plant from a pineapple top is a fun and educational project that anyone can do. With a little patience and care, you can enjoy the satisfaction of growing your own tropical fruit. Happy growing!
Conclusion
So, there you have it! The “pineapple chair” method 鈥?a surprisingly simple and effective way to propagate your own pineapple plant from the crown of a store-bought fruit. This isn’t just a fun gardening project; it’s a sustainable way to enjoy the beauty and potential bounty of your own homegrown pineapple. Forget expensive seedlings or complicated grafting techniques. This method puts the power of propagation directly in your hands, using something you’d normally discard.
Why is this a must-try? Because it’s accessible, rewarding, and teaches you a valuable lesson about the resilience of nature. Imagine the satisfaction of nurturing a pineapple plant from its humble beginnings as a discarded crown to a thriving, fruit-bearing specimen. It’s a journey that connects you to the plant world in a tangible and meaningful way. Plus, it’s a fantastic conversation starter!
But the benefits don’t stop there. Growing your own pineapple allows you to control the growing conditions, ensuring that your plant receives the best possible care. You can choose organic fertilizers, protect it from pests naturally, and ultimately enjoy a fruit that is free from harmful chemicals. And let’s be honest, there’s nothing quite like the taste of a pineapple you’ve grown yourself.
Ready to take your pineapple propagation to the next level? Consider these variations:
* Experiment with different soil mixes: While a well-draining potting mix is generally recommended, you can try adding perlite or vermiculite to improve drainage and aeration.
* Play with lighting: Observe how your pineapple plant responds to different levels of sunlight. While they thrive in bright, indirect light, you might find that a few hours of direct sunlight each day can boost growth.
* Get creative with containers: Don’t limit yourself to standard pots. Use repurposed containers like old buckets or even a decorative planter to add a touch of personality to your pineapple garden.
* Hydroponic Pineapple Chair: For a more advanced approach, you can adapt the pineapple chair method to a hydroponic setup. This involves suspending the crown in a nutrient-rich water solution, providing the plant with a constant supply of essential elements.
The “pineapple chair” method is more than just a gardening trick; it’s an invitation to connect with nature, learn about plant propagation, and enjoy the fruits (literally!) of your labor. So, grab a pineapple, prepare your “chair,” and embark on this exciting gardening adventure.
We’re confident that you’ll be amazed by the results. Don’t be afraid to experiment, adapt the method to your specific environment, and most importantly, have fun!
Now, we want to hear from you! Have you tried the “pineapple chair” method? What were your results? What challenges did you face? Share your experiences, tips, and photos in the comments below. Let’s create a community of pineapple enthusiasts and learn from each other. Your insights could help other gardeners successfully propagate their own pineapple plants. Let’s grow together!
Frequently Asked Questions (FAQ)
What exactly is the “pineapple chair” method?
The “pineapple chair” method is a simple technique for propagating a pineapple plant from the crown (the leafy top) of a store-bought pineapple. It involves removing the fruit from the crown, preparing the crown by removing some of the lower leaves, and then suspending the crown over a glass or jar of water, using toothpicks to create a “chair” that holds the crown in place. The base of the crown should be submerged in water, allowing roots to develop. Once roots have formed, the crown can be planted in soil.
Why is it called the “pineapple chair” method?
The name comes from the way the pineapple crown is suspended over the water using toothpicks. The toothpicks act as the “legs” of a chair, supporting the crown and preventing it from falling into the water. This allows the base of the crown to remain submerged while the leaves stay dry.
How long does it take for roots to grow using the “pineapple chair” method?
Root development can take anywhere from 2 to 8 weeks, depending on factors such as temperature, humidity, and the variety of pineapple. Be patient and change the water every few days to prevent bacterial growth. You’ll know it’s time to plant when the roots are at least 1-2 inches long.
What kind of water should I use for the “pineapple chair” method?
Use clean, filtered water or tap water that has been left to sit for 24 hours to allow chlorine to dissipate. Avoid using distilled water, as it lacks the minerals that can benefit root development.
What kind of soil should I use when planting the rooted pineapple crown?
Use a well-draining potting mix. A mix of equal parts potting soil, perlite, and peat moss is a good option. The soil should be slightly acidic to neutral (pH 6.0-7.0). Good drainage is crucial to prevent root rot.
How much sunlight does a pineapple plant need?
Pineapple plants thrive in bright, indirect sunlight. They can tolerate some direct sunlight, especially in the morning or late afternoon, but too much direct sun can scorch the leaves. Aim for at least 6 hours of sunlight per day.
How often should I water my pineapple plant?
Water your pineapple plant thoroughly when the top inch of soil feels dry to the touch. Allow the excess water to drain out of the pot. Avoid overwatering, as this can lead to root rot. During the winter months, reduce watering frequency.
What kind of fertilizer should I use for my pineapple plant?
Use a balanced liquid fertilizer (e.g., 10-10-10) diluted to half strength. Fertilize every 2-3 weeks during the growing season (spring and summer). Reduce or stop fertilizing during the winter months. You can also use organic fertilizers like compost tea or fish emulsion.
How long does it take for a pineapple plant to produce fruit?
It can take anywhere from 1 to 3 years for a pineapple plant grown from a crown to produce fruit. Patience is key! Factors such as sunlight, temperature, and fertilization can affect the fruiting time.
How do I encourage my pineapple plant to fruit?
One trick to encourage fruiting is to expose the plant to ethylene gas. You can do this by placing a ripe apple or banana near the plant and covering both with a plastic bag for a few days. The ethylene gas released by the fruit can stimulate flowering.
What are some common problems with pineapple plants and how do I fix them?
* Root rot: Caused by overwatering. Ensure good drainage and allow the soil to dry out between waterings.
* Mealybugs: Small, white, cottony pests. Treat with insecticidal soap or neem oil.
* Scale: Small, brown, shell-like insects. Scrape them off or treat with insecticidal soap or neem oil.
* Sunburn: Caused by too much direct sunlight. Move the plant to a shadier location.
* Yellowing leaves: Can be caused by nutrient deficiency, overwatering, or underwatering. Adjust watering and fertilizing accordingly.
Can I grow a pineapple plant indoors?
Yes, you can grow a pineapple plant indoors, provided you give it enough light. Place it near a sunny window or supplement with grow lights. Ensure good air circulation and maintain a warm temperature.
Is the “pineapple chair” method the only way to propagate pineapples?
No, there are other methods, such as propagating from slips (small plantlets that grow around the base of the pineapple) or suckers (shoots that grow from the stem). However, the “pineapple chair” method is a popular and relatively easy option for beginners.
What if my pineapple crown rots before roots develop?
Rotting is usually caused by bacterial or fungal growth due to stagnant water. Make sure to change the water every 1-2 days. You can also add a small amount of hydrogen peroxide to the water to help prevent rot. If the crown starts to rot, remove any affected parts and try again with fresh water.
Can I use any type of pineapple for the “pineapple chair” method?
Yes, you can use any type of pineapple, but some varieties may be more successful than others. Look for pineapples with healthy, green crowns that are free from damage or disease.
What is the best time of year to start the “pineapple chair” method?
The best time to start is during the spring or summer, when temperatures are warmer and the plant is actively growing. However, you can try it at any time of year, provided you can provide the plant with adequate warmth and light.
Leave a Comment