

Growing Kale for Beginners can seem daunting, but trust me, it’s easier than you think! Have you ever dreamt of stepping into your backyard and harvesting fresh, vibrant greens for a healthy salad or a nutritious smoothie? Imagine the satisfaction of knowing exactly where your food comes from and that it’s packed with vitamins and minerals. That’s the magic of home gardening, and kale is the perfect place to start.
Kale, a nutritional powerhouse, has been cultivated for over 2,000 years, with its roots tracing back to the eastern Mediterranean. It was a staple food in Roman times and throughout the Middle Ages in Europe. While it might have had a resurgence in popularity recently, its history proves its resilience and adaptability – qualities that make it ideal for beginner gardeners like us!
In today’s world, where we’re increasingly conscious of what we eat and where it comes from, growing kale for beginners offers a fantastic solution. Not only does it provide you with a sustainable source of healthy food, but it also connects you with nature and offers a rewarding hobby. Plus, store-bought kale can sometimes be expensive and lack the freshness of homegrown varieties. This DIY guide will equip you with all the essential tips and tricks to successfully cultivate your own thriving kale patch, even if you’ve never gardened before. Let’s get our hands dirty and unlock the secrets to a bountiful kale harvest!
Growing Kale: A Beginner’s Guide to Leafy Green Success
Hey there, fellow gardening enthusiasts! I’m so excited you’re thinking about growing kale. It’s seriously one of the easiest and most rewarding veggies to cultivate, plus it’s packed with nutrients! I’ve been growing kale for years, and I’m here to share all my secrets to help you get started. Trust me, even if you’ve never gardened before, you can totally do this!
Why Grow Kale?
Before we dive in, let’s talk about why kale is such a fantastic choice for your garden.
* Nutrient Powerhouse: Kale is loaded with vitamins A, C, and K, as well as calcium, iron, and antioxidants. It’s basically a superfood in leafy green form!
* Easy to Grow: Seriously, kale is incredibly forgiving. It tolerates a wide range of conditions and is relatively pest-resistant.
* Long Harvest Season: You can harvest kale leaves continuously throughout the growing season, and even into the winter in many climates.
* Versatile in the Kitchen: From salads and smoothies to soups and stir-fries, kale can be used in countless delicious recipes.
* Beautiful in the Garden: With its vibrant colors and interesting textures, kale can add a touch of beauty to your garden.
Choosing Your Kale Variety
There are so many different types of kale to choose from, each with its own unique characteristics. Here are a few popular options:
* Curly Kale (e.g., ‘Dwarf Blue Curled Vates’): This is the classic kale with tightly curled, blue-green leaves. It’s very cold-hardy.
* Lacinato Kale (e.g., ‘Dinosaur Kale’ or ‘Cavolo Nero’): Also known as dinosaur kale, this variety has long, dark green, almost black leaves with a bumpy texture. It has a slightly milder flavor than curly kale.
* Red Russian Kale: This kale has flat, fringed leaves with purple stems and veins. It’s known for its tender leaves and slightly sweet flavor.
* Redbor Kale: A beautiful ornamental kale with deeply fringed, purple leaves. It adds a pop of color to any garden.
I personally love growing a mix of different varieties for both their visual appeal and their diverse flavors.
Getting Started: Planting Kale
You can start kale from seed indoors or directly sow it in your garden. I usually prefer starting indoors, especially if I want an early start to the season.
Starting Seeds Indoors
1. Gather Your Supplies: You’ll need seed starting trays or small pots, seed starting mix, kale seeds, a spray bottle, and a grow light (optional, but highly recommended).
2. Sow the Seeds: Fill your trays or pots with seed starting mix. Moisten the mix with a spray bottle. Sow 2-3 kale seeds per cell or pot, about 1/4 inch deep.
3. Provide Light and Moisture: Place the trays or pots under a grow light or in a sunny window. Keep the soil consistently moist, but not soggy.
4. Thin the Seedlings: Once the seedlings have their first true leaves (the second set of leaves), thin them to one seedling per cell or pot. Choose the strongest, healthiest-looking seedling.
5. Harden Off the Seedlings: Before transplanting the seedlings outdoors, you’ll need to harden them off. This means gradually exposing them to outdoor conditions over a period of 7-10 days. Start by placing them in a sheltered spot outdoors for a few hours each day, gradually increasing the amount of time they spend outside.
Direct Sowing Kale Seeds
1. Prepare the Soil: Choose a sunny spot in your garden with well-drained soil. Amend the soil with compost or other organic matter to improve its fertility and drainage.
2. Sow the Seeds: Sow the kale seeds about 1/2 inch deep and 1-2 inches apart in rows.
3. Water Gently: Water the seeds gently to avoid washing them away.
4. Thin the Seedlings: Once the seedlings emerge, thin them to about 12-18 inches apart.
Transplanting Kale Seedlings
Whether you started your kale from seed indoors or purchased seedlings from a nursery, here’s how to transplant them into your garden:
1. Choose a Sunny Location: Kale needs at least 6 hours of sunlight per day.
2. Prepare the Soil: Amend the soil with compost or other organic matter.
3. Dig Holes: Dig holes that are slightly larger than the root balls of the seedlings. Space the holes 12-18 inches apart.
4. Remove the Seedlings from Their Containers: Gently remove the seedlings from their containers, being careful not to damage the roots.
5. Place the Seedlings in the Holes: Place the seedlings in the holes, making sure the top of the root ball is level with the surrounding soil.
6. Fill in the Holes: Fill in the holes with soil and gently firm the soil around the seedlings.
7. Water Thoroughly: Water the seedlings thoroughly after transplanting.
Caring for Your Kale Plants
Once your kale plants are established, they’re relatively low-maintenance. Here are a few tips to keep them healthy and productive:
* Watering: Water your kale plants regularly, especially during dry periods. Aim to keep the soil consistently moist, but not soggy.
* Fertilizing: Kale is a heavy feeder, so it benefits from regular fertilization. You can use a balanced organic fertilizer or side-dress with compost.
* Weeding: Keep the area around your kale plants free of weeds. Weeds compete with kale for nutrients and water.
* Pest Control: Kale is relatively pest-resistant, but it can be susceptible to aphids, cabbage worms, and flea beetles. Check your plants regularly for pests and take action if necessary. I like to use organic pest control methods, such as insecticidal soap or neem oil.
* Mulching: Mulch around your kale plants with straw, wood chips, or other organic material. Mulch helps to retain moisture, suppress weeds, and regulate soil temperature.
Harvesting Your Kale
One of the best things about growing kale is that you can harvest it continuously throughout the growing season.
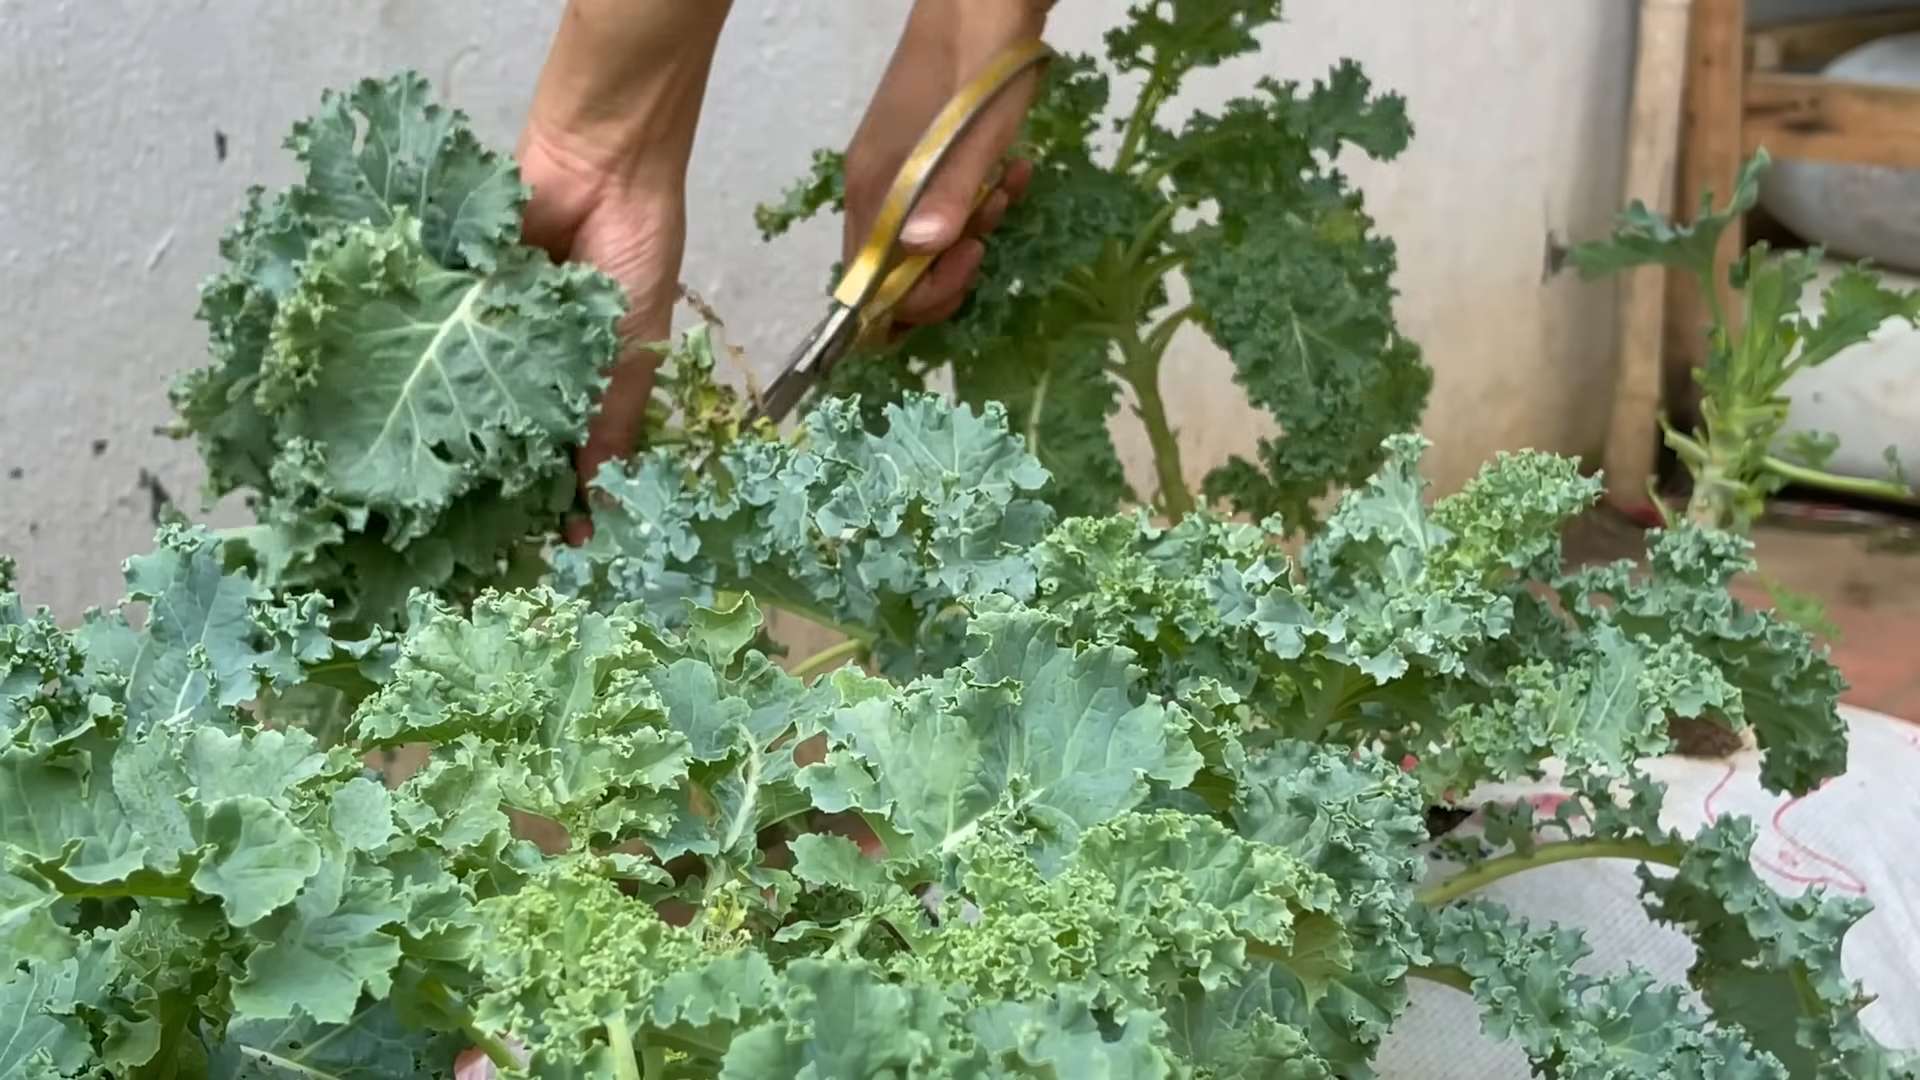
* Harvesting Individual Leaves: Start harvesting kale leaves when they are about 6-8 inches long. Harvest the outer leaves first, leaving the inner leaves to continue growing.
* Harvesting the Whole Plant: You can also harvest the entire plant at once. Cut the stem just above the ground.
* Harvesting After Frost: Kale actually tastes sweeter after a frost. The cold temperatures convert some of the starches in the leaves to sugars.
Troubleshooting Common Kale Problems
Even with the best care, you might encounter a few problems while growing kale. Here are some common issues and how to address them:
* Aphids: These tiny insects can suck the sap from kale leaves, causing them to become distorted and yellow. Spray aphids with insecticidal soap or neem oil.
* Cabbage Worms: These green caterpillars can devour kale leaves. Handpick them off the plants or use Bacillus thuringiensis (Bt), a natural bacteria that kills caterpillars.
* Flea Beetles: These tiny beetles can create small holes in kale leaves. Cover the plants with row covers to prevent flea beetles from reaching them.
* Yellowing Leaves: Yellowing leaves can be a sign of nutrient deficiency, overwatering, or underwatering. Adjust your watering and fertilizing practices as needed.
* Bolting: Bolting is when kale plants start to produce flowers and seeds. This usually happens in hot weather. To prevent bolting, choose bolt-resistant varieties and provide shade during the hottest part of the day.
Extending the Harvest Season
You can extend your kale harvest season by using a few simple techniques:
* Succession Planting: Sow kale seeds every few weeks to ensure a continuous supply of fresh leaves.
* Cold Frames or Row Covers: Protect your kale plants from frost and snow with cold frames or row covers.
* Overwintering: In mild climates, you can overwinter kale plants. Cut back the plants in the fall and cover them with mulch. They will start to grow again in the spring.
Enjoying Your Homegrown Kale
Now that you’ve successfully grown your own kale, it’s time to enjoy the fruits (or rather, leaves) of your labor! Here are a few ideas:
* Kale Salad: Massage kale leaves with olive oil, lemon juice, and salt to tenderize them. Add your favorite toppings, such as nuts, seeds, dried fruit, and cheese.
* Kale Smoothie: Blend kale with fruits, vegetables, and yogurt or milk for a healthy and delicious smoothie.
* Kale Chips: Toss kale leaves
Conclusion
So, there you have it! Growing your own kale isn’t just a trendy garden project; it’s a gateway to fresher, healthier meals and a deeper connection with the food you eat. We’ve walked through the simple steps, from selecting the right variety to harvesting your bountiful crop. The beauty of this DIY trick lies in its accessibility. Whether you have a sprawling backyard or a small balcony, you can cultivate your own patch of this nutritional powerhouse.
But why is this a must-try? Beyond the satisfaction of nurturing something from seed to table, growing your own kale offers unparalleled freshness. Store-bought kale, even when organic, can’t compare to the vibrant flavor and crisp texture of kale harvested moments before you use it. Plus, you have complete control over the growing process, ensuring no harmful pesticides or chemicals are used. This is especially important for leafy greens like kale, which tend to absorb chemicals easily.
Don’t be afraid to experiment! Consider different varieties of kale to find your favorite. Lacinato (dinosaur) kale offers a slightly sweeter, more delicate flavor, while Red Russian kale adds a beautiful splash of color to your garden and a peppery kick to your dishes. You can also try companion planting. Marigolds can deter pests, while herbs like rosemary and sage can enhance kale’s flavor and attract beneficial insects.
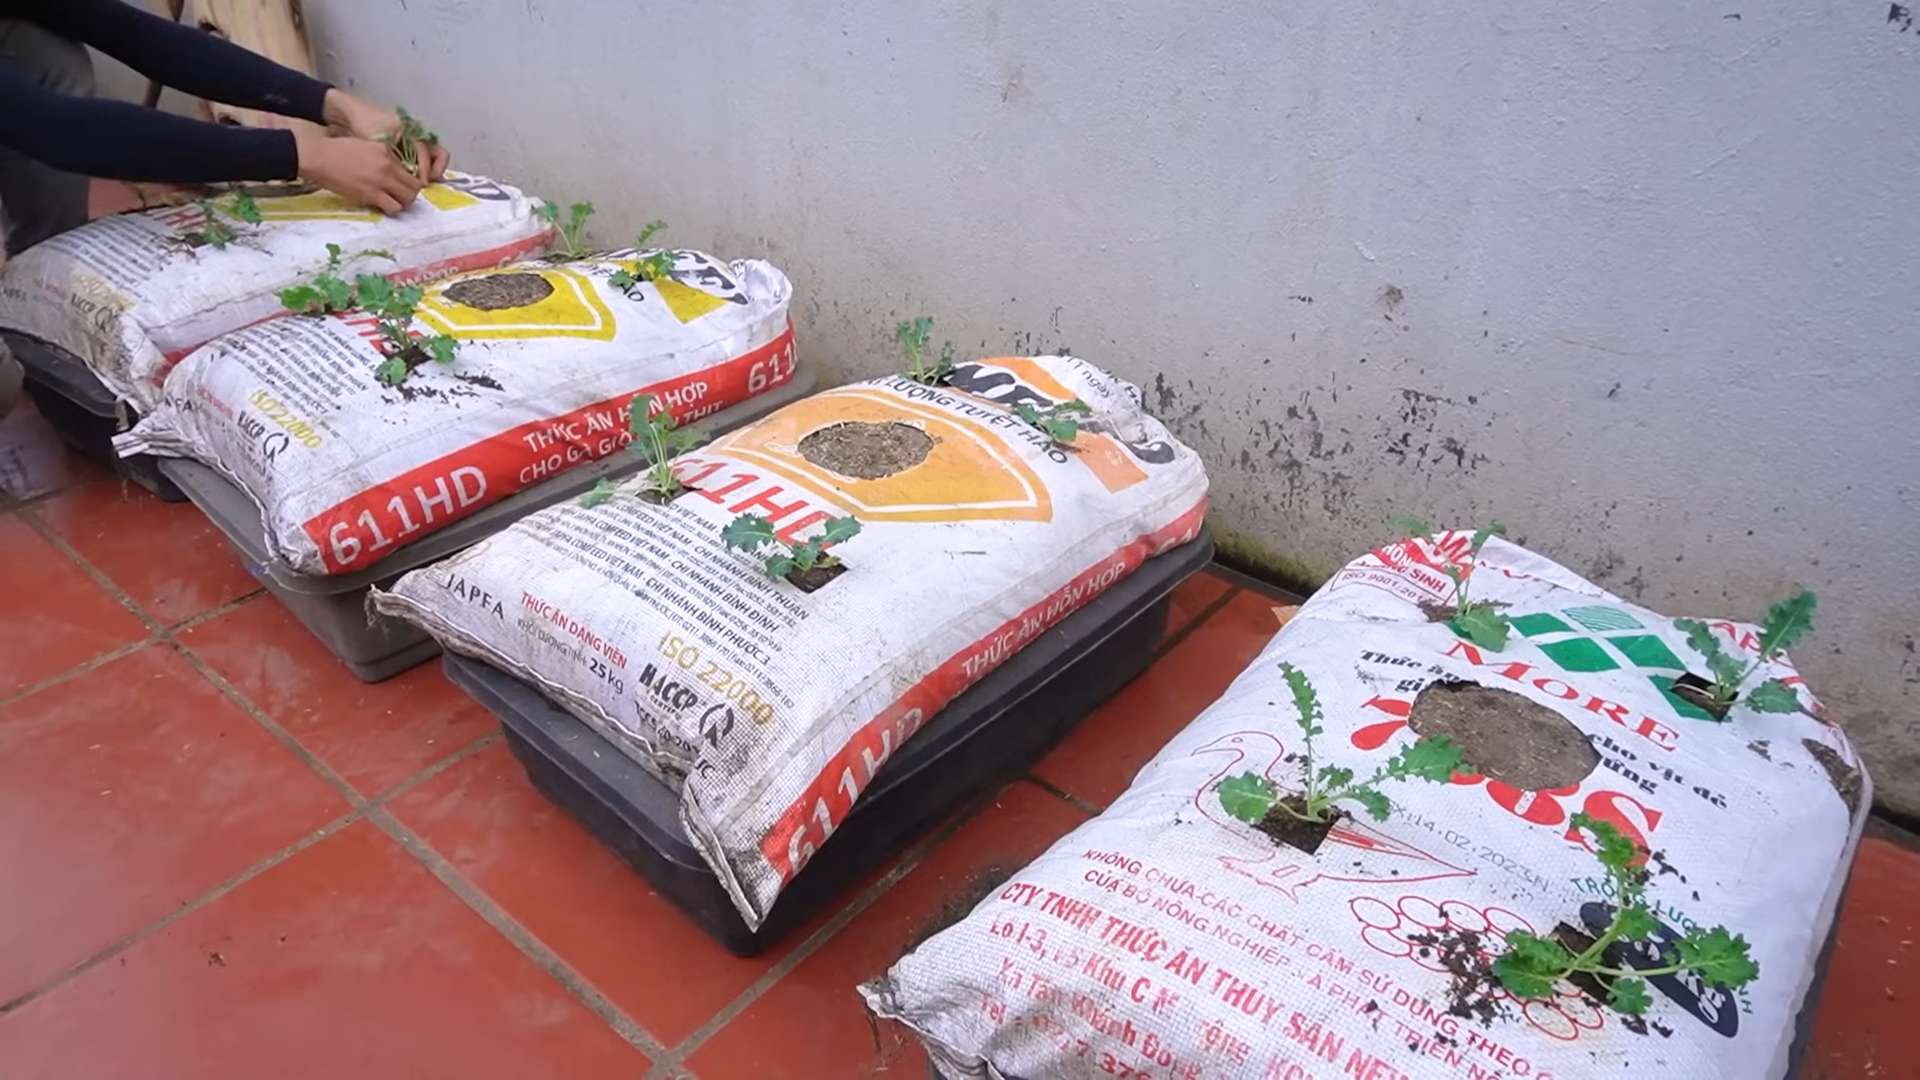
For those with limited space, container gardening is an excellent option. Choose a pot that’s at least 12 inches in diameter and filled with well-draining potting mix. Remember to water regularly and fertilize every few weeks. Even a small container of kale can provide a surprising amount of fresh greens.
Growing kale is also a fantastic way to reduce your carbon footprint. By sourcing your own produce, you’re cutting down on transportation emissions and supporting a more sustainable food system. It’s a small change that can make a big difference.
We encourage you to take the plunge and try growing your own kale. It’s a rewarding experience that will nourish your body and soul. And once you’ve harvested your first crop, don’t hesitate to get creative in the kitchen. Kale chips, smoothies, salads, soups – the possibilities are endless!
We’re confident that you’ll find growing kale to be easier and more enjoyable than you might think. So, grab some seeds, get your hands dirty, and prepare to enjoy the delicious rewards of your labor.
Most importantly, we want to hear about your experiences! Share your tips, tricks, and photos with us in the comments below. Let’s build a community of kale growers and inspire others to embrace the joys of homegrown goodness. What variety did you choose? What challenges did you face, and how did you overcome them? Your insights can help others succeed in their own kale-growing adventures. Let’s cultivate a greener, healthier world, one kale plant at a time!
Frequently Asked Questions (FAQ)
What are the best kale varieties for beginners?
For beginners, we highly recommend starting with either Curly kale or Lacinato (dinosaur) kale. Curly kale is known for its hardiness and resilience, making it a forgiving choice for novice gardeners. It’s also readily available in most garden centers. Lacinato kale, with its distinctive dark green, almost black leaves, is slightly more tender and has a milder flavor, making it a versatile option for cooking. Both varieties are relatively easy to grow from seed or transplants. Red Russian kale is another good option, offering a beautiful color and a slightly peppery taste. Avoid more exotic or less common varieties until you’ve gained some experience.
How much sunlight does kale need?
Kale thrives in full sun, which means at least 6 hours of direct sunlight per day. However, it can tolerate partial shade, especially in hotter climates. If you’re growing kale in a container on a balcony or patio, try to position it where it will receive the most sunlight possible. If you live in a region with intense summer heat, providing some afternoon shade can help prevent the leaves from scorching. Insufficient sunlight can result in leggy plants with fewer leaves.
What kind of soil is best for growing kale?
Kale prefers well-draining soil that is rich in organic matter. Before planting, amend your soil with compost or well-rotted manure to improve its fertility and drainage. The ideal soil pH for kale is between 6.0 and 7.5. You can test your soil pH using a home testing kit or by sending a sample to your local agricultural extension office. If your soil is too acidic, you can add lime to raise the pH. If it’s too alkaline, you can add sulfur to lower the pH. Good drainage is crucial to prevent root rot, so avoid planting kale in heavy clay soil that retains water.
How often should I water my kale plants?
Water kale regularly, especially during dry periods. The soil should be consistently moist but not waterlogged. Check the soil moisture by sticking your finger about an inch deep into the soil. If it feels dry, it’s time to water. Water deeply, allowing the water to soak into the soil and reach the roots. Avoid overhead watering, as this can promote fungal diseases. Instead, water at the base of the plants. During hot weather, you may need to water more frequently. Mulching around the plants can help retain moisture in the soil.
What are some common pests and diseases that affect kale?
Common pests that affect kale include aphids, cabbage worms, flea beetles, and slugs. Aphids can be controlled with insecticidal soap or by introducing beneficial insects like ladybugs. Cabbage worms can be handpicked or treated with Bacillus thuringiensis (Bt), a natural insecticide. Flea beetles can be deterred with row covers or by spraying with neem oil. Slugs can be trapped with beer traps or by using slug bait. Common diseases that affect kale include downy mildew, black rot, and clubroot. To prevent these diseases, ensure good air circulation, avoid overhead watering, and practice crop rotation. If you notice signs of disease, remove the affected leaves immediately.
When and how should I harvest my kale?
You can start harvesting kale leaves when they are about 4-6 inches long. Harvest the outer leaves first, leaving the inner leaves to continue growing. This will allow you to harvest kale continuously throughout the growing season. To harvest, simply cut the leaves off at the base of the stem with a sharp knife or scissors. Avoid tearing the leaves, as this can damage the plant. Harvest in the morning, when the leaves are crisp and hydrated. Kale tastes best after a frost, as the cold temperatures convert starches into sugars, making the leaves sweeter.
Can I grow kale in containers?
Yes, kale grows very well in containers. Choose a pot that is at least 12 inches in diameter and filled with well-draining potting mix. Make sure the pot has drainage holes to prevent waterlogging. Place the container in a sunny location that receives at least 6 hours of direct sunlight per day. Water regularly and fertilize every few weeks with a balanced fertilizer. Container-grown kale may need to be watered more frequently than kale grown in the ground, especially during hot weather.
How do I store harvested kale?
To store harvested kale, wash the leaves thoroughly and dry them completely. Wrap the dry leaves in a paper towel and store them in a plastic bag in the refrigerator. Kale stored this way will typically last for about a week. You can also freeze kale for longer storage. To freeze kale, blanch the leaves in boiling water for 2-3 minutes, then plunge them into ice water to stop the cooking process. Drain the kale thoroughly and squeeze out any excess water. Pack the blanched kale into freezer bags or containers and store them in the freezer for up to 8 months.
Can I eat the kale stems?
Yes, you can eat the kale stems, but they can be tough and fibrous. To make them more palatable, remove the tough outer layer with a vegetable peeler. You can then chop the stems and add them to soups, stews, or stir-fries. They can also be juiced or blended into smoothies. The stems contain many of the same nutrients as the leaves, so don’t throw them away!
Is kale a good source of nutrients?
Yes, kale is an excellent source of nutrients. It is packed with vitamins A, C, and K, as well as minerals like calcium, potassium, and iron. Kale is also a good source of fiber and antioxidants. Eating kale regularly can help boost your immune system, improve your bone health, and protect against chronic diseases. It’s a true superfood that deserves a place in your diet.
Leave a Comment