

Growing Peanuts in a Sack? Yes, you read that right! Forget sprawling fields; we’re bringing the peanut patch to your patio! For centuries, peanuts have been a staple crop, deeply woven into the culinary traditions of cultures worldwide, from South America to Asia and beyond. But who says you need acres of land to enjoy the satisfaction of harvesting your own homegrown peanuts?
In this DIY guide, I’m going to show you a simple, space-saving trick that will have you enjoying fresh, delicious peanuts straight from your own backyard (or balcony!). This method is perfect for urban gardeners, apartment dwellers, or anyone looking for a fun and rewarding gardening project. Imagine the delight of pulling up a sack overflowing with freshly formed peanuts – a truly unique and satisfying experience!
Why should you try growing peanuts in a sack? Well, besides the sheer novelty of it, this method offers several advantages. It’s incredibly space-efficient, requires minimal weeding, and allows for better control over soil conditions. Plus, it’s a fantastic way to get kids involved in gardening and teach them about where their food comes from. So, grab your supplies, and let’s get ready to embark on this exciting peanut-growing adventure together!
Growing Peanuts in a Sack: A Fun and Easy DIY Project!
Hey there, fellow gardening enthusiasts! Ever thought about growing your own peanuts? It’s surprisingly easy, and you don’t even need a huge garden. I’m going to walk you through how to grow peanuts in a sack – a perfect project for small spaces, balconies, or even just a fun experiment. Trust me, the satisfaction of harvesting your own homegrown peanuts is totally worth it!
What You’ll Need
Before we dive in, let’s gather our supplies. This is a pretty low-cost project, which is always a win in my book!
* **A Large Sack:** Think burlap, heavy-duty plastic (like a feed sack), or even a reinforced grow bag. The bigger, the better – aim for at least 20 gallons. This gives the peanut plants plenty of room to spread their roots and develop those delicious nuts.
* **Peanut Seeds (Raw, Unshelled):** You can usually find these at your local garden center or online. Make sure they’re raw and unshelled – roasted peanuts won’t sprout! Valencia or Virginia peanuts are good choices.
* **Potting Mix:** A well-draining potting mix is crucial. Peanuts don’t like soggy feet! I like to use a mix of compost, peat moss, and perlite for good drainage and nutrient content.
* **Optional: Compost or Aged Manure:** Adding some compost or aged manure to your potting mix will give your peanut plants an extra boost of nutrients.
* **Watering Can or Hose:** For, well, watering!
* **Scissors or a Knife:** For making drainage holes in the sack.
* **A Sunny Spot:** Peanuts need at least 6-8 hours of sunlight per day.
* **Optional: Fertilizer:** A balanced fertilizer (like 10-10-10) can help your plants thrive, but it’s not strictly necessary if your potting mix is rich enough.
* **Optional: Mulch:** Mulch helps retain moisture and suppress weeds.
Preparing the Sack
This is a crucial step to ensure your peanuts have a happy home.
1. **Drainage is Key:** First things first, we need to make sure the sack has adequate drainage. If you’re using a burlap sack, you might not need to add extra holes, as the material is naturally porous. But if you’re using a plastic sack, grab your scissors or knife and carefully poke several holes in the bottom. I usually aim for about 6-8 holes, spaced evenly.
2. **Reinforce if Needed:** If you’re using a thinner plastic sack, you might want to reinforce it to prevent it from tearing under the weight of the soil. You can do this by wrapping duct tape around the bottom and sides.
3. **Placement:** Before you fill the sack, decide where you want to place it. Once it’s full of soil, it will be heavy and difficult to move. Choose a sunny spot that gets at least 6-8 hours of direct sunlight per day.
Planting the Peanut Seeds
Now for the fun part – planting!
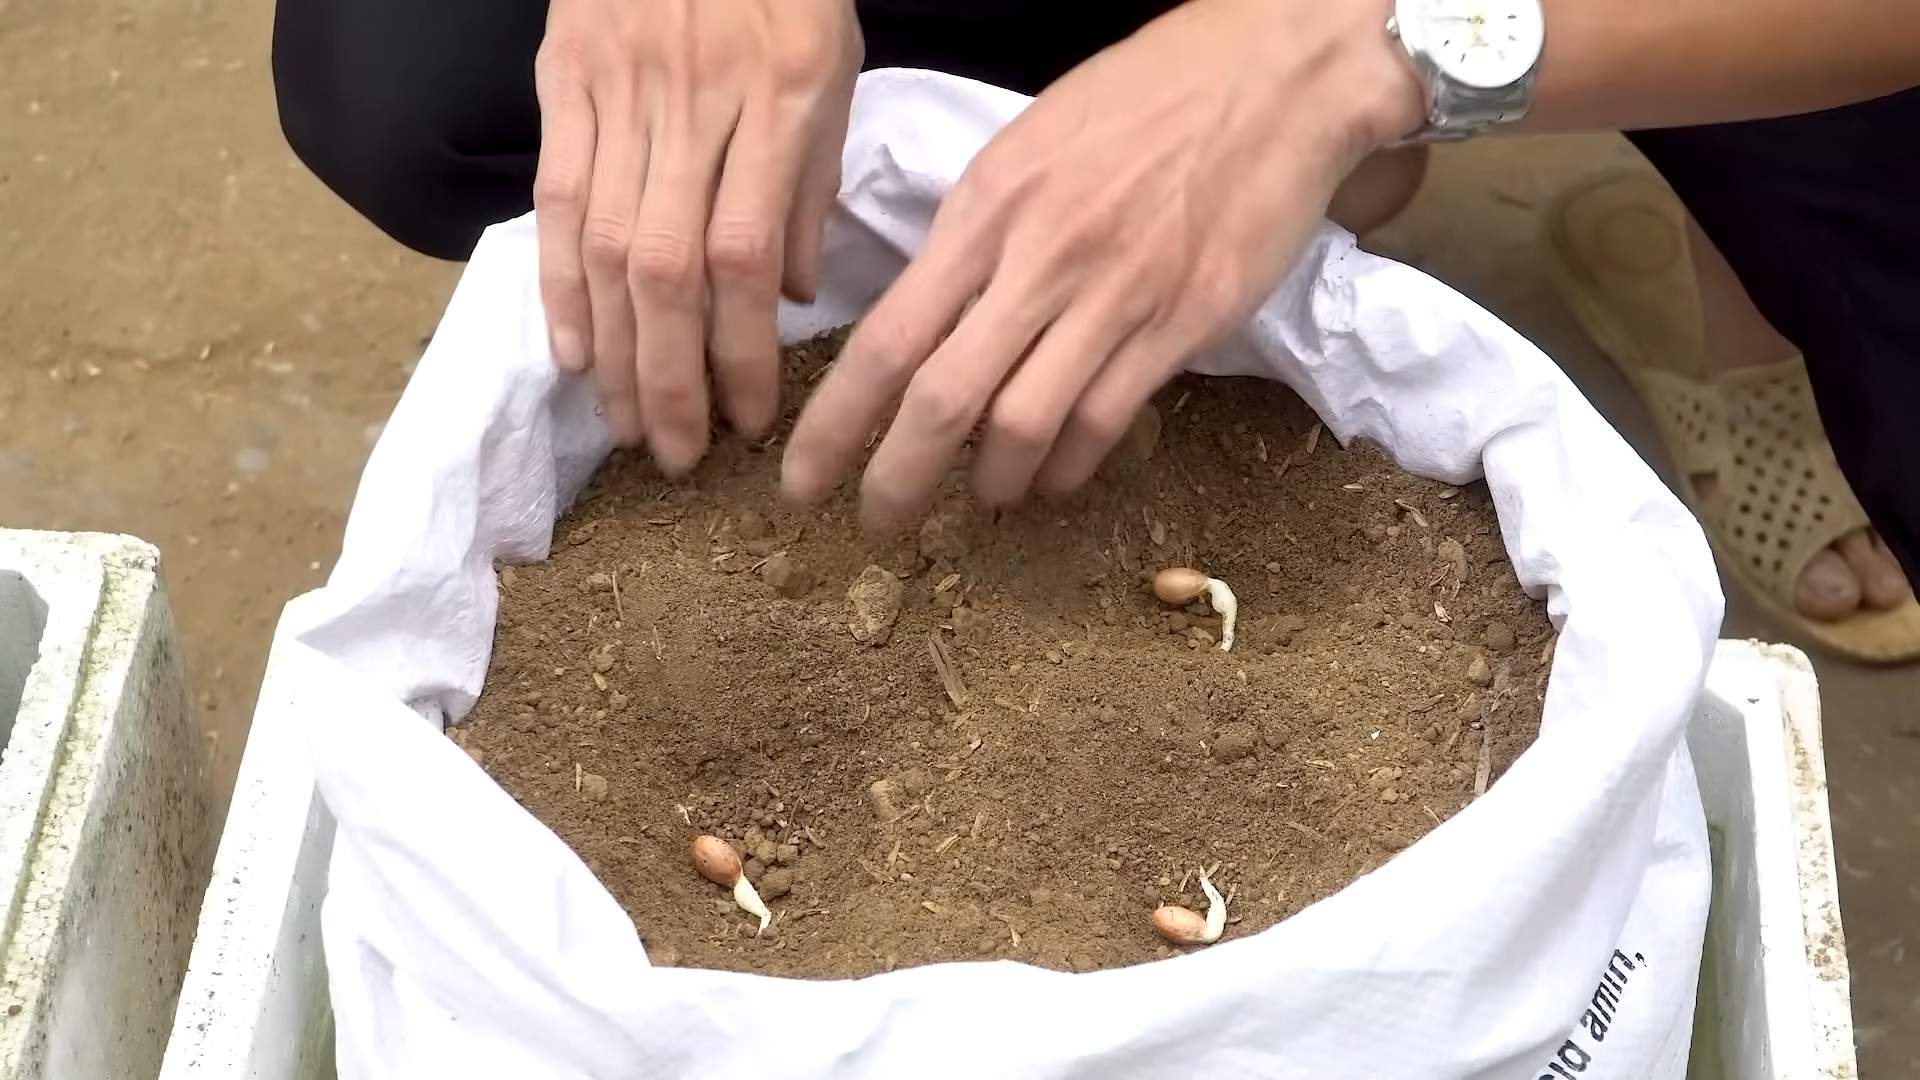
1. **Fill the Sack:** Fill the sack with your potting mix, leaving about 4-6 inches of space at the top. This will prevent the soil from overflowing when you water.
2. **Moisten the Soil:** Water the soil thoroughly until it’s evenly moist, but not soggy.
3. **Planting Depth:** Make small holes about 1-2 inches deep and spaced about 6-8 inches apart. I usually plant 4-6 peanut seeds in a 20-gallon sack.
4. **Place the Seeds:** Place one peanut seed in each hole and cover it gently with soil.
5. **Water Again:** Water the soil lightly after planting to settle the seeds in.
6. **Mulch (Optional):** Add a layer of mulch around the plants to help retain moisture and suppress weeds. Straw, wood chips, or even shredded leaves work well.
Caring for Your Peanut Plants
Peanuts are relatively low-maintenance, but they do need some attention to thrive.
1. **Watering:** Water your peanut plants regularly, especially during hot, dry weather. The soil should be consistently moist, but not waterlogged. Check the soil moisture by sticking your finger about an inch deep. If it feels dry, it’s time to water.
2. **Sunlight:** Make sure your peanut plants are getting at least 6-8 hours of direct sunlight per day. If they’re not getting enough sun, they may not produce as many peanuts.
3. **Fertilizing (Optional):** If you want to give your peanut plants an extra boost, you can fertilize them every few weeks with a balanced fertilizer. Follow the instructions on the fertilizer package. I usually dilute the fertilizer to half strength to avoid burning the plants.
4. **Weeding:** Keep the area around your peanut plants free of weeds. Weeds can compete with your plants for nutrients and water.
5. **Hilling:** As your peanut plants grow, you may need to “hill” the soil around the base of the plants. This means adding more soil to cover the developing “pegs” (the stems that grow down from the plant and into the soil, where the peanuts form). Hilling helps protect the pegs and encourages peanut production.
6. **Pest Control:** Peanuts are generally pest-resistant, but they can sometimes be bothered by aphids or spider mites. If you notice any pests, you can try spraying them with insecticidal soap or neem oil.
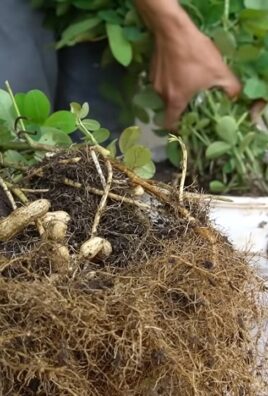
Harvesting Your Peanuts
This is the moment you’ve been waiting for! Harvesting your own peanuts is so rewarding.
1. **Timing is Key:** Peanuts are typically ready to harvest about 120-150 days after planting. A good indicator that they’re ready is when the leaves start to turn yellow and the plant begins to die back.
2. **Check a Few:** To be sure, you can dig up a few plants and check the peanuts. The peanuts should be plump and the shells should be well-formed.
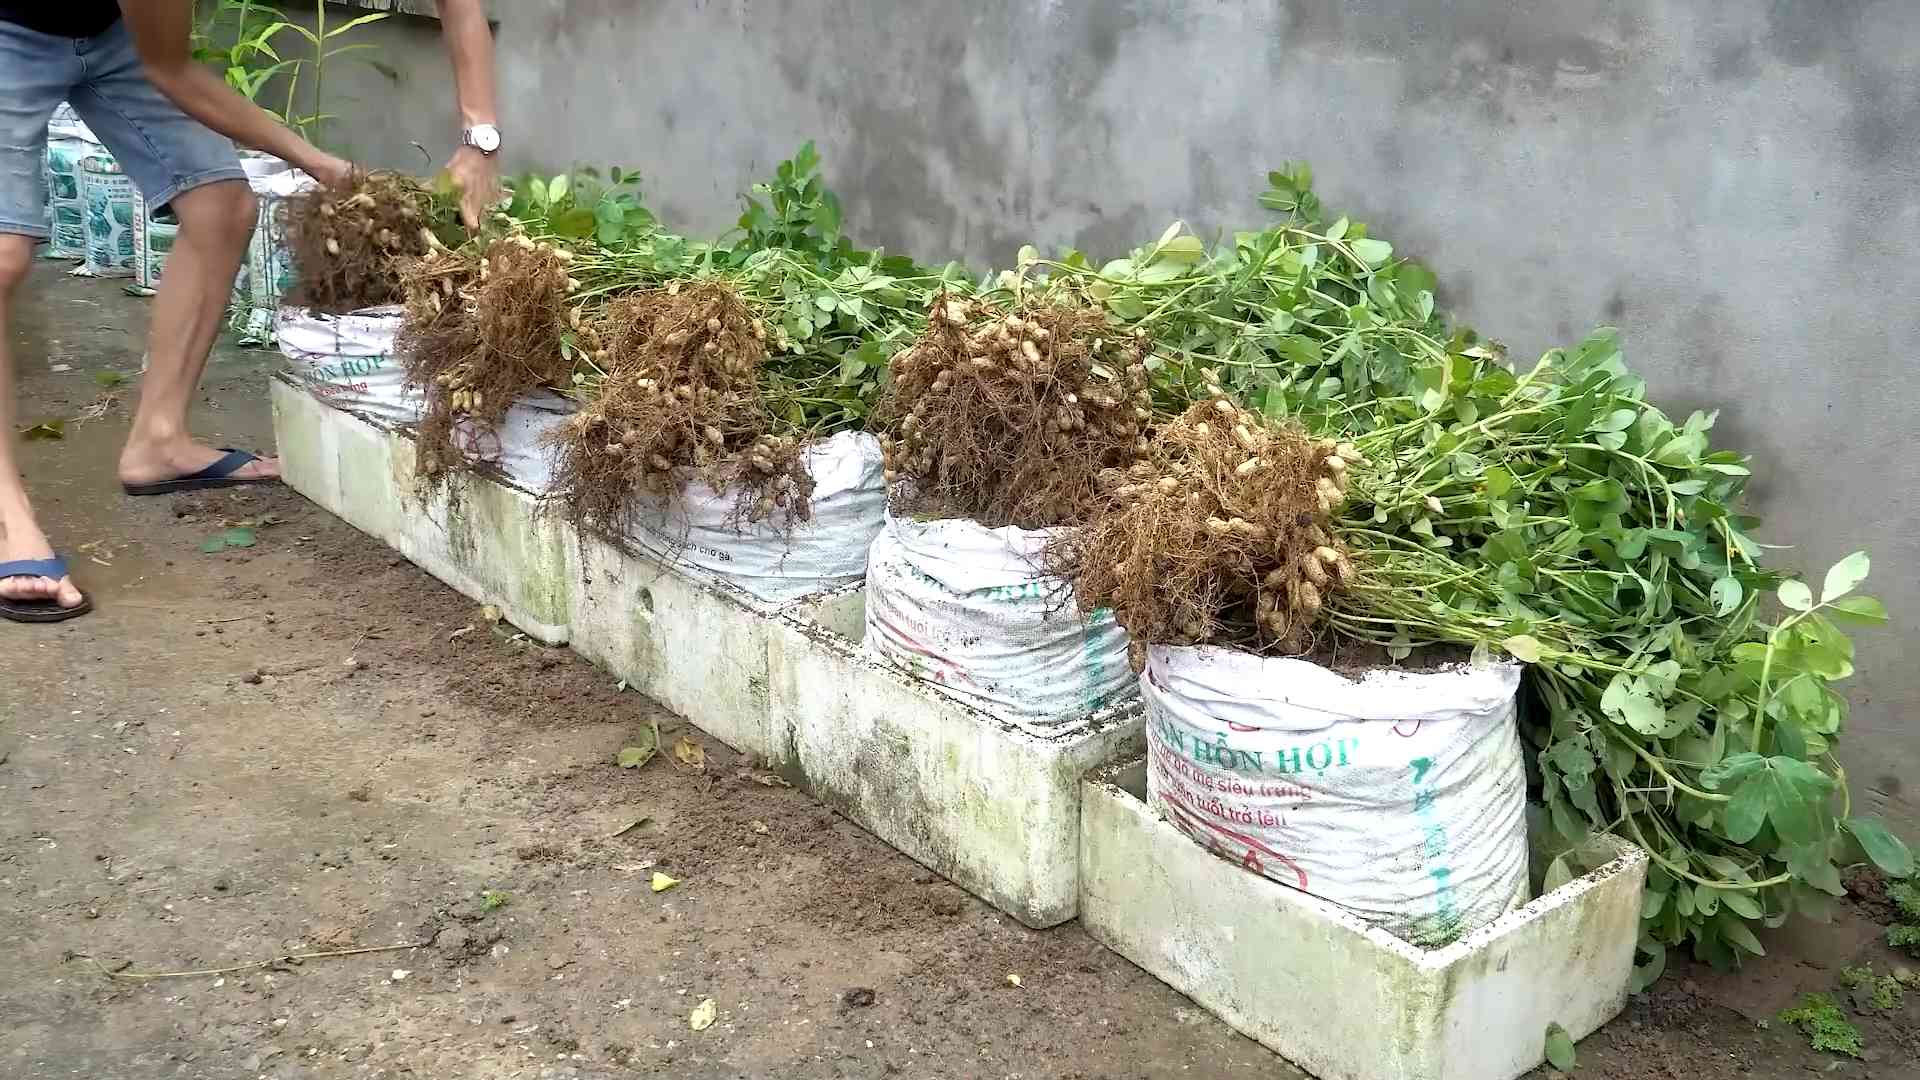
3. **Harvesting:** To harvest, gently pull the entire plant out of the sack. Shake off any excess soil.
4. **Curing:** The peanuts need to be cured before you can eat them. To cure them, spread them out in a single layer in a warm, dry, well-ventilated place for about 2-3 weeks. You can cure them indoors or outdoors, as long as they’re protected from rain and direct sunlight.
5. **Storage:** Once the peanuts are cured, you can store them in a cool, dry place for several months. You can store them in their shells or shelled.
Troubleshooting
Sometimes things don’t go exactly as planned. Here are a few common problems you might encounter and how to fix them:
* **Yellowing Leaves:** This could be a sign of overwatering, underwatering, or nutrient deficiency. Check the soil moisture and adjust your watering accordingly. If you suspect a nutrient deficiency, try fertilizing with a balanced fertilizer.
* **Poor Peanut Production:** This could be due to a lack of sunlight, poor soil, or insufficient watering. Make sure your plants are getting enough sunlight and that the soil is well-draining and nutrient-rich.
* **Pests:** As mentioned earlier, aphids and spider mites can sometimes be a problem. Treat them with insecticidal soap or neem oil.
* **Rotting Peanuts:** This is usually caused by overwatering or poor drainage. Make sure your sack has adequate drainage and that you’re not overwatering your plants.
Extra Tips and Tricks
* **Soaking Seeds:** Some gardeners like to soak their peanut seeds in water for 24 hours before planting to help them germinate faster. I’ve tried it both ways and haven’t noticed a huge difference, but it’s worth a try if you’re impatient!
* **Inoculating Seeds:** You can also inoculate your peanut seeds with a nitrogen-fixing bacteria to help them grow better. This is especially helpful if you’re planting peanuts in soil that hasn’t grown legumes before.
* **Saving Seeds:** If you want to grow peanuts again next year, you can save some of your harvested peanuts as seeds. Just make sure they’re raw and unshelled.
* Experiment! Don’t be afraid to experiment with different varieties of peanuts or different growing techniques. Gardening is all about learning and having fun!
I hope this guide has inspired you to try growing peanuts in a sack. It’s a fun, easy, and rewarding project that anyone can do. Happy gardening!
Conclusion
So, there you have it! Growing peanuts in a sack is not just a quirky gardening experiment; it’s a surprisingly effective and rewarding way to cultivate these delicious legumes, even if you’re short on space or dealing with less-than-ideal soil conditions. This method offers a unique blend of convenience, control, and the sheer joy of harvesting your own homegrown snacks.
Why is this DIY trick a must-try? Because it democratizes peanut cultivation. Forget sprawling fields and specialized equipment. With a simple sack, some quality soil, and a handful of peanut seeds, you can embark on a journey from seed to snack, right on your balcony, patio, or even indoors with sufficient sunlight. The contained environment allows you to meticulously manage soil quality, moisture levels, and pest control, leading to a potentially higher yield and healthier plants compared to traditional ground planting. Plus, the ease of harvesting – simply upending the sack – eliminates the back-breaking labor often associated with peanut farming.
But the benefits extend beyond practicality. Growing your own peanuts fosters a deeper connection with your food. Witnessing the entire life cycle of the plant, from the first sprout to the final harvest, is an incredibly fulfilling experience. It’s a tangible reminder of the effort and resources that go into producing the food we often take for granted. And let’s be honest, there’s nothing quite like the taste of freshly harvested, homegrown peanuts – a flavor that store-bought varieties simply can’t match.
Looking for variations? Consider experimenting with different types of peanut seeds. Virginia peanuts, known for their large size and excellent roasting quality, are a popular choice. Valencia peanuts, with their multiple small kernels per shell, offer a sweeter flavor. Spanish peanuts, often used in candies and snacks, are another great option. You can also tailor the soil mix to your specific needs. Adding compost or other organic matter can further enrich the soil and promote healthy growth. For those in cooler climates, starting the peanuts indoors in smaller pots before transplanting them into the sack can give them a head start.
Don’t be afraid to get creative with your sack selection, too. While burlap sacks are a classic choice, you can also use grow bags, large plastic containers with drainage holes, or even repurposed fabric bags. Just ensure that the container is large enough to accommodate the growing root system and allows for proper drainage.
The key to successful sack peanut cultivation lies in consistent watering, adequate sunlight, and diligent monitoring for pests and diseases. Keep the soil consistently moist, but avoid overwatering, which can lead to root rot. Provide at least six to eight hours of direct sunlight per day. And regularly inspect the plants for signs of aphids, spider mites, or other common garden pests.
We wholeheartedly encourage you to try this DIY trick and experience the satisfaction of growing your own peanuts. It’s a fun, educational, and rewarding project that’s perfect for gardeners of all skill levels. And most importantly, it allows you to enjoy the unparalleled taste of homegrown peanuts.
So, grab a sack, some seeds, and get ready to embark on a peanut-growing adventure! We’re confident that you’ll be amazed by the results. And once you’ve harvested your first crop, be sure to share your experience with us! We’d love to hear about your successes, challenges, and any unique variations you’ve tried. Share your photos and stories on social media using #SackPeanutGrowing and let’s create a community of sack peanut enthusiasts! Let’s all learn together how to master the art of **growing peanuts in a sack**.
Frequently Asked Questions (FAQ)
What kind of sack is best for growing peanuts?
The ideal sack for growing peanuts should be breathable, durable, and have adequate drainage. Burlap sacks are a popular choice due to their natural breathability and biodegradability. However, grow bags made of fabric are also excellent options, as they provide good aeration and drainage. Large plastic containers with drainage holes can also be used, but it’s crucial to ensure proper drainage to prevent root rot. Avoid using non-breathable plastic bags, as they can trap moisture and lead to fungal diseases. The size of the sack should be at least 15-20 gallons to accommodate the growing root system.
What type of soil should I use?
Peanuts thrive in well-draining, sandy loam soil. Avoid heavy clay soils, as they can become waterlogged and hinder root development. A good soil mix consists of equal parts garden soil, compost, and sand. The compost provides essential nutrients, while the sand improves drainage. You can also add perlite or vermiculite to further enhance drainage and aeration. Ensure the soil pH is slightly acidic to neutral, around 6.0 to 7.0. You can test the soil pH using a soil testing kit available at most garden centers.
How many peanut seeds should I plant in a sack?
For a 15-20 gallon sack, planting 3-5 peanut seeds is generally recommended. This allows for adequate spacing and prevents overcrowding. Plant the seeds about 1-2 inches deep and 6-8 inches apart. After the seedlings emerge, thin them out if necessary, leaving the strongest and healthiest plants. Overcrowding can lead to reduced yields and increased susceptibility to diseases.
How often should I water the peanuts in the sack?
Peanuts require consistent moisture, especially during flowering and pod development. Water the plants deeply whenever the top inch of soil feels dry to the touch. Avoid overwatering, as this can lead to root rot. The frequency of watering will depend on the weather conditions and the type of soil used. In hot, dry weather, you may need to water daily, while in cooler, wetter weather, watering every few days may suffice. Monitor the soil moisture regularly and adjust your watering schedule accordingly.
How much sunlight do peanuts need?
Peanuts need at least six to eight hours of direct sunlight per day to thrive. Choose a location that receives ample sunlight throughout the day. If you’re growing peanuts indoors, supplement with grow lights if necessary. Insufficient sunlight can lead to stunted growth, reduced yields, and poor pod development.
How long does it take for peanuts to mature in a sack?
Peanuts typically take 120-150 days to mature, depending on the variety and growing conditions. You’ll know the peanuts are ready to harvest when the foliage begins to yellow and the pods feel plump and mature. To check for maturity, dig up a few plants and examine the pods. The inside of the shell should be dark and the kernels should be fully developed.
What are common pests and diseases that affect peanuts, and how can I prevent them?
Common pests that affect peanuts include aphids, spider mites, and leafhoppers. These pests can be controlled with insecticidal soap or neem oil. Diseases that can affect peanuts include leaf spot, root rot, and peanut rust. To prevent these diseases, ensure good air circulation, avoid overwatering, and use disease-resistant varieties. Crop rotation can also help prevent soilborne diseases. Regularly inspect the plants for signs of pests and diseases and take action promptly.
Can I grow peanuts in a sack indoors?
Yes, you can grow peanuts in a sack indoors, but it requires providing adequate sunlight and ventilation. Place the sack near a sunny window that receives at least six to eight hours of direct sunlight per day. Supplement with grow lights if necessary. Ensure good air circulation to prevent fungal diseases. Monitor the soil moisture carefully and adjust your watering schedule accordingly.
How do I harvest peanuts from a sack?
Harvesting peanuts from a sack is relatively easy. Simply upend the sack and gently shake out the plants. Remove the peanuts from the roots and wash them thoroughly. Allow the peanuts to dry in the sun for several days before storing them.
How should I store my harvested peanuts?
After drying, store the peanuts in a cool, dry place in an airtight container. You can store them in the shell or shelled. Shelled peanuts will last longer if stored in the refrigerator or freezer. Properly stored peanuts can last for several months.
Leave a Comment