

Balcony Mint Growing Hack: Are you dreaming of fresh, fragrant mint for your mojitos, teas, and culinary creations, but limited by space? I get it! I used to think a lush herb garden was only for those with sprawling backyards. But guess what? You can absolutely cultivate a thriving mint patch right on your balcony, even if it’s tiny!
Mint has a rich history, dating back to ancient Egypt where it was used for medicinal purposes and in religious ceremonies. The Romans spread mint throughout Europe, valuing it for its refreshing scent and digestive properties. Today, mint remains a beloved herb worldwide, adding a burst of flavor to countless dishes and beverages.
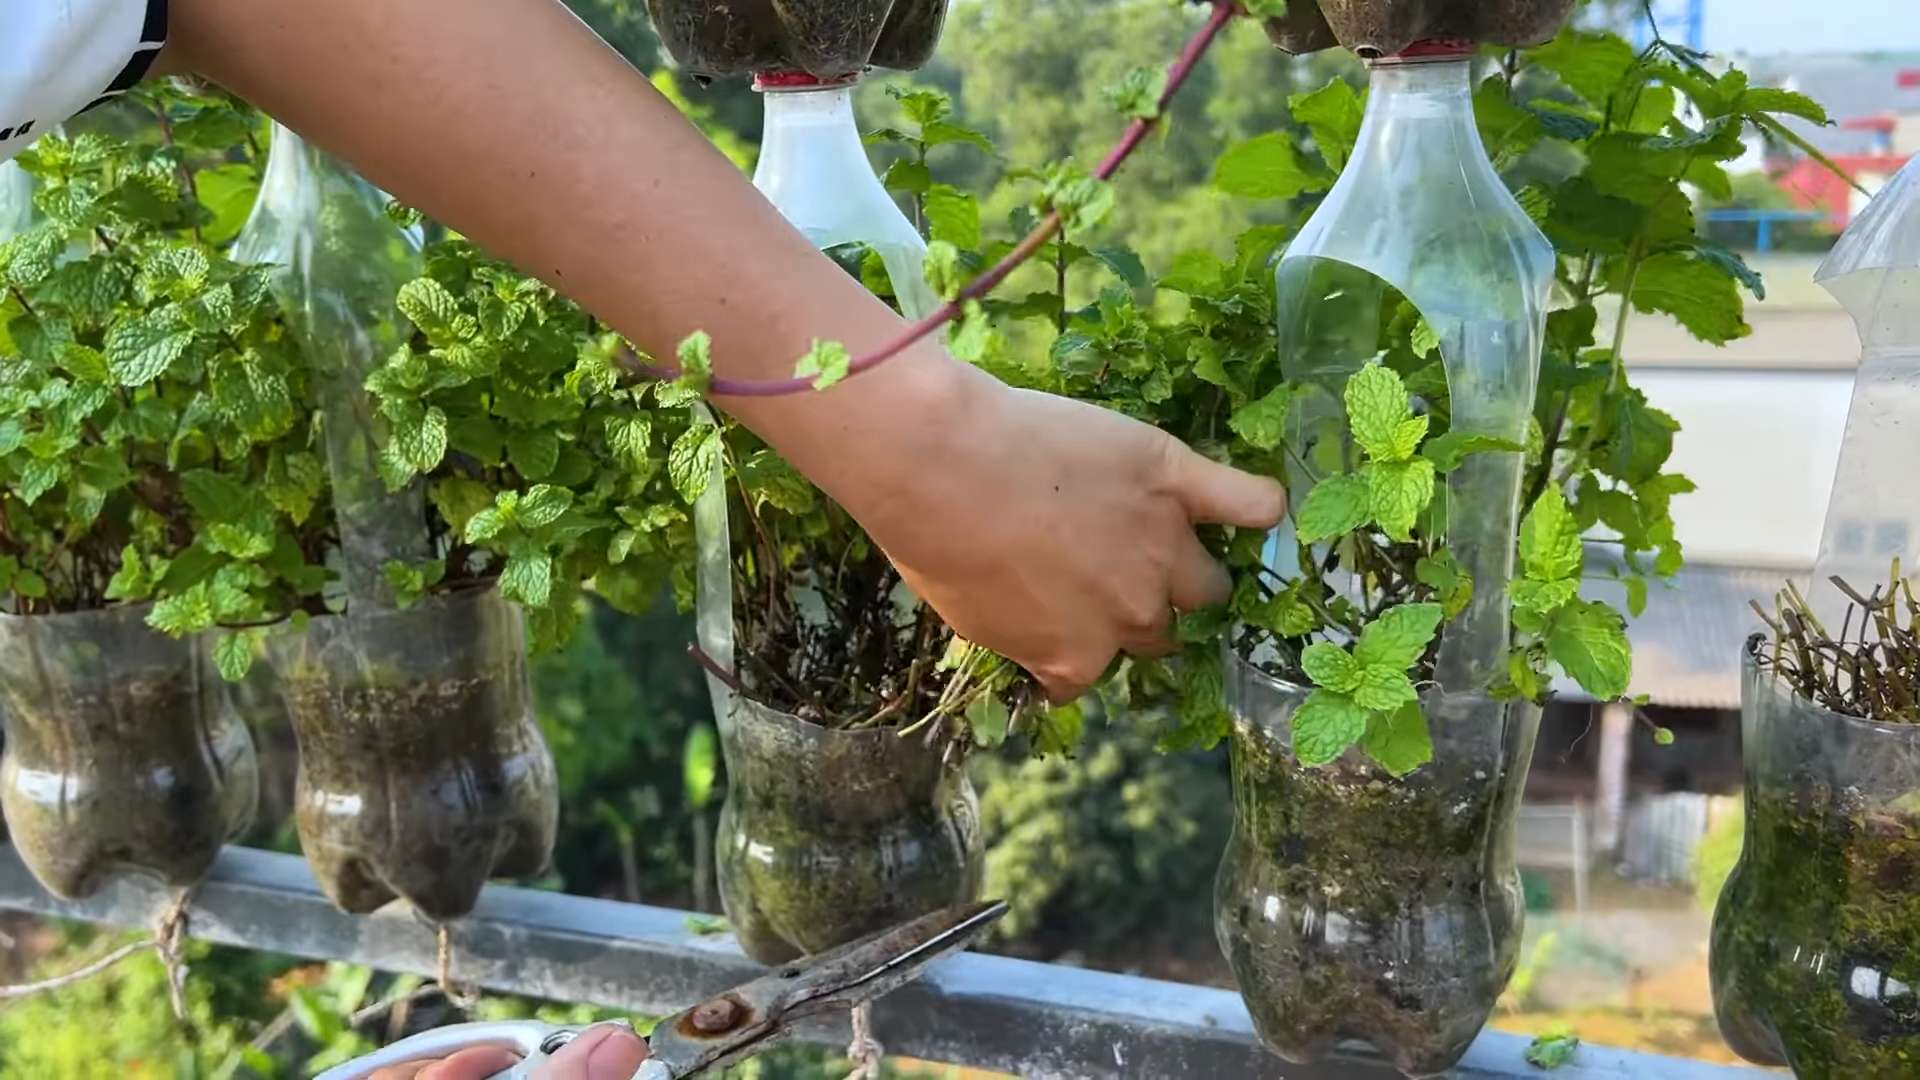
Now, here’s the thing: mint can be a bit of a bully in the garden, spreading aggressively and taking over everything in its path. That’s why containing it is key, especially on a balcony. This DIY balcony mint growing hack will show you how to create the perfect environment for your mint to flourish without becoming a green monster. I’ll share my simple, budget-friendly trick for keeping your mint contained, healthy, and ready to harvest all season long. Say goodbye to expensive store-bought mint and hello to a constant supply of fresh, aromatic leaves right at your fingertips!
Balcony Mint Growing Hack: From Zero to Herb Hero!
Okay, so you want fresh mint on your balcony, but you’re worried about space, mess, or accidentally unleashing a minty monster that takes over your entire outdoor area? I get it! Mint is notorious for being a vigorous grower, but don’t let that scare you. I’ve got a super simple, effective, and contained method that will have you sipping minty mojitos in no time. This hack focuses on vertical growing and self-watering techniques to make your balcony mint garden thrive with minimal effort.
What You’ll Need: The Minty Arsenal
Before we dive in, let’s gather our supplies. This is a relatively inexpensive project, and you might already have some of these items lying around.
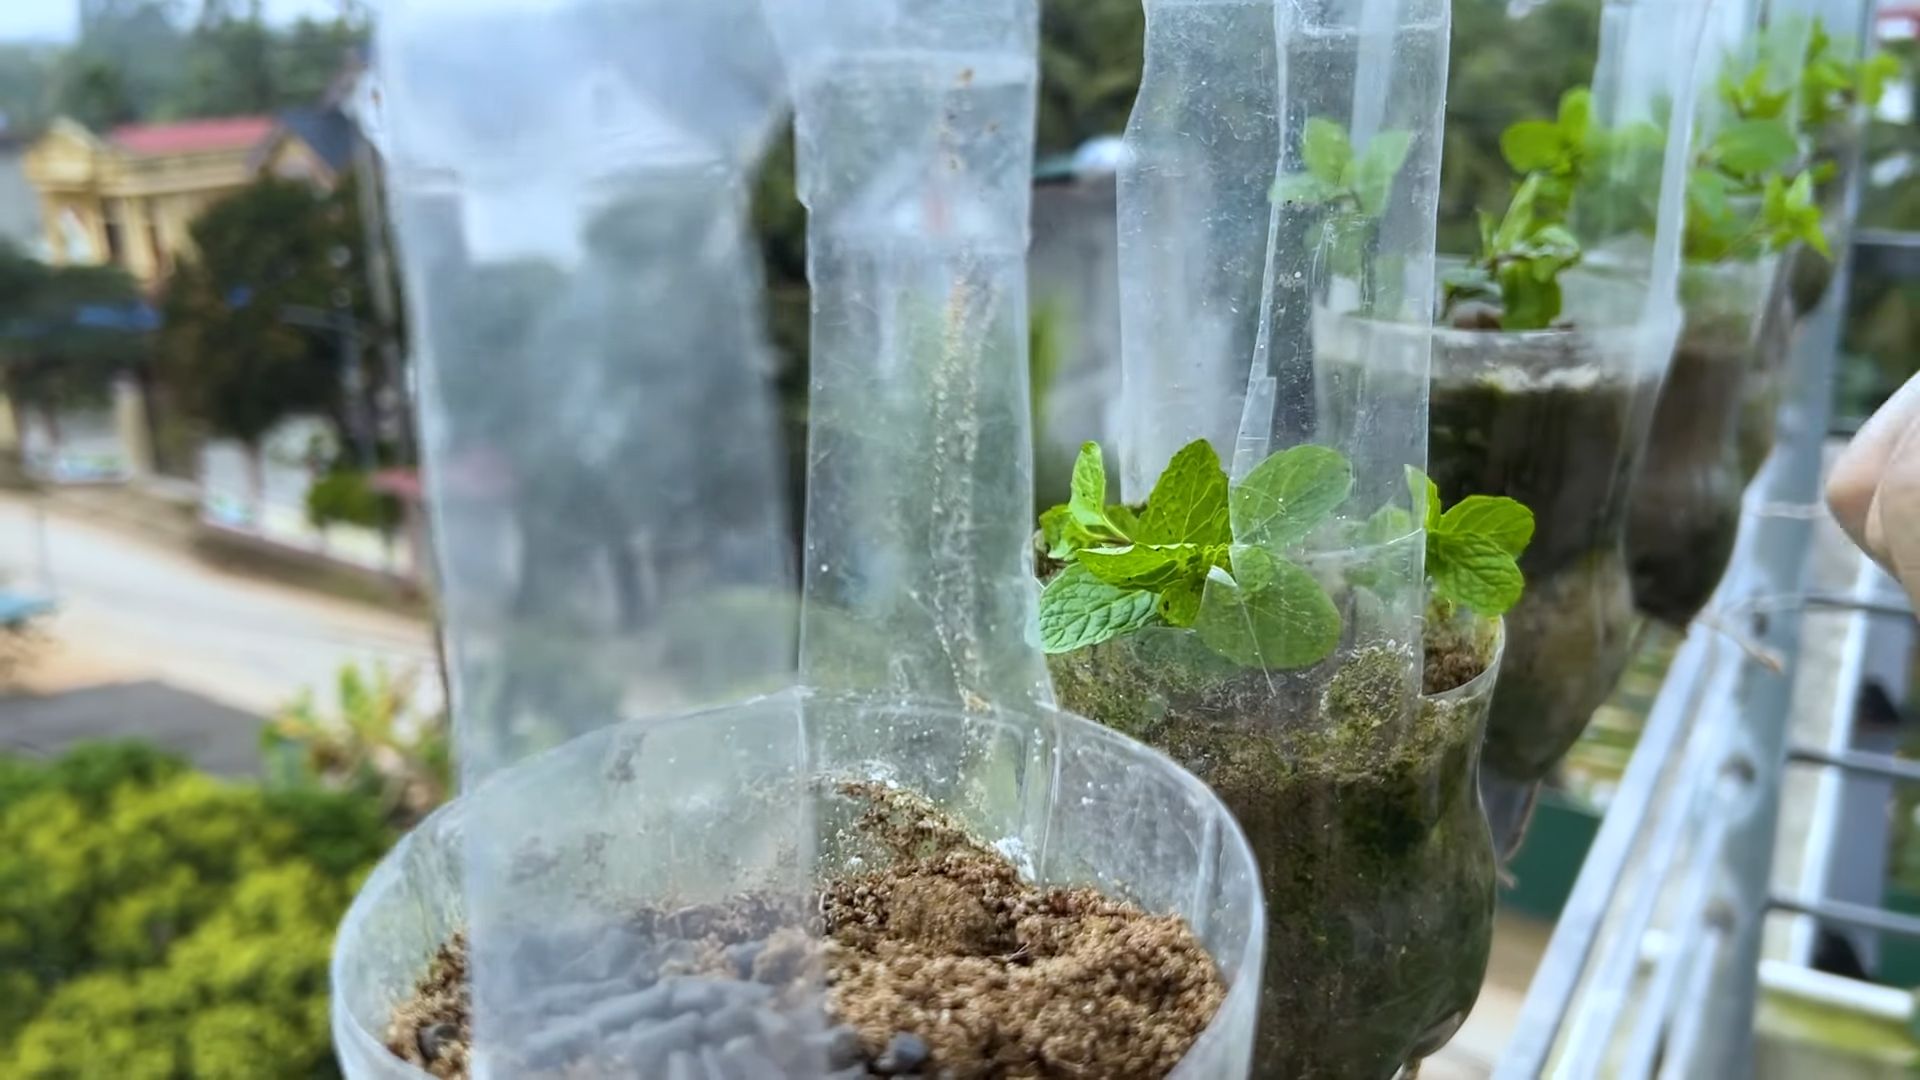
* A Large Plastic Bottle (5-liter or similar): This will be our main planter. Think soda bottle, water jug, anything sturdy and food-grade.
* A Smaller Plastic Bottle (1-liter or similar): This will act as our water reservoir.
* Scissors or a Utility Knife: For cutting the plastic bottles. Be careful!
* Drill or Screwdriver: To create drainage and wicking holes.
* Rope or Twine (Strong and Weather-Resistant): For hanging our vertical garden.
* Potting Soil: Choose a good quality potting mix that drains well.
* Mint Seedlings or Cuttings: You can buy seedlings from a garden center or propagate your own from existing mint plants. I prefer cuttings because they establish quickly.
* Water: Obviously!
* Optional: Landscape Fabric or Burlap: To line the planter and prevent soil erosion.
* Optional: Decorative Stones or Gravel: To top the soil and add a touch of style.
* Optional: Gloves: To protect your hands.
Step-by-Step: Building Your Vertical Mint Oasis
Alright, let’s get our hands dirty (or not, if you’re wearing gloves!). This is where the magic happens. Follow these steps carefully, and you’ll be well on your way to minty freshness.
1. Preparing the Large Bottle (The Planter):
* First, thoroughly clean the large plastic bottle. Remove any labels and residue.
* Next, cut the bottle horizontally about two-thirds of the way up from the bottom. You’ll be using the top portion as the planter and the bottom portion as the water reservoir.
* If you’re using landscape fabric or burlap, cut a piece large enough to line the inside of the top portion of the bottle. This will help prevent soil from washing out through the drainage holes. Secure it with a bit of glue or by folding it over the edges.
* Now, drill or poke several drainage holes in the bottom of the top portion of the bottle. These holes are crucial for preventing waterlogging and ensuring healthy root growth. I usually go for about 5-6 holes, each about 录 inch in diameter.
* Drill or poke two holes on opposite sides of the top portion, near the cut edge. These will be used to thread the rope or twine for hanging. Make sure they’re strong enough to support the weight of the planter when it’s filled with soil and plants.
2. Preparing the Small Bottle (The Water Reservoir):
* Clean the smaller plastic bottle thoroughly.
* Drill or poke several small holes around the neck of the bottle. These holes will allow water to wick up into the soil. I usually make about 8-10 small holes.
* This bottle will be placed upside down into the bottom portion of the large bottle, acting as a self-watering reservoir.
3. Assembling the Self-Watering System:
* Carefully insert the neck of the small bottle (with the holes) into the bottom portion of the large bottle. The small bottle should sit snugly inside, with the holes submerged when the reservoir is filled with water.
* Make sure the small bottle is stable and doesn’t wobble too much. You might need to adjust the size of the opening in the bottom portion of the large bottle to achieve a secure fit.
4. Planting Your Mint:
* Now, it’s time to add the potting soil to the top portion of the large bottle (the planter). Fill it almost to the top, leaving about an inch of space.
* Gently create small holes in the soil for your mint seedlings or cuttings.
* Carefully plant the mint, making sure the roots are covered with soil. If you’re using cuttings, bury the bottom inch or two of the stem.
* Water the soil thoroughly after planting. This will help settle the soil and encourage root growth.
5. Hanging Your Vertical Garden:
* Thread the rope or twine through the holes you drilled in the top portion of the large bottle.
* Tie the rope securely, creating a loop for hanging.
* Choose a sunny spot on your balcony to hang your vertical mint garden. Make sure the spot receives at least 4-6 hours of sunlight per day.
* Test the strength of the rope and the hanging point before fully trusting it. You don’t want your mint garden crashing to the ground!
6. Watering and Maintenance:
* Fill the bottom portion of the large bottle (the water reservoir) with water. The water will wick up through the holes in the small bottle, keeping the soil moist.
* Check the water level in the reservoir regularly and refill as needed. The frequency of watering will depend on the weather and the size of your plants.
* Mint prefers consistently moist soil, but avoid overwatering, which can lead to root rot.
* Trim your mint regularly to encourage bushier growth and prevent it from flowering. Flowering can make the leaves taste bitter.
* Fertilize your mint every few weeks with a balanced liquid fertilizer. Follow the instructions on the fertilizer packaging.
* Remove any dead or yellowing leaves to keep your plant healthy and attractive.
Troubleshooting: Minty Mayhem Averted
Even with the best intentions, things can sometimes go wrong. Here are a few common problems you might encounter and how to fix them.
* Yellowing Leaves: This could be a sign of overwatering, underwatering, or nutrient deficiency. Check the soil moisture and adjust your watering schedule accordingly. Fertilize your plant if necessary.
* Leggy Growth: This usually indicates insufficient sunlight. Move your plant to a sunnier location.
* Pests: Mint can be susceptible to pests like aphids and spider mites. Inspect your plant regularly and treat any infestations with insecticidal soap or neem oil.
* Root Rot: This is caused by overwatering and poor drainage. Make sure your planter has adequate drainage holes and avoid letting the soil stay soggy. If root rot is severe, you may need to repot your plant with fresh soil.
* Slow Growth: This could be due to a lack of nutrients or poor soil quality. Fertilize your plant and consider repotting it with fresh potting mix.
Propagating More Mint: Mint Multiplication!
Once your mint is thriving, you can easily propagate more plants from cuttings. This is a great way to expand your mint collection or share your bounty with friends and family.
1. Take a Cutting: Choose a healthy stem that is about 4-6 inches long. Cut the stem just below a leaf node (the point where a leaf grows out of the stem).
2. Remove Lower Leaves: Remove the leaves from the bottom inch or two of the stem.
3. Rooting in Water: Place the cutting in a glass of water, making sure the bottom nodes are submerged.
4. Wait for Roots: Place the glass in a bright, indirect light location. Change the water every few days. Roots should start to appear within a week or two.
5. Planting: Once the roots are about an inch long, you can plant the cutting in a pot filled with potting soil.
6. Water and Care: Water the newly planted cutting thoroughly and keep the soil moist until it establishes itself.
Enjoying Your Mint: Minty Delights!
Now for the best part: enjoying the fruits (or rather, leaves) of your labor! Fresh mint is incredibly versatile and can be used in a variety of culinary and beverage creations.
* Mojitos: The classic mint cocktail.
* Mint Tea: A refreshing and soothing beverage.
* Salads: Add a touch of mint to your salads for a burst of flavor.
* Desserts: Mint pairs well with chocolate, fruit, and other sweet treats.
* Garnish: Use mint as a garnish for cocktails, desserts, and savory dishes.
With a little bit of effort and this simple hack, you can have a thriving mint garden on your balcony, providing you with fresh, flavorful mint all season long. Happy growing!
Conclusion
So, there you have it! This balcony mint growing hack isn’t just a clever trick; it’s a game-changer for anyone who loves fresh mint but lacks a sprawling garden. Imagine stepping onto your balcony and snipping fragrant mint leaves for your morning tea, a refreshing mojito, or a vibrant summer salad. The convenience and satisfaction are unparalleled.
This method, focusing on contained growth and strategic watering, addresses the common challenges of growing mint in limited spaces. No more invasive roots taking over your entire garden! No more struggling with inconsistent watering schedules! This approach allows you to nurture a thriving mint plant, even on the smallest balcony.
But the beauty of this balcony mint growing hack lies in its adaptability. Feel free to experiment with different container sizes and materials. Terracotta pots offer excellent drainage, while self-watering planters can simplify your routine even further. Consider adding companion plants like marigolds or basil to deter pests and enhance the overall health of your mint. You can also try different varieties of mint, from the classic peppermint to the more exotic chocolate mint or spearmint, each offering a unique flavor profile to elevate your culinary creations.
Don’t be afraid to get creative with your setup! A vertical planter can maximize space on a small balcony, while hanging baskets can add a touch of whimsy. The key is to ensure proper drainage and adequate sunlight for your mint plant to flourish.
We’ve found that using a well-draining potting mix specifically formulated for herbs makes a significant difference in the health and vigor of the mint. Avoid using garden soil, as it can become compacted and hinder drainage. Adding a layer of mulch around the base of the plant can also help retain moisture and suppress weeds.
Beyond the practical benefits, growing your own mint offers a connection to nature and a sense of accomplishment. It’s a simple yet rewarding way to bring a touch of green into your urban environment. The aroma of fresh mint wafting through your balcony is an instant mood booster, creating a tranquil and inviting space.
We are confident that this balcony mint growing hack will transform your balcony into a fragrant oasis. It’s a simple, effective, and rewarding way to enjoy fresh mint year-round.
Now, it’s your turn! We encourage you to try this DIY trick and experience the joy of growing your own mint. Share your experiences, tips, and photos with us in the comments below. We’d love to see your balcony mint gardens and hear about your successes (and any challenges you encounter along the way!). Let’s create a community of balcony gardeners, sharing our knowledge and inspiring each other to cultivate thriving green spaces, no matter how small. Happy growing!
Frequently Asked Questions (FAQ)
What kind of container is best for growing mint on a balcony?
The best container for growing mint on a balcony is one that provides adequate drainage and is appropriately sized for the plant. Terracotta pots are a popular choice due to their porous nature, which allows excess moisture to evaporate. Plastic pots are also suitable, but be sure to choose ones with drainage holes. The size of the container will depend on the variety of mint you’re growing and how large you want the plant to become. A pot that is at least 12 inches in diameter and 12 inches deep is generally recommended. Consider using self-watering planters to simplify watering, especially if you live in a hot or dry climate. Vertical planters and hanging baskets are excellent options for maximizing space on small balconies.
How much sunlight does mint need when grown on a balcony?
Mint thrives in partial shade to full sun, requiring at least 4-6 hours of sunlight per day. On a balcony, observe the amount of sunlight your space receives throughout the day. If your balcony faces south or west, it will likely receive the most sunlight. In this case, you may need to provide some afternoon shade during the hottest part of the day to prevent the leaves from scorching. An east-facing balcony will provide gentler morning sun, which is also suitable for mint. If your balcony receives very little direct sunlight, you can supplement with a grow light to ensure the plant gets enough light for healthy growth.
How often should I water my balcony mint plant?
Watering frequency depends on several factors, including the type of container, the potting mix, the weather, and the amount of sunlight the plant receives. Generally, you should water your mint plant when the top inch of soil feels dry to the touch. Avoid overwatering, as this can lead to root rot. During hot, dry weather, you may need to water daily, while during cooler, wetter periods, you may only need to water every few days. Ensure that the container has good drainage to prevent water from accumulating at the bottom. A good rule of thumb is to water thoroughly until water drains out of the drainage holes.
What kind of soil is best for growing mint in a container?
The best soil for growing mint in a container is a well-draining potting mix that is rich in organic matter. Avoid using garden soil, as it can become compacted and hinder drainage. A potting mix specifically formulated for herbs is ideal. You can also amend a general-purpose potting mix with compost or other organic materials to improve drainage and fertility. The ideal pH for mint is between 6.0 and 7.0.
How do I prevent mint from becoming invasive in a container?
Mint is known for its invasive nature, but this is less of a concern when growing it in a container. The container itself acts as a barrier, preventing the roots from spreading. However, it’s still important to prune the plant regularly to prevent it from becoming too crowded. You can also divide the plant every year or two to prevent it from becoming root-bound. Avoid planting mint directly in the ground on your balcony unless you use a barrier to contain its roots.
How do I harvest mint from my balcony plant?
Harvest mint by snipping off stems just above a leaf node. This will encourage the plant to branch out and produce more leaves. You can harvest mint throughout the growing season, as needed. Avoid removing more than one-third of the plant at a time, as this can stress the plant. The best time to harvest mint is in the morning, after the dew has dried but before the sun gets too hot. This will help preserve the essential oils and flavor of the leaves.
What are some common pests and diseases that affect mint, and how can I prevent them?
Common pests that affect mint include aphids, spider mites, and whiteflies. You can prevent these pests by regularly inspecting your plant and removing any infested leaves. You can also spray the plant with insecticidal soap or neem oil. Common diseases that affect mint include powdery mildew and rust. You can prevent these diseases by ensuring good air circulation around the plant and avoiding overwatering. If you notice signs of disease, remove the affected leaves and spray the plant with a fungicide.
Can I grow mint indoors on my balcony during the winter?
Yes, you can grow mint indoors on your balcony during the winter, provided you have adequate light and temperature. Bring the plant indoors before the first frost and place it in a sunny location, such as a south-facing window. If you don’t have enough natural light, you can supplement with a grow light. Keep the plant away from drafts and heaters, as these can dry out the leaves. Water the plant less frequently during the winter, as it will not be growing as actively.
What are some creative ways to use my balcony-grown mint?
The possibilities are endless! Use fresh mint to flavor teas, cocktails, and other beverages. Add it to salads, soups, and sauces. Use it to make pesto or mint sauce. Garnish desserts with fresh mint leaves. You can also dry mint leaves for later use. Experiment with different varieties of mint to discover your favorite flavors. You can even use mint to make homemade beauty products, such as facial scrubs and toners.
How can I encourage my mint plant to produce more leaves?
To encourage your mint plant to produce more leaves, prune it regularly by snipping off stems just above a leaf node. This will stimulate new growth and branching. Fertilize the plant every few weeks with a balanced liquid fertilizer. Ensure that the plant receives adequate sunlight and water. Avoid letting the plant flower, as this can reduce leaf production. Pinch off any flower buds as soon as you see them.

Leave a Comment