

Rooftop Potato Growing DIY: Imagine harvesting a bounty of fresh, homegrown potatoes just steps from your kitchen, all thanks to your very own rooftop garden! For centuries, humans have cultivated potatoes, from their humble beginnings in the Andes Mountains to becoming a staple food worldwide. But who says you need acres of farmland to enjoy the taste of freshly dug spuds?
In today’s urban landscape, space is often a premium. That’s where the magic of rooftop potato growing DIY comes in! This isn’t just about gardening; it’s about reclaiming your space, connecting with nature, and enjoying the unparalleled flavor of potatoes you’ve nurtured yourself. Think of the satisfaction of serving a potato salad made entirely from ingredients grown on your own roof!
This article is your ultimate guide to transforming your rooftop into a thriving potato patch. We’ll walk you through every step, from choosing the right containers and soil to mastering essential growing techniques. Get ready to unleash your inner gardener and discover the joy of rooftop potato growing – it’s easier than you think, and the rewards are incredibly delicious!

Rooftop Potato Growing: A DIY Guide to Bountiful Harvests!
Hey there, fellow gardening enthusiasts! Ever dreamt of growing your own potatoes, but lack the sprawling backyard? Well, fret no more! I’m here to guide you through a fantastic DIY project: rooftop potato growing. It’s easier than you think, incredibly rewarding, and a great way to maximize your space. Get ready to enjoy fresh, homegrown potatoes straight from your roof!
What You’ll Need: The Potato Powerhouse Toolkit
Before we dive in, let’s gather our supplies. This is crucial for a smooth and successful potato-growing adventure.
* Growing Containers: This is where the magic happens! I recommend using large, durable containers like:
* Grow Bags: These are my personal favorite! They’re breathable, lightweight, and come in various sizes. Look for bags that are at least 20 gallons.
* Large Plastic Bins: Make sure they have drainage holes! You can drill them yourself if needed.
* Old Tires: Stacked tires can create a unique and effective growing space. Just be mindful of potential leaching and consider lining them with fabric.
* Seed Potatoes: These aren’t your regular grocery store potatoes! Seed potatoes are specifically grown for planting and are disease-free. You can find them at your local garden center or online. Choose varieties that are suitable for container growing, like Yukon Gold, Red Pontiac, or fingerling potatoes.
* Potting Mix: This is super important! Don’t use garden soil directly in your containers. It’s too heavy and doesn’t drain well. Opt for a high-quality potting mix that’s lightweight and well-draining. I like to mix in some compost for added nutrients.
* Compost: This is the black gold of gardening! Compost adds essential nutrients to the soil and improves drainage.
* Fertilizer: A balanced fertilizer (like 10-10-10) will give your potatoes a boost. You can also use organic fertilizers like bone meal or fish emulsion.
* Watering Can or Hose: Essential for keeping your potatoes hydrated.
* Shovel or Trowel: For planting and adding soil.
* Mulch (Optional): Straw or hay mulch helps retain moisture and suppress weeds.
* Gloves: To keep your hands clean and protected.
Step-by-Step Guide: From Seed to Spud
Alright, let’s get our hands dirty! Follow these steps carefully, and you’ll be well on your way to a potato harvest.
1. Chitting Your Seed Potatoes (Sprouting): This is an optional but highly recommended step. Chitting encourages your seed potatoes to sprout before planting, giving them a head start.
* A few weeks before planting, place your seed potatoes in a cool, bright location (but not direct sunlight).
* You can use an egg carton or a tray to keep them upright.
* You’ll notice small “eyes” or sprouts forming on the potatoes. These are what will eventually grow into potato plants.
2. Preparing Your Containers: Now, let’s get our containers ready for planting.
* If you’re using grow bags, simply unfold them and place them in your desired location on your rooftop.
* For plastic bins, make sure you have adequate drainage holes. Drill more if needed.
* If you’re using tires, stack them to your desired height and line the inside with fabric to prevent soil from escaping.
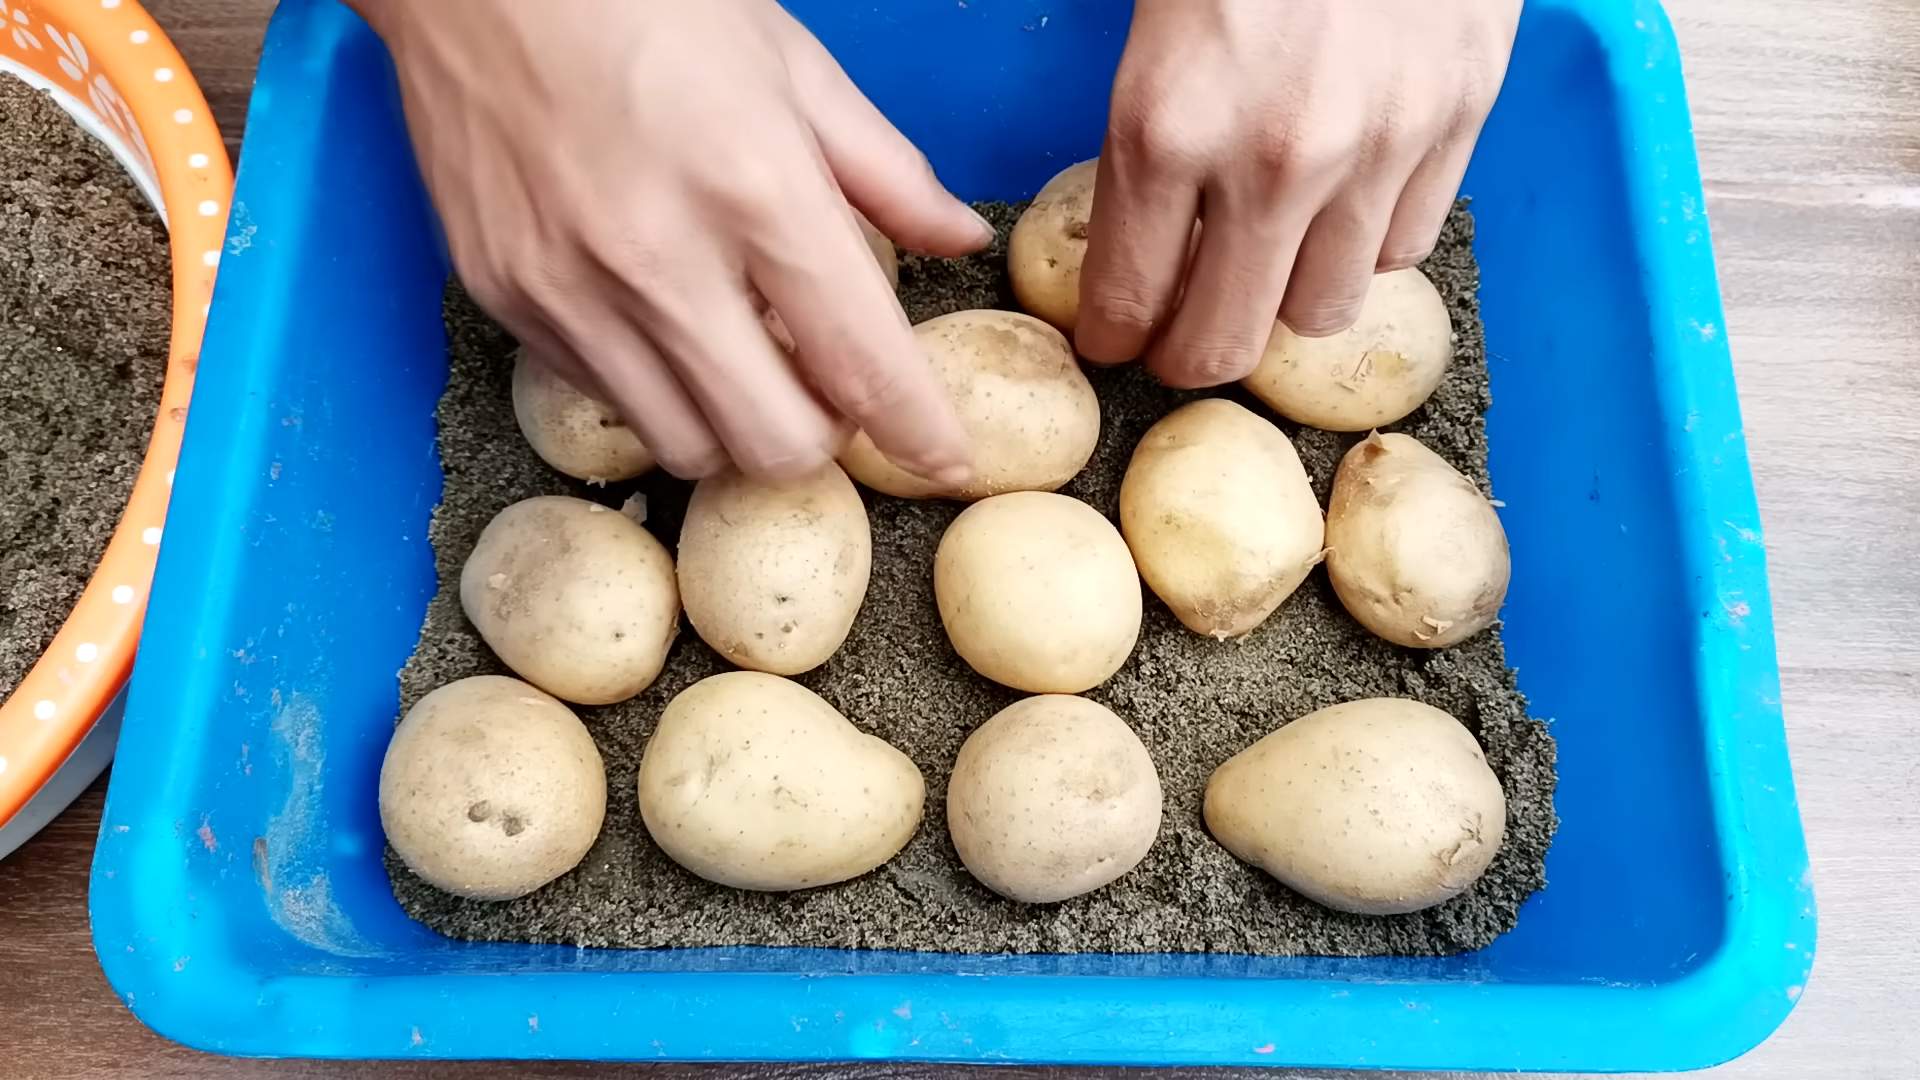
3. Adding the Initial Soil Layer: This is where we start building our potato tower!
* Fill your container with about 4-6 inches of potting mix mixed with compost.
* This initial layer will provide a base for your seed potatoes to grow.
4. Planting Your Seed Potatoes: Time to plant those sprouted potatoes!
* If your seed potatoes have large sprouts, you can cut them into pieces, ensuring that each piece has at least one or two sprouts (eyes). Let the cut pieces dry for a day or two to prevent rotting.
* Place the seed potato pieces (or whole small seed potatoes) on top of the soil layer, with the sprouts facing upwards.
* Space the seed potatoes about 8-12 inches apart.
5. Covering the Seed Potatoes: Gently cover the seed potatoes with another 4-6 inches of potting mix and compost.
* Water the soil thoroughly, making sure it’s evenly moist but not waterlogged.
6. The “Hilling” Process: This is the key to maximizing your potato yield! As your potato plants grow, you’ll need to add more soil to encourage more potatoes to form along the stems.
* When the potato plants reach about 6-8 inches tall, add another 4-6 inches of potting mix and compost, burying the lower part of the stems.
* Repeat this process every few weeks as the plants continue to grow, until the container is almost full. This is called “hilling.”
7. Watering and Fertilizing: Potatoes need consistent moisture and nutrients to thrive.
* Water your potato plants regularly, especially during hot and dry weather. The soil should be consistently moist but not soggy.
* Fertilize your potato plants every few weeks with a balanced fertilizer or an organic fertilizer like fish emulsion. Follow the instructions on the fertilizer package.
8. Sunlight: Potatoes need at least 6-8 hours of sunlight per day. Make sure your containers are placed in a sunny location on your rooftop.
9. Pest and Disease Control: Keep an eye out for common potato pests like aphids, potato beetles, and flea beetles. You can use organic pest control methods like insecticidal soap or neem oil to control these pests. Also, watch out for diseases like early blight and late blight. Ensure good air circulation around your plants and avoid overwatering to prevent these diseases.
10. Harvesting Your Potatoes: The most exciting part! Potatoes are typically ready to harvest about 80-100 days after planting, depending on the variety.
* You’ll know it’s time to harvest when the potato plants start to flower and the foliage begins to turn yellow and die back.
* Stop watering the plants a week or two before harvesting.
* Carefully dig around the base of the plants with a shovel or trowel, being careful not to damage the potatoes.
* Gently lift the potatoes from the soil.
* Cure the potatoes by letting them dry in a cool, dark, and well-ventilated place for a week or two. This will help them to store longer.
Troubleshooting Tips: Overcoming Common Challenges
Even with the best planning, you might encounter a few bumps along the road. Here are some common issues and how to tackle them:
* Potato Blight: This fungal disease can quickly decimate your potato crop. Look for brown spots on the leaves. Prevent it by ensuring good air circulation and avoiding overhead watering. If you spot blight, remove infected leaves immediately and consider using a fungicide.
* Pests: Aphids, potato beetles, and flea beetles can all feast on your potato plants. Regularly inspect your plants and use organic pest control methods like insecticidal soap or neem oil.
* Lack of Sunlight: If your potato plants aren’t getting enough sunlight, they’ll be leggy and produce fewer potatoes. Move your containers to a sunnier location if possible.
* Overwatering: Soggy soil can lead to root rot and other problems. Make sure your containers have adequate drainage and water only when the soil is dry to the touch.
* Underwatering: Dry soil can stress your potato plants and reduce your yield. Water regularly, especially during hot and dry weather.
Choosing the Right Potato Variety: A Spud for Every Palate
Selecting the right potato variety is key to a successful rooftop garden. Consider these popular choices:
* Yukon Gold: A classic all-purpose potato with a buttery flavor and smooth texture. Great for baking, boiling, and mashing.
* Red Pontiac: A red-skinned potato with a creamy texture. Excellent for boiling and potato salads.
* Fingerling Potatoes: These small, elongated potatoes have a unique flavor and texture. They’re delicious roasted or steamed.
* Russet Potatoes: The classic baking potato with a fluffy texture. Perfect for French fries and baked potatoes.
Extra Tips for a Stellar Potato Harvest
* Rotate Your Crops: Don’t plant potatoes in the same container year after year. Rotate with other vegetables to prevent soilborne diseases.
* Use Companion Planting: Plant beneficial herbs and flowers near your potatoes to attract pollinators and repel pests. Marigolds, basil, and nasturtiums are great choices.
* Add Organic Matter: Incorporate plenty of compost and other organic matter into your soil to improve drainage and fertility.
* Be
Conclusion
So, there you have it! Transforming your rooftop into a thriving potato patch is not just a whimsical dream; it’s an achievable and incredibly rewarding project. We’ve walked you through the simple steps, highlighting the ease and accessibility of this DIY endeavor. But why should you dedicate your time and effort to rooftop potato growing? The answer is multifaceted.
Firstly, it’s about reclaiming space. Urban dwellers often lack the luxury of sprawling gardens, but rooftops offer untapped potential. This method allows you to cultivate fresh, organic potatoes even in the most concrete-laden environments. Imagine the satisfaction of harvesting your own homegrown produce, knowing exactly where it came from and what went into its growth.
Secondly, it’s about sustainability. By growing your own food, you reduce your reliance on commercially produced potatoes, which often travel long distances and contribute to carbon emissions. Rooftop potato growing is a small but significant step towards a more sustainable lifestyle.
Thirdly, it’s about the sheer joy of gardening. There’s something deeply therapeutic about nurturing plants and watching them flourish. The process of planting, watering, and tending to your potato plants can be incredibly calming and rewarding. Plus, the anticipation of the harvest is a thrill unlike any other.
But the benefits don’t stop there. Rooftop gardens can also help to insulate your home, reducing energy consumption and lowering your utility bills. They can also improve air quality by absorbing carbon dioxide and releasing oxygen. And let’s not forget the aesthetic appeal – a rooftop garden can transform a drab, unused space into a vibrant and inviting oasis.
Now, let’s talk about variations. While we’ve focused on a specific method, there’s plenty of room for experimentation. You could try different varieties of potatoes, each with its own unique flavor and texture. You could also experiment with different growing mediums, such as compost, peat moss, or even a combination of both. Consider adding companion plants like marigolds to deter pests naturally.
For a spicier kick, try growing fingerling potatoes and roasting them with rosemary and garlic. Or, for a creamy and decadent treat, whip up a batch of mashed potatoes using Yukon Gold potatoes grown right on your rooftop. The possibilities are endless!
Don’t be afraid to get creative and personalize your rooftop potato garden to suit your own tastes and preferences. The most important thing is to have fun and enjoy the process.
We wholeheartedly encourage you to give this DIY trick a try. It’s a simple, affordable, and incredibly rewarding way to grow your own food, connect with nature, and transform your rooftop into a thriving urban garden. And once you’ve harvested your first crop of homegrown potatoes, we’d love to hear about your experience. Share your photos, tips, and stories with us in the comments below. Let’s build a community of rooftop potato growers and inspire others to embrace this sustainable and rewarding practice. Happy growing!
Frequently Asked Questions (FAQ)
What type of potatoes are best for rooftop growing?
Choosing the right potato variety is crucial for successful rooftop growing. Generally, smaller, earlier-maturing varieties tend to perform best in containers. Consider varieties like Yukon Gold, Red Pontiac, or fingerling potatoes. These varieties are known for their adaptability and relatively short growing season. Avoid late-season varieties that require a longer growing period, as they may not thrive in the limited space and potentially shorter growing season of a rooftop environment. Also, consider disease resistance when selecting your seed potatoes. Look for varieties that are resistant to common potato diseases like blight, which can be particularly problematic in humid environments.
How much sunlight do rooftop potatoes need?
Potatoes are sun-loving plants and require at least six to eight hours of direct sunlight per day to thrive. Before setting up your rooftop potato garden, carefully assess the amount of sunlight your rooftop receives. If your rooftop is partially shaded, try to position your containers in the sunniest spot possible. If you’re in a particularly shady location, you might consider using grow lights to supplement the natural sunlight. Remember that insufficient sunlight can lead to leggy growth, reduced yields, and increased susceptibility to diseases.
What size container is needed for growing potatoes on a rooftop?
The size of the container is a critical factor in determining the success of your rooftop potato growing venture. A general rule of thumb is to use a container that is at least 20 gallons in size. This provides ample space for the potato plants to develop a healthy root system and produce a good yield. The container should also be deep enough, ideally at least 18 inches, to allow for the “hilling” process, where you gradually add more soil around the stems as the plants grow. This encourages the formation of more potatoes along the buried stems. Fabric grow bags are an excellent option as they allow for good drainage and aeration, preventing the roots from becoming waterlogged.
How often should I water my rooftop potato plants?
Watering is essential for healthy potato growth, but overwatering can be just as detrimental as underwatering. The frequency of watering will depend on several factors, including the weather, the type of container you’re using, and the type of growing medium. As a general guideline, water your potato plants deeply whenever the top inch of soil feels dry to the touch. Avoid watering shallowly, as this encourages shallow root growth. During hot, dry weather, you may need to water your plants daily. Ensure that your containers have adequate drainage to prevent waterlogging, which can lead to root rot.
What type of soil is best for rooftop potato growing?
Potatoes thrive in well-draining, nutrient-rich soil. A good potting mix specifically formulated for vegetables is an excellent choice. Avoid using garden soil, as it can be too heavy and compact, hindering root growth. You can also create your own potting mix by combining equal parts of compost, peat moss (or coconut coir), and perlite or vermiculite. Compost provides essential nutrients, peat moss or coconut coir helps retain moisture, and perlite or vermiculite improves drainage. Ensure that the soil pH is slightly acidic, ideally between 6.0 and 6.5.
How do I fertilize my rooftop potato plants?
Potatoes are heavy feeders and require regular fertilization to produce a good yield. Start by incorporating a slow-release fertilizer into the potting mix at planting time. This will provide a steady supply of nutrients throughout the growing season. You can also supplement with liquid fertilizer every two to three weeks. Choose a fertilizer that is high in phosphorus and potassium, as these nutrients are essential for tuber development. Avoid over-fertilizing with nitrogen, as this can promote excessive foliage growth at the expense of tuber production.
How do I protect my rooftop potato plants from pests and diseases?
Rooftop gardens can be susceptible to various pests and diseases, so it’s important to take preventative measures. Regularly inspect your plants for signs of pests, such as aphids, potato beetles, or flea beetles. Handpick any pests you find or use insecticidal soap or neem oil to control infestations. To prevent diseases, ensure good air circulation around your plants and avoid overwatering. If you notice any signs of disease, such as leaf spots or wilting, remove the affected leaves immediately. Consider using organic fungicides if necessary. Companion planting with herbs like basil or marigolds can also help deter pests naturally.
When and how do I harvest my rooftop potatoes?
The timing of the harvest will depend on the variety of potatoes you’re growing. Generally, early-season varieties can be harvested about 70-80 days after planting, while late-season varieties may take up to 120 days. You can start harvesting “new potatoes” when the plants begin to flower. These are small, tender potatoes that are delicious boiled or roasted. For larger, mature potatoes, wait until the foliage starts to die back. To harvest, gently dig around the base of the plant and lift the potatoes out of the soil. Be careful not to damage the tubers.
Can I grow potatoes on my rooftop in winter?
Whether you can grow potatoes on your rooftop in winter depends on your climate. In mild climates with warm winters, you may be able to grow potatoes year-round. However, in colder climates with freezing temperatures, you will need to protect your plants from frost. You can do this by moving the containers indoors or covering them with blankets or tarps. Alternatively, you can grow potatoes in a greenhouse or cold frame to extend the growing season.
What are some creative ways to use my rooftop-grown potatoes?
The possibilities are endless! Of course, you can use them for classic dishes like mashed potatoes, roasted potatoes, and potato salad. But don’t be afraid to get creative! Try making homemade potato chips, potato pancakes, or even potato bread. You can also use your rooftop-grown potatoes to make soups, stews, and casseroles. And if you’re feeling adventurous, try making potato vodka! The fresh, homegrown flavor of your potatoes will elevate any dish.


Leave a Comment