

Growing Pineapple at Home might seem like an exotic dream reserved for tropical climates, but I’m here to tell you it’s absolutely achievable, even if you’re miles away from Hawaii! Forget expensive grocery store pineapples; imagine plucking a juicy, sun-ripened fruit straight from your own backyard (or balcony!).
The pineapple, a symbol of hospitality and welcome, has a rich history. Originating in South America, it was quickly embraced by explorers and traders, eventually becoming a prized possession in European courts. Displaying a pineapple was a sign of wealth and status – a far cry from the affordable treat we know today. But now, you can bring a touch of that historical luxury into your own life, and it’s easier than you think!
Why should you embark on this DIY adventure? Well, for starters, homegrown pineapples taste infinitely better than store-bought ones. Plus, it’s an incredibly rewarding experience to nurture a plant from a simple fruit top to a thriving, fruit-bearing beauty. In this article, I’ll share my tried-and-true tricks and hacks for successfully growing pineapple at home, regardless of your gardening experience. We’ll cover everything from preparing the pineapple top to providing the ideal growing conditions, ensuring you’ll be enjoying your own homegrown pineapple in no time. Get ready to unleash your inner gardener and impress your friends with this surprisingly simple, yet incredibly satisfying, DIY project!
How to Grow Your Own Pineapple at Home: It’s Easier Than You Think!
Hey everyone! Tired of expensive pineapples from the supermarket? Today, I’m going to show you how you can easily grow your own pineapple at home. Sounds crazy? It’s not! It does take some patience, but the result is definitely worth it. Let’s get started!
What You’ll Need:
- A ripe pineapple (preferably organic, as these are often untreated)
- A sharp knife
- A pot (about 15-20 cm in diameter)
- Potting soil or coconut fiber
- Water
- Optional: Rooting powder
- Optional: A transparent plastic bag or a mini greenhouse
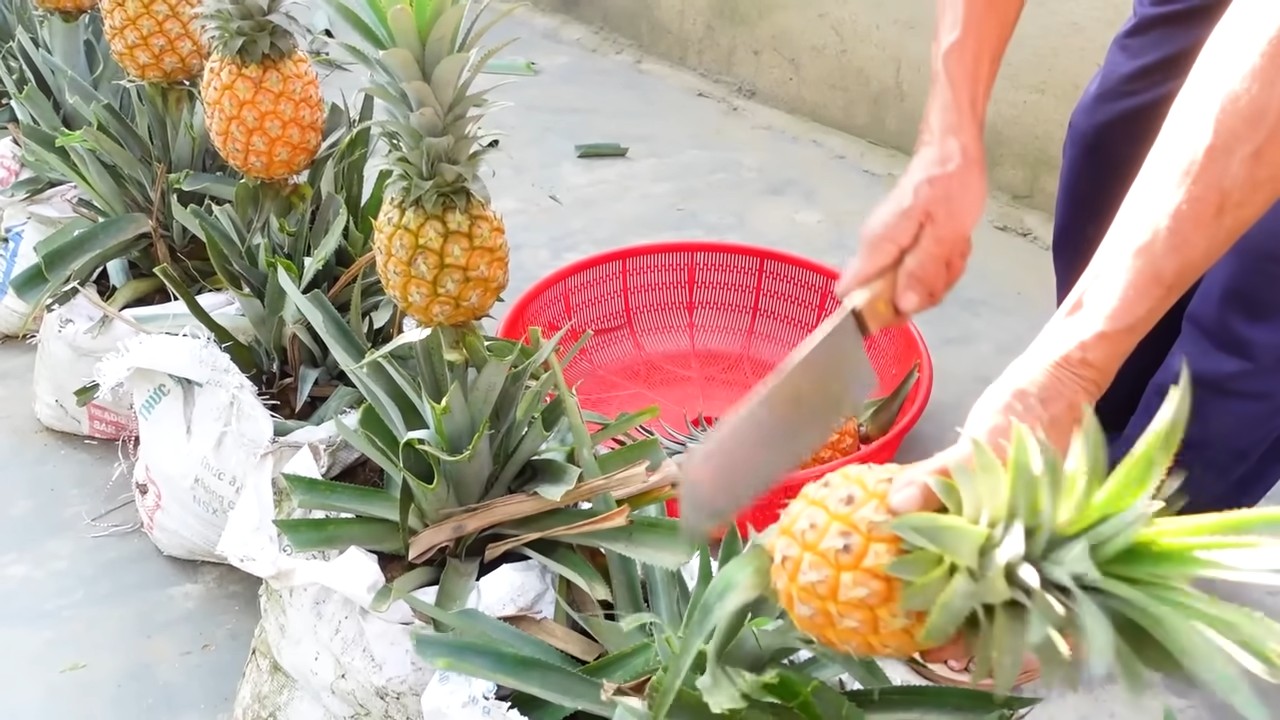
Preparing the Pineapple Crown: The Most Important Step
The most important part is preparing the pineapple crown. This is the part with the leaves that will later become our new pineapple plant.
- Cut the crown: Take your sharp knife and cut the crown with about 2-3 cm of fruit flesh. Make sure the cut is clean.
- Remove the fruit flesh: The fruit flesh must be removed because it can rot and prevent root formation. Here are two methods:
- Method 1 (My recommendation): Carefully cut the fruit flesh off with the knife. Be careful not to damage the lower leaves.
- Method 2: Firmly and carefully twist the crown until the fruit flesh comes off.
- Remove the lower leaves: Remove the bottom 2-3 layers of leaves. This exposes the root buds, allowing the plant to form roots more easily. Gently pull the leaves down.
- Let it dry: Allow the prepared crown to dry for 1-2 days in a dry, airy location. This helps prevent rotting.
Rooting: How to Develop the First Roots
Now comes the exciting part: getting the pineapple crown to develop roots. There are different methods for this:
Method 1: Rooting in a Glass of Water
This method is easy and you can watch the roots grow.
- Prepare a glass of water: Fill a glass with clean, room temperature water.
- Place the crown in the water: Place the pineapple crown in the glass so that only the bottom part, where you removed the leaves, is submerged. The leaves should not be in the water, as they can rot.
- Choose a location: Place the glass in a bright, warm spot, but not in direct sunlight.
- Change the water: Change the water every 2-3 days to prevent rotting.
- Be patient: It can take 2-8 weeks for the first roots to develop. Be patient and don’t give up!
Method 2: Direct Rooting in Soil
This method is a bit faster, but you don’t see the roots grow.
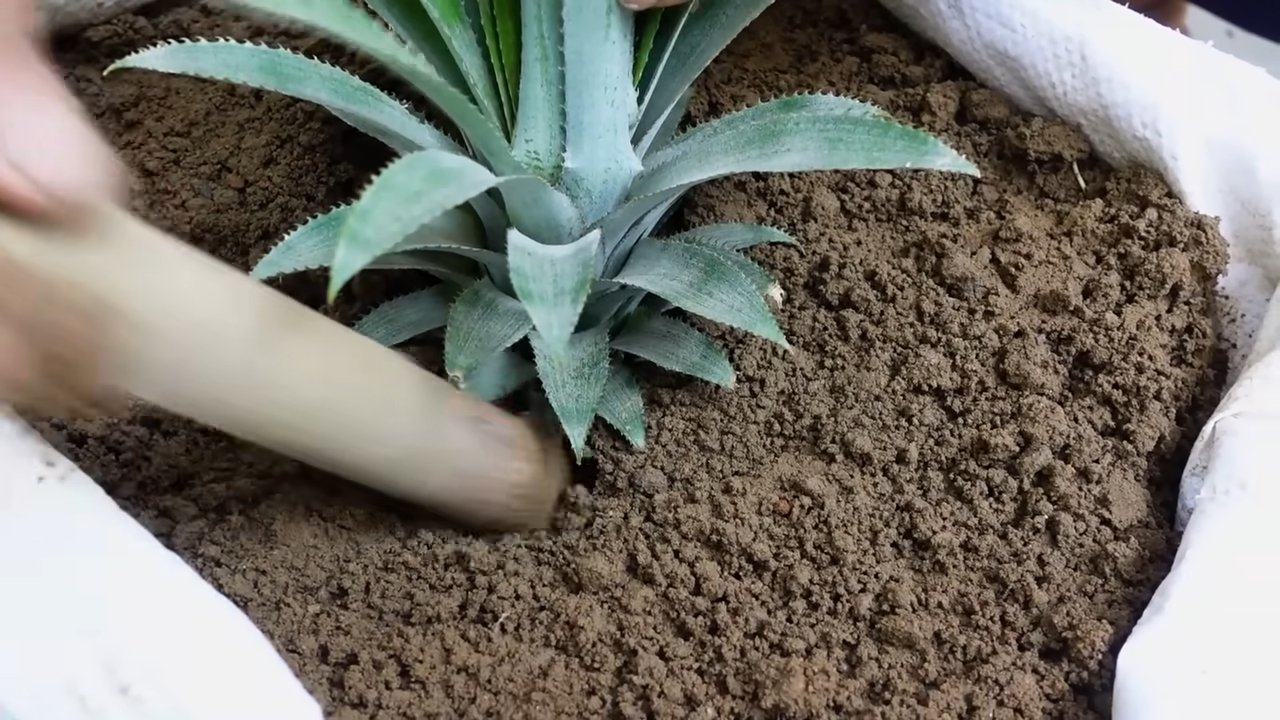
- Prepare the pot: Fill the pot with potting soil or coconut fiber. The soil should be loose and well-drained.
- Plant the crown: Plant the pineapple crown about 2-3 cm deep into the soil.
- Water it: Water the soil gently so that it is moist but not soaked.
- Choose a location: Place the pot in a bright, warm location, but not in direct sunlight.
- Keep moisture: Keep the soil moist, but avoid waterlogging. You can cover the crown with a transparent plastic bag or mini greenhouse to increase humidity. Be sure to air out the bag regularly to prevent mold.
Optional: Use Rooting Powder
Rooting powder can speed up root formation. Dip the bottom part of the crown, where the leaves were removed, into the powder before planting or placing it in water.
Planting: Your Pineapple Gets a New Home
Once the roots are about 2-3 cm long (for the glass of water method) or after a few weeks when you notice the crown is firmly in the pot (for the direct rooting method), it’s time to transplant the pineapple into a larger pot.
- Prepare a larger pot: Choose a pot that is a little bigger than the previous one (about 20-25 cm in diameter).
- Prepare the soil: Use well-draining soil, such as a mix of potting soil, sand, and a little compost.
- Transplant the pineapple: Gently lift the pineapple out of the old pot or glass and plant it in the new pot. Be careful not to damage the roots.
- Water it: Gently water the soil so it is moist but not wet.
Care: Keeping Your Pineapple Happy
Proper care is essential for your pineapple to grow and thrive.
- Location: Pineapples love light and warmth. Place them in a sunny spot, such as a south-facing windowsill. In the summer, you can place them outside, but make sure they’re protected from heavy rain and wind.
- Watering: Water the pineapple regularly, but avoid waterlogging. The soil should always be slightly moist. Water less in the winter.
- Fertilizing: Fertilize the pineapple during the growing season (spring and summer) every 2-4 weeks with a liquid fertilizer for green plants.
- Humidity: Pineapples enjoy high humidity. You can spray the leaves regularly with water or place the pot on a tray with water and pebbles.
- Wintering: In the winter, place the pineapple in a bright, cool spot (around 15-18°C) and water less.
Flowering and Fruit Formation: Patience is Key!
It can take 1-3 years for your pineapple to flower and bear fruit. The flowering process is a beautiful event: a stem grows from the center of the plant, and many small purple flowers bloom.
How to Encourage Flowering:
Sometimes, pineapples need a little help to bloom. Here are some tips:
- Ethylene Gas: Place an apple next to the pineapple or put it in a plastic bag over the plant. Apples produce ethylene gas, which can help trigger blooming.
- Magnesium Sulfate (Epsom Salt): Water the pineapple with a solution of magnesium sulfate (1 teaspoon per liter of water). Magnesium sulfate can help encourage blooming.
Once the flowers have faded, the fruit starts to form. It takes a few more months for the pineapple to ripen. You’ll know it’s ripe when the fruit turns a golden yellow and gives off a sweet fragrance.
Important Notes:
- Patience: Growing pineapples takes time and patience. Don’t give up if it doesn’t happen right away!
- Prevent Rot: Be sure the pineapple crown doesn’t rot. Remove the fruit flesh thoroughly and allow the crown to dry before planting.
- Pests: Keep an eye out for pests like spider mites or mealybugs. If you notice any, treat the plant with an appropriate insecticide.
I hope this guide helps you grow your own pineapple. It’s a great feeling to grow your own tropical fruit!
Conclusion
So, there you have it! Growing pineapple at home, while it might seem like a tropical dream reserved for expert gardeners, is surprisingly achievable with a little patience and this simple DIY trick. We’ve walked you through the process, from selecting the perfect pineapple to nurturing its growth, and hopefully, dispelled any myths you might have encountered along the way.
Why is this a must-try? Because there’s nothing quite like the satisfaction of harvesting a fruit you’ve nurtured from its humble beginnings. Imagine the bragging rights at your next barbecue when you serve up slices of sweet, homegrown pineapple! Beyond the personal satisfaction, you’re also reducing your carbon footprint by avoiding the transportation costs associated with store-bought pineapples. Plus, you know exactly what’s gone into growing your fruit – no mystery pesticides or questionable practices.
But the benefits don’t stop there. Growing a pineapple plant is a beautiful and unique addition to your home or garden. Its spiky, architectural leaves add a touch of the exotic, and it’s a conversation starter for sure. It’s also a fantastic educational opportunity, especially if you have children. They can learn about plant life cycles, the importance of patience, and the rewards of hard work.
Looking for variations? Consider experimenting with different pineapple varieties. While the smooth cayenne is a popular choice, you might find other varieties that thrive in your specific climate. You can also try different potting mixes to see what works best for your plant. Some gardeners swear by a mix of perlite, peat moss, and vermiculite, while others prefer a more organic blend. Don’t be afraid to experiment and find what suits your needs.
Another fun variation is to grow your pineapple in a decorative pot. This allows you to move it indoors during colder months and adds a touch of style to your home. Just make sure the pot has adequate drainage to prevent root rot.
We encourage you to take the plunge and try this DIY trick for growing pineapple at home. It’s a rewarding experience that will bring a touch of the tropics to your life. Don’t be discouraged if your first attempt isn’t perfect. Gardening is all about learning and adapting.
Most importantly, we want to hear about your experiences! Share your photos, tips, and challenges in the comments below. Let’s create a community of pineapple enthusiasts and learn from each other. What worked for you? What didn’t? What unexpected challenges did you face? Your insights could help other aspiring pineapple growers succeed. So, get your hands dirty, embrace the challenge, and enjoy the sweet rewards of growing your own pineapple. Happy growing!
Frequently Asked Questions (FAQ)
How long does it take to grow a pineapple from the top?
This is one of the most common questions, and the answer is: patience is key! It typically takes anywhere from 2 to 3 years for a pineapple plant grown from a top to produce fruit. The exact timeframe depends on several factors, including the variety of pineapple, the climate, the amount of sunlight it receives, and the overall care it gets. Don’t be discouraged if it takes longer than expected. Just keep providing the plant with the right conditions, and eventually, you’ll be rewarded with a delicious pineapple.
What kind of soil is best for growing pineapple?
Pineapples thrive in well-draining, slightly acidic soil. A good potting mix for pineapples should be light and airy, allowing for good root aeration. A mix of equal parts perlite, peat moss, and vermiculite is a popular choice. You can also add some compost to the mix to provide extra nutrients. Avoid heavy clay soils, as they can retain too much moisture and lead to root rot. If you’re planting your pineapple in the ground, amend the soil with organic matter to improve drainage and fertility.
How much sunlight does a pineapple plant need?
Pineapples are sun-loving plants and need at least 6 hours of direct sunlight per day to thrive. If you’re growing your pineapple indoors, place it near a sunny window. If you don’t have enough natural light, you can supplement with grow lights. Insufficient sunlight can lead to slow growth and reduced fruit production. During the summer months, you can move your pineapple plant outdoors to a sunny location, but be sure to protect it from extreme heat and sunburn.
How often should I water my pineapple plant?
Water your pineapple plant regularly, but avoid overwatering. The soil should be kept consistently moist, but not soggy. Allow the top inch of soil to dry out between waterings. During the warmer months, you may need to water more frequently. In the winter, when the plant is dormant, you can reduce watering. Always check the soil moisture before watering to avoid root rot.
How do I fertilize my pineapple plant?
Pineapples are heavy feeders and benefit from regular fertilization. Use a balanced fertilizer, such as a 10-10-10 or 14-14-14, diluted to half strength. Fertilize your pineapple plant every 2-3 months during the growing season (spring and summer). Avoid fertilizing during the winter months when the plant is dormant. You can also use organic fertilizers, such as compost tea or fish emulsion.
How do I know when my pineapple is ripe?
Determining when a pineapple is ripe can be tricky, but there are a few telltale signs. The pineapple should have a vibrant color, ranging from green to golden yellow, depending on the variety. The fruit should also have a sweet, fragrant aroma. Gently tug on one of the leaves near the top of the pineapple. If it comes off easily, the pineapple is likely ripe. You can also tap the pineapple. A ripe pineapple will have a dull, hollow sound.
What do I do if my pineapple plant doesn’t produce fruit?
There are several reasons why your pineapple plant might not be producing fruit. The most common reason is that the plant is not mature enough. Remember, it can take 2-3 years for a pineapple plant to fruit. Other factors that can affect fruit production include insufficient sunlight, improper watering, and lack of fertilization. Make sure your plant is getting enough sunlight, water, and nutrients. You can also try forcing your pineapple plant to fruit by exposing it to ethylene gas. This can be done by placing a ripe apple or banana near the plant, as these fruits release ethylene gas.
Can I grow pineapple indoors year-round?
Yes, you can grow pineapple indoors year-round, especially if you live in a climate with cold winters. However, you’ll need to provide the plant with adequate sunlight and humidity. Place the plant near a sunny window or use grow lights. You can also increase humidity by misting the plant regularly or placing it on a tray filled with pebbles and water.
What are some common pests and diseases that affect pineapple plants?
Pineapple plants are relatively pest-resistant, but they can be susceptible to certain pests and diseases. Common pests include mealybugs, scale, and spider mites. These pests can be controlled with insecticidal soap or neem oil. Root rot is a common disease that affects pineapple plants, especially if they are overwatered. To prevent root rot, make sure the soil is well-draining and avoid overwatering.
Is growing pineapple at home worth the effort?
Absolutely! While it requires patience and attention, growing pineapple at home is a rewarding experience. The taste of a homegrown pineapple is far superior to store-bought varieties, and you’ll have the satisfaction of knowing you grew it yourself. Plus, it’s a fun and educational project for the whole family. So, give it a try and enjoy the sweet rewards of your labor!

Leave a Comment