

Growing Peanuts at Home might seem like a daunting task reserved for sprawling farms, but I’m here to tell you it’s totally achievable, even in your own backyard! Forget trekking to the grocery store for that peanut butter fix; imagine harvesting your very own homegrown peanuts, bursting with fresh, nutty flavor.
Peanuts, also known as groundnuts, have a rich history, dating back thousands of years in South America. They weren’t always a staple in American cuisine, but thanks to agricultural innovators like George Washington Carver, peanuts became a vital crop and a beloved snack. Now, you can participate in this agricultural legacy, no matter how small your garden is.
Why should you try this DIY project? Well, for starters, growing peanuts at home is incredibly rewarding. There’s something magical about nurturing a plant from seed to harvest, especially when that harvest is a delicious and nutritious treat. Plus, it’s a fantastic way to connect with nature, learn about the growing process, and impress your friends and family with your green thumb. But more importantly, in a world where we’re increasingly conscious of where our food comes from, growing your own peanuts gives you complete control over the process, ensuring they’re free from unwanted chemicals and pesticides. So, let’s dive into the simple steps and secrets to successfully growing peanuts right in your own home garden!

Growing Peanuts at Home: From Seed to Snack!
Hey there, fellow gardening enthusiasts! Ever thought about growing your own peanuts? It’s surprisingly easy and incredibly rewarding. Imagine the satisfaction of harvesting your own homegrown snacks! I’m going to walk you through the entire process, from choosing the right peanuts to enjoying your delicious harvest. Let’s get started!
Choosing Your Peanuts
Before we dive into the planting process, let’s talk about the peanuts themselves. Not all peanuts are created equal when it comes to growing.
* Raw, Unsalted Peanuts: This is key! You need raw, unsalted peanuts. Roasted or salted peanuts won’t germinate. Look for them at your local health food store or online.
* Variety Matters: There are different varieties of peanuts, each with its own characteristics. Virginia peanuts are large and great for roasting, while Spanish peanuts are smaller and sweeter. Runner peanuts are commonly used for peanut butter. Choose a variety that suits your taste and climate. I personally prefer Virginia peanuts because of their size and satisfying crunch.
* Check for Viability: Give your peanuts a quick inspection. Look for plump, healthy-looking peanuts. Avoid any that are shriveled, cracked, or discolored.
Preparing for Planting
Peanuts need a sunny spot and well-drained soil to thrive. Here’s how to get your garden ready:
* Sunlight is Key: Peanuts need at least 6-8 hours of direct sunlight per day. Choose a location in your garden that gets plenty of sunshine.
* Soil Preparation: Peanuts prefer loose, sandy loam soil. If your soil is heavy clay, you’ll need to amend it with compost, peat moss, or sand to improve drainage. I like to add a generous amount of compost to my peanut patch to provide essential nutrients.
* Soil pH: Peanuts grow best in slightly acidic soil with a pH between 6.0 and 6.5. You can test your soil pH with a soil testing kit from your local garden center. If your soil is too alkaline, you can lower the pH by adding sulfur or peat moss.
* Weed Control: Clear the planting area of any weeds. Weeds compete with peanuts for nutrients and water, so it’s important to keep them under control.
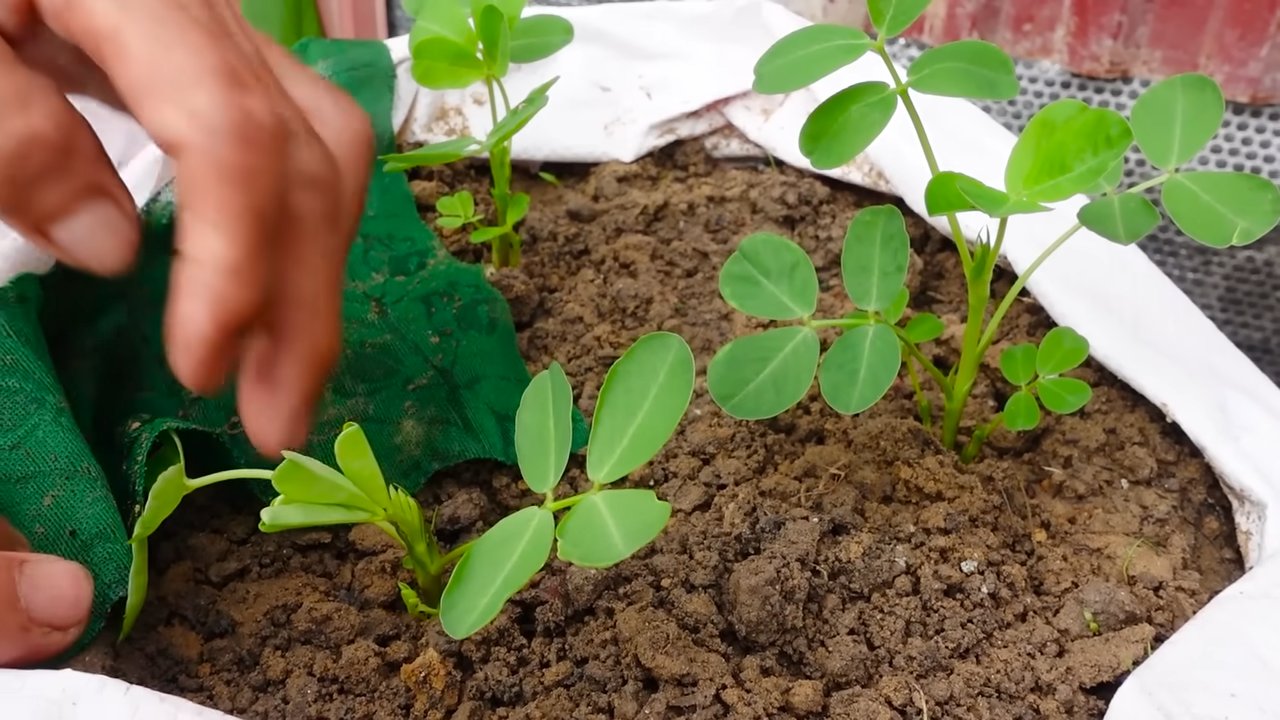
Planting Your Peanuts
Now for the fun part – planting!
1. Timing is Everything: Peanuts are warm-weather crops and should be planted after the last frost when the soil temperature reaches at least 65°F (18°C). I usually wait until late spring or early summer to plant my peanuts.
2. Soaking the Peanuts (Optional): Some gardeners like to soak their peanuts in water for a few hours before planting to speed up germination. I’ve tried it both ways and haven’t noticed a huge difference, but it can’t hurt!
3. Planting Depth and Spacing: Plant the peanuts about 1-2 inches deep and 6-8 inches apart in rows that are 2-3 feet apart. This gives the plants enough room to spread out and develop their peanuts.
4. Watering After Planting: Water the planting area thoroughly after planting. This helps to settle the soil and encourages germination.
Caring for Your Peanut Plants
Once your peanut plants are in the ground, they’ll need regular care to thrive.
* Watering: Peanuts need consistent moisture, especially during flowering and pod development. Water deeply whenever the top inch of soil feels dry. Avoid overwatering, as this can lead to fungal diseases.
* Fertilizing: Peanuts are legumes, which means they can fix nitrogen from the air. However, they still benefit from a balanced fertilizer. I like to use a fertilizer that’s low in nitrogen and higher in phosphorus and potassium. Apply the fertilizer according to the package directions.
* Weed Control: Continue to keep the planting area free of weeds. You can hand-pull weeds or use a hoe. Be careful not to damage the peanut plants’ roots.
* Hilling: As the peanut plants grow, they’ll produce “pegs” that grow down into the soil and develop into peanuts. To encourage peanut production, you can “hill” the soil around the base of the plants. This involves mounding soil around the plants to provide support and encourage pegging. I usually do this a couple of times during the growing season.
* Pest and Disease Control: Peanuts can be susceptible to pests and diseases. Keep an eye out for common pests like aphids and spider mites. You can control these pests with insecticidal soap or neem oil. Fungal diseases can be prevented by providing good air circulation and avoiding overwatering.
Harvesting Your Peanuts
The moment you’ve been waiting for – harvest time!
1. When to Harvest: Peanuts are typically ready to harvest about 120-150 days after planting. A good indicator that it’s time to harvest is when the leaves start to turn yellow and the plants begin to die back.
2. Digging Up the Plants: Use a garden fork or shovel to carefully dig up the entire peanut plant. Be gentle, as you don’t want to damage the peanuts.
3. Shaking Off the Soil: Shake off as much soil as possible from the peanut plants.
4. Curing the Peanuts: Curing is an important step in the peanut harvesting process. It helps to dry the peanuts and improve their flavor.
* Method 1: Hanging: Hang the peanut plants upside down in a well-ventilated area for 2-4 weeks. This allows the peanuts to dry slowly and evenly.
* Method 2: Drying Racks: Spread the peanuts out on drying racks in a well-ventilated area. Turn the peanuts regularly to ensure even drying.
5. Checking for Dryness: The peanuts are properly cured when the shells are dry and brittle and the kernels rattle inside.
6. Picking the Peanuts: Once the peanuts are cured, you can pick them off the plants.
Storing Your Peanuts
Proper storage is essential to keep your peanuts fresh and delicious.
* In-Shell Peanuts: Store in-shell peanuts in a cool, dry place in an airtight container. They can last for several months.
* Shelled Peanuts: Store shelled peanuts in the refrigerator or freezer in an airtight container. They can last for several weeks in the refrigerator or several months in the freezer.
Enjoying Your Homegrown Peanuts
Now for the best part – enjoying your homegrown peanuts!
* Roasting: Roasting peanuts is a great way to enhance their flavor. Preheat your oven to 350°F (175°C). Spread the peanuts out on a baking sheet and roast for 15-20 minutes, or until they are golden brown and fragrant.
* Boiling: Boiled peanuts are a Southern delicacy. Boil the peanuts in salted water for several hours, or until they are soft and tender.
* Peanut Butter: Make your own homemade peanut butter! Simply grind roasted peanuts in a food processor until smooth. You can add a little salt or honey to taste.
* Snacking: Of course, you can also just enjoy your peanuts as a healthy and delicious snack!
Troubleshooting
Even with the best care, you might encounter some challenges when growing peanuts. Here are a few common problems and how to address them:
* Poor Germination: If your peanuts aren’t germinating, make sure the soil temperature is warm enough and that the peanuts are planted at the correct depth. Also, ensure that the peanuts are viable and haven’t been roasted or salted.
* Yellowing Leaves: Yellowing leaves can be a sign of nutrient deficiency. Try fertilizing your peanut plants with a balanced fertilizer.
* Pest Infestations: Keep an eye out for pests like aphids and spider mites. Treat infestations with insecticidal soap or neem oil.
* Fungal Diseases: Prevent fungal diseases by providing good air circulation and avoiding overwatering. If you notice signs of fungal disease, treat the plants with a fungicide.
Additional Tips for Success
* Rotate Your Crops: Avoid planting peanuts in the same location year after year. Crop rotation helps to prevent soilborne diseases and pests.
* Use a Raised Bed: If you have heavy clay soil, consider growing your peanuts in a raised bed. This will improve drainage and aeration.
* Mulch Your Plants: Mulching helps to retain moisture, suppress weeds, and regulate soil temperature.
* Be Patient: Growing peanuts takes time and patience. Don’t get discouraged if you don’t see results right away. Just keep providing your plants with the care they need, and you’ll be rewarded with a bountiful harvest.
Growing peanuts at home is a fun and rewarding experience. With a little bit of planning and care, you can enjoy your own homegrown snacks. Happy gardening!
Conclusion
So, there you have it! Growing peanuts at home isn’t just a quirky gardening experiment; it’s a deeply rewarding experience that connects you to the source of your food in a tangible way. From the initial thrill of planting those unassuming seeds to the satisfying moment of unearthing your very own peanut bounty, the entire process is filled with wonder and learning.
Why is this DIY trick a must-try? Because it offers a unique blend of gardening fun, educational opportunity, and delicious reward. Forget the store-bought peanuts that have traveled miles and sat on shelves for who knows how long. Imagine the taste of freshly harvested, homegrown peanuts, roasted to perfection and enjoyed with family and friends. The difference in flavor is simply remarkable. Plus, you have complete control over the growing process, ensuring that your peanuts are free from harmful pesticides and chemicals.
But the benefits extend beyond just taste and health. Growing peanuts at home is also a fantastic way to teach children about plant life cycles, the importance of sustainable agriculture, and the joy of nurturing something from seed to harvest. It’s a hands-on learning experience that they won’t soon forget.
Looking for variations to spice things up? Consider experimenting with different peanut varieties. Virginia peanuts are known for their large size and are perfect for roasting, while Spanish peanuts are smaller and sweeter, making them ideal for candies and snacks. You could also try growing peanuts in containers if you have limited garden space. Just make sure the containers are large enough to accommodate the plant’s root system. Another fun variation is to try growing peanuts indoors during the colder months, using grow lights to supplement natural sunlight. This allows you to enjoy fresh peanuts year-round, regardless of the weather outside.
And don’t forget the possibilities for culinary creativity! Beyond simply roasting your homegrown peanuts, you can use them to make homemade peanut butter, peanut brittle, peanut sauce for Asian-inspired dishes, or even peanut flour for baking. The possibilities are truly endless.
We wholeheartedly encourage you to give this DIY trick a try. It’s easier than you might think, and the rewards are well worth the effort. Embrace the challenge, get your hands dirty, and experience the satisfaction of growing your own peanuts.
Most importantly, we want to hear about your experiences! Share your peanut-growing journey with us. Post pictures of your peanut plants, tell us about your successes and challenges, and share your favorite recipes using your homegrown peanuts. Let’s create a community of peanut-growing enthusiasts and inspire others to discover the joys of this unique and rewarding gardening adventure. So, grab some peanut seeds, get planting, and let the fun begin! Remember, successful growing peanuts at home is within your reach!
Frequently Asked Questions (FAQ)
What is the best time to plant peanuts?
The ideal time to plant peanuts is after the last frost, when the soil temperature has consistently reached at least 65 degrees Fahrenheit (around 18 degrees Celsius). This typically falls in late spring or early summer, depending on your climate. Planting too early in cold soil can hinder germination and stunt the growth of your peanut plants. Check your local weather forecasts and historical data to determine the best planting window for your region.
How much space do peanut plants need?
Peanut plants need adequate space to spread out and develop their underground peanut pods. A good rule of thumb is to space peanut plants about 6 to 8 inches apart in rows that are 2 to 3 feet apart. This allows for sufficient sunlight penetration and air circulation, which are essential for healthy growth and peanut production. If you’re growing peanuts in containers, choose pots that are at least 12 inches in diameter and depth to accommodate the plant’s root system.
What kind of soil is best for growing peanuts?
Peanuts thrive in well-drained, sandy loam soil that is rich in organic matter. The soil should be loose and friable to allow the developing peanut pods to easily penetrate the ground. Avoid heavy clay soils, as they can become compacted and restrict peanut growth. Before planting, amend your soil with compost or other organic matter to improve drainage and fertility. A slightly acidic soil pH of around 6.0 to 6.5 is ideal for peanut growth.
How often should I water my peanut plants?
Peanut plants need consistent moisture, especially during the flowering and pod development stages. Water deeply and regularly, aiming to keep the soil consistently moist but not waterlogged. Avoid overhead watering, as this can promote fungal diseases. Instead, water at the base of the plants, using a soaker hose or drip irrigation system. During periods of drought, you may need to water more frequently.
Do peanut plants need fertilizer?
Peanut plants are legumes, which means they can fix nitrogen from the atmosphere, reducing the need for nitrogen-based fertilizers. However, they still benefit from supplemental fertilization, especially with phosphorus and potassium. Before planting, incorporate a balanced fertilizer into the soil, following the manufacturer’s instructions. You can also side-dress your peanut plants with a fertilizer that is high in phosphorus and potassium during the flowering and pod development stages. Avoid over-fertilizing, as this can lead to excessive vegetative growth at the expense of peanut production.
How long does it take for peanuts to mature?
Peanuts typically take about 120 to 150 days to mature, depending on the variety and growing conditions. You’ll know your peanuts are ready to harvest when the foliage begins to yellow and die back. You can also dig up a few plants to check the peanut pods. The pods should be fully formed and the kernels inside should be plump and mature.
How do I harvest peanuts?
To harvest peanuts, carefully dig up the entire plant, being careful not to damage the peanut pods. Gently shake off any excess soil and allow the plants to dry in the sun for a few days. This will help to cure the peanuts and improve their flavor. Once the plants are dry, you can remove the peanut pods from the vines.
How should I store my harvested peanuts?
After harvesting and drying your peanuts, store them in a cool, dry place in airtight containers. Properly stored peanuts can last for several months. You can also freeze peanuts for longer-term storage. To freeze peanuts, blanch them in boiling water for a few minutes, then cool them in ice water. Drain the peanuts and spread them out on a baking sheet to dry. Once dry, transfer the peanuts to freezer bags and store them in the freezer.
What are some common pests and diseases that affect peanut plants?
Some common pests that can affect peanut plants include aphids, spider mites, and leafhoppers. These pests can be controlled with insecticidal soap or neem oil. Common diseases that can affect peanut plants include leaf spot, rust, and white mold. These diseases can be prevented by providing good air circulation, avoiding overhead watering, and applying fungicides as needed.
Can I grow peanuts in containers?
Yes, you can successfully grow peanuts in containers, provided you choose a large enough container and use well-draining soil. Select a container that is at least 12 inches in diameter and depth to accommodate the plant’s root system. Fill the container with a well-draining potting mix that is rich in organic matter. Water regularly and fertilize as needed. Place the container in a sunny location that receives at least 6 hours of direct sunlight per day. Container-grown peanuts may require more frequent watering and fertilization than peanuts grown in the ground.
Leave a Comment