

Growing Cabbage at Home can seem daunting, but trust me, it’s more rewarding than you think! Imagine harvesting your own crisp, flavorful cabbage, knowing exactly where it came from and how it was grown. Forget those bland, store-bought heads – we’re talking about vibrant, homegrown goodness!
For centuries, cabbage has been a staple in diets around the world, from the hearty stews of Eastern Europe to the tangy slaws of America. Its cultivation dates back to ancient times, with evidence suggesting its presence in gardens as early as the Bronze Age. This humble vegetable has nourished generations, and now it’s your turn to experience the joy of cultivating it yourself.
But why should you bother with growing cabbage at home? Well, besides the superior taste and freshness, it’s also a fantastic way to save money, reduce your carbon footprint, and connect with nature. Plus, let’s be honest, there’s a certain satisfaction that comes from nurturing a plant from seed to harvest. In this article, I’m going to share some simple DIY tricks and hacks that will make growing cabbage at home easier and more successful than you ever thought possible. Get ready to unleash your inner gardener!
Growing Cabbage at Home: Your DIY Guide for a Bountiful Harvest
Hey garden friends! Have you ever wondered how to grow that crispy, versatile cabbage right in your own backyard? Let me show you how it’s done! Growing cabbage is not as difficult as it seems, and with a little patience and the right tips, you’ll soon be enjoying your very own harvest. Let’s get started!
Why Grow Cabbage Yourself?
- Freshness and Flavor: Homegrown cabbage tastes better! It’s riper, more flavorful, and has a firmer texture compared to store-bought varieties.
- Control Over Growing Methods: You know exactly what’s going into your cabbage. You can avoid pesticides and use organic fertilizers.
- Sustainability: Shorter transport distances help reduce your carbon footprint.
- Satisfaction: There’s something special about growing and harvesting your own food!
- Variety: You can grow varieties that are not available in stores.
What You Need: Materials List
Before we get started, here’s a list of everything you’ll need to grow cabbage:
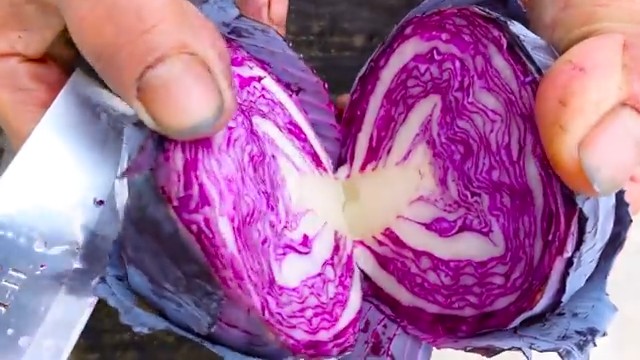
- Cabbage seeds or young plants: Choose the variety you like best! There are many types, including savoy cabbage, white cabbage, red cabbage, and napa cabbage.
- Garden tools: Shovel, rake, planting trowel, watering can or hose.
- Compost or well-rotted manure: Cabbage is a heavy feeder and needs lots of nutrients.
- Soil improvers (optional): Sand or perlite if your soil is too clayey.
- Pest protection (optional): Cabbage collars, nets, or natural pest control methods.
- Patience: Cabbage takes time to grow!
The Right Location: Where Does Cabbage Thrive?
Cabbage loves the sun! Choose a location that gets at least six hours of sunlight a day. The soil should be well-drained and nutrient-rich. Avoid locations where other cruciferous vegetables (like broccoli, cauliflower, or radishes) have been grown recently to prevent disease.
Step-by-Step Guide: How to Plant Cabbage
Now, let’s dive into the planting process! Here’s a detailed guide on how to successfully grow cabbage:
Step 1: Preparing the Soil
- Loosen the soil: Use a shovel to loosen the soil. Remove stones and weeds.
- Add compost or well-rotted manure: Mix plenty of compost or manure into the soil to give cabbage a good start.
- Improve drainage (if necessary): If your soil is heavy or clayey, mix in sand or perlite to improve drainage.
- Level the soil: Use a rake to smooth the surface.
Step 2: Sowing or Planting
- Sowing (directly in the garden):
- Make small holes about 40-60 cm apart (depending on the type of cabbage).
- Place 2-3 seeds in each hole.
- Cover the seeds with a thin layer of soil.
- Gently water the soil.
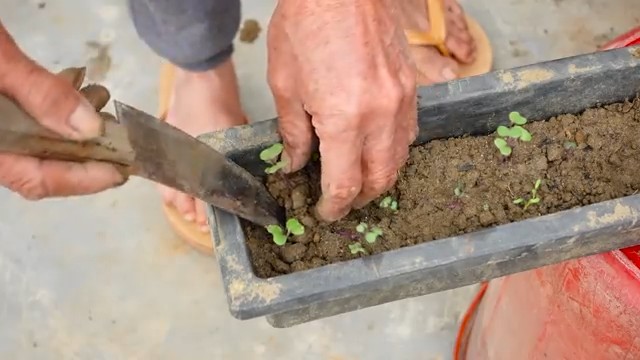
- Once the seedlings are big enough (about 5-7 cm), thin them out, leaving the strongest seedling in each hole.
- Planting young plants:
- Use a planting trowel to make holes about 40-60 cm apart (depending on the cabbage type).
- Carefully remove the young plants from their pots.
- Place the plants in the holes. The top of the root ball should be level with the soil surface.
- Fill the holes with soil and press it down gently.
- Water the plants thoroughly.
Step 3: Watering
- Cabbage needs regular watering, especially during dry periods.
- Water early in the morning so the leaves can dry out during the day. This helps prevent fungal diseases.
- Avoid waterlogging, as this can lead to root rot.
Step 4: Fertilizing
- Cabbage is a heavy feeder and needs regular fertilizing.
- Fertilize every 2-3 weeks with an organic fertilizer (e.g., nettle liquid manure, compost tea, or horn shavings).
- Be careful not to apply fertilizer directly to the leaves to avoid burns.
Step 5: Weeding
- Keep the bed free of weeds, as they compete with cabbage for nutrients and water.
- Weed regularly by hand or with a hoe.
Step 6: Pest Control
- Cabbage can be affected by various pests, such as cabbage whiteflies, cabbage root flies, or flea beetles.
- Cabbage whitefly: The larvae eat holes in the leaves. Collect the larvae by hand or use a biological insecticide. Netting over the plants can prevent butterflies from laying eggs.
- Cabbage root fly: The larvae eat the roots. Protect plants with cabbage collars or use nematodes to control them.
- Flea beetles: These tiny beetles chew holes in the leaves. Keep the soil moist and use a natural insecticide.
- Regular inspections help identify infestations early and deal with them effectively.
Step 7: Harvesting
- The harvest time depends on the cabbage variety.
- Cabbage is ready for harvest when the head is firm and closed.
- Cut the head off with a sharp knife, leaving the stalk in the ground, as it may produce side shoots that can be harvested later.
Additional Tips and Tricks:
- Crop rotation: Don’t plant cabbage in the same spot every year to prevent diseases.
- Companion planting: Plant cabbage alongside other crops that protect it from pests or promote growth. Good neighbors include marigolds, nasturtiums, sage, or rosemary.
- Soil testing: If you’re unsure whether your soil has the right nutrients, you can take a soil sample for analysis.
- Mulching: A mulch layer of straw or grass clippings helps retain moisture and suppress weeds.
Common Problems and Solutions:
- Yellowing leaves: This can indicate a nutrient deficiency or waterlogging. Fertilize or improve drainage.
- Holes in the leaves: Likely caused by pests. Check the plants regularly and treat any infestations.
- No head formation: This could be due to lack of sunlight, nutrient deficiency, or insufficient watering. Ensure plenty of sunlight, regular feeding, and watering.
- Root rot: Caused by fungi. Avoid waterlogging and ensure good ventilation.
Recommended Varieties:
- Early cabbage: ‘Primo’ (very early maturing)
- White cabbage: ‘Brunswick’ (classic), ‘Filderkraut’ (for sauerkraut)
- Red cabbage: ‘Langedijker Dauerrot’ (storage-friendly)
- Savoy cabbage: ‘Vertus’ (tender)
- Pointed cabbage: ‘Express’ (very early maturing)
Cabbage in the Kitchen: Versatile and Delicious
Cabbage is incredibly versatile and can be prepared in many ways. Here are some ideas:
- Raw: As a salad (e.g., coleslaw) or as a raw snack with dip.
- Cooked: As a side dish, in stews, or soups.
- Steamed: With butter and seasonings.
- Fermented: As sauerkraut or kimchi.
- Stuffed: As cabbage rolls.
Conclusion
I hope this guide helps you master growing cabbage! With a little practice and patience, you’ll soon be enjoying your own delicious cabbage harvest. Happy gardening!
Conclusion
So, there you have it! Growing cabbage at home is not only achievable, but it’s also incredibly rewarding. From the satisfaction of nurturing a tiny seedling to the joy of harvesting a crisp, flavorful head of cabbage, the entire process is a testament to the power of DIY gardening. We’ve walked you through the essential steps, from selecting the right variety for your climate to protecting your precious plants from pests and diseases.
But why is this DIY trick a must-try? Beyond the obvious benefits of fresh, organic produce, growing your own cabbage offers a unique connection to your food. You know exactly what went into it – no harmful pesticides, no mysterious additives, just good old-fashioned care and attention. Plus, the flavor of homegrown cabbage is simply unparalleled. It’s sweeter, more tender, and bursting with a freshness you just can’t find in store-bought varieties.
And the possibilities don’t stop there! Feel free to experiment with different cabbage varieties. Try growing red cabbage for vibrant salads, Savoy cabbage for its delicate leaves, or even Chinese cabbage for stir-fries. You can also adjust the planting schedule to extend your harvest season. Consider succession planting, where you sow new seeds every few weeks, to ensure a continuous supply of fresh cabbage throughout the year. Another variation is to try companion planting. Marigolds can deter nematodes, and dill can attract beneficial insects that prey on cabbage worms.
Don’t be intimidated by the prospect of growing your own vegetables. Cabbage is a relatively easy crop to cultivate, even for beginner gardeners. With a little planning, preparation, and patience, you can enjoy a bountiful harvest of delicious, homegrown cabbage.
We wholeheartedly encourage you to give this DIY trick a try. Imagine the pride you’ll feel when you serve a meal featuring cabbage you grew yourself! And more importantly, imagine the health benefits of incorporating fresh, organic vegetables into your diet.
We’re confident that you’ll find growing cabbage at home to be a fulfilling and enjoyable experience. So, grab your gardening gloves, gather your supplies, and get ready to embark on this exciting adventure.
We’d love to hear about your experiences! Share your tips, tricks, and photos in the comments below. Let’s build a community of cabbage-growing enthusiasts and inspire others to embrace the joys of DIY gardening. What varieties did you try? What challenges did you face? What successes did you celebrate? Your insights will be invaluable to other aspiring cabbage growers. Let’s get growing!
Frequently Asked Questions (FAQ)
What is the best time of year to plant cabbage?
The best time to plant cabbage depends on your climate and the specific variety you’re growing. In general, cabbage is a cool-season crop, meaning it thrives in temperatures between 60°F and 70°F. For spring harvests, start seeds indoors 6-8 weeks before the last expected frost. Transplant seedlings outdoors 2-3 weeks before the last frost. For fall harvests, sow seeds directly into the garden in mid-summer. Check your local frost dates and the specific recommendations for your chosen cabbage variety for the most accurate timing.
How much sunlight does cabbage need?
Cabbage requires at least 6 hours of direct sunlight per day to thrive. Choose a planting location that receives ample sunlight throughout the day. If you live in a particularly hot climate, some afternoon shade can be beneficial to prevent the leaves from scorching.
What kind of soil is best for growing cabbage?
Cabbage prefers well-drained, fertile soil that is rich in organic matter. The ideal soil pH is between 6.0 and 7.0. Before planting, amend the soil with compost, aged manure, or other organic materials to improve drainage and fertility. A soil test can help you determine if your soil needs any additional amendments.
How often should I water cabbage plants?
Cabbage plants need consistent moisture, especially during hot, dry weather. Water deeply and regularly, aiming to keep the soil consistently moist but not waterlogged. A good rule of thumb is to water when the top inch of soil feels dry to the touch. Mulching around the plants can help retain moisture and suppress weeds.
What are some common pests and diseases that affect cabbage?
Cabbage is susceptible to a variety of pests and diseases, including cabbage worms, aphids, flea beetles, clubroot, and black rot. Regularly inspect your plants for signs of infestation or disease. Use organic pest control methods, such as handpicking pests, using insecticidal soap, or applying Bacillus thuringiensis (Bt) to control cabbage worms. To prevent diseases, practice crop rotation, choose disease-resistant varieties, and ensure good air circulation around the plants.
How do I know when my cabbage is ready to harvest?
Cabbage is ready to harvest when the head is firm and solid to the touch. The size of the head will vary depending on the variety, but generally, a mature head will be about 6-12 inches in diameter. To harvest, use a sharp knife to cut the head from the stem, leaving a few outer leaves attached.
Can I grow cabbage in containers?
Yes, you can grow cabbage in containers, but you’ll need to choose a large container (at least 12 inches in diameter) to accommodate the plant’s root system. Use a well-draining potting mix and provide regular watering and fertilization. Container-grown cabbage may require more frequent watering than cabbage grown in the ground.
How do I store harvested cabbage?
To store harvested cabbage, remove any loose outer leaves and wrap the head tightly in plastic wrap. Store in the refrigerator for up to 2 weeks. You can also freeze cabbage, but it’s best to blanch it first to preserve its quality.
What are some good companion plants for cabbage?
Good companion plants for cabbage include marigolds, dill, rosemary, thyme, and onions. Marigolds deter nematodes, dill attracts beneficial insects that prey on cabbage worms, and rosemary and thyme repel cabbage moths. Onions can also help deter pests. Avoid planting cabbage near strawberries, tomatoes, or grapes, as these plants can inhibit cabbage growth.
Can I save seeds from my cabbage plants?
Saving seeds from cabbage can be challenging because cabbage is a biennial plant, meaning it takes two years to produce seeds. If you want to save seeds, you’ll need to overwinter the plants and allow them to flower and produce seeds in the second year. However, cabbage is also cross-pollinated, so the seeds may not produce plants that are true to type. For best results, purchase seeds from a reputable source.


Leave a Comment