

Growing Cabbage in Bottles might sound like something out of a science fiction novel, but trust me, it’s a surprisingly effective and space-saving gardening trick! Have you ever dreamt of harvesting fresh, crisp cabbage right from your balcony or even your kitchen windowsill? I know I have! This innovative method allows you to cultivate this nutritious vegetable even if you’re short on garden space.
While container gardening itself has ancient roots, with evidence suggesting its practice in ancient Egypt and Rome, the specific technique of growing cabbage in bottles is a more modern adaptation, born from the desire to maximize yields in limited urban environments. It’s a testament to human ingenuity and our constant quest to connect with nature, even in the most unlikely of places.
Why should you try this DIY trick? Well, for starters, it’s incredibly space-efficient. Apartment dwellers and those with small yards can rejoice! Plus, it offers excellent drainage and aeration for your cabbage, leading to healthier, more robust plants. And let’s be honest, there’s something incredibly satisfying about repurposing plastic bottles and turning them into mini-cabbage farms. So, if you’re looking for a fun, eco-friendly, and productive way to enjoy fresh cabbage, let’s dive into the world of growing cabbage in bottles! I’m excited to share my tips and tricks to help you succeed.
Cabbage in a Bottle Garden: A DIY Guide for the Urban Gardener
Hello dear garden friends! Do you have limited space but still want fresh, homegrown cabbage? Then I have just the thing for you: cabbage in a bottle garden! Sounds crazy? Maybe it is a little, but it works and is a great way to grow fresh vegetables even on the smallest balcony or indoors. I’ll show you how it’s done!
What you need for your bottle cabbage garden:
- Empty plastic bottles: 5-liter water bottles or larger are best. The larger the bottle, the more space the cabbage has to grow.
- Cabbage plants: Young plants of head cabbage, Brussels sprouts, kale, or savoy cabbage are ideal. Make sure they look healthy and strong.
- Soil: Good potting soil or vegetable soil is important. It should be loose and rich in nutrients.
- Scissors or knife: For cutting the bottles.
- Gloves: To protect your hands.
- Watering can or spray bottle: For watering the plants.
- Optional: Drainage material (pebbles, expanded clay) for the bottom of the bottle to prevent waterlogging.
- Optional: Plant labels to identify the different cabbage varieties.
Preparing the Bottles: The Foundation for Your Cabbage
Before we can start planting, we need to prepare the bottles. But don’t worry, it’s not difficult at all, I promise!
- Cleaning: First, you should clean the bottles thoroughly. Remove all labels and rinse them with warm water and a little dish soap. Make sure no soap residue remains.
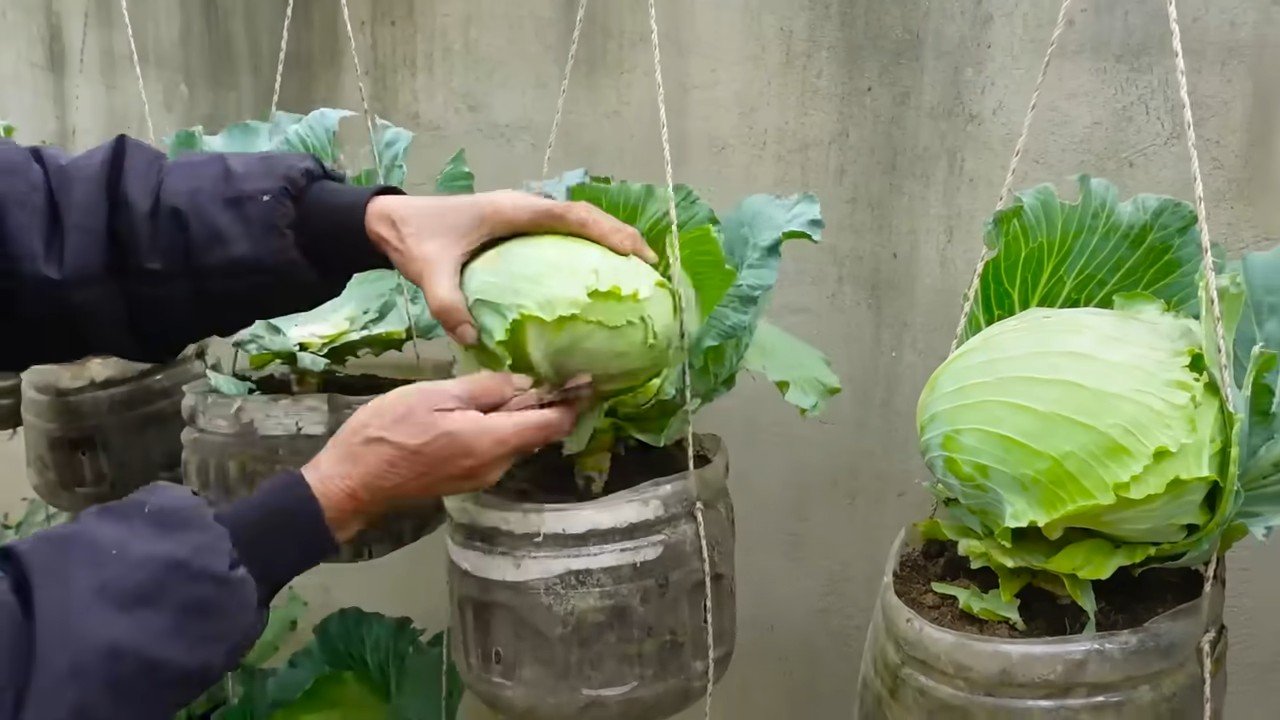
- Cutting: Now comes the exciting part: cutting the bottles. There are several ways you can do this. I prefer to cut the bottle horizontally in the middle. This gives you two parts: the lower part, which serves as the planter, and the upper part, which you can later use as a kind of mini-greenhouse.
- Option 1: Cut the bottle in the middle.
- Option 2: Cut off only the top part of the bottle, creating a large pot.
- Option 3: Cut the bottle lengthwise and bend the edges outwards to create more space.
Choose the option you like best and that best suits your space.
- Drainage (optional): If you want to avoid waterlogging, you can add a layer of drainage material (pebbles or expanded clay) to the bottom of the bottle. This ensures that excess water can drain away.
Planting: Now the Cabbage Goes into the Bottle!
Now it’s getting serious: we’re planting the cabbage in the prepared bottles.
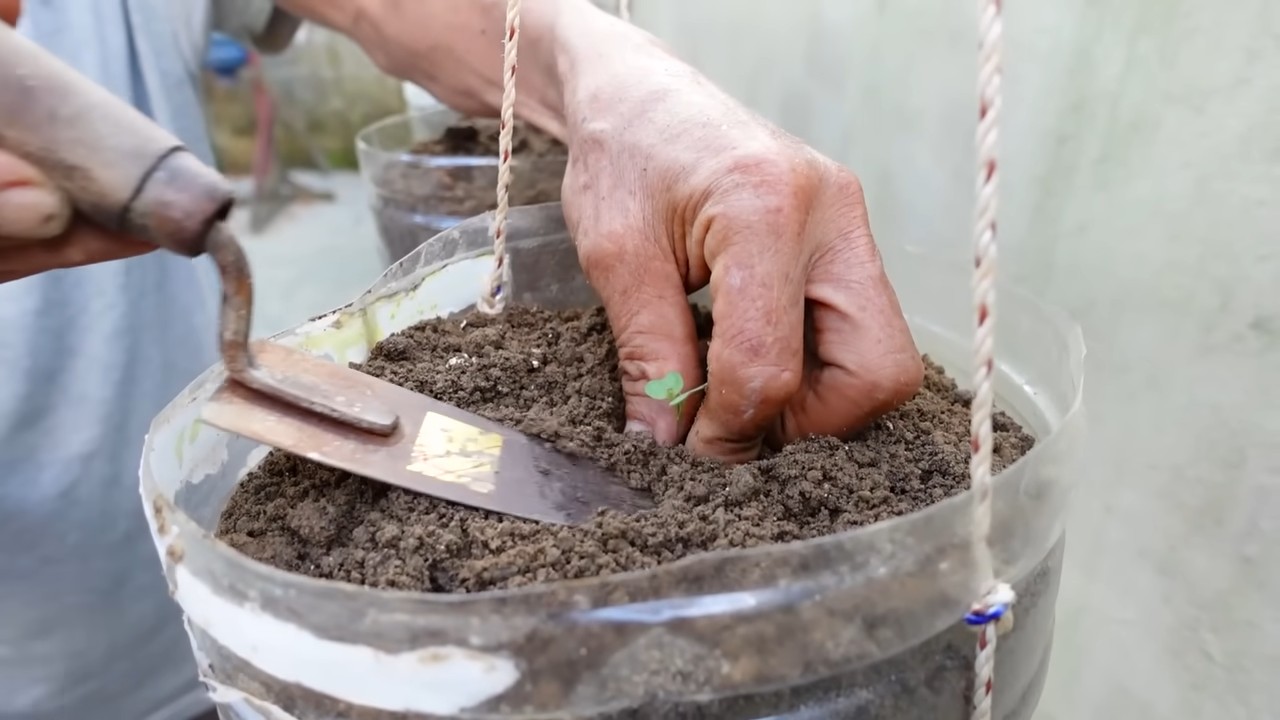
- Fill with soil: Fill the bottle with soil. Leave about 2-3 cm of space to the rim. The soil should be loose and not too compacted.
- Dig a planting hole: Use your fingers or a small spoon to dig a small planting hole in the soil. It should be large enough to fit the root ball of the cabbage plant.
- Insert the cabbage plant: Carefully remove the cabbage plant from its nursery pot and place it in the planting hole. Make sure the root ball is completely covered with soil.
- Watering: Water the cabbage plant carefully. It’s best to use a watering can with a rose attachment or a spray bottle to avoid making the soil too wet.
- Mini-greenhouse (optional): If you saved the top part of the bottle, you can now place it over the cabbage plant as a mini-greenhouse. This creates a warm, humid climate and helps the plant to establish itself. However, make sure the plant gets enough air by occasionally opening the bottle cap or drilling small holes in the bottle.
Care: Ensuring Your Cabbage Thrives
For your cabbage in the bottle garden to thrive, it naturally needs the right care.
- Watering: Cabbage needs regular water, but it doesn’t like waterlogging. Water the plants when the soil feels dry. The best way to test this is with your finger. In summer, you may need to water daily; in winter, less often.
- Fertilizing: Cabbage is a heavy feeder and needs a lot of nutrients. Fertilize the plants regularly with an organic vegetable fertilizer. Pay attention to the manufacturer’s dosage instructions.
- Location: Cabbage needs a lot of sun. Place the bottles in a sunny location, preferably on the balcony or terrace. If you are growing the plants indoors, you should place them by a bright window.
- Pest protection: Unfortunately, cabbage is susceptible to pests like cabbage whites or aphids. Check the plants regularly and remove pests by hand or with a biological pesticide if necessary.
- Ventilation: If you use the top part of the bottle as a mini-greenhouse, you should ventilate the plants regularly to prevent mold. Open the bottle cap or drill small holes in the bottle.
- Rotating: Rotate the bottles regularly so that the plants receive light evenly from all sides.
Harvest: The Reward for Your Efforts
After a few weeks or months (depending on the cabbage variety), you can finally harvest your homegrown cabbage.
- Harvest time: The harvest time depends on the cabbage variety. Head cabbage is ready to harvest when the head is firm and closed. Brussels sprouts can be harvested when the sprouts are firm and closed. Kale can be harvested as needed by picking the outer leaves.
- Harvesting method: Cut the head cabbage with a sharp knife. You can simply break the Brussels sprouts off the plant. As mentioned, you can harvest kale as needed.
- Use: Use your homegrown cabbage for delicious dishes like cabbage rolls, stews, salads, or stir-fries. Enjoy your meal!
Additional Tips and Tricks:
- Variety selection: Choose cabbage varieties that are suitable for growing in pots. Dwarf varieties are ideal.
- Bottle size: The bigger the bottle, the better. Larger bottles offer more space for the roots and store more water.
- Soil: Use high-quality soil that drains well and contains sufficient nutrients.
- Fertilizer: Fertilize the plants regularly to promote healthy growth.
- Pests: Check the plants regularly for pests and control them if necessary.
- Climate: Pay attention to the climate. Cabbage likes it cool and sunny.
- Creativity: Be creative! You can paint the bottles or decorate them with other materials to make your bottle cabbage garden even more individual.
I hope you enjoyed this guide and that it inspires you to grow your own cabbage in a bottle garden. It’s a great way to grow fresh vegetables in a small space while also doing something for the environment. Happy gardening!
Conclusion
So, there you have it! Growing cabbage in bottles might sound unconventional, but it’s a game-changer for urban gardeners, those with limited space, or anyone looking for a fun and rewarding gardening project. This method offers a surprising number of benefits, from protecting your precious cabbage seedlings from pests and harsh weather to maximizing your yield in a small area. It’s a testament to the fact that you don’t need acres of land to enjoy fresh, homegrown vegetables.
The beauty of this DIY trick lies in its adaptability. Feel free to experiment with different bottle sizes to accommodate various cabbage varieties. Consider using clear bottles for optimal sunlight exposure, or try painting the bottles white to reflect excess heat in hotter climates. You could even create a vertical garden by hanging the bottles from a sturdy structure, adding a visually stunning element to your space while increasing your growing capacity.
Beyond the practical advantages, growing cabbage in bottles is simply a fascinating and educational experience. It allows you to observe the plant’s growth process up close, fostering a deeper connection with nature and a greater appreciation for the food you eat. It’s also a fantastic way to introduce children to the wonders of gardening and teach them about sustainability.
We wholeheartedly encourage you to give this DIY trick a try. It’s a simple, cost-effective, and incredibly satisfying way to grow your own cabbage, regardless of your gardening experience. Don’t be afraid to get creative and personalize the process to suit your specific needs and preferences. The possibilities are endless!
Once you’ve harvested your first bottle-grown cabbage, we’d love to hear about your experience. Share your photos, tips, and any variations you’ve tried in the comments below. Let’s create a community of bottle-cabbage enthusiasts and inspire others to embrace this innovative gardening technique. Happy growing! Remember, successful **cabbage growing** is within your reach, even in the most unexpected containers.
Frequently Asked Questions (FAQ)
What type of cabbage is best suited for growing in bottles?
While you can technically grow any type of cabbage in a bottle, smaller varieties tend to thrive best. Consider varieties like ‘Dwarf Morden,’ ‘Golden Acre,’ or ‘Early Jersey Wakefield.’ These varieties mature relatively quickly and don’t require as much space as larger cabbage heads. However, with proper care and adequate bottle size, you can even attempt to grow slightly larger varieties. Just be mindful of the plant’s overall size and ensure the bottle provides sufficient support and room for root development.
What size bottle should I use for growing cabbage?
The ideal bottle size depends on the cabbage variety you choose. For smaller varieties, a 2-liter bottle might suffice. However, for slightly larger varieties, a 3-liter or even a gallon-sized bottle would be more appropriate. The key is to ensure the bottle is large enough to accommodate the plant’s root system and provide adequate space for the head to develop. Remember to consider the drainage needs of the plant when selecting your bottle.
How do I prepare the bottle for planting?
First, thoroughly clean the bottle to remove any residue or contaminants. Then, carefully cut off the top of the bottle, leaving enough of the neck to provide support. Drill drainage holes in the bottom of the bottle to prevent waterlogging. You can also add a layer of gravel or small stones to the bottom of the bottle to further improve drainage. Finally, fill the bottle with a high-quality potting mix that is well-draining and rich in nutrients.
How often should I water my bottle-grown cabbage?
The watering frequency will depend on factors such as the weather, the size of the bottle, and the type of potting mix you’re using. Generally, you should water your cabbage when the top inch of soil feels dry to the touch. Avoid overwatering, as this can lead to root rot. Ensure the water drains freely from the drainage holes. During hot and dry periods, you may need to water more frequently.
What kind of fertilizer should I use for my bottle-grown cabbage?
Cabbage is a heavy feeder, so it’s important to provide it with adequate nutrients. You can use a balanced liquid fertilizer, such as a 10-10-10 or 20-20-20, diluted to half strength. Apply the fertilizer every two to three weeks, following the instructions on the fertilizer label. You can also supplement with organic fertilizers, such as compost tea or fish emulsion.
How do I protect my bottle-grown cabbage from pests?
Growing cabbage in bottles can actually help to reduce pest problems, as the bottles provide a physical barrier against some pests. However, you may still encounter issues with pests like aphids, cabbage worms, or slugs. Regularly inspect your plants for signs of infestation. You can handpick pests off the plants or use organic pest control methods, such as insecticidal soap or neem oil. Consider covering the bottles with netting to prevent pests from accessing the plants.
How much sunlight does bottle-grown cabbage need?
Cabbage requires at least six hours of sunlight per day to thrive. Place your bottle-grown cabbage in a location that receives ample sunlight. If you live in a hot climate, consider providing some afternoon shade to prevent the plants from overheating. You can also use grow lights to supplement natural sunlight, especially during the winter months.
How long does it take to grow cabbage in bottles?
The time it takes to grow cabbage in bottles depends on the variety you’re growing and the growing conditions. Generally, it takes about 60 to 90 days from transplanting seedlings to harvest. Keep an eye on the head of the cabbage. It is ready to harvest when it feels firm and has reached the desired size.
Can I reuse the bottles for growing other plants?
Yes, you can definitely reuse the bottles for growing other plants. Just make sure to thoroughly clean the bottles before reusing them to remove any residual soil or pathogens. You can use the bottles to grow a variety of other vegetables, herbs, or flowers. This makes bottle gardening a sustainable and environmentally friendly practice.
What are the advantages of growing cabbage in bottles compared to traditional gardening?
Growing cabbage in bottles offers several advantages:
* **Space-saving:** Ideal for small spaces like balconies or patios.
* **Pest control:** Bottles provide a barrier against some pests.
* **Portability:** Easy to move plants to optimal sunlight or shelter.
* **Improved drainage:** Easier to control drainage compared to in-ground gardening.
* **Educational:** A fun and engaging way to learn about plant growth.
* **Upcycling:** Reuses plastic bottles, reducing waste.
What if my cabbage outgrows the bottle?
If your cabbage plant starts to outgrow its bottle, you have a couple of options. You can either transplant it into a larger container or harvest the cabbage head early. If you choose to transplant, carefully remove the plant from the bottle and transfer it to a larger pot or directly into the ground. Be gentle with the roots to avoid damaging them. If you choose to harvest early, the cabbage head may be smaller, but it will still be edible.

Leave a Comment