

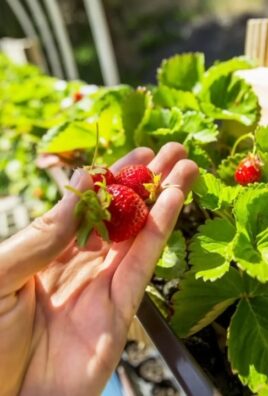
Sweet Potato Planting Beginners, listen up! Have you ever dreamed of harvesting your own vibrant, delicious sweet potatoes right from your backyard? It’s easier than you think, and I’m here to guide you through every step of the process. Forget those bland, store-bought spuds – imagine the satisfaction of serving up a homegrown sweet potato casserole or enjoying perfectly roasted sweet potato fries made with your own two hands!
Sweet potatoes have a rich history, dating back thousands of years in Central and South America. They were a staple food for many ancient civilizations and eventually made their way around the world, becoming a beloved ingredient in countless cuisines. Today, they’re not only delicious but also packed with nutrients, making them a fantastic addition to any diet.
But why should you try sweet potato planting yourself? Well, for starters, it’s incredibly rewarding! Plus, growing your own allows you to control exactly what goes into your food, avoiding harmful pesticides and ensuring the freshest possible flavor. In this article, I’ll share some simple DIY tricks and hacks that will help even the most novice gardener successfully cultivate a bountiful sweet potato harvest. Get ready to get your hands dirty and experience the joy of growing your own food!
DIY: Transforming Old T-Shirts into Stylish Reusable Shopping Bags
Hey there, fellow DIY enthusiasts! I’m super excited to share one of my favorite upcycling projects with you: turning those old, forgotten t-shirts into awesome, reusable shopping bags. Not only is this a fantastic way to reduce waste and be kinder to the planet, but it also lets you create unique and personalized bags that are way cooler than anything you can buy in a store. Plus, it’s surprisingly easy! Let’s dive in!
Materials You’ll Need
Before we get started, let’s gather all the necessary supplies. Don’t worry, you probably already have most of these lying around:
* An old t-shirt (preferably a thicker cotton one for durability)
* Sharp scissors or a rotary cutter
* A ruler or measuring tape
* A marker or fabric chalk
* Sewing machine (optional, but recommended for a stronger bag)
* Thread (matching or contrasting color, depending on your preference)
* Pins (if sewing)
* Iron and ironing board (optional, but helpful for crisp edges)
* Cardboard or a cutting mat (to protect your work surface)
Choosing the Right T-Shirt
The key to a successful t-shirt bag is choosing the right shirt. Here’s what I look for:
* Fabric: Opt for a thicker cotton t-shirt. Thin, flimsy fabrics won’t hold up well to carrying groceries.
* Size: A larger t-shirt will naturally create a larger bag. Consider what you’ll primarily be using the bag for when selecting your shirt.
* Design: Think about the design on the t-shirt. Do you want it to be the focal point of your bag? Or would you prefer a more subtle look?
* Condition: Check for any major holes or stains. Small imperfections can often be worked around, but large damages might make the shirt unsuitable.
Step-by-Step Instructions: Creating Your T-Shirt Bag
Alright, let’s get down to business! Here’s how I transform my old t-shirts into stylish and functional shopping bags:
1. Prepare the T-Shirt:
* Lay your t-shirt flat on a clean, even surface.
* Smooth out any wrinkles with your hands. If you want, you can iron the shirt for a super crisp finish.
* If there are any noticeable stains or imperfections, try to position them in a way that they won’t be visible on the finished bag (e.g., on the bottom or inside).
2. Cut Off the Sleeves:
* Using your scissors or rotary cutter, carefully cut off both sleeves of the t-shirt.
* Follow the seam line as closely as possible for a clean, even cut.
* Don’t worry if the edges are a little rough; we’ll be addressing those later.
3. Widen the Neckline (Optional):
* If you want a wider opening for your bag, you can enlarge the neckline.
* Cut along the neckline, removing a few inches of fabric.
* Be careful not to cut too much, as this could weaken the straps.
* I usually try it on first to see how much I want to remove.
4. Create the Bottom Fringe (or Sew a Seam):
* This is where you decide if you want a fringed bottom or a sewn bottom. I’ll explain both methods.
* Fringed Bottom:
* Turn the t-shirt inside out.
* Using your ruler and marker, draw a line across the bottom of the t-shirt, about 3-4 inches from the hem. This will be your cutting line.
* Cut vertical strips from the bottom hem up to the line you just drew. Make each strip about 1 inch wide.
* Now, tie the strips together in double knots. Start by tying adjacent strips together, creating a first row of knots.
* Then, tie the strips from the first row together, creating a second row of knots. This will seal the bottom of the bag.
* Turn the bag right side out.
* Sewn Bottom:
* Turn the t-shirt inside out.
* Pin the bottom hem together, making sure the edges are aligned.
* Using your sewing machine, sew a straight seam across the bottom of the t-shirt, about 1/2 inch from the edge.
* For extra strength, you can sew a second seam parallel to the first one.
* Trim any excess fabric along the seam.
* Turn the bag right side out.
5. Reinforce the Straps (Optional):
* For added durability, especially if you plan on carrying heavy items, you can reinforce the straps (the areas where the sleeves used to be).
* Fold the raw edges of the armholes inward, about 1/2 inch.
* Pin the folded edges in place.
* Sew a straight seam along the folded edges, securing them to the body of the bag.
* You can sew multiple rows of stitching for even greater strength.
6. Add Embellishments (Optional):
* This is where you can really get creative and personalize your bag!
* You can add fabric paint, stencils, patches, buttons, or any other embellishments you like.
* I love using fabric markers to draw designs or write quotes on my bags.
* You can also sew on pieces of fabric from other old clothes to create a patchwork effect.
7. Finishing Touches:
* Give your bag a final inspection, looking for any loose threads or uneven edges.
* Trim any stray threads with your scissors.
* If you used fabric paint or glue, make sure it’s completely dry before using the bag.
Sewing Machine vs. No-Sew Method
As you can see, I’ve outlined both a fringed (no-sew) method and a sewn method for creating the bottom of the bag. Here’s a quick comparison:
* Sewing Machine: This method creates a stronger and more durable bag, especially if you’re planning on carrying heavy items. It also gives the bag a cleaner, more professional look. However, it requires access to a sewing machine and some basic sewing skills.
* No-Sew (Fringed): This method is perfect for beginners or anyone who doesn’t have a sewing machine. It’s quick, easy, and requires no special skills. However, the fringed bottom might not be as strong as a sewn bottom, so it’s best suited for lighter items.
Tips and Tricks for a Perfect T-Shirt Bag
Here are a few extra tips and tricks I’ve learned along the way:
* Use a Rotary Cutter: A rotary cutter and cutting mat will make cutting the fabric much easier and more precise.
* Iron the Fabric: Ironing the t-shirt before you start will help to create cleaner lines and a more professional-looking bag.
* Reinforce the Straps: If you’re planning on carrying heavy items, be sure to reinforce the straps.
* Get Creative with Embellishments: Don’t be afraid to experiment with different embellishments to create a unique and personalized bag.
* Practice on a Scrap T-Shirt: If you’re new to sewing or upcycling, practice on a scrap t-shirt before working on your good one.
* Wash the T-Shirt First: Always wash the t-shirt before you start cutting and sewing. This will help to prevent shrinkage and ensure that the colors don’t bleed.
* Consider the T-Shirt Design: Think about how the design on the t-shirt will look on the finished bag. You might want to position the design in a specific way or choose a t-shirt with a design that complements the bag’s shape.
* Double Knot the Fringe: If you’re using the fringed method, make sure to double knot the strips securely to prevent the bottom of the bag from coming undone.
* Use a Strong Thread: When sewing, use a strong thread that is appropriate for the fabric. This will help to ensure that the seams are durable and won’t break easily.
* Don’t Overload the Bag: Even with reinforced straps and a strong bottom, it’s important not to overload the bag. Overloading can put stress on the seams and cause them to tear.
Ideas for Using Your T-Shirt Bag
Now that you’ve created your awesome t-shirt bag, here are some ideas for how to use it:
* Grocery Shopping: This is the most obvious use, and it’s a great way to reduce your reliance on plastic bags.
* Library Bag: Carry your books and
Conclusion
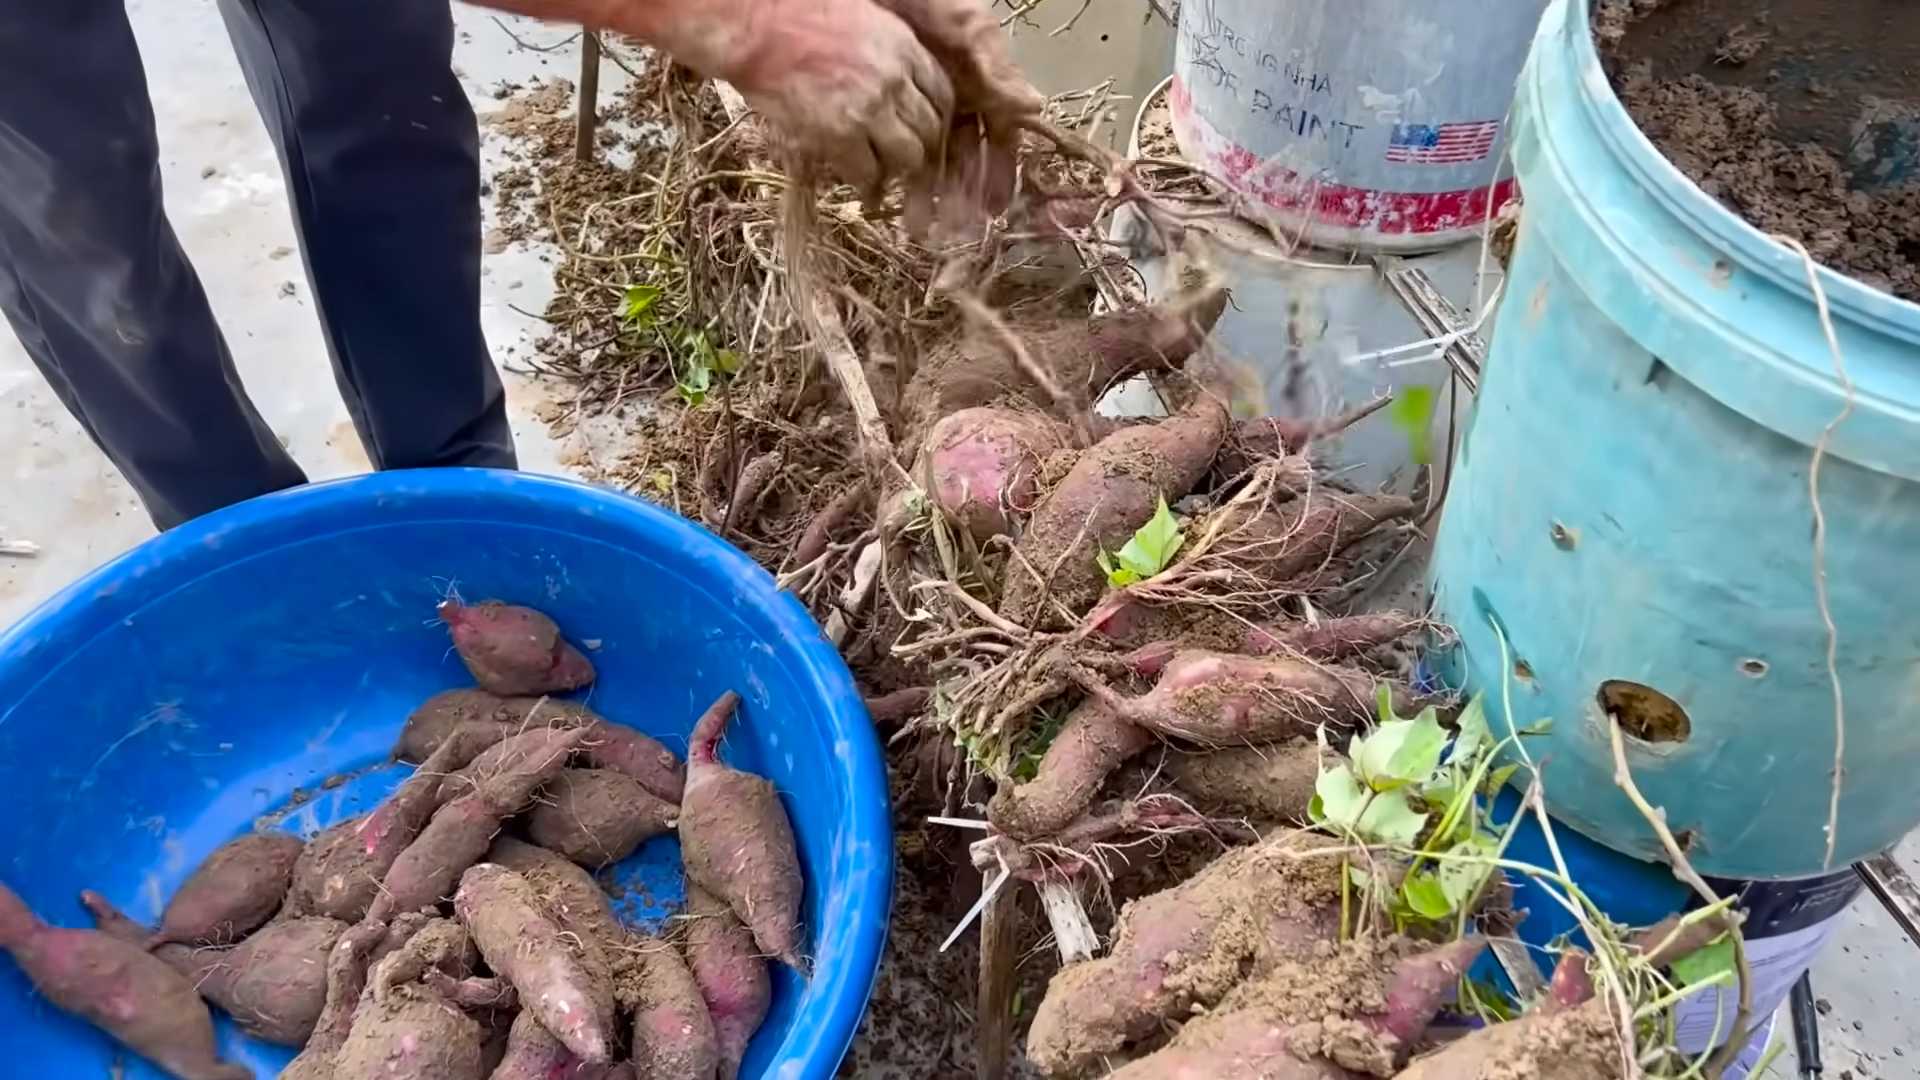
So, there you have it! Planting sweet potatoes doesn’t have to be an intimidating endeavor. This simple DIY trick, starting with slips from a store-bought sweet potato, is a game-changer for beginner gardeners and seasoned pros alike. It’s cost-effective, sustainable, and incredibly rewarding to watch those little slips transform into a bountiful harvest of delicious, nutritious sweet potatoes.
Why is this a must-try? Because it bypasses the need for specialized seed potatoes or complicated propagation methods. You’re essentially turning food waste into food abundance! Plus, it’s a fantastic learning experience, connecting you more deeply with the growing process and the miracle of nature.
Consider these variations to personalize your sweet potato planting journey:
* Experiment with different sweet potato varieties: Try different colored sweet potatoes like purple or white varieties to see which grows best in your climate and which flavors you prefer.
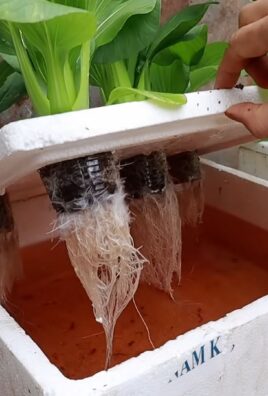
* Hydroponic slips: Instead of water, try rooting your slips in a hydroponic setup for potentially faster root development.
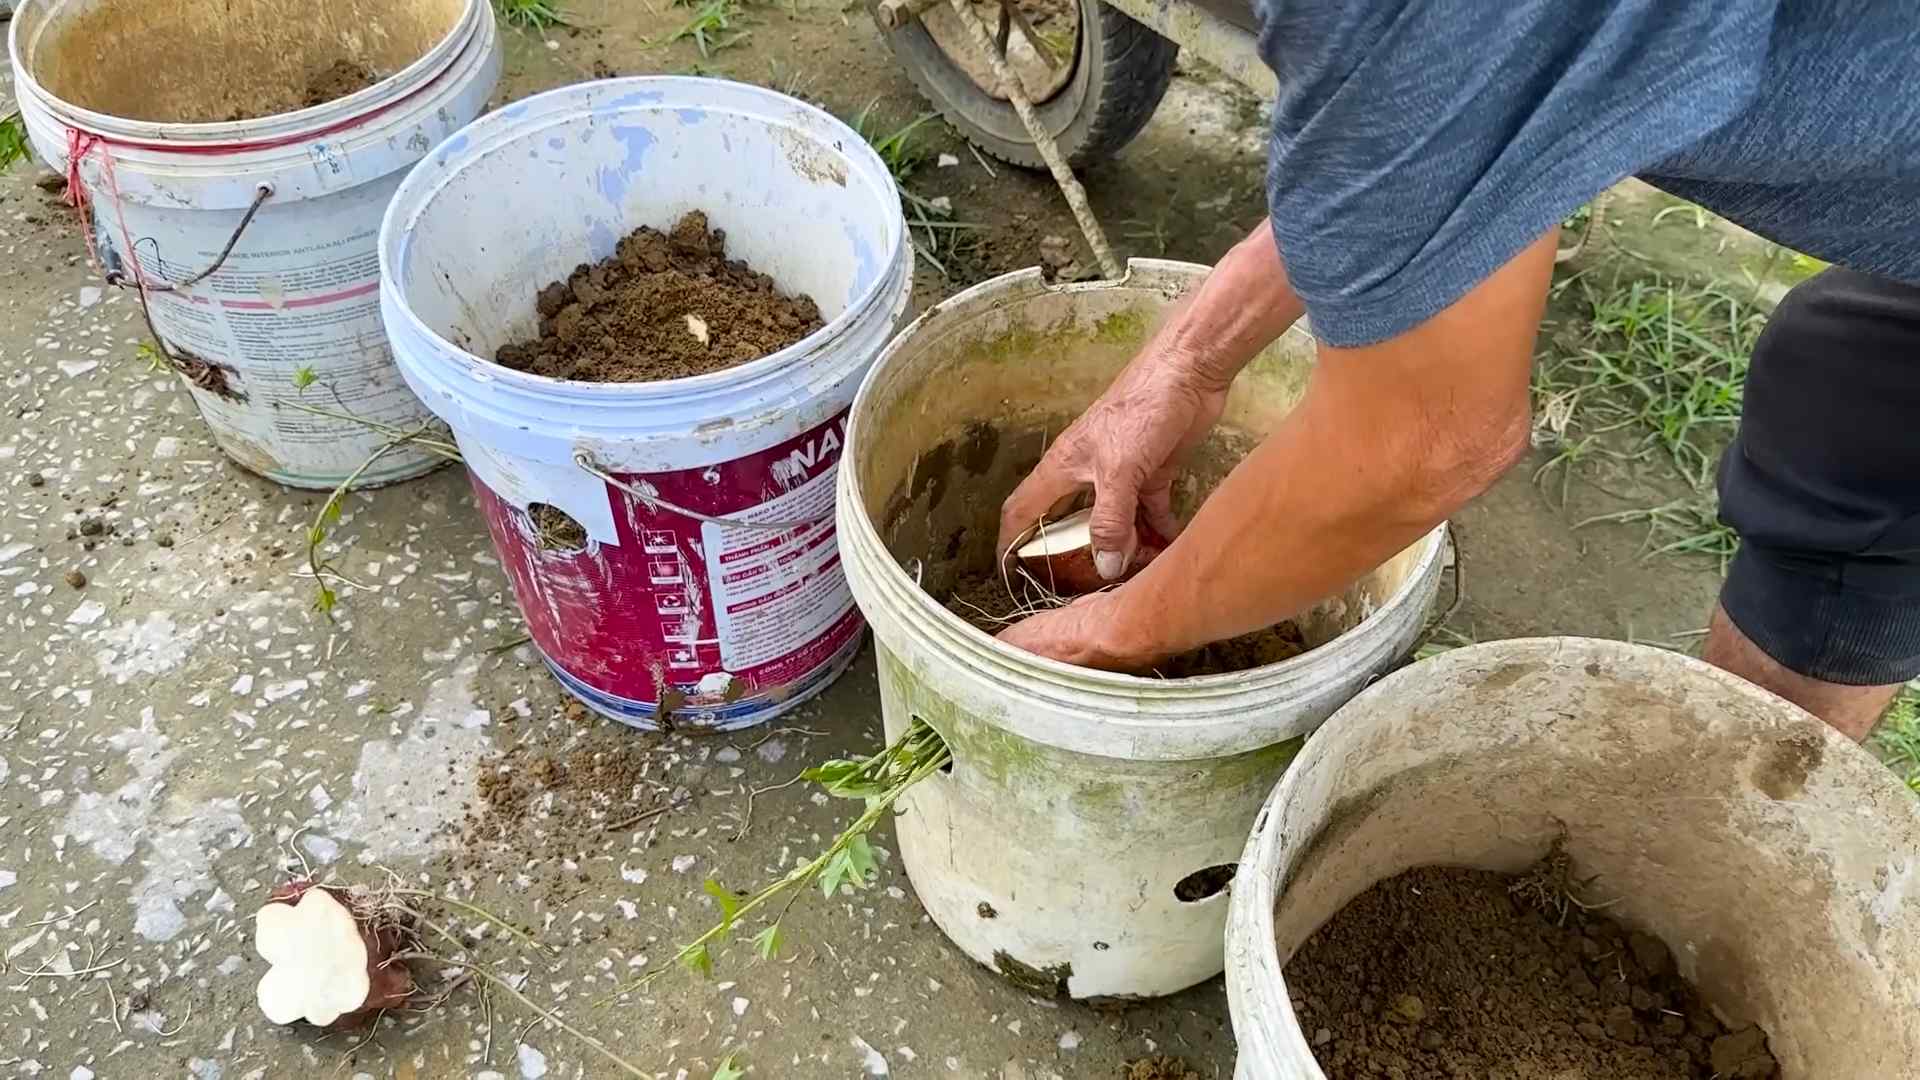
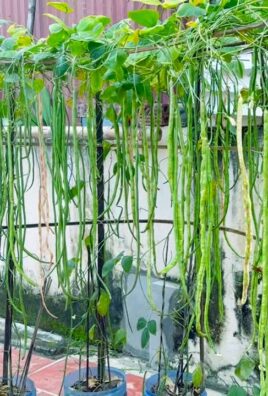
* Container gardening: If you’re short on space, sweet potatoes can thrive in large containers. Just ensure they have plenty of room to spread.
* Companion planting: Plant sweet potatoes alongside beneficial companions like beans, peas, or thyme to deter pests and improve soil health.
Don’t be afraid to get your hands dirty and embrace the process. Sweet potato planting is a journey, not just a destination. The satisfaction of harvesting your own homegrown sweet potatoes is unparalleled. Imagine the delicious pies, fries, and casseroles you can create with your homegrown bounty!
We are confident that this DIY trick will simplify your sweet potato planting experience and yield impressive results. Now, it’s your turn! Give this method a try and witness the magic unfold. We’re eager to hear about your experiences. Share your photos, tips, and triumphs in the comments below. Let’s build a community of thriving sweet potato growers! Remember, successful sweet potato planting starts with a single slip, and this method makes that first step easier than ever. Happy gardening!
Frequently Asked Questions (FAQ)
What kind of sweet potato should I use to grow slips?
You can use any store-bought sweet potato to grow slips, but organic sweet potatoes are generally recommended. Non-organic sweet potatoes may be treated with sprout inhibitors, which can prevent them from producing slips. Look for sweet potatoes that are firm, free of blemishes, and haven’t started to sprout already. While sprouting isn’t a deal-breaker, it’s a sign that the potato is ready to grow. Different varieties will produce different colored and flavored sweet potatoes, so choose one that appeals to you.
How long does it take for sweet potato slips to grow?
The time it takes for slips to grow varies depending on factors like temperature, humidity, and the variety of sweet potato. Generally, you can expect to see slips emerging within 2-4 weeks. Keep the sweet potato in a warm, bright location to encourage faster growth. Once the slips are about 6-8 inches long and have developed roots, they are ready to be transplanted.
How do I know when the slips are ready to be planted?
Slips are ready to be planted when they are about 6-8 inches long and have a well-developed root system. The roots should be at least an inch or two long. Gently remove the slips from the sweet potato, being careful not to damage the roots. You can either twist them off or use a sharp knife to cut them off close to the potato.
What kind of soil is best for sweet potatoes?
Sweet potatoes prefer well-drained, sandy loam soil. They don’t thrive in heavy clay soil, as it can restrict root growth and lead to misshapen tubers. Amend heavy soil with compost and sand to improve drainage. The ideal soil pH for sweet potatoes is between 5.5 and 6.5.
How much sun do sweet potatoes need?
Sweet potatoes need at least 6-8 hours of direct sunlight per day to thrive. Choose a sunny location in your garden for planting. If you’re growing sweet potatoes in containers, make sure to place them in a spot that receives plenty of sunlight.
How often should I water sweet potatoes?
Water sweet potatoes regularly, especially during dry periods. Keep the soil consistently moist, but avoid overwatering, which can lead to root rot. Water deeply when the top inch of soil feels dry to the touch. Once the plants are established, they become more drought-tolerant.
How far apart should I plant sweet potato slips?
Plant sweet potato slips about 12-18 inches apart in rows that are 3-4 feet apart. This spacing allows the plants plenty of room to spread and develop large tubers. If you’re growing sweet potatoes in containers, plant one slip per large container (at least 10 gallons).
Do sweet potatoes need fertilizer?
Sweet potatoes benefit from a balanced fertilizer, especially during the early stages of growth. Use a fertilizer that is low in nitrogen and higher in phosphorus and potassium. Avoid over-fertilizing with nitrogen, as this can promote excessive vine growth at the expense of tuber development.
When is the best time to harvest sweet potatoes?
Sweet potatoes are typically harvested in the fall, before the first frost. The leaves will start to turn yellow and the vines will begin to die back, indicating that the tubers are ready to be harvested. Gently dig around the plants to avoid damaging the sweet potatoes.
How do I cure sweet potatoes after harvesting?
Curing sweet potatoes is essential for improving their flavor and storage life. After harvesting, brush off any excess soil and place the sweet potatoes in a warm, humid location (80-85°F and 85-90% humidity) for 7-10 days. This allows the skins to harden and any minor cuts or bruises to heal. After curing, store the sweet potatoes in a cool, dry, and well-ventilated place (55-60°F).
Can I grow sweet potatoes in containers?
Yes, sweet potatoes can be successfully grown in containers. Choose a large container (at least 10 gallons) with good drainage. Fill the container with well-draining potting mix and plant one slip per container. Provide plenty of sunlight and water regularly.
What are some common pests and diseases that affect sweet potatoes?
Common pests that affect sweet potatoes include sweet potato weevils, flea beetles, and aphids. Diseases that can affect sweet potatoes include stem rot, black rot, and scurf. Practice good garden hygiene, such as removing plant debris and rotating crops, to prevent pest and disease problems.
Can I eat the sweet potato leaves?
Yes, sweet potato leaves are edible and nutritious. They can be eaten raw in salads or cooked like spinach. Choose young, tender leaves for the best flavor.
What if my sweet potato doesn’t sprout slips?
Sometimes, a sweet potato may not sprout slips due to various reasons, such as being treated with sprout inhibitors or being too old. Try using a different sweet potato or ensuring that the sweet potato is kept in a warm, bright location with adequate moisture. You can also try scoring the sweet potato with a knife to encourage sprouting.
How do I store sweet potatoes long-term?
Properly cured and stored sweet potatoes can last for several months. Store them in a cool, dry, and well-ventilated place (55-60°F). Avoid storing them in the refrigerator, as this can cause them to develop a hard core and lose flavor. Check the sweet potatoes periodically and remove any that show signs of spoilage.
Leave a Comment