

Growing green onions from scraps is easier than you might think, and I’m here to show you how! Have you ever tossed those little green onion ends, thinking they were destined for the compost bin? Well, hold on to your gardening gloves, because I’m about to reveal a simple, sustainable, and incredibly rewarding way to turn kitchen scraps into a never-ending supply of fresh green onions.
For generations, resourceful gardeners have employed similar techniques to propagate plants and minimize waste. This practice echoes the “victory gardens” of the World Wars, where families cultivated their own food to support the war effort and promote self-sufficiency. It’s a tradition rooted in practicality and a deep connection to the earth.
In today’s fast-paced world, we often overlook the simple joys of growing our own food. But imagine this: no more last-minute grocery store runs for a bunch of green onions! With this easy DIY trick, you can have fresh, flavorful green onions readily available, adding a zesty touch to your favorite dishes. Plus, you’ll be reducing food waste and saving money – it’s a win-win! So, let’s dive into the wonderful world of growing green onions from scraps and unlock the secrets to a thriving, sustainable garden, right from your kitchen counter.
Growing Green Onions From Scraps: A Beginner’s Guide
Hey there, fellow gardening enthusiasts! Ever find yourself tossing the root ends of your green onions after using the leafy tops? Stop right there! Did you know you can easily regrow those scraps into fresh, delicious green onions, practically for free? It’s a super simple and rewarding DIY project, perfect for beginners and seasoned gardeners alike. I’m going to walk you through the whole process, step-by-step, so you can have a continuous supply of green onions right at your fingertips.
What You’ll Need
Before we dive in, let’s gather our supplies. The beauty of this project is that you probably already have most of these things lying around:
* Green Onion Scraps: The stars of the show! You’ll need the white root ends of your green onions, about 1-2 inches long, with the roots still attached.
* A Glass or Jar: Any small glass or jar will do. I like to use recycled jam jars or small drinking glasses.
* Water: Tap water is perfectly fine.
* Potting Soil: If you plan to transplant your green onions to soil (which I highly recommend!), you’ll need some good quality potting soil.
* A Small Pot or Container: Choose a pot that’s at least 6 inches in diameter to give your green onions room to grow.
* Optional: Liquid Fertilizer: A diluted liquid fertilizer can give your green onions a boost, but it’s not essential.
Regrowing Green Onions in Water: The Quick Start
This is the easiest and fastest way to get started. It’s a great way to see quick results and get you excited about the project.
1. Prepare the Green Onion Scraps: Take your green onion scraps and gently remove any loose or slimy outer layers. Be careful not to damage the roots. If the roots are excessively long, you can trim them slightly, but make sure to leave at least half an inch of roots intact.
2. Place the Scraps in Water: Fill your glass or jar with enough water to cover the roots of the green onions, but not so much that it submerges the entire white part. You want the cut end to be exposed to air.
3. Find a Sunny Spot: Place the jar in a bright, sunny location, like a windowsill. Green onions need plenty of sunlight to grow.
4. Change the Water Regularly: This is crucial! Change the water every 1-2 days to prevent bacteria growth and keep the water fresh. This will help your green onions thrive.
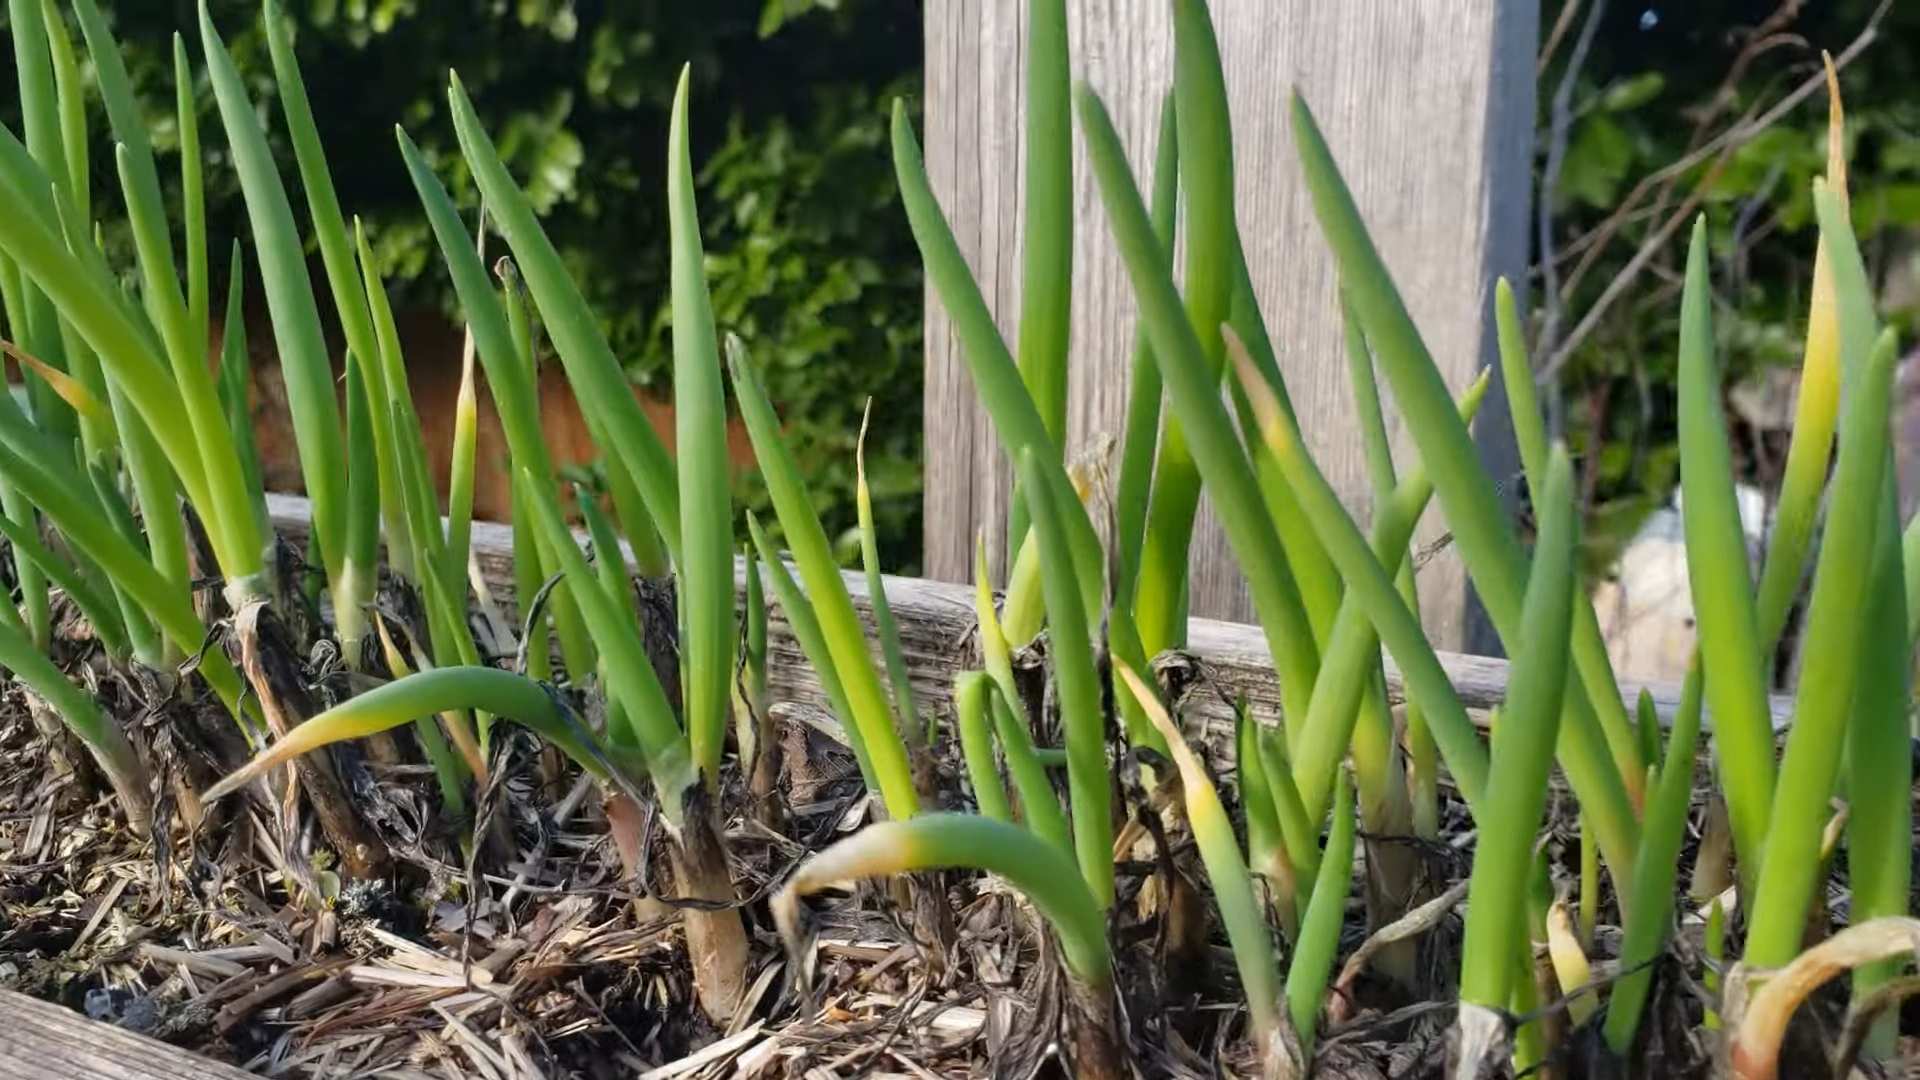
5. Watch Them Grow! Within a few days, you should start to see new green shoots emerging from the center of the green onion scraps. It’s so exciting to watch!
6. Harvesting: Once the green shoots are a few inches long, you can start harvesting them. Simply snip off the amount you need with scissors. The green onions will continue to grow, providing you with a continuous supply.
Transplanting to Soil: For Long-Term Growth
While you can continue to grow green onions in water indefinitely, transplanting them to soil will result in stronger, healthier plants and a more abundant harvest.
1. Prepare Your Pot: Fill your pot with potting soil, leaving about an inch of space at the top.
2. Create Planting Holes: Make small holes in the soil, spaced about 1-2 inches apart. The holes should be deep enough to accommodate the roots of the green onion scraps.
3. Carefully Remove the Green Onions from Water: Gently remove the green onion scraps from the water, being careful not to damage the roots.
4. Plant the Green Onions: Place each green onion scrap into a planting hole, making sure the roots are covered with soil. The white part of the green onion should be mostly buried, with just the green shoots exposed.
5. Water Thoroughly: Water the soil thoroughly after planting, until the water drains out of the bottom of the pot.
6. Find a Sunny Spot: Place the pot in a sunny location, just like when growing them in water.
7. Water Regularly: Keep the soil consistently moist, but not soggy. Water when the top inch of soil feels dry to the touch.
8. Fertilize (Optional): If you want to give your green onions a boost, you can fertilize them every few weeks with a diluted liquid fertilizer. Follow the instructions on the fertilizer packaging.
9. Harvesting: You can harvest your green onions as needed, just like when growing them in water. Simply snip off the amount you need with scissors.
Troubleshooting
Even with the best intentions, sometimes things don’t go exactly as planned. Here are a few common issues you might encounter and how to fix them:
* Yellowing Leaves: Yellowing leaves can be a sign of overwatering or underwatering. Make sure the soil is consistently moist, but not soggy. Also, ensure your green onions are getting enough sunlight.
* Slow Growth: Slow growth can be caused by a lack of sunlight or nutrients. Make sure your green onions are in a sunny location and consider fertilizing them with a diluted liquid fertilizer.
* Rotting Roots: Rotting roots are usually caused by overwatering or poor drainage. Make sure your pot has drainage holes and avoid overwatering. If you’re growing them in water, change the water more frequently.
* Pests: While green onions are relatively pest-resistant, they can sometimes be affected by aphids or other small pests. If you notice pests, try spraying them with a mixture of water and dish soap.
Tips and Tricks for Success
Here are a few extra tips to help you get the most out of your green onion growing adventure:
* Use Fresh Scraps: The fresher the green onion scraps, the better the chances of success. Try to use them as soon as possible after cutting off the leafy tops.
* Experiment with Different Varieties: There are many different varieties of green onions, so feel free to experiment and see which ones grow best for you.
* Successive Planting: To ensure a continuous supply of green onions, plant new scraps every few weeks.
* Indoor vs. Outdoor Growing: Green onions can be grown both indoors and outdoors. If you live in a cold climate, you can grow them indoors year-round. If you live in a warmer climate, you can grow them outdoors during the growing season.
* Companion Planting: Green onions are great companion plants for many vegetables, such as tomatoes, peppers, and cabbage. They can help to deter pests and improve the flavor of these vegetables.
* Don’t Over-Harvest: While it’s tempting to harvest all of your green onions at once, try to avoid over-harvesting. This will give the plants time to recover and continue to grow.
* Enjoy the Process! Growing green onions from scraps is a fun and rewarding project. Don’t be afraid to experiment and learn along the way.
Harvesting and Using Your Homegrown Green Onions
The best part about growing your own green onions is, of course, getting to use them in your cooking! Here’s how to harvest and use your homegrown bounty:
* Harvesting: As mentioned earlier, simply snip off the amount of green onion you need with scissors. Cut the green shoots close to the base of the plant, leaving about an inch or two of green growth. This will allow the plant to continue to grow.
* Washing: After harvesting, wash the green onions thoroughly under cold water to remove any dirt or debris.
* Storing: You can store your harvested green onions in the refrigerator for up to a week. Wrap them in a damp paper towel and place them in a plastic bag or container.
* Using: Green onions are incredibly versatile and can be used in a wide variety of dishes. Here are just a few ideas:
* Salads: Add chopped green onions to salads for a fresh, oniony flavor.
* Soups and Stews: Sprinkle chopped green onions on top of soups and stews as a garnish.
* Dips and Sauces: Use chopped green onions in dips and sauces for added flavor.
* Omelets and Frittatas: Add chopped green onions to omelets and frittatas for a savory touch.
* Stir-Fries: Use chopped green onions in stir-fries for a burst of flavor.
* Grilled Meats and Vegetables: Sprinkle chopped green onions on top of grilled meats and vegetables for a delicious garnish.
* Baked Potatoes: Top baked potatoes with sour cream and chopped green onions.
* Tacos and Burritos: Add chopped green onions to tacos and burritos for a fresh, oniony flavor.
So there you have it! Growing green onions from scraps is a simple, sustainable, and rewarding way to add fresh flavor to

Conclusion
So, there you have it! Growing green onions from scraps isn’t just a fun little experiment; it’s a genuinely practical and rewarding way to reduce food waste, save money, and have fresh, flavorful green onions readily available whenever you need them. Forget those sad, wilted bunches from the grocery store – imagine snipping vibrant, crisp green onions straight from your windowsill or garden, adding a burst of freshness to your omelets, salads, stir-fries, or any dish that calls for that delicate oniony bite.
This simple DIY trick is a must-try for several reasons. First, it’s incredibly easy. Even if you don’t have a green thumb, you can succeed with this method. Second, it’s sustainable. By regrowing your green onions, you’re actively participating in reducing food waste and minimizing your environmental impact. Third, it’s cost-effective. Think about how often you buy green onions, only to use a small portion and let the rest go bad. With this method, you’re essentially getting free green onions!
But the benefits don’t stop there. You can also experiment with different variations to suit your preferences and growing conditions. For instance, try using different types of containers. While a simple glass of water works perfectly well, you could also use a small pot with soil for a more permanent setup. This allows the green onions to develop stronger roots and potentially produce even more growth. You can also experiment with different locations. While a sunny windowsill is ideal, you might find that a partially shaded spot works better in hotter climates.
Another fun variation is to let some of your regrown green onions flower. The flowers are not only beautiful but also edible, adding a mild onion flavor to salads and other dishes. Plus, allowing them to flower will produce seeds that you can use to grow even more green onions!
The key to success with this DIY trick is consistency. Remember to change the water regularly (every 1-2 days) to prevent bacterial growth and keep the roots healthy. If you’re growing your green onions in soil, make sure to keep the soil moist but not waterlogged. And don’t be afraid to experiment and see what works best for you.
We are confident that once you try growing green onions from scraps, you’ll be hooked! It’s a simple, satisfying, and sustainable way to add fresh flavor to your meals. So, gather your green onion scraps, grab a glass of water or a pot of soil, and get started today.
We’d love to hear about your experiences! Share your photos and tips on social media using #RegrowGreenOnions and let us know how this DIY trick has worked for you. Happy growing!
Frequently Asked Questions (FAQ)
1. How long does it take for green onions to regrow from scraps?
Generally, you’ll start to see new growth within a few days. Within a week or two, you should have a noticeable amount of new green onion shoots that are ready to harvest. The speed of growth depends on factors like sunlight, water quality, and temperature. Warmer temperatures and plenty of sunlight will encourage faster growth.
2. What part of the green onion do I need to regrow it?
You need the bottom part of the green onion, including the roots (or the remnants of the roots) and about an inch or two of the white part of the stalk. This is where the plant’s growth cells are located, allowing it to regenerate. Make sure to cut the green onions about an inch or two above the roots when you’re using them in your cooking.
3. Can I regrow green onions in soil instead of water?
Yes, absolutely! Growing green onions in soil can actually lead to stronger, more robust growth. After the roots have started to develop in water (usually after a few days), you can transplant the green onion scraps into a small pot filled with well-draining potting soil. Bury the white part of the onion, leaving the green shoots exposed. Water regularly, keeping the soil moist but not soggy.
4. How often should I change the water when regrowing green onions in water?
It’s recommended to change the water every 1-2 days. This helps prevent bacterial growth and keeps the roots healthy. Stagnant water can lead to rot and hinder growth. Using filtered water can also be beneficial.
5. How much sunlight do regrowing green onions need?
Green onions thrive in bright, indirect sunlight. A sunny windowsill is an ideal location. However, avoid direct sunlight, especially during the hottest part of the day, as it can scorch the leaves. If you don’t have a sunny windowsill, you can use a grow light to supplement the natural light.
6. Can I regrow green onions indefinitely?
While you can regrow green onions multiple times from the same scraps, the growth will eventually slow down and the quality of the green onions may diminish. After a few cycles of regrowth, it’s best to start with fresh green onion scraps for optimal results.
7. What if my green onions start to turn yellow or brown?
Yellowing or browning leaves can indicate a few things. It could be due to overwatering, underwatering, lack of sunlight, or nutrient deficiency. Make sure the soil is well-draining and not waterlogged. Adjust the amount of sunlight the green onions are receiving. If you’re growing them in water, ensure you’re changing the water regularly. If the problem persists, you can try adding a diluted liquid fertilizer to the water or soil.
8. Can I use any type of onion to regrow green onions?
No, you need to start with actual green onions (also known as scallions). Other types of onions, like yellow or red onions, won’t regrow in the same way.
9. Are there any pests or diseases that affect regrowing green onions?
Green onions are generally quite resilient, but they can be susceptible to pests like aphids or diseases like onion rot. Inspect your green onions regularly for any signs of infestation or disease. If you notice aphids, you can wash them off with a strong stream of water or use insecticidal soap. To prevent onion rot, ensure good drainage and avoid overwatering.
10. Can I freeze regrown green onions?
Yes, you can freeze regrown green onions for later use. Simply chop them up and place them in a freezer-safe bag or container. They may lose some of their crispness when thawed, but they’ll still retain their flavor and can be used in cooked dishes.
11. Is it safe to eat regrown green onions?
Yes, regrown green onions are perfectly safe to eat, as long as they are grown in a clean environment and free from pests and diseases. Wash them thoroughly before using them in your cooking.
12. Can I grow green onions indoors year-round?
Yes, you can grow green onions indoors year-round, as long as you provide them with adequate light, water, and nutrients. This makes it a great option for those who live in colder climates or don’t have access to an outdoor garden.
13. What are some creative ways to use regrown green onions?
The possibilities are endless! Use them as a garnish for soups, salads, and tacos. Add them to omelets, stir-fries, and dips. Mix them into mashed potatoes or rice. Use them to make green onion pancakes or scallion oil. Get creative and experiment with different ways to incorporate them into your favorite dishes. Growing green onions from scraps is a gift that keeps on giving!
Leave a Comment