

Harvest bean sprouts like a pro with these simple, yet effective DIY tricks! Have you ever wondered how those crunchy, delicious bean sprouts end up in your stir-fries and salads? It’s easier than you think to grow your own, and I’m here to guide you through the process. For centuries, sprouting has been a staple in various cultures, particularly in Asian cuisine, where they’re valued for their nutritional benefits and fresh taste. Think of it as a miniature garden right in your kitchen!
But why should you bother learning how to harvest bean sprouts yourself? Well, for starters, it’s incredibly rewarding to nurture something from seed to sprout. Plus, store-bought sprouts can sometimes be a bit pricey, and let’s be honest, they don’t always have that vibrant, fresh flavor. With my DIY methods, you’ll not only save money but also enjoy the satisfaction of knowing exactly where your food comes from. Imagine adding a handful of freshly harvested bean sprouts to your next meal, knowing you grew them yourself – it’s a game-changer! So, let’s dive in and unlock the secrets to successful bean sprout harvesting!
DIY: How to Grow Sprouts at Home – An Easy Guide
Hello DIY friends! I love fresh sprouts. They’re crispy, healthy, and add a nice crunch to any dish. And the best part? You can easily grow them yourself at home! In this article, I’ll show you how to grow your own sprouts in just a few simple steps. It’s easier than you think and a lot of fun!
What You’ll Need:
Before we get started, here’s a list of everything you need:
- Sprouting Jars or a Sprouter: I personally prefer sprouting jars because they’re easy to clean and take up little space. However, there are also great multi-tiered sprouters if you want to grow larger quantities.
- Sprouting Seeds: Make sure to buy special sprouting seeds. These are untreated and suitable for consumption. You can find them in health food stores, organic shops, or online. Popular varieties include alfalfa, radish, broccoli, mung beans, and lentils.
- Clean Water: It’s best to use filtered or boiled (and cooled) water.
- Fine Mesh Strainer or Cloth: For rinsing the sprouts.
- A Dark, Cool Place: Sprouts germinate best in the dark.
- Patience: Sprouts need a few days to grow.
How to Grow Sprouts in a Sprouting Jar: Step by Step
- Prepare the Seeds: Place one tablespoon of sprouting seeds into your sprouting jar. The exact amount depends on the variety and the size of your jar. Less is more, as the seeds will expand as they germinate.
- Soaking: Fill the jar with plenty of water and let the seeds soak for 4-12 hours. The soaking time depends on the variety, so it’s best to check the instructions on the seed packet.
- Drain the Water: Drain the soaking water through a fine mesh strainer or cloth. Make sure all the seeds stay in the jar.
- Rinse: Rinse the seeds thoroughly with fresh water. This helps to prevent mold growth.
- Position the Jar: Place the jar at an angle so that excess water can drain out. It’s best to place it in a bowl or on a draining rack.
- Dark Place: Keep the jar in a dark, cool place. A pantry or kitchen cabinet is ideal.
- Regular Rinsing: Rinse the sprouts 2-3 times daily with fresh water. This is crucial for successful sprout cultivation. Make sure the water drains out well so the sprouts don’t sit in water.
- Wait and Watch: After a few days, you’ll start to see the seeds sprouting. Little roots and tiny leaves will begin to appear.
- Light Exposure: Once the sprouts have germinated, you can place them in indirect sunlight for a few hours each day. This helps the sprouts produce chlorophyll and turn greener. But be careful: too much direct sunlight can dry them out.
- Harvest: After 3-7 days (depending on the variety), your sprouts will be ready for harvest. They should look fresh and crisp.
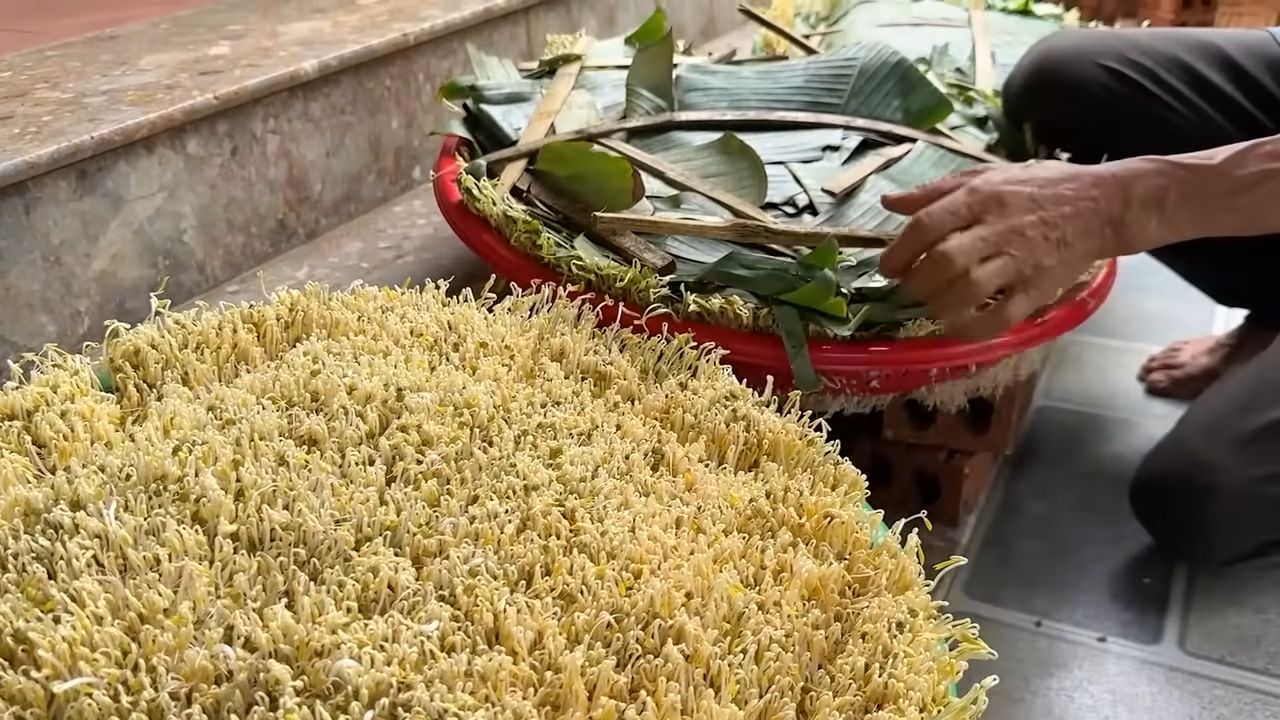
Harvesting Sprouts: The Right Way
- Rinse Thoroughly: Before harvesting, give the sprouts another good rinse with cold water.
- Remove Seed Hulls (optional): Some people like to remove the seed hulls before eating the sprouts. It’s a matter of preference. You can simply eat them with the hulls. If you want to remove them, place the sprouts in a bowl of water and scoop off the hulls.
- Drain: Let the sprouts drain well before using them.
- Storage: Store the harvested sprouts in the refrigerator. They will keep for 2-3 days. It’s best to store them in a clean container covered with a damp cloth.
Common Problems and Solutions
- Mold: Mold is a common issue when sprouting. It’s usually caused by poor hygiene or insufficient ventilation. Make sure to clean your sprouting jars and seeds thoroughly and rinse the sprouts regularly. Ensure good ventilation by not overcrowding the jar and placing it at an angle. If you see mold, discard the affected sprouts.
- Rotting Sprouts: Rotten sprouts have an unpleasant smell and slimy texture. This is usually caused by too much moisture. Make sure the water drains well after each rinse.
- No Germination: If your seeds aren’t germinating, it could be due to old seeds, poor-quality seeds, or improper storage. Make sure you’re using fresh, high-quality sprouting seeds and store them in a cool, dry place. Also, check if the soaking time was too short.
Which Sprouts Are Best for Beginners?
For beginners, I recommend alfalfa, radish, or mung beans. These varieties are relatively easy to grow and sprout quickly.
Using Sprouts in the Kitchen: Versatile Uses
Sprouts are incredibly versatile and can be used in many dishes.
- Salads: Sprouts add a nice crunch to any salad.
- Sandwiches and Wraps: Sprouts make a great addition to sandwiches and wraps.
- Soups and Stews: Add sprouts just before serving to give soups and stews a fresh kick.
- Wok Dishes: Sprouts are a popular ingredient in wok dishes.
- Smoothies: You can also blend sprouts into smoothies.
- As a Garnish: Sprouts make a great garnish for various dishes.
Why Sprouts Are So Healthy
Sprouts are packed with nutrients. They contain many vitamins, minerals, enzymes, and fiber. Additionally, they are easy to digest and provide valuable energy.
- Vitamins: Sprouts are rich in vitamins like vitamin C, vitamin K, and B-vitamins.
- Minerals: Sprouts are high in minerals like iron, calcium, and magnesium.
- Enzymes: Sprouts contain many enzymes that aid digestion.
- Fiber: Sprouts are a good source of fiber, which supports digestive health.
- Antioxidants: Sprouts contain antioxidants that protect cells from damage.
More Tips and Tricks
- Mixing Different Varieties: You can mix different types of sprouts to create a more varied flavor.
- Growing Sprouts in the Garden: You can also grow sprouts in the garden using a sprouting bed or sprouting box.
- Sprouts as Pet Food: Sprouts are also a healthy food for pets like birds and small animals.
- Drying Sprouts: You can also dry sprouts and use them in soups and stews.
Conclusion
Growing your own sprouts is an easy and rewarding way to produce fresh, healthy food at home. With a little patience and the right tips and tricks, anyone can do it! Give it a try and enjoy the variety and taste that sprouts bring to your meals. Wishing you great success in sprouting!

Conclusion
So, there you have it! Harvesting bean sprouts at home is not only surprisingly simple, but it’s also incredibly rewarding. Forget those limp, flavorless sprouts from the grocery store. With this easy DIY trick, you can cultivate a vibrant, crunchy, and intensely flavorful batch of bean sprouts right in your own kitchen. The difference in taste and texture is truly remarkable, and once you experience the freshness of homegrown sprouts, you’ll never want to go back to store-bought again.
This method is a must-try for anyone looking to add a healthy and delicious boost to their meals. Think about the possibilities! Toss them into stir-fries for added crunch and nutrients, layer them onto sandwiches and wraps for a refreshing bite, or sprinkle them over salads for a burst of flavor. The versatility of fresh bean sprouts is truly endless.
Beyond the superior taste and texture, growing your own bean sprouts is also a fantastic way to save money and reduce your environmental impact. You’ll be cutting down on plastic packaging and transportation costs, all while enjoying a sustainable and healthy food source. It’s a win-win situation!
Ready to take your bean sprout game to the next level? Consider experimenting with different types of beans. Mung beans are the most common choice, but you can also try adzuki beans, lentils, or even chickpeas for a unique flavor profile. Each type of bean will yield sprouts with slightly different textures and tastes, allowing you to customize your harvest to your liking.
Another variation to explore is the growing environment. While a simple jar or sprouting container works perfectly well, you can also experiment with different levels of light exposure. Some people prefer to grow their sprouts in complete darkness for a milder flavor, while others prefer to expose them to indirect sunlight for a slightly sweeter taste.
Don’t be afraid to get creative and experiment with different techniques to find what works best for you. The beauty of this DIY trick is that it’s incredibly forgiving and adaptable. Even if you’re a complete beginner, you’re almost guaranteed to have success.
We wholeheartedly encourage you to give this DIY trick a try. It’s a simple, affordable, and incredibly satisfying way to enjoy fresh, healthy, and delicious bean sprouts at home. Once you’ve experienced the joy of harvesting your own sprouts, we’re confident that you’ll be hooked!
And most importantly, we want to hear about your experience! Share your tips, tricks, and photos with us in the comments below. Let us know what type of beans you used, what variations you tried, and how you’re enjoying your homegrown bean sprouts. We’re excited to learn from your experiences and build a community of fellow sprout enthusiasts. Happy sprouting!
Frequently Asked Questions (FAQ)
What types of beans are best for sprouting?
The most common and readily available bean for sprouting is the mung bean. Mung beans sprout quickly and reliably, producing crisp and flavorful sprouts. However, you can also experiment with other types of beans, such as adzuki beans, lentils, chickpeas, and even soybeans. Each type of bean will yield sprouts with a slightly different flavor and texture. For example, adzuki beans have a slightly sweeter taste, while lentils tend to be more earthy. When choosing beans for sprouting, make sure they are whole, un-split, and specifically intended for sprouting or culinary use. Avoid using beans that are labeled as “treated” or “intended for planting,” as these may contain chemicals that are not safe for consumption.
How long does it take to harvest bean sprouts?
The entire process, from soaking the beans to harvesting the sprouts, typically takes between 3 to 7 days, depending on the type of bean, the temperature, and the humidity. Mung beans usually sprout within 3 to 5 days, while other types of beans may take a bit longer. You’ll know your sprouts are ready to harvest when they have reached your desired length and have developed small, leafy green shoots. It’s important to monitor your sprouts closely and harvest them before they become too long or bitter.
What is the best way to store harvested bean sprouts?
Once you’ve harvested your bean sprouts, it’s important to store them properly to maintain their freshness and prevent spoilage. The best way to store bean sprouts is in the refrigerator, in a sealed container lined with a paper towel. The paper towel will help absorb excess moisture and keep the sprouts from becoming soggy. You can also rinse the sprouts with cold water before storing them to remove any remaining hulls or debris. Properly stored bean sprouts will typically last for up to a week in the refrigerator.
How do I prevent mold growth during the sprouting process?
Mold growth is a common concern when sprouting beans, but it can be easily prevented with proper hygiene and ventilation. The most important thing is to rinse your beans thoroughly at least twice a day with fresh, clean water. This will help remove any bacteria or mold spores that may be present. It’s also important to ensure that your sprouting container has adequate ventilation to prevent moisture buildup. Avoid overcrowding the container with too many beans, as this can also contribute to mold growth. If you notice any signs of mold, such as a fuzzy white or gray growth, discard the entire batch of sprouts immediately.
Are there any health benefits to eating bean sprouts?
Yes, bean sprouts are a nutritional powerhouse! They are a good source of vitamins, minerals, and antioxidants. They are particularly rich in vitamin C, vitamin K, folate, and fiber. Bean sprouts are also low in calories and fat, making them a healthy addition to any diet. The sprouting process actually increases the bioavailability of certain nutrients, making them easier for your body to absorb. Eating bean sprouts can help boost your immune system, improve digestion, and protect against chronic diseases.
Can I eat the bean hulls or should I remove them?
Whether or not to eat the bean hulls is a matter of personal preference. Some people find them to be slightly bitter or tough, while others don’t mind them at all. If you prefer to remove the hulls, you can do so by gently rubbing the sprouts under cold water. The hulls will usually float to the surface and can be easily skimmed off. However, removing the hulls is not necessary, and they are perfectly safe to eat. They actually contain a good amount of fiber, which can be beneficial for digestion.
What if my bean sprouts don’t sprout?
If your bean sprouts aren’t sprouting, there are a few possible reasons. First, make sure that your beans are fresh and viable. Old or damaged beans may not sprout properly. Second, ensure that you are soaking the beans for the correct amount of time. Over-soaking or under-soaking can both inhibit sprouting. Third, check the temperature of your sprouting environment. Bean sprouts prefer a warm, humid environment, but not too hot. If the temperature is too cold, the sprouts may not germinate. Finally, make sure that you are rinsing the beans regularly with fresh water. Lack of moisture can also prevent sprouting. If you’ve tried all of these tips and your beans still aren’t sprouting, it’s possible that they are simply not viable and you’ll need to try a different batch.
Leave a Comment