

Grow Basil Indoors? Absolutely! Imagine having fresh, fragrant basil right at your fingertips, no matter the season. Forget those sad, wilted bunches from the grocery store. I’m going to show you how to cultivate your own thriving basil plant inside your home, bringing a touch of summer to your kitchen year-round.
Basil, with its vibrant green leaves and intoxicating aroma, has a rich history. Originating in Southeast Asia, it’s been revered for centuries, not just for its culinary uses but also for its medicinal properties and even its symbolic significance in various cultures. From ancient rituals to modern-day pesto, basil has truly stood the test of time.
But why should *you* learn to grow basil indoors? Well, for starters, it’s incredibly rewarding! There’s something deeply satisfying about nurturing a plant from seed to harvest. Plus, think of the convenience! No more last-minute trips to the store when you need a sprig of basil for your pasta sauce or Caprese salad. And let’s be honest, store-bought basil can be expensive and often lacks the intense flavor of homegrown. This DIY guide will provide you with simple, effective tricks and hacks to ensure your indoor basil thrives, even if you don’t have a green thumb. Get ready to enjoy the freshest, most flavorful basil you’ve ever tasted!
Growing Basil Indoors: A Comprehensive DIY Guide
Hey there, fellow plant enthusiasts! I’m so excited to share my tried-and-true method for growing lush, fragrant basil right in your own home. Forget those sad, wilted grocery store bunches – with a little know-how, you can have a constant supply of fresh basil for all your culinary creations. Let’s dive in!
Choosing the Right Basil Variety
First things first, not all basil is created equal, especially when it comes to indoor growing. Some varieties are simply better suited for containers and indoor environments. Here are a few of my favorites:
* Genovese Basil: This is the classic Italian basil, perfect for pesto and tomato sauces. It’s relatively easy to grow indoors and has a strong, delicious flavor.
* Dwarf Basil: As the name suggests, dwarf basil varieties like ‘Spicy Globe’ stay compact, making them ideal for smaller spaces and windowsills. They have a slightly spicier flavor than Genovese.
* Lemon Basil: If you’re looking for something a little different, lemon basil adds a bright, citrusy note to your dishes. It’s also a beautiful plant with delicate leaves.
* Thai Basil: With its anise-like flavor, Thai basil is a must-have for Asian cuisine. It’s a bit more heat-tolerant than other varieties, which can be helpful indoors.
Gathering Your Supplies
Before we get our hands dirty, let’s make sure we have everything we need. Here’s a checklist of essential supplies:
* Basil Seeds or Seedlings: You can start from seed or purchase small basil plants from a nursery. I personally prefer starting from seed, as it gives you more control over the process.
* Potting Mix: Use a high-quality, well-draining potting mix specifically formulated for containers. Avoid using garden soil, as it can become compacted and doesn’t drain well.
* Pots: Choose pots that are at least 6 inches in diameter and have drainage holes. Terra cotta pots are a great option, as they allow the soil to breathe.
* Grow Lights (Optional but Recommended): While basil can grow on a sunny windowsill, grow lights will ensure consistent growth and prevent leggy plants, especially during the winter months.
* Watering Can or Spray Bottle: For gentle watering.
* Small Shovel or Trowel: For transplanting seedlings.
* Seed Starting Tray (If starting from seed): A tray with individual cells for starting seeds.
* Humidity Dome (If starting from seed): To help retain moisture during germination.
* Fertilizer: A balanced liquid fertilizer diluted to half strength.
Starting from Seed: A Step-by-Step Guide
Okay, let’s get those seeds started! This is my favorite part because you get to watch your little basil babies grow from tiny specks into vibrant plants.
1. Prepare Your Seed Starting Tray: Fill each cell of your seed starting tray with moist potting mix. Gently press down on the soil to remove any air pockets.
2. Sow the Seeds: Place 2-3 basil seeds in each cell. Cover the seeds with a thin layer of potting mix (about 1/4 inch).
3. Water Gently: Use a spray bottle to mist the soil thoroughly. Avoid overwatering, as this can cause the seeds to rot.
4. Cover with a Humidity Dome: Place the humidity dome over the seed starting tray to create a warm, moist environment.
5. Provide Light: Place the seed starting tray under grow lights or on a sunny windowsill. If using grow lights, keep them about 2-4 inches above the tray.
6. Maintain Moisture: Check the soil daily and mist with water as needed to keep it moist but not soggy.
7. Germination: Basil seeds typically germinate within 5-10 days. Once the seedlings emerge, remove the humidity dome.
8. Thin the Seedlings: Once the seedlings have their first true leaves (the second set of leaves), thin them to one seedling per cell. Choose the strongest, healthiest seedling and snip off the others at the soil line.
Transplanting Seedlings or Planting Store-Bought Basil
Once your seedlings are big enough (a few inches tall with several sets of leaves) or you’ve brought home a basil plant from the store, it’s time to transplant them into their permanent pots.
1. Prepare Your Pots: Fill your pots with potting mix, leaving about an inch of space at the top.
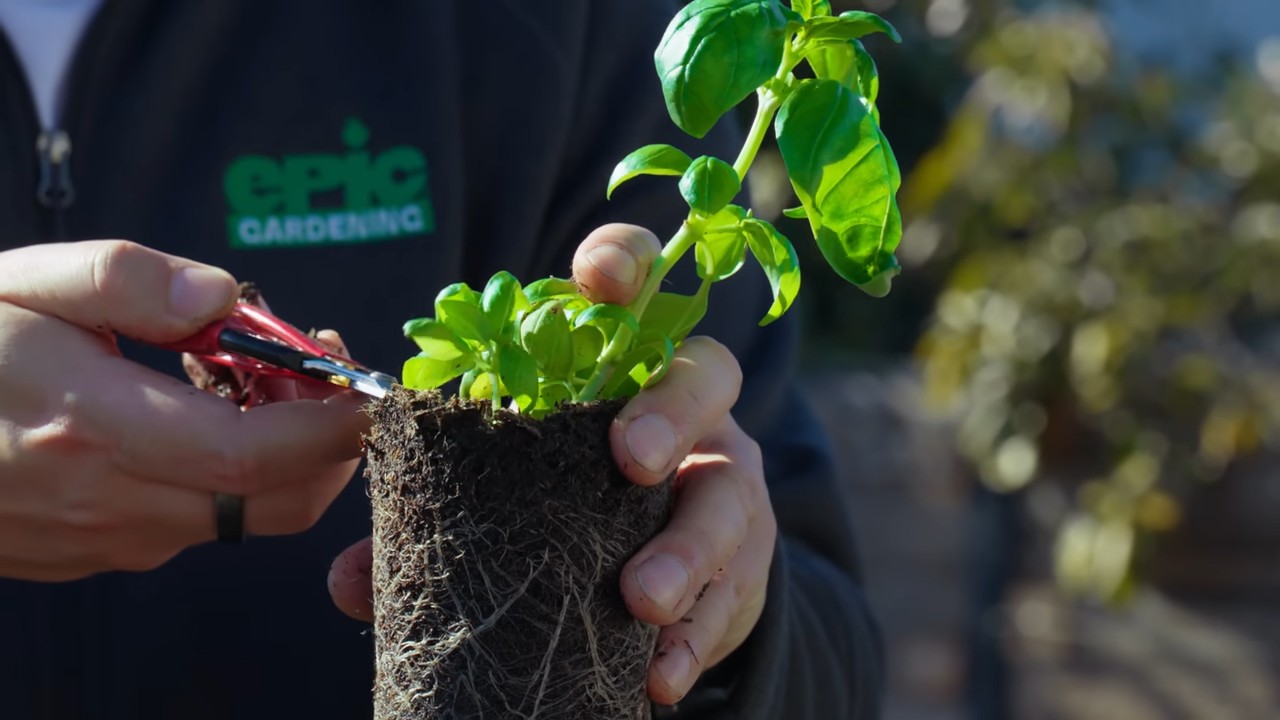
2. Carefully Remove the Seedlings: Gently loosen the soil around the seedlings in the seed starting tray. Carefully lift each seedling out of its cell, being careful not to damage the roots. If you bought a basil plant, gently remove it from its container.
3. Plant the Seedlings: Create a small hole in the center of the potting mix in each pot. Place the seedling in the hole and gently backfill with potting mix. Make sure the top of the root ball is level with the soil surface.
4. Water Thoroughly: Water the newly transplanted seedlings thoroughly until water drains out of the drainage holes.
5. Provide Support (Optional): If your basil plants are tall and leggy, you can provide support by inserting a small stake into the pot and tying the plant to it with twine.
Caring for Your Indoor Basil Plants
Now that your basil plants are happily settled in their new homes, it’s time to provide them with the care they need to thrive.
1. Light: Basil needs at least 6-8 hours of sunlight per day. If you don’t have a sunny windowsill, use grow lights to supplement the natural light. Place the grow lights about 6-12 inches above the plants.
2. Watering: Water your basil plants when the top inch of soil feels dry to the touch. Avoid overwatering, as this can lead to root rot. Water deeply, until water drains out of the drainage holes.
3. Fertilizing: Feed your basil plants every 2-4 weeks with a balanced liquid fertilizer diluted to half strength.
4. Temperature: Basil prefers temperatures between 65-80°F (18-27°C). Avoid placing your plants near drafts or cold windows.
5. Humidity: Basil prefers moderate humidity. If your home is dry, you can increase the humidity by placing a tray of water near the plants or using a humidifier.
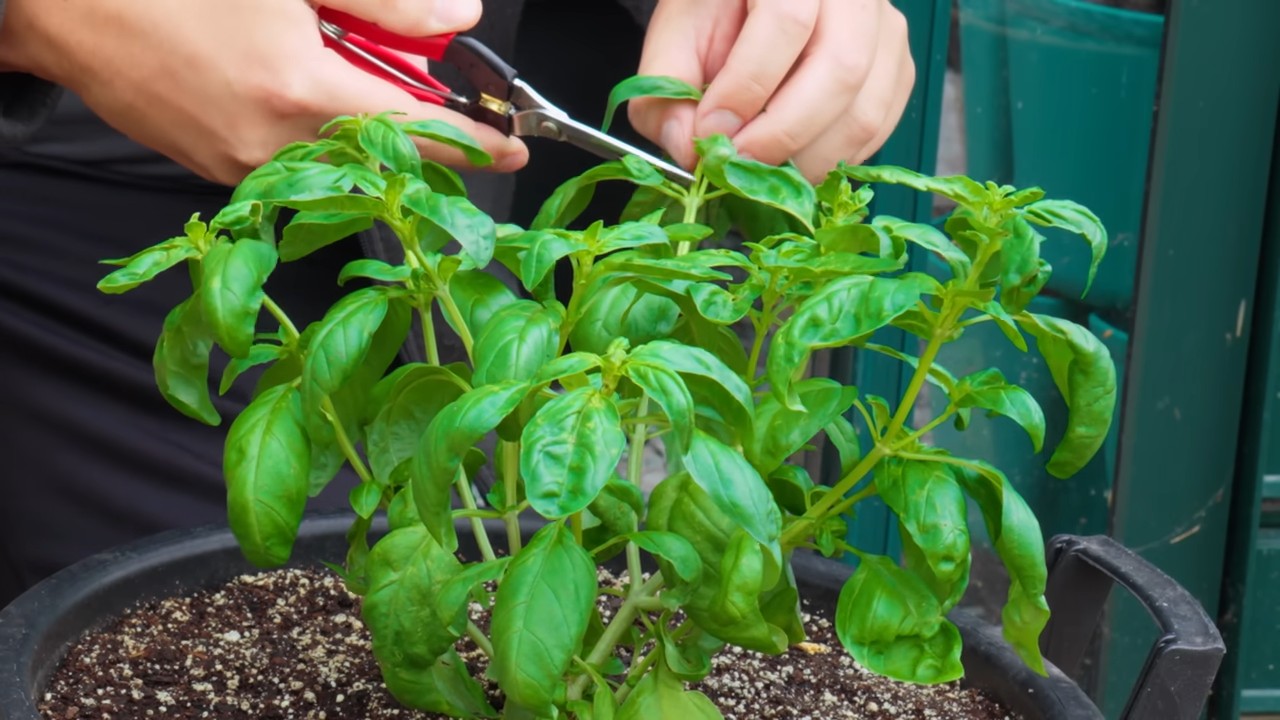
6. Pruning: Pruning is essential for keeping your basil plants bushy and productive. Pinch off the top sets of leaves regularly to encourage branching. When the plant starts to produce flower buds, pinch them off to prevent the plant from going to seed. Once basil flowers, the leaves become bitter.
7. Pest Control: Keep an eye out for pests like aphids, spider mites, and whiteflies. If you notice any pests, treat them with insecticidal soap or neem oil.
8. Air Circulation: Good air circulation helps prevent fungal diseases. Make sure your plants have plenty of space around them and avoid overcrowding. A small fan can also help improve air circulation.
Harvesting Your Basil
The best part of growing your own basil is, of course, harvesting it! You can start harvesting basil leaves as soon as the plant is a few inches tall.
1. Harvesting Technique: Use scissors or your fingers to pinch off the top sets of leaves. Avoid cutting the main stem, as this will stunt the plant’s growth.
2. Harvesting Frequency: Harvest basil leaves regularly to encourage new growth. You can harvest up to one-third of the plant at a time.
3. Preserving Basil: If you have more basil than you can use, you can preserve it by drying it, freezing it, or making pesto.
Troubleshooting Common Basil Problems
Even with the best care, you might encounter some problems while growing basil indoors. Here are a few common issues and how to fix them:
* Yellowing Leaves: Yellowing leaves can be caused by overwatering, underwatering, nutrient deficiencies, or pests. Check the soil moisture and adjust your watering accordingly. Fertilize your plants regularly. Inspect the leaves for pests.
* Leggy Growth: Leggy growth is usually caused by insufficient light. Provide your plants with more light, either by moving them to a sunnier location or using grow lights.
* Root Rot: Root rot is caused by overwatering. Make sure your pots have drainage holes and avoid overwatering. If you suspect root rot, repot your plants in fresh potting mix.
* Pests: Pests can be a problem for indoor basil plants. Inspect your plants regularly for pests and treat them with insecticidal soap or neem oil.
Enjoy Your Homegrown Basil!
And there you have it! With a little bit of effort, you can enjoy fresh, fragrant basil all year round. I hope this guide has been helpful. Happy growing! I know
Conclusion
So, there you have it! Mastering the art of growing basil indoors is not only achievable, but it’s also incredibly rewarding. Imagine having a constant supply of fresh, fragrant basil right at your fingertips, ready to elevate your culinary creations at a moment’s notice. No more last-minute trips to the grocery store or settling for wilted, lackluster herbs. This simple DIY trick transforms your kitchen into a miniature herb garden, bringing a touch of nature and vibrant flavor into your daily life.
The beauty of growing basil indoors lies in its accessibility and adaptability. Whether you’re a seasoned gardener or a complete novice, this method is designed to be straightforward and successful. The minimal space requirements make it perfect for apartment dwellers, and the relatively low maintenance ensures that even the busiest individuals can enjoy the fruits (or rather, leaves) of their labor.
But the benefits extend beyond mere convenience. Homegrown basil boasts a flavor profile that far surpasses anything you can find in a store. The intense aroma and vibrant taste are a testament to the freshness and care you put into nurturing your plants. Plus, you have complete control over the growing environment, ensuring that your basil is free from harmful pesticides and chemicals.
Ready to take your indoor basil cultivation to the next level? Consider experimenting with different varieties of basil. Genovese basil is a classic choice for pesto and Italian dishes, while Thai basil adds a unique anise-like flavor to Asian cuisine. Lemon basil offers a refreshing citrusy twist, and purple basil provides a beautiful visual contrast. You can even try growing multiple varieties side-by-side to create a diverse and flavorful herb garden.
Another variation to explore is hydroponic basil growing. While this method requires a slightly more advanced setup, it can result in faster growth and higher yields. Alternatively, you can propagate new basil plants from cuttings, effectively multiplying your basil supply without having to start from seed.
Don’t be afraid to experiment with different lighting conditions and watering schedules to find what works best for your specific environment. Observe your plants closely and adjust your care routine as needed. Remember, growing basil indoors is a learning process, and every plant is unique.
We wholeheartedly encourage you to give this DIY trick a try. It’s a simple, affordable, and incredibly satisfying way to enhance your cooking and bring a touch of green into your home. Once you’ve experienced the joy of harvesting your own fresh basil, you’ll never want to go back to store-bought herbs again.
And most importantly, we want to hear about your experience! Share your photos, tips, and stories in the comments below. Let us know what varieties of basil you’re growing, what challenges you’ve faced, and what successes you’ve achieved. Together, we can create a thriving community of indoor basil enthusiasts. So, grab your pots, soil, and seeds, and get ready to embark on a flavorful adventure! Let’s all learn how to grow basil indoors together!
Frequently Asked Questions (FAQ)
What kind of soil is best for growing basil indoors?
The ideal soil for growing basil indoors is a well-draining potting mix. Avoid using garden soil, as it can be too heavy and compact, leading to poor drainage and root rot. Look for a potting mix that contains ingredients like peat moss, perlite, and vermiculite, which help to retain moisture while providing adequate aeration. You can also create your own potting mix by combining equal parts of peat moss, perlite, and compost. Ensure the pH level of the soil is slightly acidic to neutral, ideally between 6.0 and 7.5.
How much sunlight does indoor basil need?
Basil thrives in bright, indirect sunlight. Aim for at least 6-8 hours of sunlight per day. If you don’t have a sunny windowsill, you can supplement with artificial grow lights. Position the grow lights about 6-12 inches above the plants and keep them on for 12-14 hours per day. Rotate your basil plants regularly to ensure even exposure to sunlight and prevent them from leaning towards the light source. Insufficient sunlight can lead to leggy growth and reduced flavor.
How often should I water my indoor basil plant?
Water your basil plant when the top inch of soil feels dry to the touch. Avoid overwatering, as this can lead to root rot. Water thoroughly until excess water drains out of the bottom of the pot. Ensure the pot has drainage holes to prevent water from accumulating. During the warmer months, you may need to water more frequently. Check the soil moisture regularly and adjust your watering schedule accordingly. Wilting leaves are a sign that your basil plant needs water, while yellowing leaves can indicate overwatering.
How do I harvest basil leaves without harming the plant?
The best way to harvest basil leaves is to pinch or cut them off just above a leaf node (the point where leaves grow from the stem). This encourages the plant to branch out and produce more leaves. Avoid removing more than one-third of the plant’s leaves at a time, as this can stress the plant. Regularly pruning your basil plant will also help to prevent it from flowering, which can reduce the flavor of the leaves. Harvest basil leaves in the morning, when their essential oils are most concentrated.
Why are the leaves on my indoor basil plant turning yellow?
Yellowing leaves on your indoor basil plant can be caused by several factors, including overwatering, underwatering, nutrient deficiencies, or pests. Check the soil moisture to determine if you are watering too much or too little. Ensure the plant is receiving adequate sunlight. If the yellowing is accompanied by stunted growth or other symptoms, it could be a sign of a nutrient deficiency. Fertilize your basil plant with a balanced liquid fertilizer every 2-4 weeks. Inspect the leaves for signs of pests, such as aphids or spider mites, and treat accordingly.
How can I prevent pests from attacking my indoor basil plant?
To prevent pests from attacking your indoor basil plant, start by inspecting the plant regularly for signs of infestation. Keep the area around the plant clean and free of debris. Ensure good air circulation to prevent fungal diseases. If you notice pests, you can try washing the leaves with a mild soap solution or using insecticidal soap. Neem oil is another effective and natural pest control option. Avoid using harsh chemicals, as they can harm the plant and make the leaves unsafe to eat.
Can I grow basil indoors from seed or cuttings?
Yes, you can grow basil indoors from both seed and cuttings. Starting from seed is a great option if you want to grow a specific variety of basil. Sow the seeds in a seed-starting mix and keep them moist until they germinate. Once the seedlings have developed a few sets of true leaves, you can transplant them into individual pots. Growing basil from cuttings is a faster way to propagate new plants. Simply take a 4-6 inch cutting from a healthy basil plant, remove the lower leaves, and place the cutting in water. Roots should develop within a week or two, at which point you can transplant the cutting into soil.
How do I store fresh basil leaves?
Fresh basil leaves are best used immediately, but they can be stored for a few days. To store basil leaves, wrap them loosely in a damp paper towel and place them in a plastic bag in the refrigerator. Avoid storing basil leaves near ethylene-producing fruits, such as apples and bananas, as this can cause them to brown. You can also freeze basil leaves for longer-term storage. Blanch the leaves in boiling water for a few seconds, then plunge them into ice water. Drain the leaves and pat them dry before freezing them in a single layer on a baking sheet. Once frozen, transfer the leaves to a freezer bag or container. Alternatively, you can make basil pesto and freeze it in ice cube trays for easy portioning.
Leave a Comment