

Grow Cabbage From Seed and unlock the rewarding experience of nurturing your own delicious, homegrown vegetables! Have you ever imagined strolling through your backyard, harvesting crisp, vibrant cabbage heads that you cultivated from tiny seeds? It’s not just a dream; it’s an achievable reality with a little know-how and a touch of patience.
Cabbage, a staple in cuisines worldwide, boasts a rich history dating back to ancient times. From its humble beginnings as a wild leafy green, it has evolved into a diverse range of varieties, each offering unique flavors and textures. For centuries, cabbage has been a symbol of sustenance and resourcefulness, providing essential nutrients and playing a vital role in traditional diets.
In today’s world, where access to fresh, healthy produce can sometimes be a challenge, learning to grow cabbage from seed offers a fantastic solution. Not only does it provide you with a sustainable source of food, but it also allows you to control the quality and growing conditions of your vegetables. Plus, there’s something incredibly satisfying about watching a tiny seed transform into a bountiful harvest. I’m excited to share some simple yet effective DIY tricks and hacks that will empower you to successfully grow cabbage from seed, even if you’re a complete beginner. Let’s get started!
Growing Cabbage From Seed: A Complete DIY Guide
Hey there, fellow gardening enthusiasts! I’m so excited to share my tried-and-true method for growing beautiful, bountiful cabbages from seed. It’s easier than you might think, and the satisfaction of harvesting your own homegrown cabbage is truly rewarding. Let’s dive in!
Choosing Your Cabbage Variety
Before we get our hands dirty, let’s talk about cabbage varieties. There are tons to choose from, each with its own unique characteristics. Consider your climate, growing season, and personal preferences when making your selection. Here are a few popular options:
* Early Varieties: These mature quickly (around 60-70 days) and are great for shorter growing seasons. Examples include ‘Golden Acre’ and ‘Early Jersey Wakefield’.
* Mid-Season Varieties: These take a bit longer (70-90 days) and offer good flavor and storage potential. ‘Copenhagen Market’ and ‘Savoy Ace’ are excellent choices.
* Late Varieties: These require the longest growing season (90-120 days) and are ideal for long-term storage. ‘Danish Ballhead’ and ‘January King’ are known for their keeping qualities.
* Savoy Cabbage: Characterized by its crinkled leaves and mild flavor.
* Red Cabbage: Adds a pop of color to your garden and is rich in antioxidants.
Gathering Your Supplies
Okay, now that we’ve picked our cabbage variety, let’s gather everything we need. Here’s a checklist:
* Cabbage Seeds: Choose high-quality seeds from a reputable source.
* Seed Starting Trays or Pots: I prefer using seed starting trays with individual cells, but small pots work just as well.
* Seed Starting Mix: This is a lightweight, sterile mix specifically designed for starting seeds. Don’t use garden soil!
* Watering Can or Spray Bottle: For gentle watering.
* Grow Lights (Optional): If you don’t have a sunny windowsill, grow lights will provide the necessary light for your seedlings.
* Heat Mat (Optional): A heat mat can speed up germination, but it’s not essential.
* Labels and a Permanent Marker: To keep track of your different cabbage varieties.
* Gardening Gloves: To protect your hands.
* Trowel or Small Shovel: For transplanting.
* Fertilizer: A balanced fertilizer for feeding your seedlings and mature plants.
* Insect Netting (Optional): To protect your cabbages from pests like cabbage moths.
Starting Your Cabbage Seeds Indoors
Starting your cabbage seeds indoors gives them a head start, especially in regions with short growing seasons. Here’s how I do it:
1. Prepare Your Seed Starting Trays: Fill each cell of your seed starting tray with seed starting mix. Gently tap the tray to settle the mix.
2. Sow the Seeds: Make a small indentation (about 1/4 inch deep) in the center of each cell. Place 2-3 cabbage seeds in each indentation. This increases the chances of at least one seed germinating.
3. Cover the Seeds: Gently cover the seeds with seed starting mix.
4. Water Thoroughly: Use a watering can or spray bottle to thoroughly moisten the seed starting mix. Be careful not to wash away the seeds.
5. Label Your Trays: Use labels and a permanent marker to clearly identify each cabbage variety.
6. Provide Warmth and Light: Place the seed starting trays in a warm location (around 70-75°F). A heat mat can help maintain this temperature. If you don’t have a sunny windowsill, use grow lights. Position the lights a few inches above the trays and keep them on for 14-16 hours per day.
7. Keep the Soil Moist: Check the soil moisture daily and water as needed to keep it consistently moist but not soggy.
8. Thin the Seedlings: Once the seedlings have emerged and have their first true leaves (the second set of leaves), thin them to one seedling per cell. Choose the strongest, healthiest seedling and snip off the others at the soil line.
Transplanting Your Cabbage Seedlings Outdoors
After about 4-6 weeks, your cabbage seedlings will be ready to transplant outdoors. This is a crucial step, so let’s do it right!
1. Harden Off the Seedlings: Before transplanting, you need to “harden off” the seedlings. This process gradually acclimates them to outdoor conditions. Start by placing the trays outdoors in a sheltered location for a few hours each day, gradually increasing the amount of time they spend outside over the course of a week. Protect them from direct sunlight and strong winds.
2. Prepare the Garden Bed: Choose a sunny location with well-drained soil. Cabbages prefer a soil pH of 6.0-7.5. Amend the soil with compost or well-rotted manure to improve its fertility and drainage.
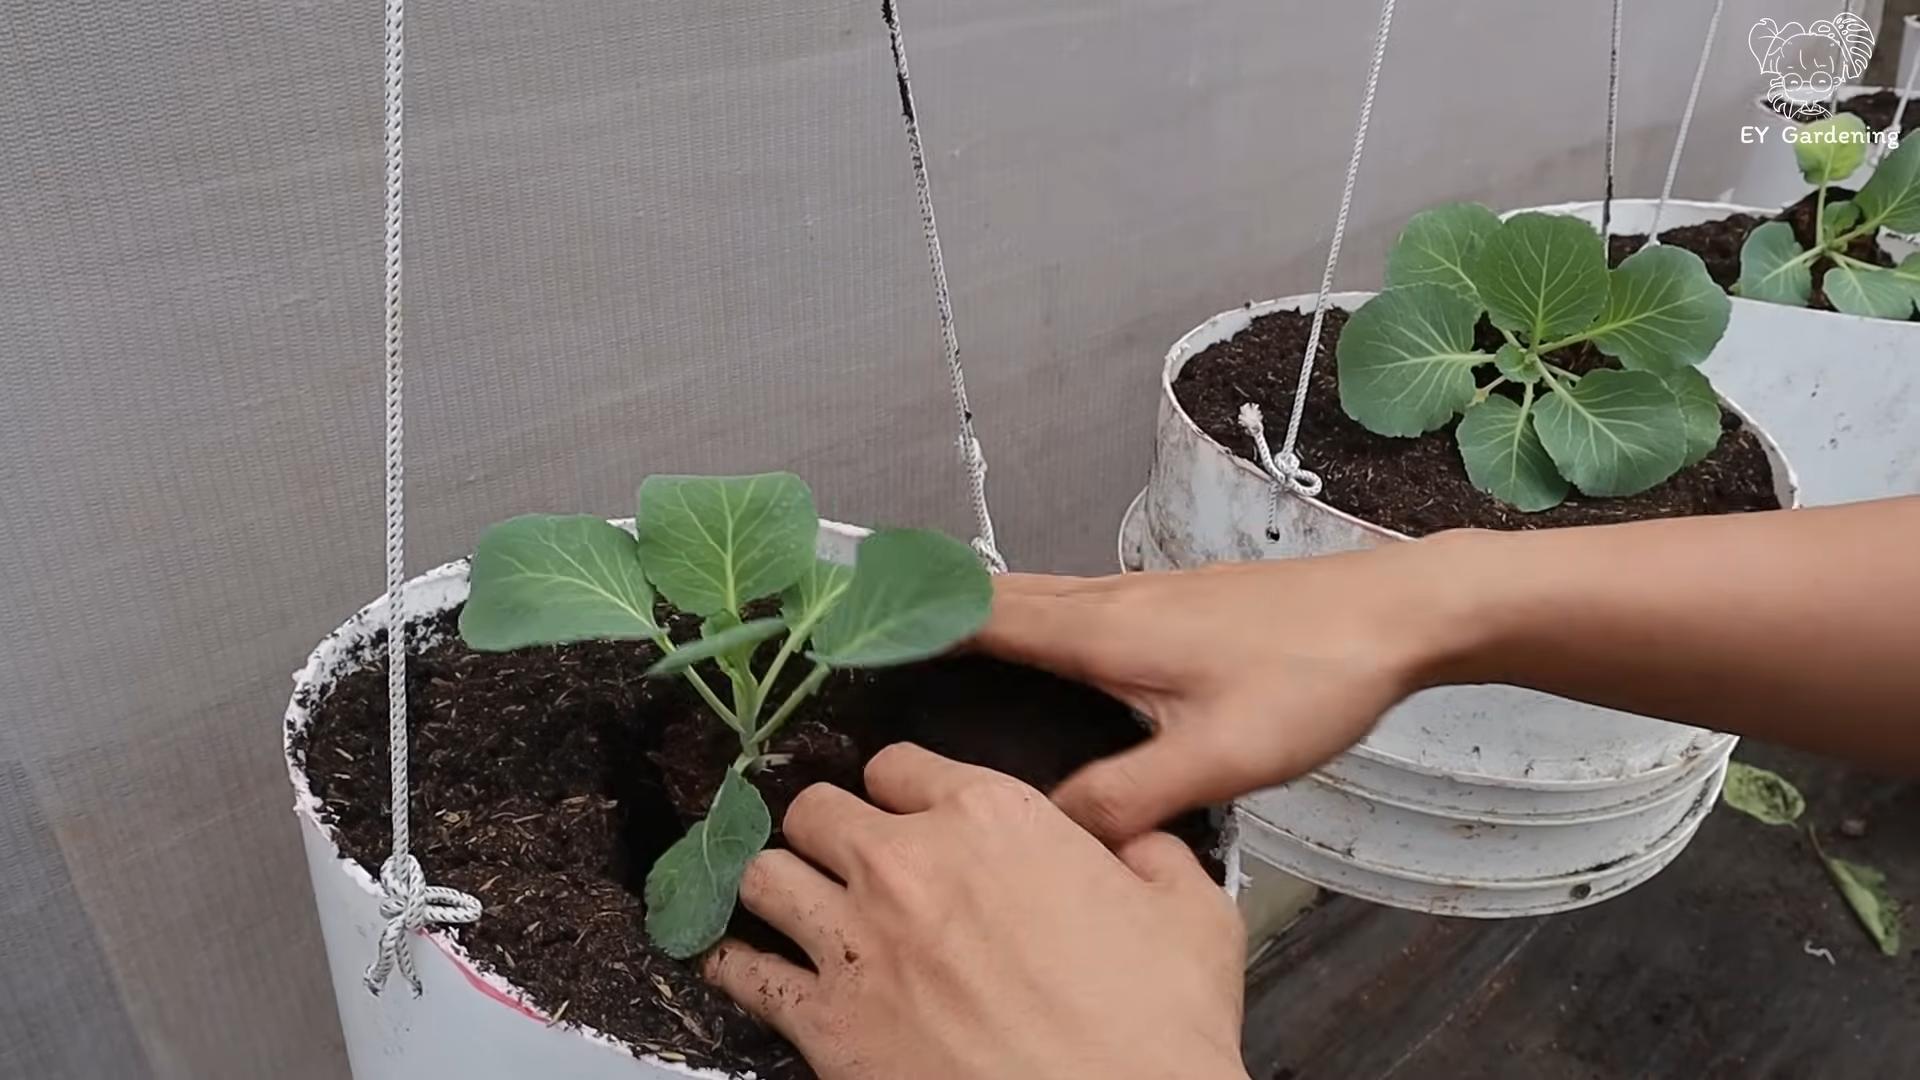
3. Transplant the Seedlings: Dig holes that are slightly larger than the root balls of the seedlings. Space the holes according to the mature size of your chosen cabbage variety (usually 12-24 inches apart). Gently remove the seedlings from the trays and place them in the holes. Backfill with soil and gently firm around the base of the plants.
4. Water Thoroughly: Water the newly transplanted seedlings thoroughly.
5. Mulch Around the Plants: Apply a layer of mulch (such as straw or wood chips) around the plants to help retain moisture, suppress weeds, and regulate soil temperature.
6. Protect from Pests: Cabbage moths can be a major problem. Consider using insect netting to protect your plants.
Caring for Your Cabbage Plants
Now that your cabbages are in the ground, it’s time to provide them with the care they need to thrive.
1. Watering: Cabbages need consistent moisture, especially during head formation. Water deeply and regularly, especially during dry periods. Aim for about 1-1.5 inches of water per week.
2. Fertilizing: Feed your cabbage plants every 2-3 weeks with a balanced fertilizer. Follow the instructions on the fertilizer package.
3. Weeding: Keep the garden bed free of weeds, which can compete with your cabbages for nutrients and water.
4. Pest Control: Monitor your plants regularly for pests. Cabbage moths, cabbage loopers, and aphids are common culprits. Handpick pests when possible. For more severe infestations, consider using organic insecticides like Bacillus thuringiensis (Bt) for caterpillars or insecticidal soap for aphids.
5. Disease Prevention: Cabbages can be susceptible to diseases like black rot and clubroot. Choose disease-resistant varieties and practice good garden hygiene to prevent these problems. Ensure good air circulation around the plants and avoid overhead watering.
Harvesting Your Cabbage
The moment you’ve been waiting for! Knowing when to harvest your cabbage is key to getting the best flavor and texture.
1. Check for Firmness: The cabbage head should feel firm and solid when squeezed gently.
2. Consider Size: The size of the head will vary depending on the variety, but it should be close to the expected mature size.
3. Check the Outer Leaves: The outer leaves should be tightly wrapped around the head.
4. Harvesting: Use a sharp knife to cut the cabbage head from the stem, leaving a few outer leaves attached.
Storing Your Cabbage
If you’re not planning to eat your cabbage right away, you can store it for several weeks.
1. Cool and Dry: Store your cabbage in a cool, dry place, such as a refrigerator or root cellar.
2. Remove Damaged Leaves: Remove any damaged or yellowing outer leaves.
3. Wrap in Plastic: Wrap the cabbage head in plastic wrap to help retain moisture.
4. Check Regularly: Check the cabbage regularly for signs of spoilage.
Troubleshooting Common Cabbage Problems
Even with the best care, you might encounter some problems along the way. Here are a few common issues and how to address them:
* Cabbage Worms/Loopers: These caterpillars can decimate your cabbage plants. Use Bt or handpick them off the plants.
* Aphids: These tiny insects suck the sap from the leaves. Use insecticidal soap or a strong stream of water to dislodge them.
* Slugs and Snails: These pests can chew holes in the leaves. Use slug bait or handpick them at night.
* Black Rot: This bacterial disease causes black veins in the leaves. Remove infected plants and avoid overhead watering.
* Clubroot: This fungal disease causes swollen roots and stunted growth.
Conclusion
So, there you have it! Growing cabbage from seed might seem daunting at first, but with a little patience and these simple steps, you’ll be harvesting your own delicious, homegrown cabbage in no time. This DIY trick is a must-try for several reasons. First, it’s incredibly rewarding to nurture a plant from a tiny seed to a full-fledged vegetable. Second, you have complete control over the growing process, ensuring your cabbage is free from unwanted pesticides and chemicals. Third, and perhaps most importantly, the flavor of homegrown cabbage is simply unmatched – it’s sweeter, crisper, and more vibrant than anything you’ll find in the grocery store.
But the benefits don’t stop there. Growing your own cabbage from seed is also a fantastic way to save money. Seed packets are relatively inexpensive, and you can grow a significant amount of cabbage from just one packet. Plus, you’ll reduce your carbon footprint by eliminating the need for transportation and packaging associated with store-bought produce.
Don’t be afraid to experiment with different varieties of cabbage. There are countless options to choose from, each with its own unique flavor and texture. Try growing red cabbage for a colorful addition to salads, savoy cabbage for its crinkled leaves and mild flavor, or Napa cabbage for its delicate sweetness. You can even try succession planting, sowing seeds every few weeks to ensure a continuous harvest throughout the growing season.
Consider companion planting to further enhance your cabbage growing experience. Marigolds can help deter pests, while dill and chamomile can attract beneficial insects. Planting clover as a ground cover can also help suppress weeds and improve soil health.
Ready to take the plunge and grow your own cabbage from seed? We encourage you to give it a try! It’s a fun, educational, and ultimately delicious experience. And remember, even if you encounter a few challenges along the way, don’t give up! Gardening is a learning process, and every mistake is an opportunity to grow (pun intended!).
Once you’ve harvested your first head of homegrown cabbage, be sure to share your experience with us. We’d love to hear about your successes, your challenges, and any tips or tricks you’ve discovered along the way. Share your photos and stories on social media using #HomegrownCabbage and let’s inspire others to embrace the joy of growing their own food.
Variations and Further Exploration
Beyond the basic steps outlined, there are several ways to customize your cabbage-growing journey. For example, if you live in a colder climate, you might consider starting your seeds indoors several weeks before the last frost. This will give your seedlings a head start and allow them to mature more quickly once they’re transplanted outdoors.
Another variation is to experiment with different soil amendments. Adding compost, aged manure, or other organic matter to your soil can significantly improve its fertility and drainage, leading to healthier and more productive cabbage plants.
Finally, don’t be afraid to get creative with your cabbage recipes. Cabbage is a versatile vegetable that can be used in a wide variety of dishes, from classic coleslaw and sauerkraut to stir-fries, soups, and stews. Explore different cuisines and experiment with different flavor combinations to discover your favorite ways to enjoy your homegrown cabbage.
Embrace the Journey
Growing cabbage from seed is more than just a way to get fresh vegetables; it’s a connection to nature, a celebration of the seasons, and a testament to the power of perseverance. So, grab a packet of seeds, get your hands dirty, and embark on this rewarding journey. You might be surprised at what you can achieve!
FAQ
Here are some frequently asked questions to help you successfully grow cabbage from seed:
What is the best time to start cabbage seeds?
The timing for starting cabbage seeds depends on your climate and the specific variety of cabbage you’re growing. In general, you can start seeds indoors 6-8 weeks before the last expected frost in spring for a spring/summer harvest, or 10-12 weeks before the first expected frost in fall for a fall/winter harvest. Check the seed packet for specific recommendations for your chosen variety. If you live in a region with mild winters, you can often direct sow cabbage seeds in late summer or early fall for a winter harvest.
How deep should I plant cabbage seeds?
Cabbage seeds should be planted about ¼ to ½ inch deep in well-draining soil. Gently cover the seeds with soil and water thoroughly. Keep the soil consistently moist until the seeds germinate, which usually takes 5-10 days.
What kind of soil is best for growing cabbage?
Cabbage thrives in well-draining, fertile soil that is rich in organic matter. The ideal soil pH is between 6.0 and 7.5. Before planting, amend your soil with compost, aged manure, or other organic matter to improve its fertility and drainage. You can also add a slow-release fertilizer to provide your cabbage plants with the nutrients they need to grow.
How much sunlight does cabbage need?
Cabbage requires at least 6 hours of direct sunlight per day to grow properly. Choose a sunny location in your garden where your cabbage plants will receive ample sunlight. If you live in a hot climate, some afternoon shade can be beneficial to prevent the leaves from scorching.
How often should I water cabbage plants?
Cabbage plants need consistent moisture to thrive. Water deeply and regularly, especially during dry periods. Aim to keep the soil consistently moist but not waterlogged. Mulching around your cabbage plants can help retain moisture and suppress weeds.
What are some common pests and diseases that affect cabbage?
Cabbage is susceptible to several pests and diseases, including cabbage worms, aphids, flea beetles, clubroot, and black rot. To prevent pest and disease problems, practice good garden hygiene, such as removing plant debris and weeds. You can also use row covers to protect your cabbage plants from pests. If you encounter pest or disease problems, treat them promptly with appropriate organic or chemical controls.
How do I know when my cabbage is ready to harvest?
Cabbage is ready to harvest when the head is firm and solid. The size of the head will vary depending on the variety. To harvest, use a sharp knife to cut the head from the stem, leaving a few outer leaves attached.
Can I grow cabbage in containers?
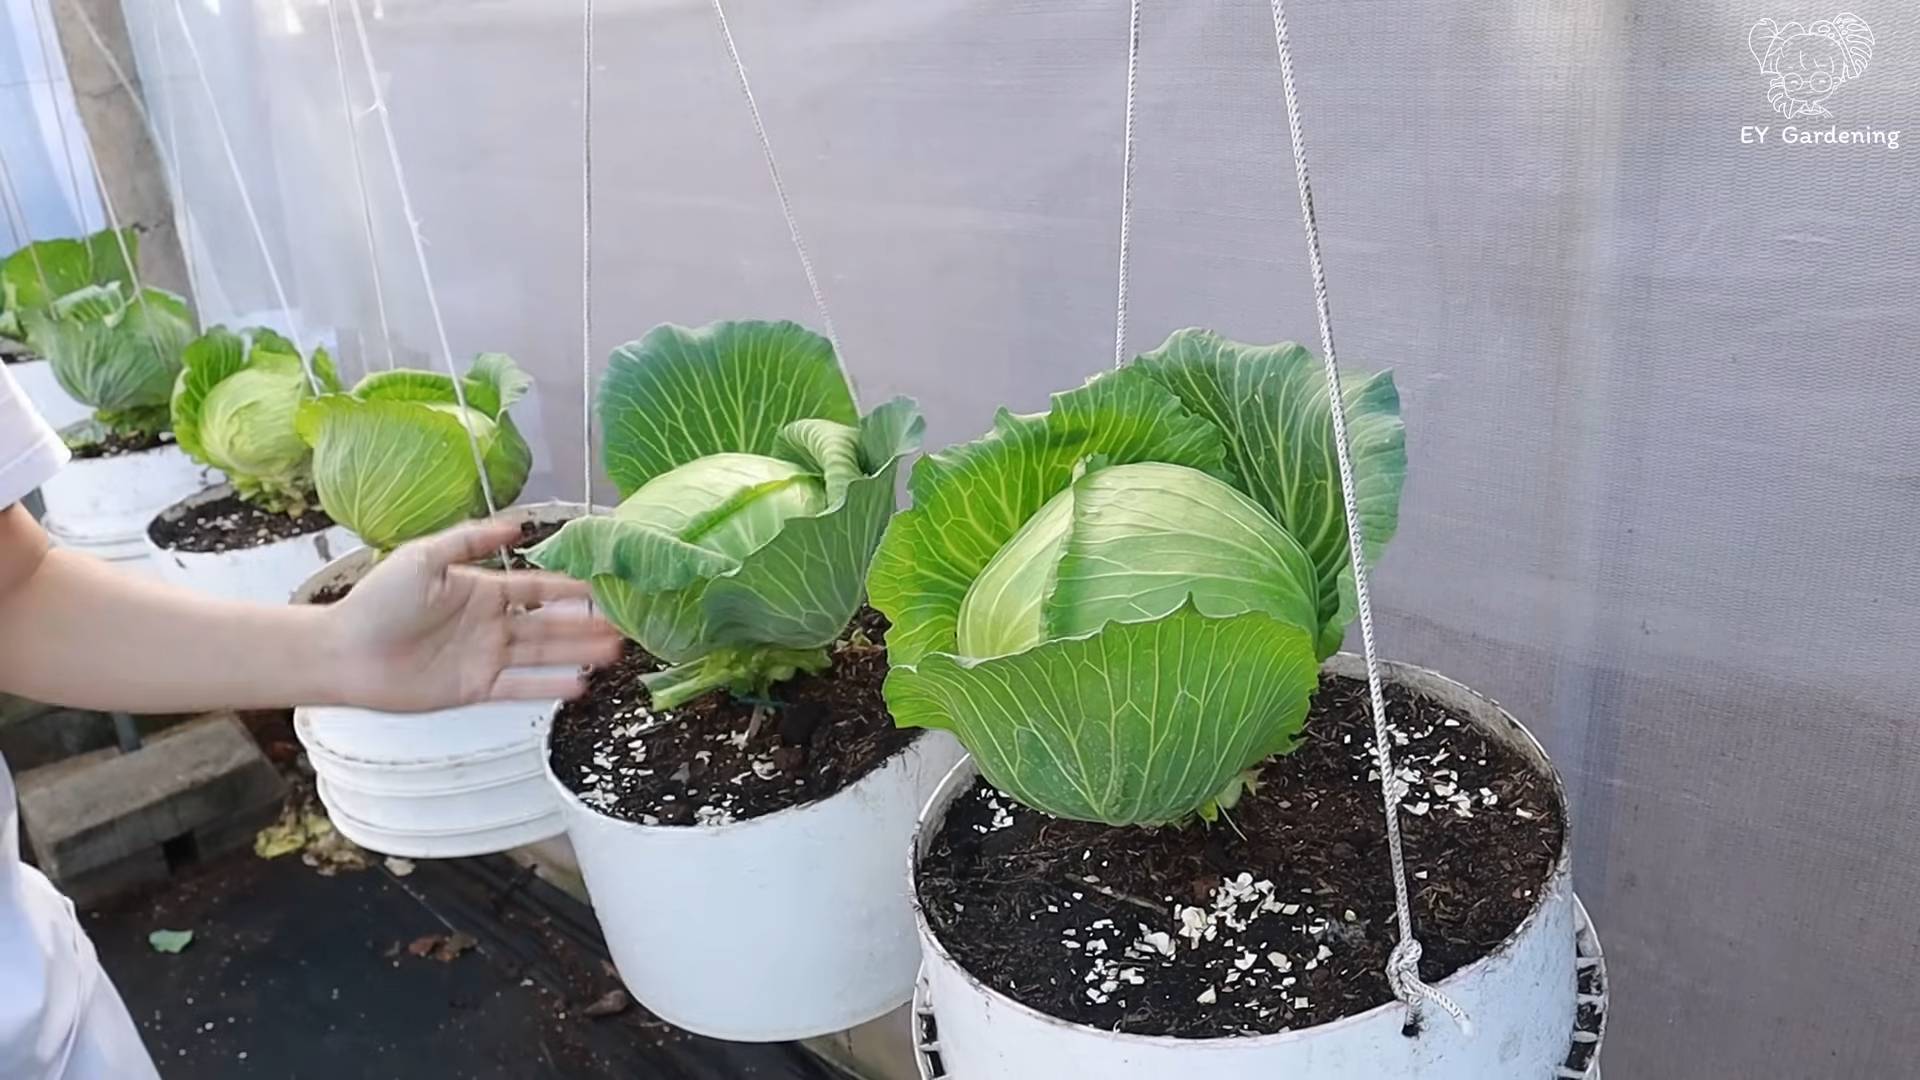
Yes, you can grow cabbage in containers, but you’ll need to choose a large container that is at least 12 inches in diameter and 12 inches deep. Use a well-draining potting mix and water regularly. Container-grown cabbage may require more frequent fertilization than cabbage grown in the ground.
What are some good companion plants for cabbage?
Good companion plants for cabbage include marigolds, dill, chamomile, rosemary, thyme, and clover. Marigolds help deter pests, while dill and chamomile attract beneficial insects. Clover can help suppress weeds and improve soil health. Avoid planting cabbage near members of the nightshade family, such as tomatoes, peppers, and eggplants, as they can compete for nutrients and attract similar pests.
Can I save seeds from my homegrown cabbage?
Saving seeds from cabbage can be a bit challenging, as cabbage is a biennial plant, meaning it takes two years to produce seeds. If you want to save seeds, you’ll need to overwinter your cabbage plants and allow them to flower and produce seeds in the second year. Keep in mind that cabbage is cross-pollinated, so if you’re growing multiple varieties, the seeds may not be true to type.

Leave a Comment