

Growing Yellow Habanero Peppers can seem intimidating, but trust me, with a few simple tricks and a little DIY spirit, you can cultivate these fiery delights right in your own backyard! For centuries, peppers, including the habanero, have been cherished not only for their culinary kick but also for their medicinal properties. Originating in the Amazon basin and spreading throughout the Americas, these vibrant fruits have become a staple in cuisines worldwide.
Have you ever dreamed of adding a burst of sunshine and intense heat to your dishes with peppers you’ve nurtured yourself? Imagine the satisfaction of harvesting your own growing yellow habanero peppers, knowing exactly where they came from and how they were grown. In this article, I’m going to share some easy-to-follow DIY hacks that will help you successfully grow these flavorful peppers, even if you’re a complete beginner.
Many people shy away from growing habaneros because they believe it’s too difficult. But the truth is, with the right knowledge and a few clever techniques, you can overcome common challenges like slow germination, pest control, and achieving optimal pepper production. I’m here to empower you with the knowledge and confidence to transform your garden into a habanero haven. Let’s get started!

Growing Yellow Habanero Peppers: A DIY Guide to Fiery Success!
Alright, pepper lovers! Get ready to turn up the heat because we’re diving into the wonderful world of growing yellow habanero peppers. These little sunshine bombs pack a serious punch, and there’s nothing quite like the satisfaction of harvesting your own homegrown fire. I’m going to walk you through everything you need to know, from seed to sizzling sauce. Let’s get started!
Choosing Your Seeds and Starting Indoors
Habaneros need a long growing season, so starting them indoors is crucial, especially if you live in a cooler climate.
* Seed Selection: Opt for high-quality seeds from a reputable source. Look for varieties specifically labeled “yellow habanero” to ensure you get the color and heat you’re after. I personally love the flavor profile of the ‘Golden Habanero’ variety.
* Timing is Key: Start your seeds indoors 8-10 weeks before the last expected frost. This gives them plenty of time to germinate and develop into strong seedlings.
* Seed Starting Mix: Use a seed starting mix, not regular potting soil. Seed starting mixes are lighter and provide better drainage, which is essential for delicate seedlings.
* Containers: You can use seed starting trays, peat pots, or even recycled egg cartons (with drainage holes!). I prefer seed starting trays with a humidity dome to create a warm, moist environment.
* Lighting: Habaneros need plenty of light to thrive. If you don’t have a sunny windowsill, invest in a grow light. I use a simple fluorescent shop light, and it works wonders.
Step-by-Step Seed Starting:
1. Moisten the Seed Starting Mix: Before filling your containers, thoroughly moisten the seed starting mix. It should be damp but not soggy.
2. Fill the Containers: Fill your chosen containers with the moistened seed starting mix, leaving about half an inch of space at the top.
3. Sow the Seeds: Plant the seeds about 录 inch deep. I usually plant 2-3 seeds per cell to increase the chances of germination.
4. Cover and Water: Gently cover the seeds with more seed starting mix and lightly water them using a spray bottle. Avoid overwatering, as this can lead to damping off (a fungal disease that kills seedlings).
5. Create a Humid Environment: Place the seed starting tray under a humidity dome or cover it with plastic wrap to create a humid environment. This helps the seeds germinate.
6. Provide Warmth: Habaneros germinate best at temperatures between 80-85掳F (27-29掳C). Use a heat mat under the seed starting tray to maintain the ideal temperature.
7. Provide Light: Place the seed starting tray under a grow light or in a sunny windowsill. If using a grow light, keep it a few inches above the seedlings.
8. Monitor and Water: Check the soil moisture daily and water as needed to keep it consistently moist but not soggy. Remove the humidity dome or plastic wrap once the seedlings emerge.
9. Thin the Seedlings: Once the seedlings have their first true leaves (the second set of leaves), thin them to one plant per cell. Choose the strongest seedling and snip off the others at the soil line. Don’t pull them out, as this can disturb the roots of the remaining seedling.
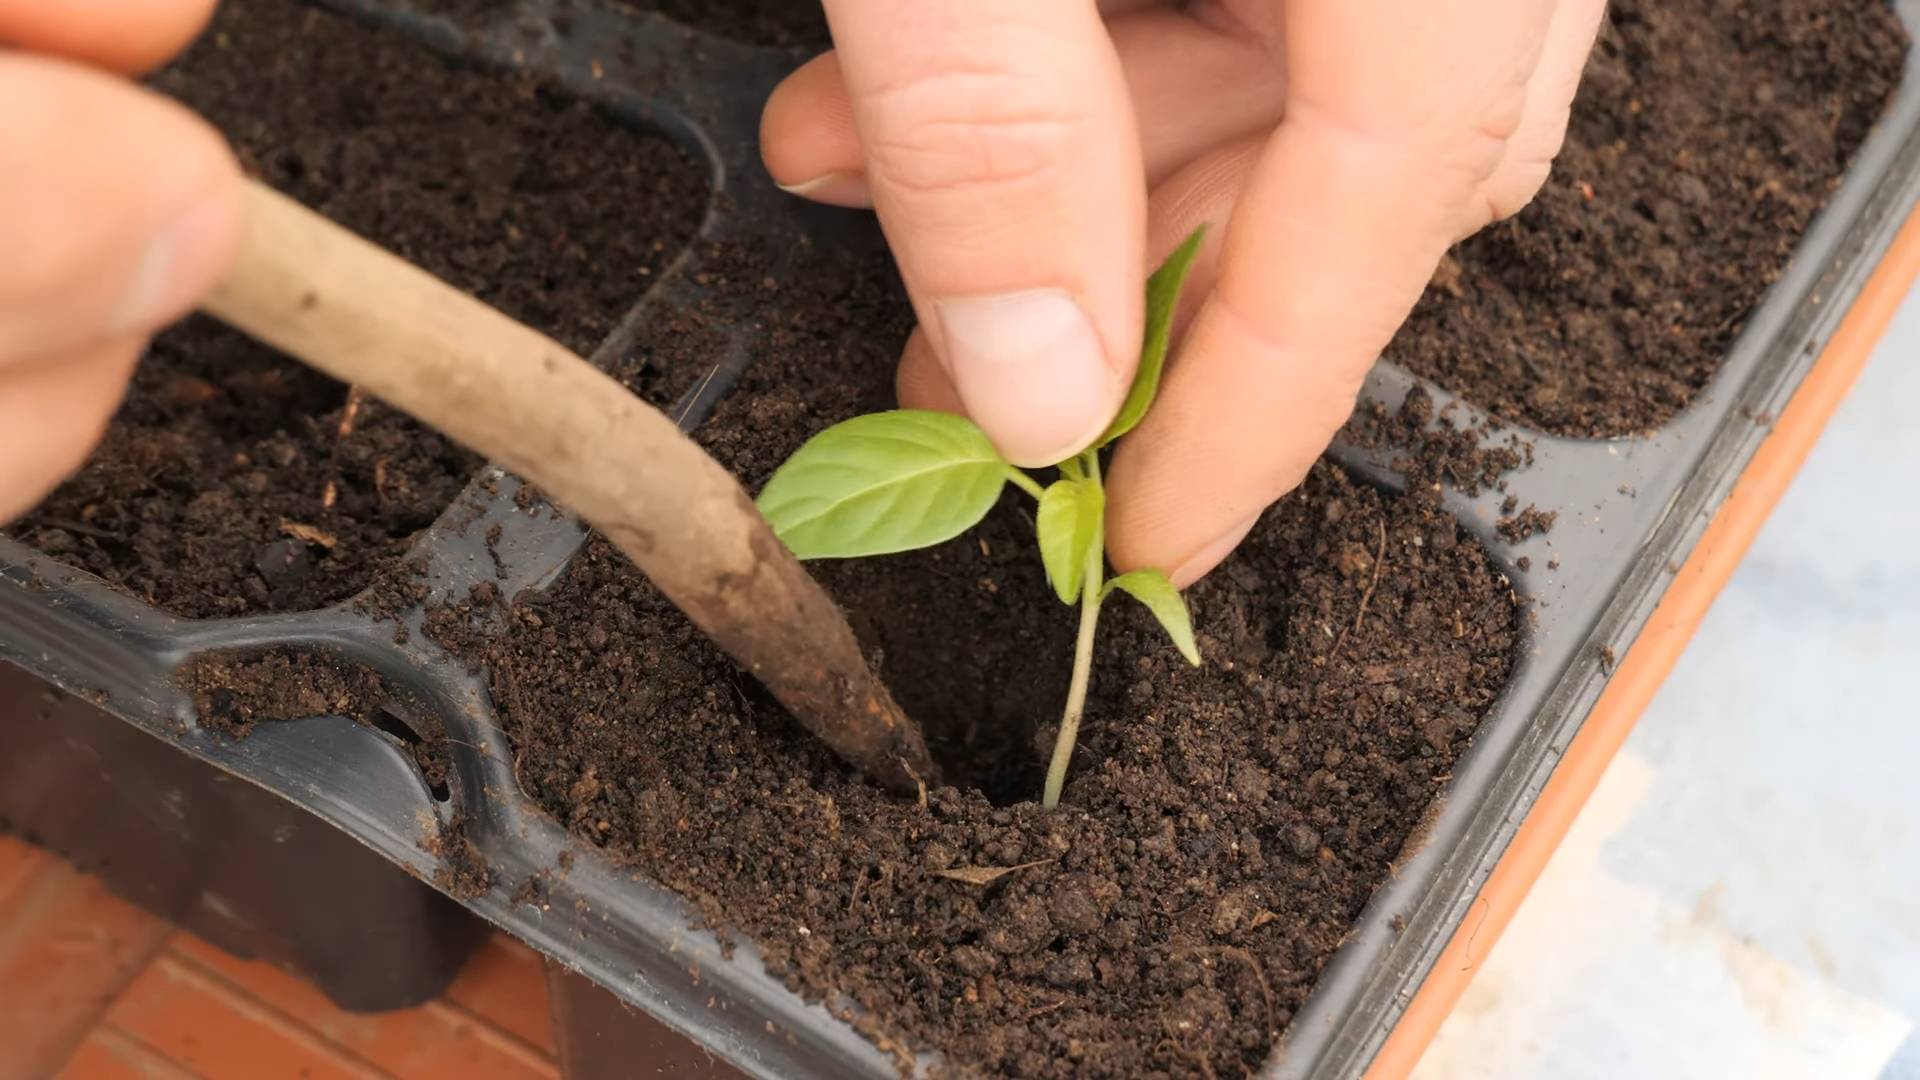
Transplanting Your Seedlings
Once the danger of frost has passed and your seedlings are a few inches tall with several sets of true leaves, it’s time to transplant them outdoors.
* Hardening Off: Before transplanting, you need to harden off your seedlings. This process gradually acclimates them to outdoor conditions, preventing transplant shock.
* Choosing a Location: Habaneros need at least 6-8 hours of sunlight per day. Choose a location with well-draining soil.
* Soil Preparation: Amend the soil with compost or other organic matter to improve drainage and fertility.
* Spacing: Space the plants 18-24 inches apart to allow them plenty of room to grow.
Step-by-Step Transplanting:
1. Harden Off the Seedlings: Start by placing the seedlings outdoors in a sheltered location for a few hours each day, gradually increasing the amount of time they spend outside over the course of a week or two. Protect them from direct sunlight and strong winds.
2. Prepare the Planting Hole: Dig a hole that is slightly larger than the root ball of the seedling.
3. Remove the Seedling: Gently remove the seedling from its container, being careful not to damage the roots. If the seedling is root-bound (the roots are tightly circling the pot), gently loosen the roots before planting.
4. Plant the Seedling: Place the seedling in the hole and backfill with soil, gently firming the soil around the base of the plant.
5. Water Thoroughly: Water the seedling thoroughly after planting.
6. Mulch: Apply a layer of mulch around the base of the plant to help retain moisture and suppress weeds. I like to use straw or wood chips.
7. Protect from Pests: Keep an eye out for pests such as aphids and flea beetles. Treat them as needed with insecticidal soap or other organic pest control methods.
Caring for Your Habanero Plants
Once your habanero plants are in the ground, it’s important to provide them with proper care to ensure a bountiful harvest.
* Watering: Water regularly, especially during hot, dry weather. Habaneros need consistent moisture, but avoid overwatering, as this can lead to root rot.
* Fertilizing: Fertilize every 2-3 weeks with a balanced fertilizer or a fertilizer specifically formulated for peppers. I like to use a liquid fertilizer diluted to half strength.
* Pruning: Pruning is not essential, but it can help to improve air circulation and encourage bushier growth. Remove any suckers (small shoots that grow from the base of the plant) to direct the plant’s energy towards fruit production.
* Support: As the plants grow and the peppers develop, they may need support to prevent them from falling over. Use stakes or cages to provide support.
* Pest and Disease Control: Monitor your plants regularly for pests and diseases. Treat them as needed with appropriate organic or chemical controls.
Specific Care Tips:
* Consistent Watering is Key: Habaneros are thirsty plants, especially when they are fruiting. Aim for consistent moisture, but avoid letting the soil become waterlogged.
* Fertilize Regularly: Peppers are heavy feeders, so regular fertilization is essential for optimal growth and fruit production.
* Watch Out for Blossom End Rot: Blossom end rot is a common problem in peppers, caused by a calcium deficiency. To prevent blossom end rot, ensure that your soil is rich in calcium and that you are watering consistently. You can also add calcium to the soil by mixing in crushed eggshells or bone meal.
* Protect from Extreme Heat: While habaneros love the sun, they can suffer from heat stress in extreme temperatures. If you live in a very hot climate, provide some afternoon shade to protect your plants.
Harvesting Your Habanero Peppers
The moment you’ve been waiting for! Harvesting your fiery bounty.
* When to Harvest: Habaneros are typically ready to harvest about 80-100 days after transplanting. The peppers will turn from green to yellow (or orange, depending on the variety) when they are ripe.
* How to Harvest: Use pruning shears or scissors to cut the peppers from the plant, leaving a small stem attached.
* Handling with Care: Wear gloves when handling habaneros, as the capsaicin (the compound that makes them hot) can irritate your skin. Avoid touching your eyes or face after handling the peppers.
Step-by-Step Harvesting:
1. Identify Ripe Peppers: Look for peppers that have turned a vibrant yellow color and are firm to the touch.
2. Use Pruning Shears or Scissors: Carefully cut the pepper from the plant, leaving a small stem attached.
3. Wear Gloves: Protect your hands by wearing gloves when handling the peppers.
4. Store Properly: Store the harvested peppers in a cool, dry place. They can be stored in the refrigerator for several weeks or frozen for longer storage. You can also dry them or pickle them.
Enjoying Your Harvest
Now for the fun part! There are countless ways to enjoy your homegrown habanero peppers.
* Fresh: Use them fresh in salsas, sauces, and other dishes. Remember, a little goes a long way!
* Dried: Dry them for later use. You can string them together and hang them to dry, or use a dehydrator.
* Pickled: Pickle them for a tangy and spicy treat.
*
Conclusion
So, there you have it! Growing your own yellow habanero peppers is not only achievable, but it’s also incredibly rewarding. From the vibrant color to the intense heat, these peppers bring a unique dimension to your culinary creations. This DIY approach empowers you to control the entire process, ensuring you get the freshest, most flavorful peppers possible, free from unwanted chemicals or additives.
Why is this a must-try? Because store-bought habaneros simply can’t compare to the satisfaction of harvesting your own. You’ll know exactly where they came from, how they were grown, and you’ll have a constant supply of these fiery gems right at your fingertips. Plus, it’s a fantastic way to connect with nature and learn more about the fascinating world of plants.
But the fun doesn’t stop there! Feel free to experiment with different growing mediums. While we’ve outlined a successful method, you might find that your yellow habanero peppers thrive even more in a slightly different soil composition. Consider adding a bit more perlite for enhanced drainage, or incorporating some compost tea for an extra boost of nutrients.
Another exciting variation is to try different container sizes. While a 5-gallon pot is a good starting point, you might want to experiment with larger containers to see if it encourages even more prolific pepper production. Just remember to adjust your watering and fertilizing schedule accordingly.
And don’t forget about companion planting! Basil, carrots, and onions are all known to be beneficial companions for peppers, helping to deter pests and improve overall plant health. Consider incorporating these into your garden alongside your yellow habaneros for a more holistic and productive growing experience.
Ultimately, the best way to learn is by doing. So, we strongly encourage you to give this DIY trick a try. Start small, be patient, and don’t be afraid to experiment. You might be surprised at how easy and enjoyable it is to grow your own yellow habanero peppers.
Once you’ve harvested your first batch, we’d love to hear about your experience! Share your tips, tricks, and successes in the comments below. Let’s build a community of passionate pepper growers and learn from each other. Did you encounter any challenges? What did you do to overcome them? What unique variations did you try? Your insights could be invaluable to other aspiring pepper growers.
Growing your own yellow habanero peppers is more than just a gardening project; it’s an adventure. It’s a chance to connect with nature, learn new skills, and enjoy the fruits (or rather, peppers) of your labor. So, grab your seeds, get your hands dirty, and get ready to experience the fiery flavor of homegrown habaneros! We are confident that you will find this process rewarding and that you will enjoy the delicious results. Happy growing!
Frequently Asked Questions (FAQ)
What is the best time of year to start growing yellow habanero peppers?
The ideal time to start your yellow habanero pepper seeds depends on your climate. In general, you should start your seeds indoors 6-8 weeks before the last expected frost. This allows the seedlings to develop a strong root system before being transplanted outdoors. If you live in a warmer climate with a longer growing season, you can start your seeds a bit later. If you live in a colder climate, you may need to start them even earlier. A good rule of thumb is to check your local frost dates and plan accordingly. You can also purchase starter plants from a local nursery if you prefer to skip the seed starting process.
How much sunlight do yellow habanero peppers need?
Yellow habanero peppers thrive in full sun, meaning they need at least 6-8 hours of direct sunlight per day. Insufficient sunlight can lead to leggy growth, reduced pepper production, and less intense flavor. If you’re growing your peppers indoors, you may need to supplement with grow lights to ensure they receive enough light. When transplanting your seedlings outdoors, choose a location that receives plenty of sunlight throughout the day. If you live in a particularly hot climate, you may want to provide some afternoon shade to prevent the peppers from getting scorched.
What kind of soil is best for growing yellow habanero peppers?
Yellow habanero peppers prefer well-draining soil that is rich in organic matter. A good potting mix for peppers should be slightly acidic, with a pH between 6.0 and 6.8. You can amend your soil with compost, aged manure, or other organic materials to improve its fertility and drainage. Avoid using heavy clay soils, as they can retain too much water and lead to root rot. If you’re growing your peppers in containers, make sure the pots have drainage holes to prevent waterlogging.
How often should I water my yellow habanero peppers?
Water your yellow habanero peppers regularly, especially during hot and dry weather. The soil should be kept consistently moist, but not waterlogged. Overwatering can lead to root rot, while underwatering can stress the plants and reduce pepper production. A good way to check if your peppers need water is to stick your finger into the soil. If the top inch or two feels dry, it’s time to water. When watering, water deeply and thoroughly, allowing the water to reach the roots. Avoid watering the foliage, as this can encourage fungal diseases.
What kind of fertilizer should I use for yellow habanero peppers?
Yellow habanero peppers benefit from regular fertilization, especially during the growing season. Use a balanced fertilizer with a ratio of N-P-K (nitrogen, phosphorus, potassium) that is appropriate for peppers. A good starting point is a 5-10-10 fertilizer. Nitrogen promotes leafy growth, phosphorus promotes root development and flowering, and potassium promotes fruit production. You can also use organic fertilizers, such as compost tea or fish emulsion. Avoid over-fertilizing, as this can lead to excessive foliage growth and reduced pepper production. Follow the instructions on the fertilizer label carefully.
How do I protect my yellow habanero peppers from pests and diseases?
Yellow habanero peppers can be susceptible to various pests and diseases, including aphids, spider mites, whiteflies, and fungal diseases. To prevent pest and disease problems, start with healthy plants, provide good air circulation, and avoid overwatering. Inspect your plants regularly for signs of pests or diseases. If you find any problems, treat them promptly with appropriate organic or chemical controls. Neem oil is a good organic option for controlling many common pests. Copper fungicide can be used to prevent or treat fungal diseases.
How long does it take for yellow habanero peppers to mature?
Yellow habanero peppers typically take 80-100 days to mature after transplanting. The exact time will depend on the variety, growing conditions, and climate. The peppers will start out green and gradually turn yellow as they ripen. You can harvest the peppers when they are fully yellow and firm to the touch. Use pruning shears or scissors to cut the peppers from the plant, leaving a small stem attached.
How hot are yellow habanero peppers?
Yellow habanero peppers are known for their intense heat. They typically range from 100,000 to 350,000 Scoville heat units (SHU) on the Scoville scale, which measures the pungency of chili peppers. This makes them significantly hotter than jalape帽o peppers, which typically range from 2,500 to 8,000 SHU. When handling yellow habanero peppers, it’s important to wear gloves to protect your skin from the capsaicin, the compound that gives peppers their heat. Avoid touching your eyes or face after handling the peppers.
Can I grow yellow habanero peppers indoors?
Yes, you can grow yellow habanero peppers indoors, but you’ll need to provide them with adequate light and warmth. Use grow lights to supplement natural sunlight, and maintain a consistent temperature between 70 and 80 degrees Fahrenheit. Choose a pot that is at least 5 gallons in size, and use a well-draining potting mix. Water regularly and fertilize as needed. Indoor-grown peppers may not be as productive as outdoor-grown peppers, but you can still harvest a decent crop.
How do I store yellow habanero peppers?
Yellow habanero peppers can be stored in several ways. Fresh peppers can be stored in the refrigerator for up to a week. You can also freeze the peppers for longer storage. To freeze, wash and dry the peppers, then place them in a freezer bag or container. Frozen peppers can be stored for up to a year. Another option is to dry the peppers. You can dry them in a dehydrator, in the oven at a low temperature, or by hanging them in a well-ventilated area. Dried peppers can be stored in an airtight container for up to a year. You can also pickle the peppers or make hot sauce.
Leave a Comment