

Grow Watermelons at Home – sounds like a dream, right? I know, I know, you’re probably thinking watermelons are only for sprawling farms, but trust me, with a few clever tricks and a little DIY spirit, you can absolutely cultivate these juicy giants in your own backyard, or even on a sunny balcony!
For centuries, watermelons have been a symbol of summer, abundance, and pure, unadulterated joy. Originating in Africa, they’ve traveled the globe, becoming a beloved treat in countless cultures. Think about it – summer picnics, family gatherings, that refreshing sweetness on a hot day…watermelons are woven into so many happy memories.
But why rely on store-bought watermelons when you can experience the unparalleled satisfaction of harvesting your own? Not only will you save money, but you’ll also have complete control over the growing process, ensuring a delicious, organic treat free from harmful pesticides. Plus, let’s be honest, there’s something incredibly rewarding about nurturing a tiny seed into a massive, mouthwatering fruit. This DIY guide is packed with easy-to-follow tips and tricks that will empower you to grow watermelons at home successfully, even if you’re a complete beginner. So, grab your gardening gloves, and let’s get started!

Growing Watermelons: A Sweet Summer Project You Can Do!
Okay, let’s be honest, who doesn’t love a juicy, refreshing watermelon on a hot summer day? And imagine the bragging rights if you grew it yourself! It might seem intimidating, but growing watermelons at home is totally achievable, even if you don’t have acres of land. I’m going to walk you through everything you need to know, from choosing the right variety to harvesting your prize-winning melon.
Choosing the Right Watermelon Variety
Before we get our hands dirty, let’s talk about watermelon varieties. Not all watermelons are created equal, and some are definitely better suited for home gardens than others. Consider your space, climate, and personal preferences when making your choice.
* Space Savers: If you’re short on space, look for bush or dwarf varieties like ‘Bush Sugar Baby’ or ‘Garden Baby’. These compact plants produce smaller melons but still pack a ton of flavor.
* Classic Favorites: ‘Sugar Baby’ is a reliable and popular choice for its sweet, red flesh and relatively small size. ‘Crimson Sweet’ is another classic, known for its large size and excellent taste.
* Unique Options: Want something a little different? Try a yellow or orange-fleshed variety like ‘Yellow Doll’ or ‘OrangeGlo’. These offer a unique flavor profile and a beautiful presentation.
* Seedless Wonders: Seedless watermelons are a convenient option, but they require a pollinator variety to produce fruit. ‘Millionaire’ and ‘Genesis’ are popular seedless choices.
Getting Started: Planting Your Watermelon Seeds
Now for the fun part! You have two options here: starting seeds indoors or direct sowing them in your garden. I usually prefer starting indoors, especially if you live in a cooler climate, as it gives the plants a head start.
Starting Seeds Indoors:
1. Gather Your Supplies: You’ll need seed starting trays or small pots, seed starting mix, watermelon seeds, a spray bottle, and a warm, sunny location or grow lights.
2. Sow the Seeds: Fill your trays or pots with seed starting mix, leaving about half an inch of space at the top. Moisten the mix with the spray bottle. Plant 2-3 watermelon seeds per cell or pot, about half an inch deep.
3. Provide Warmth and Light: Watermelon seeds need warmth to germinate. Aim for a soil temperature of 70-85°F (21-29°C). Place your trays in a warm, sunny spot or use a heat mat. If you’re using grow lights, keep them a few inches above the soil surface.
4. Keep the Soil Moist: Water gently with the spray bottle whenever the soil surface feels dry. Avoid overwatering, as this can lead to damping off, a fungal disease that can kill seedlings.
5. Thin the Seedlings: Once the seedlings have developed their first true leaves (the second set of leaves), thin them to one plant per cell or pot. Choose the strongest, healthiest-looking seedling and snip off the others at the soil line.
6. Harden Off the Seedlings: About a week before you plan to transplant your seedlings outdoors, start hardening them off. This means gradually exposing them to outdoor conditions to help them adjust. Start by placing them in a sheltered spot for an hour or two each day, gradually increasing the amount of time they spend outside.
Direct Sowing Seeds Outdoors:
1. Wait for Warm Weather: Watermelons are heat-loving plants, so it’s crucial to wait until the soil has warmed up to at least 70°F (21°C) before direct sowing. This is usually a few weeks after the last frost.
2. Prepare the Soil: Choose a sunny spot with well-drained soil. Amend the soil with compost or well-rotted manure to improve its fertility and drainage.
3. Sow the Seeds: Sow the seeds about an inch deep and 2-3 feet apart. Water gently after planting.
4. Protect from Pests: Young watermelon seedlings are vulnerable to pests like cutworms and flea beetles. Use row covers or insecticidal soap to protect them.
Transplanting and Caring for Your Watermelon Plants
Whether you started your seeds indoors or direct sowed them, proper care is essential for healthy watermelon plants and a bountiful harvest.
1. Choose a Sunny Location: Watermelons need at least 6-8 hours of direct sunlight per day. Choose a spot in your garden that gets plenty of sun.
2. Prepare the Soil: Watermelons thrive in well-drained, fertile soil. Before transplanting, amend the soil with compost or well-rotted manure. This will provide the plants with the nutrients they need to grow and produce fruit.
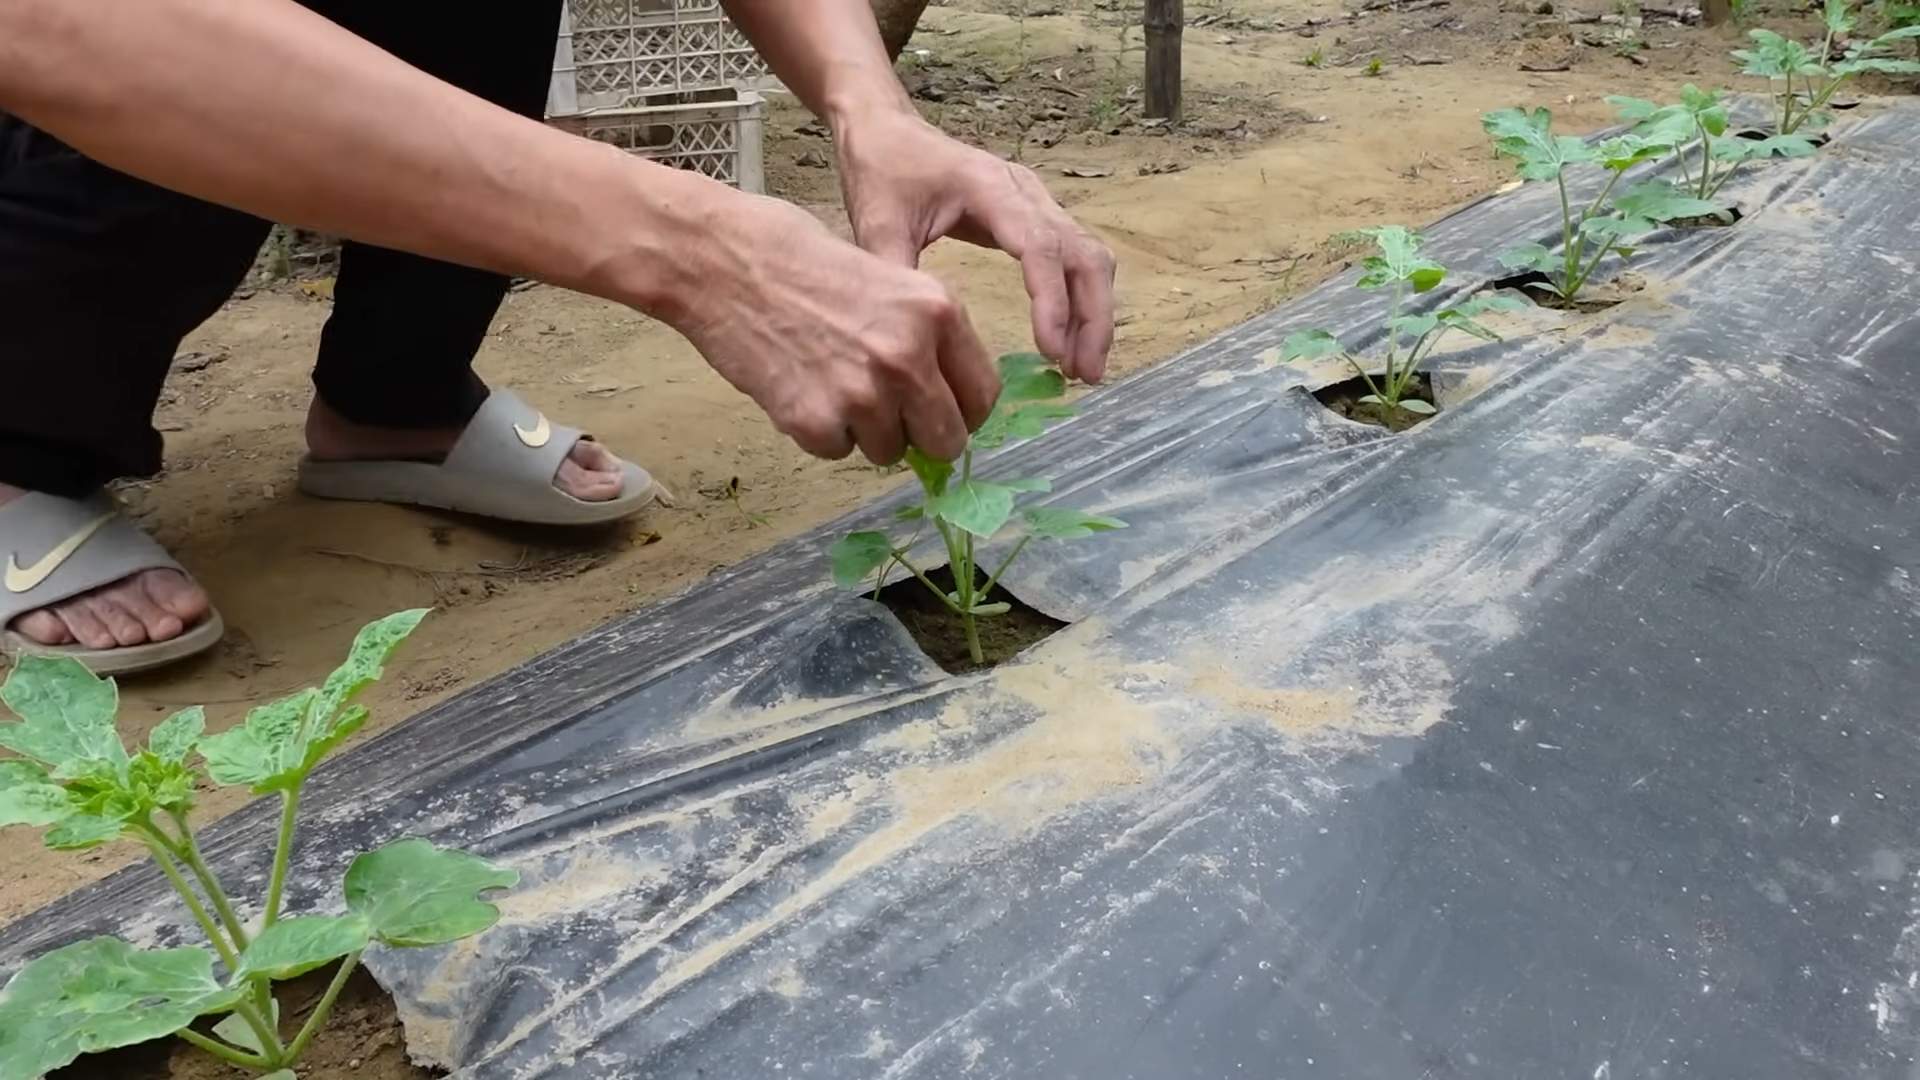
3. Transplant Carefully: If you started your seeds indoors, gently remove the seedlings from their pots and transplant them into the garden, spacing them 2-3 feet apart. Be careful not to damage the roots.
4. Water Deeply: Watermelon plants need consistent moisture, especially during hot weather. Water deeply at the base of the plants, avoiding getting the leaves wet. Aim for about 1-2 inches of water per week.
5. Fertilize Regularly: Watermelons are heavy feeders, so they need regular fertilization. Use a balanced fertilizer (e.g., 10-10-10) every 2-3 weeks, following the instructions on the package. You can also side-dress with compost or well-rotted manure.
6. Mulch Around the Plants: Mulching around your watermelon plants helps to retain moisture, suppress weeds, and regulate soil temperature. Use organic mulch like straw, hay, or wood chips.
7. Control Pests and Diseases: Watermelons are susceptible to various pests and diseases, including aphids, squash bugs, vine borers, and powdery mildew. Monitor your plants regularly and take action promptly if you notice any problems. Use organic pest control methods whenever possible.
8. Provide Support (Optional): If you’re growing a vining variety of watermelon, you may want to provide support for the vines. This can help to keep the fruits off the ground and prevent them from rotting. You can use a trellis, fence, or even just a pile of straw.
Pollination: Helping Your Watermelons Set Fruit
Watermelons are monoecious, meaning they have separate male and female flowers on the same plant. Pollination is essential for fruit set. Bees are the primary pollinators, so attract them to your garden by planting flowers that they love.
* Attract Pollinators: Plant flowers like lavender, sunflowers, and zinnias near your watermelon plants to attract bees and other pollinators.
* Hand-Pollination (If Necessary): If you’re not seeing a lot of bee activity, you can hand-pollinate your watermelon flowers. Use a small paintbrush to transfer pollen from the male flowers to the female flowers. The male flowers have a thin stem directly behind the flower, while the female flowers have a small, immature watermelon behind the flower.
Harvesting Your Watermelons: The Sweet Reward
Knowing when to harvest your watermelons is crucial for getting the best flavor and texture. Here are a few signs to look for:
1. The Tendril Test: The tendril closest to the fruit stem should be brown and dry.
2. The Ground Spot: The spot where the watermelon rests on the ground should be yellow or cream-colored.
3. The Thump Test: Give the watermelon a gentle thump. A ripe watermelon will sound hollow.
4. Days to Maturity: Check the seed packet for the days to maturity and start checking your watermelons around that time.
Once you’ve determined that your watermelon is ripe, use a sharp knife to cut it from the vine, leaving a few inches of stem attached.
Troubleshooting Common Watermelon Problems
Even with the best care, you might encounter some problems while growing watermelons. Here are a few common issues and how to address them:
* Blossom End Rot: This is caused by a calcium deficiency and results in a dark, sunken spot on the bottom of the fruit. To prevent blossom end rot, ensure your soil is rich in calcium and water consistently. You can also add calcium supplements to the soil.
* Poor Fruit Set: This can be caused by a lack of pollination or extreme temperatures. Attract pollinators to your garden and hand-pollinate if necessary. Protect your plants from extreme heat or cold.
* Pest Infestations: Monitor your plants regularly for pests like aphids, squash bugs, and vine borers. Use organic pest control methods like insecticidal soap or neem oil to control infestations.
* Fungal Diseases: Watermelons are susceptible to fungal diseases like powdery mildew and anthracnose. Prevent these diseases by providing good air circulation, avoiding overhead watering, and using a fungicide if necessary.
Enjoying Your Homegrown Watermelon
Conclusion
So, there you have it! Growing watermelons at home, while it might seem daunting at first, is entirely achievable with a little planning, patience, and the right approach. We’ve walked you through the essential steps, from selecting the perfect variety for your climate to nurturing those precious seedlings and finally, harvesting your own juicy, homegrown watermelons.
But why should you bother? Why not just pick one up at the grocery store? The answer is simple: flavor and satisfaction. There’s nothing quite like the taste of a watermelon you’ve nurtured from seed to fruit. The sweetness is more intense, the texture is crisper, and the sense of accomplishment is unparalleled. Plus, you know exactly what went into growing it – no mystery pesticides or long-distance transportation. You’re getting a truly fresh, local, and organic product, straight from your backyard.
This DIY approach to growing watermelons isn’t just about saving money (although that’s a nice bonus!). It’s about connecting with nature, learning new skills, and enjoying the fruits (literally!) of your labor. It’s about experiencing the magic of watching a tiny seed transform into a sprawling vine laden with delicious, refreshing watermelons.
This is more than just a gardening project; it’s an experience.
And the best part? You can customize your watermelon growing journey to suit your preferences. Experiment with different varieties – perhaps a personal-sized ‘Sugar Baby’ or a vibrant yellow ‘Golden Midget’. Try different trellising methods to save space and improve air circulation. Consider companion planting with herbs like basil or marigolds to deter pests naturally. The possibilities are endless!
Don’t be afraid to get your hands dirty and embrace the challenges that come with growing your own food. Remember, even experienced gardeners encounter setbacks. The key is to learn from your mistakes, adapt your techniques, and keep trying.
We wholeheartedly encourage you to give this DIY watermelon growing trick a try. Imagine biting into a slice of your own homegrown watermelon on a hot summer day – the ultimate reward for your hard work and dedication.
So, grab some seeds, prepare your garden bed, and get ready to embark on a rewarding and delicious adventure. We’re confident that you’ll be amazed by what you can achieve.
And most importantly, we want to hear about your experience! Share your photos, tips, and stories with us in the comments below. Let’s create a community of home gardeners who are passionate about growing their own watermelons and enjoying the sweet taste of success. Happy gardening!
Frequently Asked Questions (FAQ)
What is the best time to start growing watermelons?
The ideal time to start growing watermelons depends on your climate. Watermelons are warm-season crops and require a long growing season of at least 70-90 days. In general, you should start seeds indoors about 6-8 weeks before the last expected frost. If you live in a warmer climate with a longer growing season, you can direct sow seeds into the garden after the soil has warmed up to at least 70°F (21°C). Check your local frost dates and adjust your planting schedule accordingly. Starting too early can lead to frost damage, while starting too late may not give the watermelons enough time to mature before the end of the season.
What kind of soil is best for growing watermelons?
Watermelons thrive in well-drained, sandy loam soil that is rich in organic matter. The soil should have a pH between 6.0 and 6.8. Before planting, amend the soil with compost, aged manure, or other organic materials to improve drainage, fertility, and water retention. Avoid heavy clay soils, as they can become waterlogged and hinder root growth. If you have clay soil, consider growing watermelons in raised beds or containers filled with a suitable potting mix. Proper soil preparation is crucial for healthy watermelon growth and abundant fruit production.
How much sunlight do watermelons need?
Watermelons require at least 6-8 hours of direct sunlight per day to thrive. Choose a planting location that receives full sun throughout the day. Insufficient sunlight can lead to weak growth, poor fruit development, and reduced sweetness. If you live in a particularly hot climate, some afternoon shade may be beneficial to prevent sunburn on the fruits. However, avoid planting watermelons in areas that are shaded for most of the day.
How often should I water my watermelons?
Watermelons need consistent watering, especially during hot and dry periods. Water deeply and regularly, aiming to keep the soil consistently moist but not waterlogged. Water at the base of the plants to avoid wetting the foliage, which can increase the risk of fungal diseases. During fruit development, watermelons require even more water to support the growing fruits. Reduce watering as the fruits ripen to concentrate the sugars and improve flavor. A good rule of thumb is to water when the top inch of soil feels dry to the touch.
How do I know when my watermelons are ripe?
Determining when a watermelon is ripe can be tricky, but there are several indicators to look for. First, check the tendril closest to the fruit stem. When this tendril turns brown and dries out, it’s a good sign that the watermelon is nearing ripeness. Second, examine the underside of the watermelon where it rests on the ground. This spot, known as the ground spot, should turn from white to a creamy yellow color. Finally, thump the watermelon with your knuckles. A ripe watermelon will produce a deep, hollow sound. If it sounds dull or high-pitched, it’s likely not ripe yet. With practice, you’ll develop a feel for identifying ripe watermelons.
What are some common pests and diseases that affect watermelons?
Watermelons are susceptible to various pests and diseases, including aphids, squash bugs, vine borers, powdery mildew, and fusarium wilt. Regularly inspect your plants for signs of infestation or disease. Use organic pest control methods, such as insecticidal soap or neem oil, to control aphids and squash bugs. Protect your plants from vine borers by wrapping the stems with aluminum foil or netting. Prevent powdery mildew by ensuring good air circulation and avoiding overhead watering. Choose disease-resistant varieties to minimize the risk of fusarium wilt. Early detection and prompt treatment are essential for preventing serious damage to your watermelon crop.
Can I grow watermelons in containers?
Yes, you can grow watermelons in containers, but you’ll need to choose a large container (at least 20 gallons) and select a compact or bush variety, such as ‘Sugar Baby’ or ‘Bush Sugar Baby’. Use a high-quality potting mix and provide adequate drainage. Container-grown watermelons require more frequent watering and fertilization than those grown in the ground. Place the container in a sunny location and provide support for the vines as they grow. While container-grown watermelons may not produce as many fruits as those grown in the ground, they can still provide a satisfying harvest.
Do watermelons need to be pollinated?
Yes, watermelons require pollination to produce fruit. Watermelons have separate male and female flowers on the same plant. Pollen must be transferred from the male flowers to the female flowers for fertilization to occur. This is typically done by bees and other pollinating insects. To attract pollinators to your garden, plant flowers that are rich in nectar and pollen, such as sunflowers, zinnias, and lavender. If you notice a lack of bee activity, you can hand-pollinate the flowers by using a small brush to transfer pollen from the male flowers to the female flowers.
How can I improve the sweetness of my watermelons?
Several factors can influence the sweetness of watermelons. First, choose a variety that is known for its sweetness. Second, ensure that your plants receive adequate sunlight and water. Third, fertilize your plants with a balanced fertilizer that is rich in potassium. Fourth, reduce watering as the fruits ripen to concentrate the sugars. Finally, harvest your watermelons at the peak of ripeness. By following these tips, you can maximize the sweetness of your homegrown watermelons.
What are some creative ways to use homegrown watermelons?
Beyond simply slicing and enjoying fresh, homegrown watermelons can be used in a variety of creative ways. Blend them into refreshing smoothies or juices. Grill watermelon slices for a smoky and caramelized flavor. Make watermelon salsa with diced watermelon, red onion, cilantro, and lime juice. Use watermelon juice to create popsicles or sorbet. Pickle watermelon rind for a tangy and crunchy treat. The possibilities are endless! Don’t be afraid to experiment and discover new ways to enjoy the delicious flavor of your homegrown watermelons.

Leave a Comment