

Grow Winged Beans Backyard – ever dreamt of having a garden that not only looks beautiful but also feeds you with nutritious and delicious food? I know I have! And that’s why I’m so excited to share this amazing DIY guide on growing winged beans right in your own backyard. Forget those bland, store-bought veggies; imagine stepping outside and harvesting fresh, vibrant winged beans whenever you want!
Winged beans, also known as asparagus peas or goa beans, have a rich history, particularly in Southeast Asia and Papua New Guinea, where they’ve been cultivated for centuries. They’re not just a tasty treat; they’re a nutritional powerhouse, packed with protein, vitamins, and minerals. But here’s the thing: they’re often overlooked in Western gardens. Why? Because many people don’t realize how easy and rewarding it is to grow winged beans backyard!
This DIY guide is your secret weapon to unlocking the potential of this incredible plant. Whether you’re a seasoned gardener or just starting out, I’ll walk you through every step, from choosing the right location to harvesting your bountiful crop. You’ll learn simple tricks and hacks that will ensure your winged beans thrive, even if you have limited space or a less-than-perfect green thumb. So, are you ready to transform your backyard into a winged bean paradise? Let’s get started!
Growing Winged Beans in Your Backyard: A Comprehensive DIY Guide
Hey there, fellow gardening enthusiasts! I’m so excited to share my experience with growing winged beans (Psophocarpus tetragonolobus) in my backyard. These fascinating legumes are not only beautiful climbers but also incredibly nutritious, with every part of the plant being edible – pods, leaves, flowers, seeds, and even the tubers! If you’re looking for a unique and rewarding addition to your garden, look no further. This guide will walk you through everything you need to know, from preparing the soil to harvesting your bounty.
Why Winged Beans?
Before we dive in, let’s talk about why winged beans are so awesome. They’re packed with protein, vitamins, and minerals. Plus, they’re relatively easy to grow, especially if you provide them with the right support. They’re also a great conversation starter – trust me, your neighbors will be curious!
Getting Started: Planning and Preparation
The key to a successful winged bean harvest lies in proper planning and preparation. Here’s what you need to consider:
* Climate: Winged beans thrive in warm, humid climates. They need a long growing season of at least 120-150 days. If you live in a cooler region, you can start the seeds indoors.
* Sunlight: These beans need at least 6-8 hours of direct sunlight per day. Choose a sunny spot in your garden.
* Soil: Winged beans prefer well-drained, fertile soil with a slightly acidic to neutral pH (6.0-7.0).
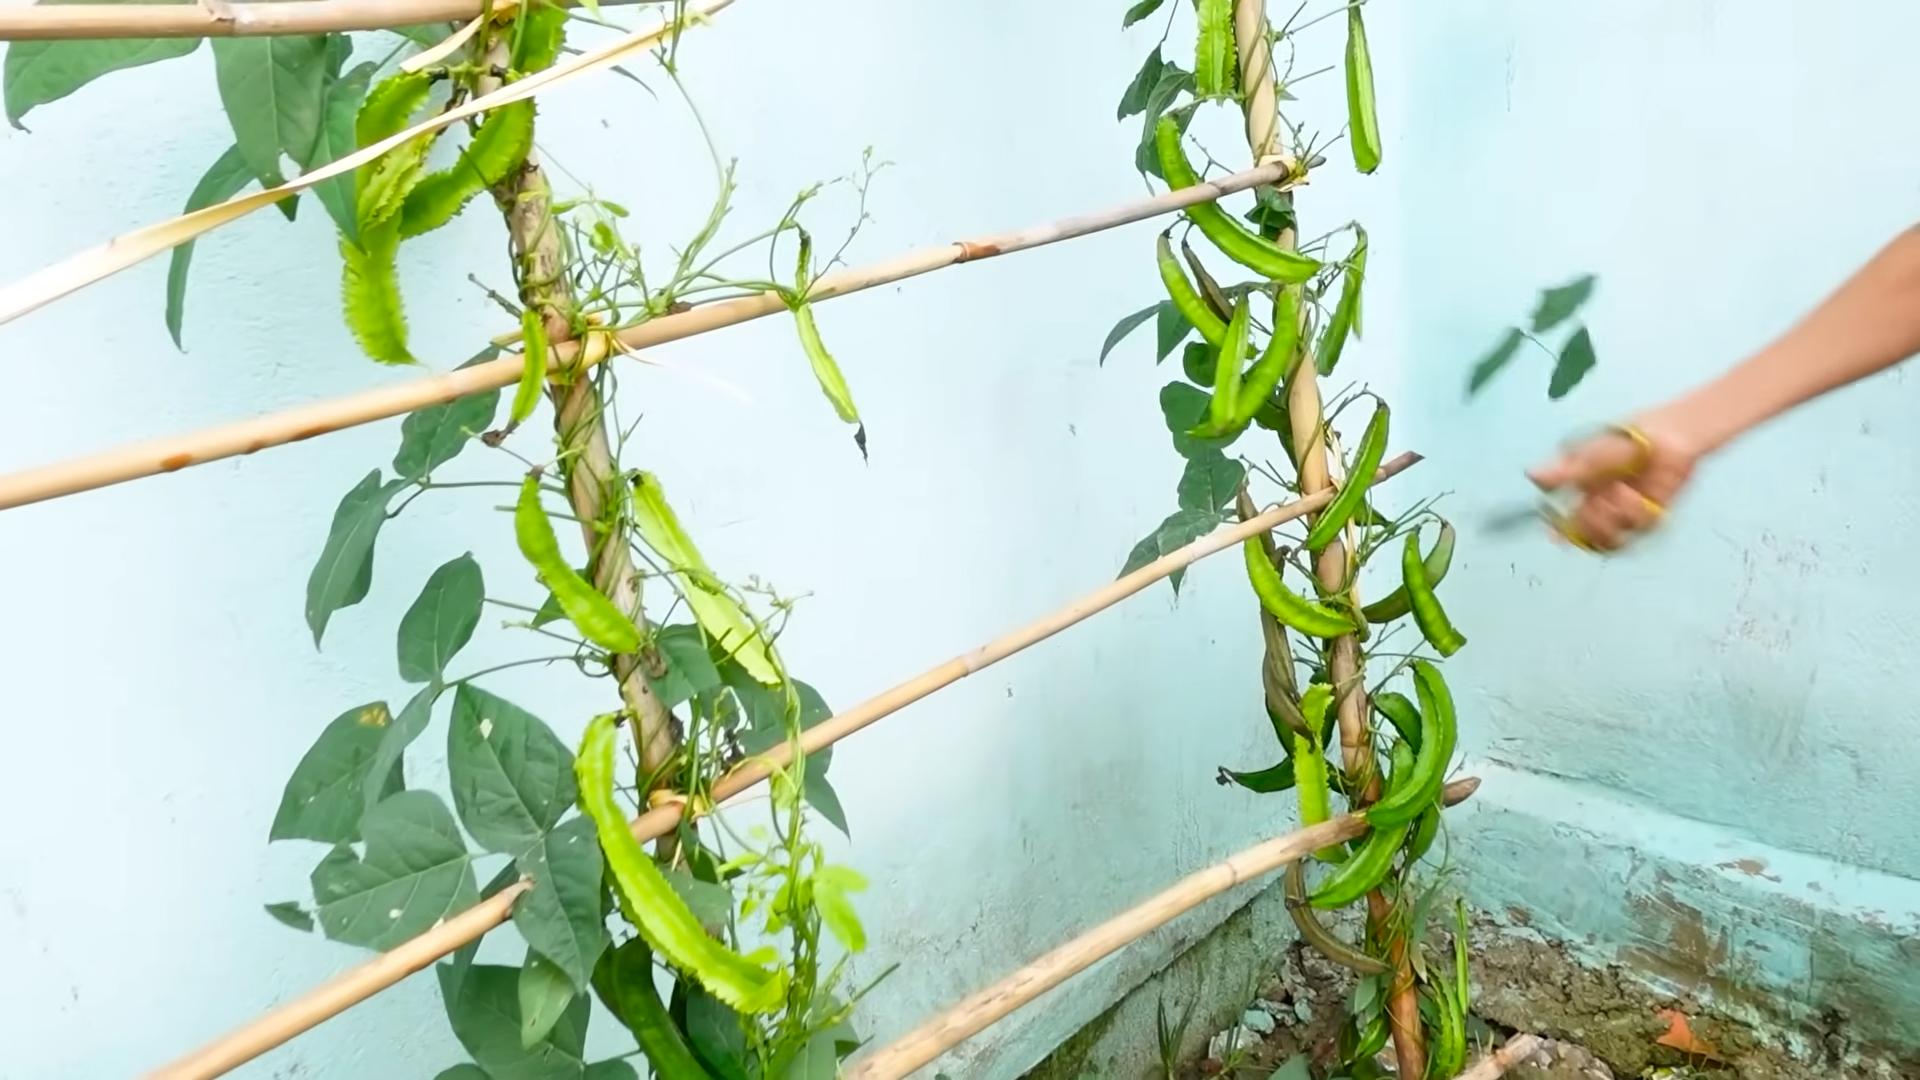
* Support: As climbers, winged beans need a strong trellis, fence, or other support structure to grow on. They can easily reach 6-12 feet in height, so plan accordingly.
* Seed Source: Obtain your seeds from a reputable source. Look for varieties that are well-suited to your local climate.
Step-by-Step Planting Guide
Okay, let’s get our hands dirty! Here’s a detailed guide to planting your winged beans:
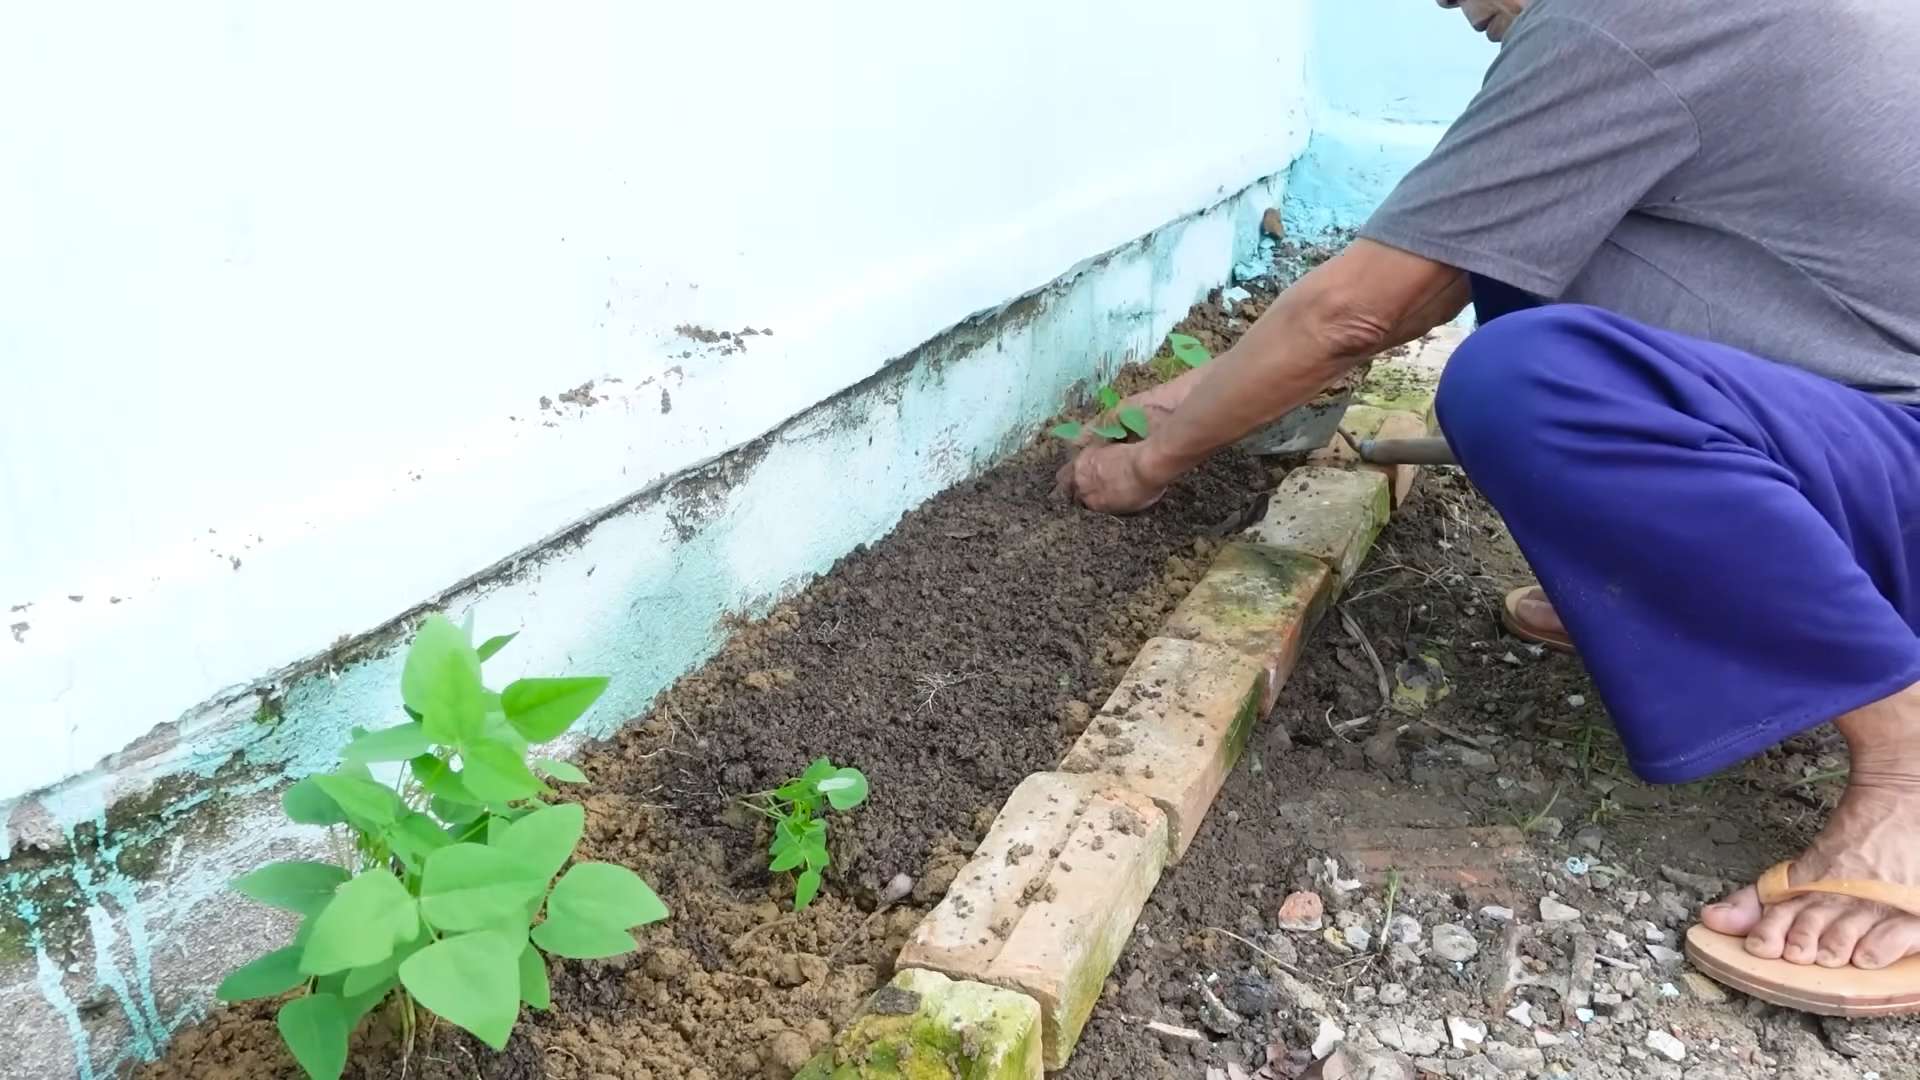
1. Soil Preparation
This is a crucial step! Winged beans need loose, nutrient-rich soil to thrive.
1. Clear the Area: Remove any weeds, rocks, and debris from the planting area.
2. Amend the Soil: Dig in plenty of compost, well-rotted manure, or other organic matter to improve soil fertility and drainage. I usually add about 2-3 inches of compost.
3. Check the pH: Use a soil testing kit to check the pH level. If the soil is too alkaline, you can amend it with sulfur or peat moss.
4. Loosen the Soil: Use a garden fork or tiller to loosen the soil to a depth of at least 12 inches. This will allow the roots to penetrate easily.
5. Create a Raised Bed (Optional): If your soil is poorly drained, consider creating a raised bed to improve drainage.
2. Starting Seeds (Indoors or Outdoors)
You can either start your seeds indoors or directly sow them in the garden, depending on your climate.
Starting Seeds Indoors:
1. Timing: Start seeds indoors about 4-6 weeks before the last expected frost.
2. Seed Trays or Pots: Fill seed trays or small pots with a seed-starting mix.
3. Sowing: Sow the seeds about 1 inch deep. I usually plant 2-3 seeds per pot to increase the chances of germination.
4. Watering: Water gently to moisten the soil.
5. Warmth and Light: Place the trays or pots in a warm location (around 70-75°F) with plenty of light. A heat mat can help speed up germination.
6. Transplanting: Once the seedlings have developed a few sets of true leaves and the weather has warmed up, transplant them into the garden. Harden them off for a week before transplanting by gradually exposing them to outdoor conditions.
Direct Sowing Outdoors:
1. Timing: Sow seeds directly in the garden after the last expected frost, when the soil has warmed up to at least 65°F.
2. Spacing: Sow the seeds about 1 inch deep and 6-12 inches apart.
3. Watering: Water gently to moisten the soil.
4. Thinning: Once the seedlings emerge, thin them to the strongest plant every 12 inches.
3. Setting Up the Support Structure
Winged beans are vigorous climbers, so a sturdy support structure is essential.
1. Choose Your Support: Options include a trellis, fence, bamboo poles, or even a sturdy tree branch.
2. Install Before Planting: It’s best to install the support structure before planting the seeds or transplanting the seedlings to avoid disturbing the roots later.
3. Ensure Stability: Make sure the support structure is strong enough to handle the weight of the mature plants. I’ve seen flimsy trellises collapse under the weight of a fully grown winged bean vine!
4. Guide the Vines: As the vines grow, gently guide them onto the support structure. They will eventually cling on their own.
4. Watering and Fertilizing
Proper watering and fertilization are crucial for healthy growth and abundant yields.
1. Watering: Water regularly, especially during dry periods. Winged beans need consistent moisture, but avoid overwatering, which can lead to root rot. Aim for about 1 inch of water per week.
2. Fertilizing: Fertilize every 4-6 weeks with a balanced fertilizer or compost tea. Avoid fertilizers that are too high in nitrogen, as this can promote leafy growth at the expense of pod production. I like to use a fertilizer with an NPK ratio of 5-10-10.
3. Mulching: Apply a layer of mulch around the base of the plants to help retain moisture, suppress weeds, and regulate soil temperature.
5. Pest and Disease Control
Winged beans are generally resistant to pests and diseases, but it’s still important to be vigilant.
1. Common Pests: Watch out for aphids, spider mites, and bean beetles. You can control these pests with insecticidal soap, neem oil, or by handpicking them off the plants.
2. Common Diseases: Root rot can be a problem in poorly drained soil. Ensure good drainage and avoid overwatering.
3. Prevention: Practice good garden hygiene to prevent pest and disease problems. Remove any diseased or infested plant material promptly.
Harvesting Your Winged Beans
The best part! Harvesting your winged beans is a rewarding experience.
1. Timing: Harvest the pods when they are young and tender, typically 6-8 inches long. They should be firm and snap easily.
2. Frequency: Harvest regularly to encourage continued pod production.
3. Method: Use scissors or pruning shears to cut the pods from the vine.
4. Other Edible Parts: Don’t forget that the leaves, flowers, and seeds are also edible! The tubers can be harvested in the fall after the plants have died back.
Using Your Harvest
Now that you’ve harvested your winged beans, it’s time to enjoy them!
1. Pods: The pods can be eaten raw, steamed, stir-fried, or added to soups and stews. They have a slightly nutty flavor.
2. Leaves: The leaves can be eaten raw in salads or cooked like spinach.
3. Flowers: The flowers can be added to salads or used as a garnish.
4. Seeds: The seeds can be roasted and eaten like nuts or ground into flour.
5. Tubers: The tubers can be boiled, baked, or fried like potatoes.
Troubleshooting
Even with the best planning, you might encounter some challenges. Here are a few common problems and how to address them:
* Poor Germination: Make sure the soil is warm enough and the seeds are not planted too deep. You can also soak the seeds in water for 24 hours before planting to improve germination.
* Slow Growth: Ensure the plants are getting enough sunlight, water, and nutrients. Amend the soil with compost or fertilizer.
* Lack of Pod Production: This could be due to insufficient sunlight, over-fertilization with nitrogen, or poor pollination. Ensure the plants are getting at least 6 hours of sunlight per day and use a fertilizer with a lower nitrogen content. You can also hand-pollinate the flowers by gently transferring pollen from one flower to another.
* Pest Infestations: Monitor the plants regularly for pests and take action promptly. Insecticidal soap and neem oil are effective organic options.
Final Thoughts
Growing winged beans is a fun and rewarding experience. With a little planning and effort, you can enjoy a bountiful harvest of
Conclusion
So, there you have it! Growing winged beans in your backyard is not just a gardening project; it’s an adventure in sustainable living, a culinary exploration, and a chance to impress your friends and neighbors with a truly unique and versatile crop. This DIY trick, from seed to table, offers a rewarding experience that connects you to the earth and provides a delicious, nutritious harvest.
Why is this a must-try? Because winged beans are more than just a pretty vine. They are a powerhouse of nutrients, offering a complete protein source, vitamins, and minerals. They are also incredibly versatile in the kitchen. You can eat the young pods like green beans, the mature beans like soybeans, the flowers in salads, the leaves like spinach, and even the tubers like potatoes. Imagine the possibilities!
But the benefits extend beyond the kitchen. Growing winged beans is an environmentally friendly practice. They are nitrogen-fixing plants, meaning they enrich the soil with nitrogen, reducing the need for synthetic fertilizers. They also require minimal maintenance once established, making them a low-effort, high-reward crop.
Looking for variations? Consider these ideas:
* **Trellis Designs:** Experiment with different trellis designs to suit your backyard aesthetic. A simple bamboo structure, a repurposed pallet, or even a decorative archway can provide the support winged beans need while adding visual appeal to your garden.
* **Companion Planting:** Plant winged beans alongside other beneficial plants like basil, marigolds, or nasturtiums to deter pests and attract pollinators.
* **Regional Varieties:** Explore different varieties of winged beans that are well-suited to your specific climate and growing conditions. Some varieties may be more heat-tolerant, while others may be more cold-hardy.
* **Culinary Creations:** Don’t limit yourself to traditional recipes. Get creative in the kitchen and experiment with different ways to incorporate winged beans into your meals. Try adding them to stir-fries, soups, stews, salads, or even desserts.
Growing winged beans backyard is an investment in your health, your garden, and your culinary creativity. It’s a chance to connect with nature, learn new skills, and enjoy the fruits (or rather, the beans!) of your labor.
We encourage you to give this DIY trick a try. Start small, experiment with different techniques, and don’t be afraid to make mistakes. Gardening is a learning process, and every experience, whether successful or not, is an opportunity to grow.
Most importantly, share your experience with us! We would love to hear about your successes, your challenges, and your creative culinary creations. Share your photos, your tips, and your recipes in the comments below. Let’s build a community of winged bean enthusiasts and inspire others to discover the joys of growing this amazing plant. So, grab your seeds, get your hands dirty, and embark on your winged bean adventure today! You won’t regret it.
FAQ
What exactly are winged beans, and why should I grow them?
Winged beans (Psophocarpus tetragonolobus) are a tropical legume native to Southeast Asia. They are called “winged” because of the four frilly wings that run along the length of the pod. The entire plant is edible, from the young pods and leaves to the mature beans and tubers. They are a nutritional powerhouse, packed with protein, vitamins, and minerals. Growing them is a sustainable way to add diversity to your diet and garden. They are also nitrogen fixers, improving soil health.
How difficult is it to grow winged beans in my backyard?
Winged beans are relatively easy to grow, especially in warm climates. They require a long growing season (around 120-150 days) and plenty of sunlight. The most important factor is providing a sturdy trellis or support structure for the vines to climb. Once established, they are relatively low-maintenance.
What kind of soil and climate do winged beans need?
Winged beans prefer well-drained soil that is rich in organic matter. They thrive in warm, humid climates with temperatures between 70°F and 85°F (21°C and 29°C). They are sensitive to frost, so it’s important to plant them after the last frost date in your area. If you live in a cooler climate, you can start the seeds indoors a few weeks before the last frost and transplant them outdoors once the weather warms up.
How do I start winged beans from seed?
You can start winged beans from seed either directly in the ground or indoors. To start them indoors, sow the seeds in small pots filled with seed-starting mix about 4-6 weeks before the last frost. Keep the soil moist and warm (around 75°F or 24°C). Once the seedlings have developed a few true leaves, you can transplant them outdoors after the last frost. If you are planting directly in the ground, soak the seeds in water for 24 hours before planting to improve germination. Plant the seeds about 1 inch deep and 2-3 feet apart.
What kind of trellis or support structure do winged beans need?
Winged beans are vigorous climbers and require a strong trellis or support structure to grow properly. The vines can grow up to 10-12 feet tall, so choose a trellis that is tall and sturdy enough to support the weight of the plant. You can use a variety of materials to build a trellis, such as bamboo poles, wooden stakes, wire mesh, or even a repurposed pallet.
How often should I water and fertilize winged beans?
Winged beans need regular watering, especially during hot, dry weather. Water deeply and frequently, keeping the soil consistently moist but not waterlogged. Avoid overhead watering, as this can promote fungal diseases. Winged beans are nitrogen-fixing plants, so they don’t require a lot of fertilizer. However, you can amend the soil with compost or well-rotted manure before planting to provide them with essential nutrients.
What are some common pests and diseases that affect winged beans?
Winged beans are generally resistant to pests and diseases, but they can be susceptible to aphids, spider mites, and fungal diseases like powdery mildew. To prevent pest and disease problems, practice good garden hygiene, such as removing weeds and debris from around the plants. You can also use organic pest control methods, such as insecticidal soap or neem oil, to control aphids and spider mites. To prevent fungal diseases, ensure good air circulation around the plants and avoid overhead watering.
When and how do I harvest winged beans?
You can harvest winged beans at different stages of maturity, depending on how you want to use them. The young pods can be harvested when they are about 4-6 inches long and still tender. They can be eaten raw in salads or cooked like green beans. The mature beans can be harvested when the pods are dry and the beans are fully formed. They can be used like soybeans in various dishes. The leaves can be harvested throughout the growing season and used like spinach. The tubers can be harvested in the fall after the plant has died back.
How do I store winged beans?
Fresh winged bean pods can be stored in the refrigerator for up to a week. Mature beans can be dried and stored in an airtight container for several months. The leaves can be stored in the refrigerator for a few days or frozen for longer storage. The tubers can be stored in a cool, dry place like potatoes.
Can I grow winged beans in containers?
Yes, you can grow winged beans in containers, but you will need a large container (at least 15-20 gallons) and a sturdy trellis. Make sure the container has good drainage and use a well-draining potting mix. Container-grown winged beans may require more frequent watering and fertilization than those grown in the ground.


Leave a Comment