

Grow Celery at Home, you say? Absolutely! Imagine stepping into your backyard and snipping fresh, crisp celery stalks for your salads, soups, or even just a healthy snack. No more limp, store-bought celery that’s been sitting on the shelf for days! This isn’t just about convenience; it’s about connecting with nature and enjoying the unparalleled flavor of homegrown produce.
For centuries, celery has been valued not only for its culinary uses but also for its medicinal properties. Ancient Egyptians used it in religious ceremonies, and the Romans crowned victors with celery leaves. While we might not be crowning anyone today, cultivating your own celery is definitely a victory for your taste buds and your well-being!
But why should you bother with the effort? Well, let’s face it, store-bought celery can be expensive and often lacks that vibrant, fresh taste. Plus, knowing exactly where your food comes from and how it’s grown is incredibly empowering. In this DIY guide, I’m going to share some simple yet effective tricks and hacks to help you grow celery at home, even if you have limited space or gardening experience. Get ready to ditch the grocery store celery and embrace the joy of homegrown goodness!
Grow Your Own Celery at Home: A Complete DIY Guide
Hello gardening friends! Have you ever wondered if you can grow celery right at home? The answer is a clear YES! And I’ll show you how. It’s easier than you think, and incredibly rewarding to harvest crisp, fresh celery straight from your own garden—or even from a sunny windowsill. This guide walks you step by step through the entire process, from choosing the right celery to harvesting your own crunchy stalks.
What You’ll Need: The Preparation
Before we get started, here’s a list of what you’ll need. Don’t worry, most of these items you probably already have at home:
- A bunch of celery: Choose a fresh, firm bunch from the supermarket or market. Make sure the base (the bottom where the roots were) is intact and undamaged.
- A sharp knife: For clean cuts.
- A glass or bowl: Big enough to hold the celery base.
- Water: Best if tap water that has stood for a few hours.
- Potting soil: High-quality soil is important for growth.
- A pot: With drainage holes to avoid waterlogging.
- A sunny spot: Celery loves light!
- Patience: The most important ingredient of all!
Phase 1: Bringing the Celery Base Back to Life
This first step is crucial to get the celery base sprouting again. We’re basically simulating springtime for it.
- Prepare the celery: Cut the celery stalks about 5–7 cm above the base. (You can, of course, use the stalks for soups, salads, or snacking!)
- Place in water: Put the base into your glass or bowl. Fill it with water so that the base is about halfway covered. Make sure only the base sits in water, not the cut stalks.
- Sunny location: Place the glass in a bright, sunny spot. A windowsill is perfect.
- Change water regularly: Replace the water every 1–2 days to keep it fresh and prevent bacteria from building up.
- Observe: After a few days (usually 3–7), you should see small roots sprouting from the base and new green leaves growing in the center. That’s a great sign!
Phase 2: Potting and Continued Care
Once the roots are well developed, it’s time to transfer the celery to soil.
- Prepare the pot: Fill your pot with potting soil, leaving about 2–3 cm of space at the top.
- Planting: Make a hole large enough for the celery base. Place the base carefully inside and cover it with soil. Be sure the new leaves are not buried.
- Watering: Water gently until the soil is moist but not soggy.
- Sunny spot: Put the pot back in a sunny place.
- Regular watering: Keep the soil consistently moist, but avoid waterlogging.
- Fertilizing (optional): Feed every few weeks with an organic liquid fertilizer to encourage strong growth.
Phase 3: Patience and Care for Healthy Growth
Now it’s about patience and proper care to ensure healthy celery growth.
- Monitor closely: Watch your celery regularly for pests or disease.
- Pest control: If pests appear, you can use natural remedies like a mild soap solution.
- Rotate the pot: Turn the pot regularly so the celery receives light evenly on all sides.
- Adjust watering: Adapt watering to the season and weather—celery needs more water in summer than in winter.
- Support (optional): If stalks get tall and heavy, support them with stakes or a small frame.
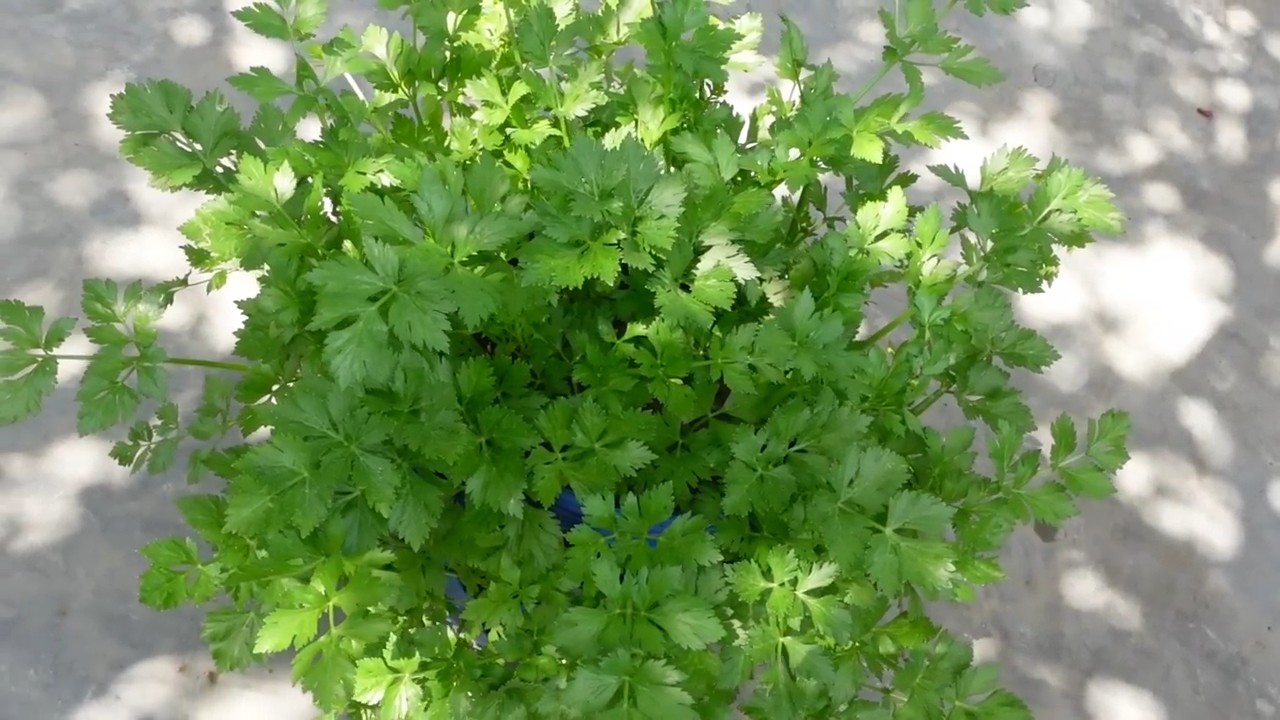
Phase 4: Harvest – The Reward for Your Efforts
After a few weeks or months (depending on conditions), you’ll be ready to harvest your own celery!
- When to harvest: Celery is ready when the stalks are of good size and firm.
- How to harvest: Cut the outer stalks with a sharp knife, leaving the inner stalks so the plant continues to grow.
- Enjoy: Wash thoroughly and enjoy fresh—in salads, soups, as a snack, or wherever you’d like!
Extra Tips and Tricks for Success
- Varieties: There are different celery varieties—check which one grows best in your region.
- Blanching: For lighter and milder stalks, wrap the celery stalks with soil or paper a few weeks before harvest (this is called blanching).
- Overwintering: In mild climates, celery can survive outdoors in winter. In colder regions, bring it indoors.
- Growing from seed: You can also grow celery from seed, though it takes more time and effort.
- As a houseplant: Even without a garden, celery can thrive as a decorative indoor plant.
- Companion planting: Celery grows well alongside tomatoes, cabbages, and onions.
Common Problems and Solutions
- Yellow leaves: Usually a sign of overwatering or nutrient deficiency. Adjust watering and fertilize if needed.
- Pests: Aphids, slugs, or other pests may appear—combat them with natural remedies.
- Diseases: Fungal diseases can occur. Ensure good airflow and avoid waterlogging.
I hope this guide has inspired you to try growing celery at home. It’s a rewarding project that brings fresh, homegrown vegetables right to your table. Happy gardening!

Conclusion
So, there you have it! Growing celery at home from kitchen scraps is not just a fun experiment; it’s a sustainable way to reduce food waste, enjoy fresh, crisp celery, and even impress your friends and family with your green thumb. It’s a surprisingly simple process that yields rewarding results. Forget those limp, store-bought stalks – imagine the satisfaction of harvesting your own vibrant, flavorful celery, ready to be enjoyed in salads, soups, or as a healthy snack.
This DIY trick is a must-try for several compelling reasons. First, it’s incredibly cost-effective. Instead of tossing the celery base into the compost bin, you’re essentially getting a second chance at a free crop. Second, it’s environmentally friendly. By regrowing celery, you’re reducing your reliance on commercially grown produce, which often involves significant transportation and packaging. Third, it’s a fantastic learning experience, especially for children. It teaches them about plant life cycles, sustainability, and the magic of gardening.
But the benefits don’t stop there. Homegrown celery often boasts a superior flavor compared to store-bought varieties. It’s fresher, crisper, and packed with more nutrients. Plus, you have complete control over the growing conditions, ensuring that your celery is free from harmful pesticides and chemicals.
Looking for variations? Absolutely! Once your celery has established a strong root system, consider transplanting it into a larger pot or even directly into your garden. Experiment with different soil types and fertilizers to see what works best for your growing conditions. You can also try growing different varieties of celery, such as Pascal celery or Golden Self-Blanching celery, to add some variety to your harvest. Another fun variation is to use the celery leaves in pesto or as a flavorful addition to stocks and broths. Don’t let any part of the plant go to waste!
We encourage you to give this DIY trick a try. It’s a simple, rewarding, and sustainable way to enjoy fresh celery. And remember, even if your first attempt isn’t perfect, don’t give up! Gardening is all about learning and experimenting. With a little patience and care, you’ll be harvesting your own homegrown celery in no time.
We’d love to hear about your experiences! Share your photos, tips, and tricks in the comments below. Let’s create a community of celery-growing enthusiasts and inspire others to embrace this simple and sustainable practice. What are you waiting for? Get growing!
FAQ
Can I really grow celery from the base I usually throw away?
Yes, absolutely! The base of a celery stalk contains the plant’s root crown, which has the potential to regenerate and grow into a new celery plant. It’s a fantastic way to recycle food waste and enjoy fresh celery at home. The key is to provide the right conditions for the base to sprout and develop roots.
How long does it take to grow celery from a base?
The time it takes to grow celery from a base can vary depending on factors such as temperature, sunlight, and water availability. Generally, you can expect to see new growth within a week or two. It will take several weeks to months to grow a full-sized celery stalk. Be patient and consistent with your care, and you’ll be rewarded with fresh, homegrown celery.
What kind of water should I use?
Tap water is generally fine for growing celery, but if your tap water is heavily chlorinated, it’s best to let it sit out for 24 hours before using it to allow the chlorine to dissipate. Alternatively, you can use filtered water or rainwater. Avoid using softened water, as it can contain high levels of sodium, which can be harmful to plants.
How much sunlight does celery need?
Celery thrives in full sun, which means it needs at least six hours of direct sunlight per day. However, in hotter climates, it can benefit from some afternoon shade to prevent the leaves from scorching. If you’re growing celery indoors, place it near a sunny window or use a grow light to provide adequate light.
What kind of soil should I use?
Celery prefers rich, well-draining soil that is high in organic matter. A good potting mix or garden soil amended with compost or aged manure is ideal. Avoid using heavy clay soil, as it can become waterlogged and prevent the roots from getting enough oxygen.
How often should I water my celery?
Celery needs consistent moisture to thrive. Water it regularly, keeping the soil evenly moist but not waterlogged. Check the soil moisture level daily and water when the top inch feels dry to the touch. During hot, dry weather, you may need to water more frequently.
Do I need to fertilize my celery?
Yes, celery benefits from regular fertilization, especially during the active growing season. Use a balanced fertilizer or a fertilizer specifically formulated for vegetables. Follow the instructions on the fertilizer package for application rates and frequency. You can also supplement with organic fertilizers such as compost tea or fish emulsion.
When is the best time to harvest my celery?
You can harvest celery when the stalks are at least 6-8 inches tall and have reached the desired thickness. To harvest, simply cut the stalks at the base of the plant with a sharp knife. You can harvest individual stalks as needed or harvest the entire plant at once.
Can I grow celery indoors year-round?
Yes, you can grow celery indoors year-round, provided you can provide adequate light and temperature. Place your celery plant near a sunny window or use a grow light to supplement natural light. Maintain a consistent temperature between 60-70°F (15-21°C).
What are some common problems when growing celery and how can I fix them?
Some common problems when growing celery include pests such as aphids and celery leaf tiers, diseases such as celery blight, and nutrient deficiencies. To prevent pests and diseases, practice good sanitation, such as removing dead leaves and weeds. Use insecticidal soap or neem oil to control pests. Ensure your celery receives adequate nutrients by fertilizing regularly. If you suspect a disease, consult a gardening expert or your local extension office for advice.
Is growing celery at home really worth the effort?
Absolutely! While it requires some patience and care, growing celery at home is a rewarding experience. You’ll enjoy fresh, flavorful celery that is free from harmful chemicals and pesticides. Plus, it’s a sustainable way to reduce food waste and connect with nature. The taste difference alone makes **growing celery at home** worth the effort.
Leave a Comment