

Chili pepper soil bag growing is a fantastic way to cultivate these fiery delights, even if you’re short on space or gardening experience! Have you ever dreamed of harvesting your own vibrant chili peppers, adding a kick to your favorite dishes straight from your backyard (or balcony!)? Well, dream no more! This DIY guide will unlock the secrets to successful chili pepper cultivation using a simple, cost-effective, and surprisingly productive method: the humble soil bag.
Growing food at home has a rich history, dating back to ancient civilizations where self-sufficiency was a way of life. While we might not rely on our gardens for survival today, the satisfaction of nurturing a plant from seed to harvest is deeply rewarding. Plus, there’s something incredibly special about knowing exactly where your food comes from and avoiding those pesky grocery store trips for that one crucial ingredient!
But why chili pepper soil bag growing specifically? Let’s face it, traditional gardening can be intimidating. It requires space, tilling, weeding, and a whole lot of knowledge. This method simplifies everything! It’s perfect for apartment dwellers, beginner gardeners, or anyone looking for a low-maintenance way to grow their own peppers. I’m going to show you how to transform a simple bag of soil into a thriving chili pepper garden, providing you with a continuous supply of fresh, flavorful peppers. Get ready to spice up your life, one chili pepper at a time!

Chili-Pflanzen im Pflanzsack: Dein DIY-Guide für eine reiche Ernte
Hey Chili-Liebhaber! Hast du Lust, deine eigenen scharfen Schoten anzubauen, aber wenig Platz im Garten? Kein Problem! Mit dieser DIY-Anleitung zeige ich dir, wie du Chili-Pflanzen erfolgreich in Pflanzsäcken ziehen kannst. Es ist einfacher als du denkst und macht unglaublich viel Spaß!
Was du brauchst: Die Zutaten für deinen Chili-Erfolg
Bevor wir loslegen, hier eine Liste mit allem, was du für dein Chili-Pflanzsack-Projekt benötigst:
* Chili-Samen oder Jungpflanzen: Wähle deine Lieblingssorten! Ob Jalapeño, Habanero oder Cayenne – die Vielfalt ist riesig.
* Pflanzsäcke: Achte auf eine gute Größe (mindestens 10 Liter pro Pflanze, besser 20 Liter für größere Sorten). Stoff-Pflanzsäcke sind atmungsaktiv und fördern ein gesundes Wurzelwachstum.
* Hochwertige Pflanzerde: Spezielle Chili-Erde oder eine Mischung aus Blumenerde, Kompost und Perlit ist ideal.
* Dünger: Ein Langzeitdünger oder Flüssigdünger für Chili-Pflanzen.
* Gießkanne oder Schlauch: Für die regelmäßige Bewässerung.
* Pflanzschaufel: Zum Umtopfen und Befüllen der Pflanzsäcke.
* Handschuhe: Zum Schutz deiner Hände.
* Pflanzstäbe oder Rankhilfe (optional): Für Sorten, die viel Halt benötigen.
* Sprühflasche (optional): Für die Blattdüngung und zur Vorbeugung von Schädlingen.
* Schere oder Messer: Zum Entfernen von unerwünschten Trieben.
Die Vorbereitung: Der Grundstein für eine gute Ernte
Bevor wir mit dem Pflanzen beginnen, ist eine gute Vorbereitung das A und O.
1. Samen vorziehen (optional): Wenn du mit Samen startest, solltest du sie am besten im Februar oder März in Anzuchtschalen oder kleinen Töpfen vorziehen. Fülle die Anzuchtschalen mit Anzuchterde und säe die Samen etwa 0,5 cm tief ein. Halte die Erde feucht und stelle die Schalen an einen warmen, hellen Ort (z.B. auf eine Fensterbank oder in ein Gewächshaus). Die Keimung dauert in der Regel 1-3 Wochen.
2. Pflanzsäcke vorbereiten: Rolle die Pflanzsäcke aus und stelle sie an den Ort, wo deine Chili-Pflanzen später stehen sollen. Bedenke, dass die Säcke nach dem Befüllen schwerer sind und sich nicht mehr so leicht bewegen lassen.
3. Erde vorbereiten: Mische die Pflanzerde mit Kompost und Perlit, um sie lockerer und durchlässiger zu machen. Das ist wichtig, damit das Wasser gut abfließen kann und die Wurzeln nicht faulen. Wenn du einen Langzeitdünger verwendest, mische ihn jetzt unter die Erde.
Das Pflanzen: Der Start ins Chili-Abenteuer
Jetzt kommt der spannende Teil: Das Pflanzen deiner Chili-Babys!
1. Pflanzsäcke befüllen: Fülle die Pflanzsäcke zu etwa zwei Dritteln mit der vorbereiteten Erde.
2. Pflanzen vorbereiten: Wenn du Jungpflanzen gekauft hast, lockere vorsichtig den Wurzelballen auf. Das hilft den Wurzeln, sich besser in der neuen Erde zu etablieren.
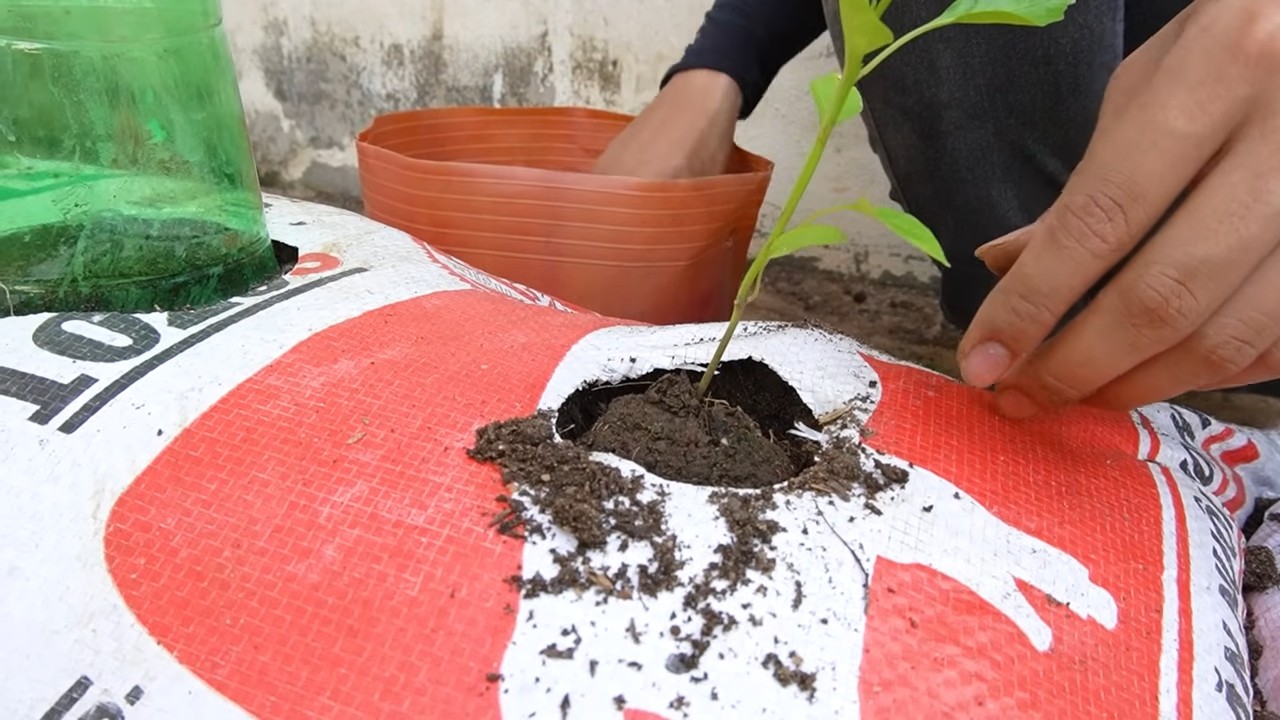
3. Pflanzen einsetzen: Grabe ein kleines Loch in die Erde und setze die Chili-Pflanze hinein. Die Oberkante des Wurzelballens sollte mit der Erdoberfläche abschließen.
4. Mit Erde auffüllen: Fülle das Loch mit Erde auf und drücke sie leicht an.
5. Angießen: Gieße die Pflanzen gründlich an, damit sich die Erde setzt und die Wurzeln gut mit Wasser versorgt werden.
Die Pflege: Damit deine Chilis prächtig gedeihen
Die richtige Pflege ist entscheidend für eine reiche Chili-Ernte.
1. Bewässerung: Chili-Pflanzen mögen es feucht, aber nicht nass. Gieße regelmäßig, besonders an heißen Tagen. Achte darauf, dass das Wasser gut abfließen kann, um Staunässe zu vermeiden. Die Erde sollte sich leicht feucht anfühlen, wenn du sie mit dem Finger überprüfst.
2. Düngung: Chili-Pflanzen sind Starkzehrer und benötigen regelmäßig Dünger. Verwende einen speziellen Chili-Dünger oder einen Flüssigdünger für Tomaten und Gemüse. Dünge während der Wachstums- und Blütezeit alle 1-2 Wochen.
3. Standort: Chili-Pflanzen lieben die Sonne! Stelle die Pflanzsäcke an einen sonnigen, warmen und windgeschützten Ort. Mindestens 6 Stunden Sonne pro Tag sind ideal.
4. Ausgeizen (optional): Bei einigen Chili-Sorten kann es sinnvoll sein, die Seitentriebe (Geiztriebe) auszugeizen, um die Bildung von Früchten zu fördern. Informiere dich, ob deine Chili-Sorte dazu neigt, viele Geiztriebe zu bilden.
5. Schutz vor Schädlingen: Kontrolliere deine Chili-Pflanzen regelmäßig auf Schädlinge wie Blattläuse, Spinnmilben oder Weiße Fliegen. Bei Bedarf kannst du biologische Schädlingsbekämpfungsmittel einsetzen. Eine Sprühflasche mit Wasser und etwas Schmierseife kann helfen, Blattläuse zu bekämpfen.
6. Unterstützung: Einige Chili-Sorten werden sehr groß und benötigen eine Rankhilfe oder Pflanzstäbe, um nicht umzuknicken.
Die Ernte: Der Lohn deiner Mühe
Endlich ist es soweit: Du kannst deine eigenen Chili-Schoten ernten!
1. Reife erkennen: Die Reifezeit hängt von der Chili-Sorte ab. In der Regel verändern die Schoten ihre Farbe, wenn sie reif sind. Sie werden rot, gelb, orange oder braun, je nach Sorte.
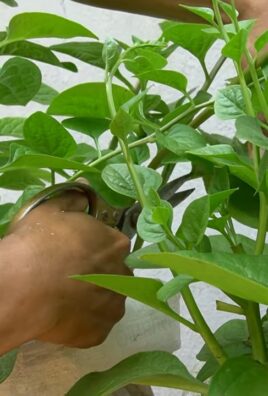
2. Ernten: Schneide die reifen Chili-Schoten mit einer Schere oder einem Messer ab. Trage dabei am besten Handschuhe, um Hautreizungen zu vermeiden.
3. Verwendung: Verwende deine frischen Chilis zum Kochen, Einlegen oder Trocknen. Du kannst sie auch zu Chili-Pulver oder Chili-Öl verarbeiten.
Häufige Probleme und Lösungen: Was tun, wenn’s mal nicht so läuft?
Auch beim Chili-Anbau können Probleme auftreten. Hier sind einige häufige Probleme und wie du sie lösen kannst:
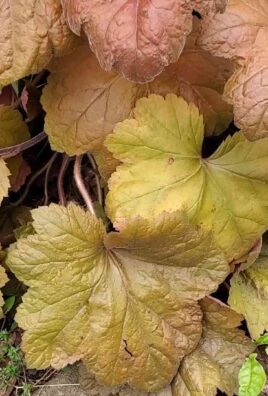
* Gelbe Blätter: Können ein Zeichen für Nährstoffmangel, Überwässerung oder Schädlingsbefall sein. Überprüfe die Bewässerung und Dünung und kontrolliere die Pflanzen auf Schädlinge.
* Blütenfall: Kann durch zu hohe oder zu niedrige Temperaturen, Wassermangel oder Nährstoffmangel verursacht werden. Achte auf einen optimalen Standort und eine ausgewogene Düngung.
* Schädlinge: Bekämpfe Schädlinge mit biologischen Mitteln oder Hausmitteln.
* Faule Früchte: Können durch Staunässe oder Pilzbefall verursacht werden. Achte auf eine gute Drainage und vermeide es, die Blätter beim Gießen zu benetzen.
Extra-Tipps für Chili-Profis: So holst du noch mehr aus deinen Pflanzen heraus
* Chili-Pflanzen überwintern: Wenn du deine Chili-Pflanzen überwintern möchtest, schneide sie im Herbst zurück und stelle sie an einen hellen, kühlen Ort (z.B. in den Keller oder die Garage). Gieße sie nur sparsam und dünge sie nicht. Im Frühjahr kannst du sie dann wieder ins Freie stellen.
* Eigene Samen gewinnen: Wenn du Samen von deinen eigenen Chili-Pflanzen gewinnen möchtest, lasse einige Schoten an der Pflanze vollständig ausreifen und trocknen. Entnimm die Samen und lagere sie an einem kühlen, trockenen Ort.
* Verschiedene Sorten anbauen: Probiere verschiedene Chili-Sorten aus, um herauszufinden, welche dir am besten schmecken und welche am besten in deinem Klima gedeihen.
Ich hoffe, diese Anleitung hilft dir dabei, deine eigenen Chili-Pflanzen im Pflanzsack erfolgreich anzubauen. Viel Spaß und
Conclusion
So, there you have it! Transforming ordinary soil into a chili pepper paradise is not only achievable but surprisingly simple. This DIY chili pepper soil bag growing method is a game-changer for anyone serious about cultivating fiery flavors right in their own backyard (or balcony!). Why is it a must-try? Because it offers a trifecta of benefits: superior drainage, enhanced nutrient retention, and a warm, inviting environment that chili peppers absolutely thrive in. Forget struggling with compacted soil and inconsistent results. This method puts you in control, allowing you to tailor the growing medium to the specific needs of your chosen chili varieties.
Think about it: habaneros demanding scorching heat and excellent drainage, jalapeños craving a steady supply of nutrients, or even those delicate Thai chilies needing a little extra love. With this DIY approach, you can cater to them all.
But the beauty of this method doesn’t stop there. It’s incredibly versatile. Want to boost the organic matter? Add more compost or well-rotted manure. Need to improve drainage further? Incorporate extra perlite or vermiculite. Experiment with different ratios of ingredients to find the perfect blend for your local climate and chili pepper preferences. Consider adding a slow-release fertilizer specifically formulated for peppers to ensure a consistent supply of nutrients throughout the growing season. You could even try incorporating mycorrhizae fungi into your soil mix to enhance root development and nutrient uptake.
Beyond the basic recipe, consider these variations:
* Spicy Boost: Add a tablespoon of bone meal to the soil mix for extra phosphorus, promoting robust root growth and abundant flowering.
* Water Retention Wonder: Incorporate water-absorbing polymers (hydrogels) into the mix, especially if you live in a hot, dry climate. This will help retain moisture and reduce the frequency of watering.
* Pest Deterrent: Mix in some diatomaceous earth to help control soil-borne pests.
* Container Gardening Pro: This method is perfect for container gardening! Just ensure your container has adequate drainage holes.
The possibilities are endless! The key is to observe your plants, learn their needs, and adjust your soil mix accordingly.
We are confident that once you experience the difference this DIY chili pepper soil bag growing method makes, you’ll never go back to pre-packaged soil again. The vibrant colors, the intense flavors, and the sheer satisfaction of harvesting your own homegrown chilies are simply unmatched.
So, what are you waiting for? Gather your ingredients, grab a soil bag, and get ready to embark on a chili pepper growing adventure. We encourage you to try this DIY trick and share your experiences with us! Let us know which chili varieties you’re growing, what modifications you’ve made to the soil mix, and any tips or tricks you’ve discovered along the way. Share your photos and stories on social media using [Your Hashtag] and let’s build a community of passionate chili pepper growers! Your insights could help other gardeners achieve chili pepper success. Happy growing!
Frequently Asked Questions (FAQ)
What exactly is a “soil bag” and where can I get one?
A soil bag, in this context, refers to a large, heavy-duty plastic bag that is typically used for storing and transporting soil, compost, or other gardening materials. You can often find these bags at garden centers, nurseries, or even hardware stores. Look for bags that are sturdy and puncture-resistant. Alternatively, you can repurpose large, strong plastic bags, such as those used for animal feed or construction materials, as long as they are clean and free of any harmful chemicals. The size of the bag will depend on the number of chili pepper plants you plan to grow. A good starting point is a bag that holds around 20-30 gallons of soil.
Can I use any type of soil for this DIY mix?
While you can technically use any type of soil as a base, it’s highly recommended to start with a good quality garden soil or topsoil. Avoid using soil that is heavy clay or pure sand, as these types of soil don’t provide the necessary drainage and nutrient retention for chili peppers. If you’re unsure about the quality of your soil, consider getting it tested to determine its pH level and nutrient content. This will help you make informed decisions about what amendments to add to your DIY mix.
How often should I water my chili peppers grown in a soil bag?
Watering frequency will depend on several factors, including the climate, the size of the bag, the type of soil mix you’re using, and the stage of growth of your chili pepper plants. As a general rule, water deeply whenever the top inch of soil feels dry to the touch. Avoid overwatering, as this can lead to root rot. During hot, dry weather, you may need to water more frequently. Conversely, during cooler, wetter weather, you may need to water less often. A good way to check the moisture level of the soil is to insert your finger into the soil near the base of the plant. If the soil feels dry, it’s time to water.
What kind of fertilizer should I use for my chili peppers?
Chili peppers are heavy feeders, so it’s important to provide them with a consistent supply of nutrients. A balanced fertilizer with an NPK ratio (nitrogen, phosphorus, potassium) of around 5-10-10 or 5-10-5 is a good starting point. Look for fertilizers that are specifically formulated for peppers or tomatoes, as these will typically contain the right balance of nutrients for optimal growth and fruit production. You can use either a granular slow-release fertilizer or a liquid fertilizer. If using a granular fertilizer, incorporate it into the soil mix before planting. If using a liquid fertilizer, apply it according to the manufacturer’s instructions, typically every 2-4 weeks.
How do I prevent pests and diseases from affecting my chili pepper plants?
Prevention is key when it comes to pests and diseases. Start by using healthy, disease-free seedlings or seeds. Ensure that your plants have adequate spacing to allow for good air circulation. Regularly inspect your plants for signs of pests or diseases, such as aphids, spider mites, whiteflies, or fungal infections. If you spot any problems, take action immediately. You can use organic pest control methods, such as insecticidal soap, neem oil, or diatomaceous earth, to control pests. For fungal diseases, you can use copper-based fungicides or other organic fungicides. Avoid overwatering, as this can create a favorable environment for fungal diseases.
My chili pepper plants are flowering but not producing any fruit. What could be the problem?
There are several reasons why your chili pepper plants might be flowering but not producing fruit. One common cause is lack of pollination. Chili peppers are self-pollinating, but they often benefit from a little help from pollinators, such as bees or butterflies. If you’re growing your plants indoors or in an area with limited pollinator activity, you can hand-pollinate them by gently shaking the flowers or using a small paintbrush to transfer pollen from one flower to another. Another possible cause is nutrient deficiency. Make sure your plants are getting enough phosphorus and potassium, as these nutrients are essential for fruit production. Extreme temperatures can also affect fruit set. If temperatures are too hot or too cold, the flowers may drop off before they can be pollinated.
Can I reuse the soil bag for future plantings?
Yes, you can reuse the soil bag, but it’s important to take some precautions. After harvesting your chili peppers, remove any remaining plant debris from the bag. You may also want to amend the soil with fresh compost or fertilizer to replenish any nutrients that have been depleted. If you suspect that the soil may be contaminated with pests or diseases, you can sterilize it by baking it in the oven at 180°F (82°C) for 30 minutes or by solarizing it in the sun for several weeks. However, keep in mind that sterilizing the soil will also kill beneficial microorganisms, so you may want to reintroduce them by adding compost or a microbial inoculant.
Leave a Comment