

Double pepper harvest – the very words conjure images of overflowing baskets, vibrant colors, and the satisfaction of reaping the rewards of your green thumb! Have you ever dreamed of maximizing your pepper yield without expanding your garden space? I know I have! For centuries, gardeners have sought ways to coax more bounty from their plants, and the quest for a prolific pepper harvest is no different. From ancient agricultural practices to modern hydroponics, the desire to optimize yields is deeply rooted in our connection to the land.
Let’s face it, growing your own food is incredibly rewarding, but it can also be a bit frustrating when your pepper plants aren’t producing as much as you’d hoped. Maybe you’re short on space, or perhaps you simply want to get the most out of your existing plants. Whatever the reason, this DIY guide is here to help you unlock the secrets to a double pepper harvest. We’ll explore simple yet effective techniques that you can implement right away to boost your pepper production and enjoy a season filled with delicious, homegrown goodness. Get ready to transform your pepper patch into a veritable pepper paradise!
Doppelte Paprikaernte: Mein DIY-Trick für eine üppige Ernte
Ich liebe Paprika! Und nichts ist frustrierender, als wenn die Paprikapflanzen zwar blühen, aber die Ernte mager ausfällt. Über die Jahre habe ich verschiedene Methoden ausprobiert, um die Ernte zu steigern, und eine davon hat sich als besonders effektiv erwiesen: das sogenannte “Entgeizen” und gezieltes Düngen. Hier zeige ich dir, wie du mit einfachen Mitteln deine Paprikaernte verdoppeln kannst!
Was ist “Entgeizen” und warum ist es wichtig?
Entgeizen bedeutet, die Seitentriebe, die in den Blattachseln der Paprikapflanze wachsen, zu entfernen. Stell dir vor, die Paprikapflanze ist wie ein kleiner Baum. Anstatt alle Äste wachsen zu lassen, konzentrieren wir uns auf die Haupttriebe. Warum? Weil die Pflanze sonst ihre Energie in das Wachstum vieler kleiner Triebe steckt, anstatt in die Entwicklung großer, saftiger Paprika.
* Mehr Energie für die Früchte: Durch das Entfernen der Seitentriebe lenken wir die Energie der Pflanze in die Haupttriebe und somit in die Fruchtbildung.
* Bessere Belüftung: Eine gut belüftete Pflanze ist weniger anfällig für Krankheiten und Schädlinge. Das Entgeizen sorgt für eine bessere Luftzirkulation.
* Mehr Licht: Wenn die Pflanze nicht zu dicht bewachsen ist, bekommen die Früchte mehr Sonnenlicht, was zu einer besseren Reifung und einem intensiveren Geschmack führt.
Schritt-für-Schritt-Anleitung zum Entgeizen von Paprikapflanzen
1. Wähle den richtigen Zeitpunkt: Beginne mit dem Entgeizen, sobald die Pflanze etwa 20-30 cm hoch ist und die ersten Seitentriebe erscheinen.
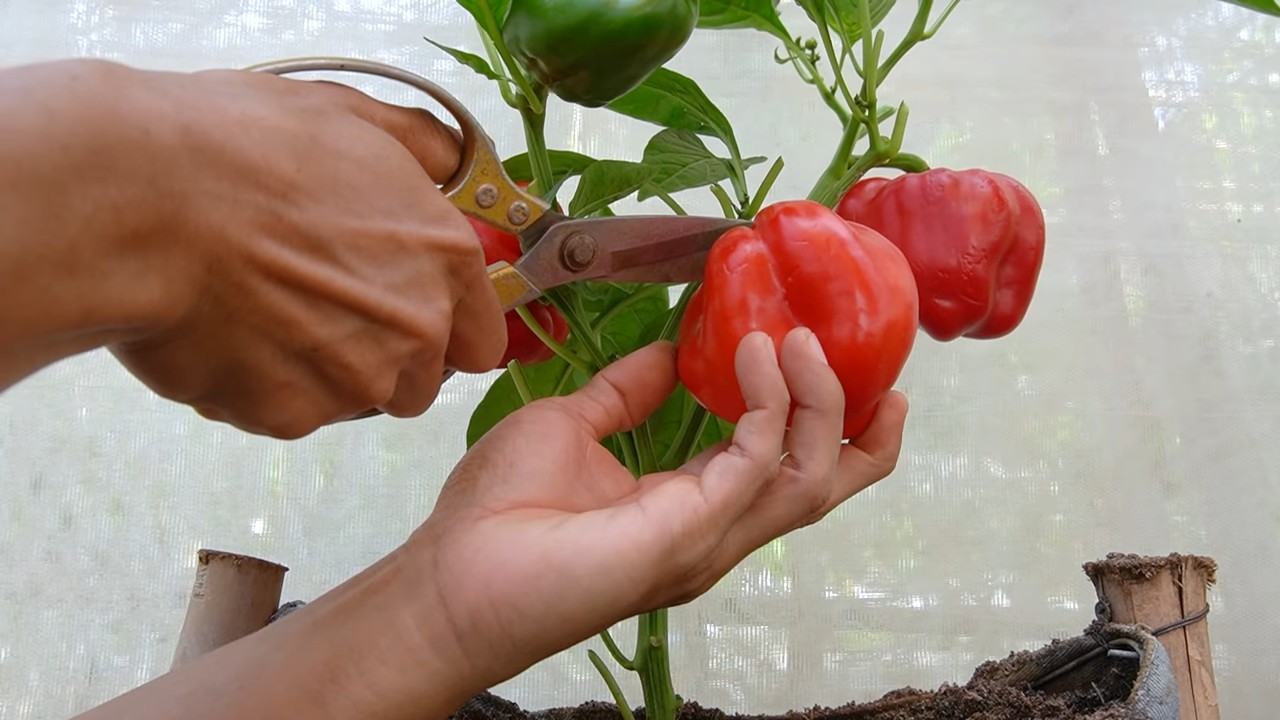
2. Identifiziere die Seitentriebe: Die Seitentriebe wachsen in den Blattachseln, also dort, wo die Blätter aus dem Hauptstamm wachsen. Sie sehen aus wie kleine, neue Triebe.
3. Entferne die Seitentriebe: Am besten brichst du die Seitentriebe vorsichtig mit den Fingern ab. Achte darauf, den Hauptstamm nicht zu beschädigen. Du kannst auch eine saubere Gartenschere verwenden, besonders bei älteren, dickeren Trieben.
4. Regelmäßige Kontrolle: Kontrolliere deine Paprikapflanzen regelmäßig (etwa einmal pro Woche) und entferne neue Seitentriebe, sobald sie erscheinen.
5. Die ersten Blüten: Entferne die erste Blüte (die sogenannte Königsblüte) an der Spitze der Pflanze. Das mag hart klingen, aber es fördert das Wachstum der Pflanze und führt letztendlich zu einer größeren Ernte.
Die richtige Düngung für eine reiche Paprikaernte
Neben dem Entgeizen ist die richtige Düngung entscheidend für eine üppige Paprikaernte. Paprika sind Starkzehrer und benötigen ausreichend Nährstoffe, um gut zu wachsen und viele Früchte zu produzieren.
* Stickstoff (N): Fördert das Wachstum der Blätter und des Stängels.
* Phosphor (P): Wichtig für die Wurzelentwicklung und die Blütenbildung.
* Kalium (K): Fördert die Fruchtbildung und die Widerstandsfähigkeit der Pflanze.
Welchen Dünger soll ich verwenden?
Ich persönlich verwende gerne organischen Dünger, da er die Bodenqualität verbessert und die Pflanzen auf natürliche Weise mit Nährstoffen versorgt. Du kannst aber auch mineralischen Dünger verwenden, der schnell wirkt.
* Organischer Dünger: Kompost, Hornspäne, Beinwelljauche, Gemüsejauche.
* Mineralischer Dünger: Tomatendünger (ist auch für Paprika geeignet), spezieller Paprikadünger.
Düngeplan für Paprikapflanzen
1. Grunddüngung bei der Pflanzung: Mische Kompost oder Hornspäne in das Pflanzloch.
2. Erste Düngung nach dem Anwachsen: Sobald die Pflanzen angewachsen sind (etwa 2-3 Wochen nach der Pflanzung), kannst du mit der ersten Düngung beginnen. Verwende einen Flüssigdünger oder streue Hornspäne um die Pflanzen.
3. Regelmäßige Düngung während der Wachstumsperiode: Dünge deine Paprikapflanzen alle 2-3 Wochen mit einem geeigneten Dünger. Achte dabei auf die Dosierungsanleitung des Herstellers.
4. Düngung während der Fruchtbildung: Sobald die ersten Früchte erscheinen, erhöhe den Kaliumanteil im Dünger. Kalium fördert die Fruchtbildung und sorgt für einen guten Geschmack. Beinwelljauche ist hierfür ideal.
Zusätzliche Tipps für eine erfolgreiche Paprikaernte
* Der richtige Standort: Paprika lieben die Sonne! Wähle einen sonnigen Standort mit mindestens 6 Stunden Sonne pro Tag.
* Guter Boden: Der Boden sollte locker, durchlässig und nährstoffreich sein.
* Regelmäßiges Gießen: Paprika benötigen ausreichend Wasser, besonders während der Fruchtbildung. Gieße regelmäßig, aber vermeide Staunässe.
* Stützen: Wenn die Pflanzen viele Früchte tragen, kann es sinnvoll sein, sie zu stützen, damit die Äste nicht abbrechen.
* Schutz vor Schädlingen: Kontrolliere deine Pflanzen regelmäßig auf Schädlinge wie Blattläuse oder Spinnmilben. Bei Bedarf kannst du biologische Schädlingsbekämpfungsmittel einsetzen.
* Mulchen: Mulchen hilft, die Feuchtigkeit im Boden zu halten und Unkraut zu unterdrücken. Du kannst zum Beispiel Stroh oder Rasenschnitt verwenden.
Häufige Fehler beim Paprikaanbau und wie du sie vermeidest
* Zu wenig Sonne: Paprika brauchen viel Sonne, um gut zu wachsen und Früchte zu bilden. Achte darauf, dass der Standort sonnig ist.
* Falsche Bewässerung: Zu viel oder zu wenig Wasser kann zu Problemen führen. Gieße regelmäßig, aber vermeide Staunässe.
* Falsche Düngung: Eine falsche Düngung kann zu Nährstoffmangel oder -überschuss führen. Verwende einen geeigneten Dünger und halte dich an die Dosierungsanleitung.
* Nicht entgeizen: Das Entgeizen ist wichtig, um die Energie der Pflanze in die Fruchtbildung zu lenken.
* Zu späte Ernte: Ernte die Paprika, sobald sie reif sind. Wenn du sie zu lange hängen lässt, kann das die Produktion neuer Früchte hemmen.
Sortenwahl für eine reiche Ernte
Die Wahl der richtigen Paprikasorte kann ebenfalls einen großen Einfluss auf die Ernte haben. Einige Sorten sind von Natur aus ertragreicher als andere. Hier sind einige Sorten, die ich empfehlen kann:
* ‘California Wonder’: Eine klassische, robuste Sorte mit großen, blockförmigen Früchten.
* ‘Yolo Wonder’: Ähnlich wie ‘California Wonder’, aber etwas früher reifend.
* ‘Sweet Palermo’: Eine süße, längliche Paprika mit dünner Haut.
* ‘Snackpaprika’: Kleine, süße Paprika, ideal zum Naschen.
* ‘Jalapeño’: Eine beliebte, mittelscharfe Chili-Sorte.
Zusammenfassung: Die wichtigsten Schritte für eine doppelte Paprikaernte
1. Entgeizen: Entferne regelmäßig die Seitentriebe, um die Energie der Pflanze in die Fruchtbildung zu lenken.
2. Düngen: Dünge deine Paprikapflanzen regelmäßig mit einem geeigneten Dünger, der ausreichend Stickstoff, Phosphor und Kalium enthält.
3. Standort: Wähle einen sonnigen Standort mit mindestens 6 Stunden Sonne pro Tag.
4. Bewässerung: Gieße regelmäßig, aber vermeide Staunässe.
5. Sortenwahl: Wähle eine ertragreiche Paprikasorte.
Mit diesen Tipps und Tricks kannst du deine Paprikaernte verdoppeln und dich auf eine reiche Ernte freuen! Ich wünsche dir viel Erfolg beim Gärtnern!
Conclusion
So, there you have it! This simple yet incredibly effective DIY trick for achieving a double pepper harvest is a game-changer for any gardener, regardless of experience level. We’ve walked you through the process, highlighting the key steps and explaining the science behind why it works. But why is this a must-try?
Firstly, it’s about maximizing your yield. Imagine doubling the number of peppers you harvest from the same plants, without needing to invest in more seeds, fertilizer, or garden space. That’s a significant return on investment, especially if you’re growing peppers for canning, freezing, or simply enjoying fresh throughout the season. A double pepper harvest means more delicious meals, more to share with friends and family, and a greater sense of accomplishment in your gardening endeavors.
Secondly, this technique promotes healthier, more robust plants. By strategically pruning and encouraging branching, you’re creating a stronger foundation for your pepper plants to thrive. This leads to better air circulation, reduced risk of disease, and ultimately, a more resilient and productive garden.
But don’t just take our word for it. We encourage you to experiment with this DIY trick in your own garden. Try it on different varieties of peppers – bell peppers, jalapenos, habaneros, even sweet peppers. Observe the results and adjust the technique to suit your specific growing conditions.
Speaking of variations, consider these ideas:
* Experiment with different pruning techniques: While we’ve outlined a general approach, you can adapt the pruning to your plant’s specific growth habit. Some varieties may benefit from more aggressive pruning, while others may prefer a lighter touch.
* Use different types of fertilizer: Supplement your plants with a balanced fertilizer that’s rich in phosphorus and potassium to support fruit development. Organic options like bone meal and compost tea are excellent choices.
* Provide extra support: As your pepper plants become laden with fruit, they may need additional support to prevent branches from breaking. Use stakes, cages, or trellises to keep your plants upright and healthy.
* Companion planting: Consider planting basil or marigolds near your pepper plants. These companion plants can help deter pests and attract beneficial insects, further enhancing your harvest.
The beauty of gardening lies in experimentation and discovery. This DIY trick is just a starting point. We encourage you to explore, adapt, and refine the technique to create your own personalized approach to achieving a double pepper harvest.
We’re confident that you’ll be amazed by the results. So, grab your pruning shears, head out to your garden, and give it a try! And most importantly, we want to hear about your experience. Share your photos, tips, and success stories in the comments section below. Let’s learn from each other and create a community of thriving pepper growers! Your insights could help other gardeners achieve their own bountiful harvests. Let us know if you were able to achieve a double pepper harvest.
Frequently Asked Questions (FAQ)
What exactly does this DIY trick involve?
This DIY trick focuses on strategic pruning of your pepper plants to encourage branching and, consequently, more fruit production. The core idea is to remove the initial “king” flower or bud that forms at the first node of the plant. This redirects the plant’s energy away from producing a single, early pepper and towards developing multiple branches, each capable of producing its own peppers. It’s about sacrificing a little early yield for a significantly larger overall harvest.
When is the best time to implement this technique?
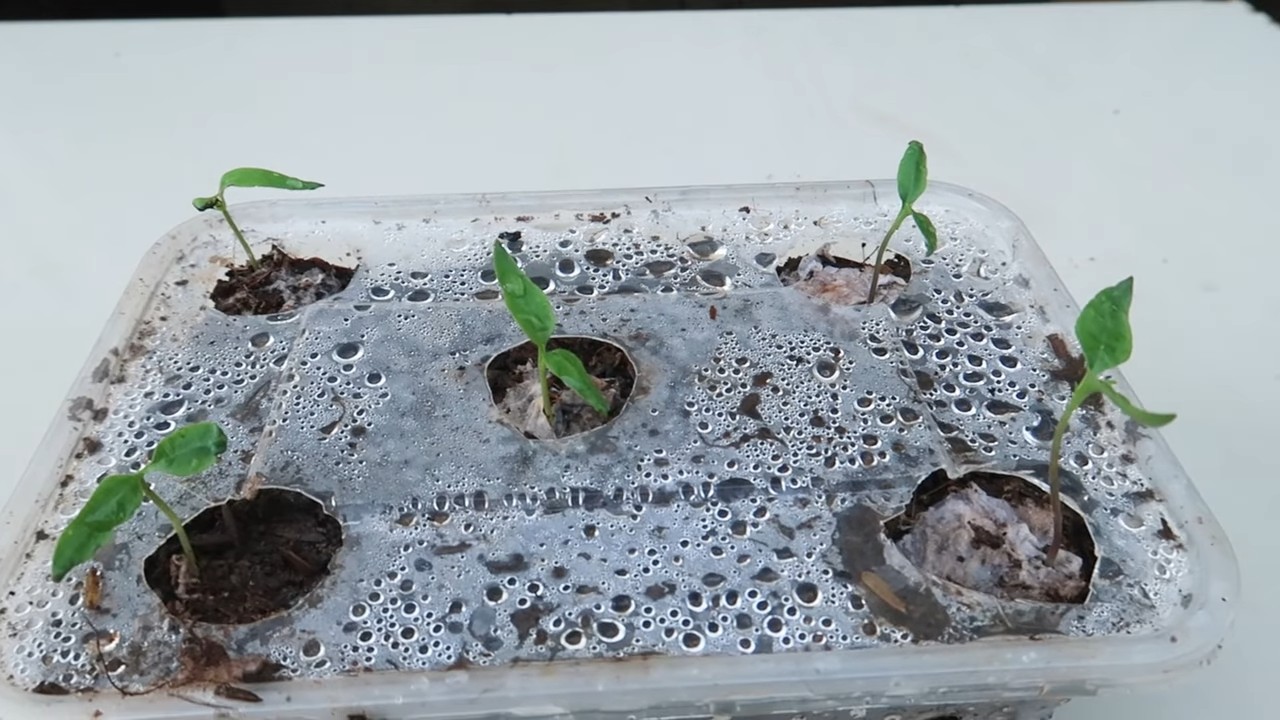
The ideal time to implement this technique is when your pepper plants are young, typically around 6-8 inches tall. You want to prune the “king” flower or bud before it fully develops. This allows the plant to focus its energy on branching out rather than producing that first pepper. If you miss the initial window, you can still prune later, but the results may not be as dramatic.
Will this technique work on all types of peppers?
While this technique is generally effective on most pepper varieties, some may respond better than others. Bell peppers, jalapenos, and other common varieties tend to benefit significantly. However, smaller, ornamental peppers may not show as much of an increase in yield. It’s always a good idea to experiment and observe how different varieties respond in your specific growing conditions.
How much pruning is too much?
It’s important to avoid over-pruning your pepper plants. Focus on removing the “king” flower or bud and any suckers that develop at the base of the plant. Avoid removing too many leaves, as they are essential for photosynthesis. The goal is to encourage branching, not to stunt the plant’s growth. A good rule of thumb is to remove no more than 20-30% of the plant’s foliage at any one time.
What if I accidentally remove too many leaves?
Don’t panic! Pepper plants are generally resilient. If you accidentally remove too many leaves, simply provide the plant with extra care, such as adequate watering and fertilization. Avoid stressing the plant further by exposing it to extreme temperatures or harsh sunlight. It should recover and continue to grow, although the yield may be slightly reduced.
How long will it take to see results?
You should start to see new branches developing within a week or two of pruning. The increased fruit production will become noticeable as the season progresses. Keep in mind that the exact timing will depend on factors such as the pepper variety, growing conditions, and overall plant health. Be patient and continue to provide your plants with the care they need.
Do I need to fertilize my pepper plants after pruning?
Yes, fertilizing your pepper plants after pruning is highly recommended. Pruning can put a slight strain on the plant, so providing it with extra nutrients will help it recover and thrive. Use a balanced fertilizer that’s rich in phosphorus and potassium to support fruit development. Organic options like bone meal and compost tea are excellent choices.
What are some common mistakes to avoid when using this technique?
Some common mistakes to avoid include:
* Pruning too late in the season.
* Over-pruning the plant.
* Neglecting to fertilize after pruning.
* Failing to provide adequate support for the branches as they become laden with fruit.
* Not monitoring for pests and diseases.
Can I use this technique on peppers grown in containers?
Yes, this technique can be used on peppers grown in containers. In fact, it can be particularly beneficial for container-grown peppers, as it helps to maximize their yield in a limited space. Just be sure to choose a container that’s large enough to accommodate the plant’s mature size and provide adequate drainage.
What if my pepper plants are already producing peppers? Is it too late to try this technique?
While it’s best to implement this technique early in the plant’s life, you can still try it even if your pepper plants are already producing peppers. However, the results may not be as dramatic as if you had pruned earlier. In this case, focus on removing any suckers that are developing at the base of the plant and lightly pruning any overcrowded branches. This can still help to improve air circulation and encourage further fruit production.
Leave a Comment