

Grow tomatoes at home and unlock a world of fresh, flavorful possibilities right in your backyard! Imagine biting into a sun-ripened tomato, bursting with juicy sweetness, knowing you nurtured it from seed to table. Forget those bland, store-bought tomatoes – with a few clever tricks and DIY hacks, you can cultivate a thriving tomato garden, no matter the size of your space.
The allure of growing your own food is deeply rooted in human history. For centuries, cultivating tomatoes has been a cherished tradition in many cultures, particularly in Italy and Mexico, where they are integral to their cuisines. From simple backyard plots to elaborate greenhouse setups, the desire to nurture these vibrant fruits has connected generations.
But why should you embark on this tomato-growing adventure? In today’s world, where we’re increasingly conscious of what we consume, knowing the origin of our food is paramount. Plus, let’s be honest, who wouldn’t want to save money on groceries while enjoying the unparalleled taste of homegrown goodness? This article is your guide to simple, effective DIY techniques that will empower you to grow tomatoes at home successfully, even if you’re a complete beginner. I’m excited to share these tips and tricks with you, so let’s get started!
Tomatenanbau zu Hause: Dein umfassender DIY-Leitfaden
Hallo Gartenfreunde! Ich freue mich riesig, euch heute zu zeigen, wie ihr eure eigenen, köstlichen Tomaten zu Hause anbauen könnt. Es ist einfacher, als ihr vielleicht denkt, und der Geschmack von frisch geernteten Tomaten aus dem eigenen Garten ist einfach unschlagbar. Egal, ob ihr einen großen Garten, einen kleinen Balkon oder nur ein sonniges Fensterbrett habt, es gibt eine Möglichkeit, Tomaten anzubauen. Lasst uns loslegen!
Was du brauchst: Die richtige Ausrüstung
Bevor wir anfangen, ist es wichtig, dass wir alles zusammen haben, was wir brauchen. Hier ist eine Liste der wichtigsten Dinge:
* Tomatensamen oder Jungpflanzen: Du kannst entweder mit Samen beginnen oder Jungpflanzen kaufen. Samen sind günstiger, aber Jungpflanzen sparen Zeit.
* Anzuchterde: Spezielle Anzuchterde ist nährstoffarm und locker, ideal für die Keimung von Samen.
* Töpfe oder Anzuchtschalen: Für die Anzucht der Samen oder Jungpflanzen.
* Größere Töpfe oder ein Beet: Für das Auspflanzen der Tomatenpflanzen.
* Tomatenerde: Nährstoffreiche Erde, die speziell für Tomaten entwickelt wurde.
* Pflanzstäbe oder Rankgitter: Tomatenpflanzen brauchen Unterstützung, besonders wenn sie Früchte tragen.
* Gießkanne oder Gartenschlauch: Zum Bewässern der Pflanzen.
* Dünger: Spezieller Tomatendünger, um die Pflanzen mit ausreichend Nährstoffen zu versorgen.
* Gartenschere: Zum Ausgeizen der Seitentriebe.
* Handschuhe: Um deine Hände sauber zu halten.
* (Optional) Gewächshaus oder Folientunnel: Für einen früheren Start und besseren Schutz vor schlechtem Wetter.
Phase 1: Die Anzucht (Wenn du mit Samen beginnst)
Wenn du dich für den Anbau aus Samen entschieden hast, ist die Anzucht der erste Schritt. Ich finde, es ist immer wieder faszinierend zu sehen, wie aus einem kleinen Samenkorn eine ganze Pflanze entsteht.
1. Vorbereitung der Anzuchtschalen: Fülle die Anzuchtschalen oder kleinen Töpfe mit Anzuchterde. Drücke die Erde leicht an.
2. Aussaat der Samen: Lege 2-3 Samen pro Topf oder Schale. Bedecke die Samen mit einer dünnen Schicht Erde (ca. 0,5 cm).
3. Bewässerung: Befeuchte die Erde vorsichtig mit einer Sprühflasche oder einer Gießkanne mit feinem Brausekopf. Die Erde sollte feucht, aber nicht nass sein.
4. Standort: Stelle die Anzuchtschalen an einen warmen und hellen Ort. Eine Temperatur von 20-25°C ist ideal. Ein Mini-Gewächshaus oder eine durchsichtige Plastikabdeckung kann helfen, die Feuchtigkeit zu halten.
5. Keimung: Die Samen keimen in der Regel innerhalb von 7-14 Tagen. Halte die Erde während dieser Zeit feucht.
6. Pikieren: Sobald die Sämlinge ihre ersten richtigen Blätter (neben den Keimblättern) entwickelt haben, ist es Zeit zum Pikieren. Das bedeutet, dass du die stärksten Sämlinge vorsichtig in größere Töpfe umpflanzt.
* Fülle die größeren Töpfe mit Anzuchterde.
* Löse die Sämlinge vorsichtig aus den Anzuchtschalen. Am besten geht das mit einem Pikierstab oder einem Löffel.
* Pflanze die Sämlinge in die größeren Töpfe und bedecke die Wurzeln mit Erde.
* Gieße die Sämlinge vorsichtig an.
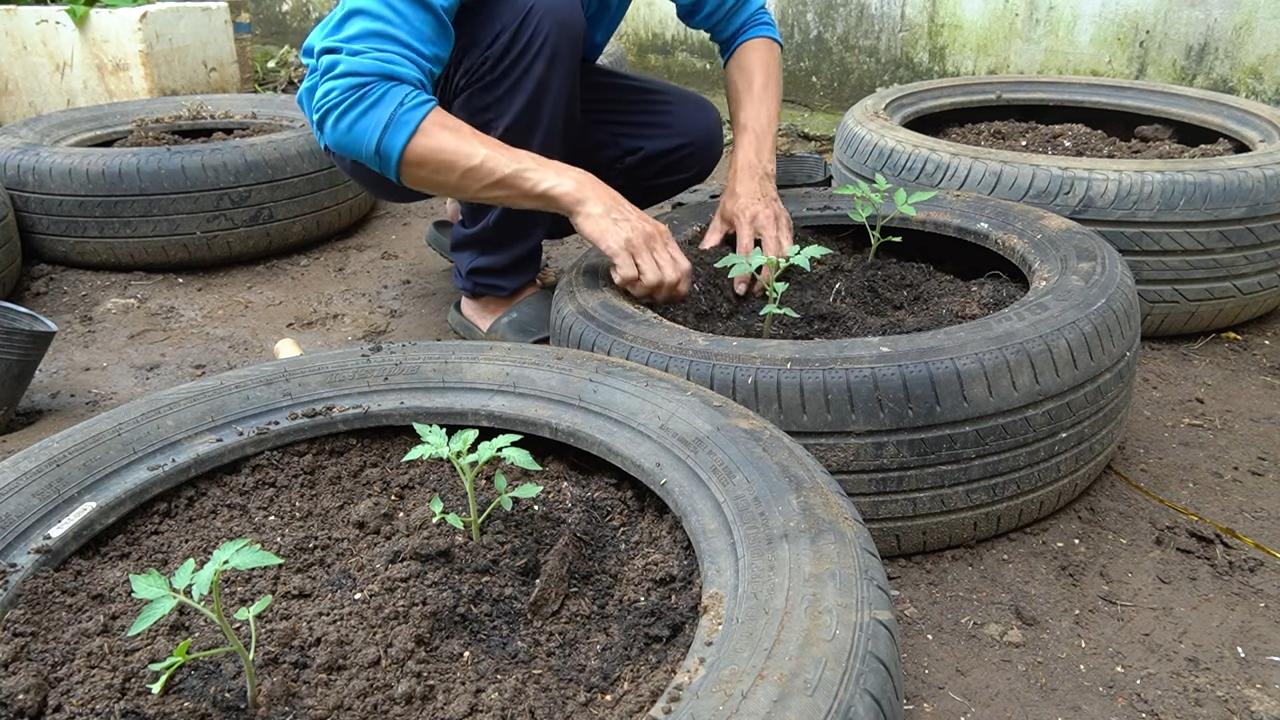
Phase 2: Das Auspflanzen
Sobald die Tomatenpflanzen groß genug sind und das Wetter mitspielt, können sie ins Freie gepflanzt werden. Das ist ein wichtiger Schritt, denn jetzt bekommen die Pflanzen den Platz und die Nährstoffe, die sie zum Wachsen und Gedeihen brauchen.
1. Vorbereitung des Standorts: Wähle einen sonnigen Standort für deine Tomatenpflanzen. Tomaten brauchen mindestens 6-8 Stunden Sonne pro Tag. Der Boden sollte locker, nährstoffreich und gut durchlässig sein.
2. Vorbereitung des Bodens: Grabe ein Loch, das etwas größer ist als der Wurzelballen der Tomatenpflanze. Lockere den Boden am Boden des Lochs auf.
3. Einsetzen der Pflanzen: Nimm die Tomatenpflanze vorsichtig aus dem Topf. Lockere den Wurzelballen leicht auf. Setze die Pflanze in das Loch und fülle es mit Tomatenerde auf. Die untersten Blätter der Pflanze können ruhig mit Erde bedeckt werden, da sich dort neue Wurzeln bilden können.
4. Bewässerung: Gieße die Tomatenpflanzen nach dem Einpflanzen gründlich an.
5. Anbringen von Stützen: Bringe Pflanzstäbe oder Rankgitter an, um die Tomatenpflanzen zu stützen. Tomatenpflanzen können sehr groß und schwer werden, besonders wenn sie viele Früchte tragen.
6. Abstand: Achte auf den richtigen Abstand zwischen den Pflanzen. Je nach Sorte sollten die Pflanzen 50-80 cm auseinander stehen.
Phase 3: Die Pflege
Die Pflege der Tomatenpflanzen ist entscheidend für eine reiche Ernte. Hier sind einige wichtige Tipps:
1. Bewässerung: Tomaten brauchen regelmäßig Wasser, besonders während der Fruchtbildung. Gieße die Pflanzen am besten morgens, damit die Blätter über den Tag abtrocknen können. Vermeide es, die Blätter zu gießen, da dies Pilzkrankheiten fördern kann.
2. Düngung: Dünge die Tomatenpflanzen regelmäßig mit speziellem Tomatendünger. Beginne damit etwa 2-3 Wochen nach dem Auspflanzen. Befolge die Anweisungen auf der Düngerverpackung.
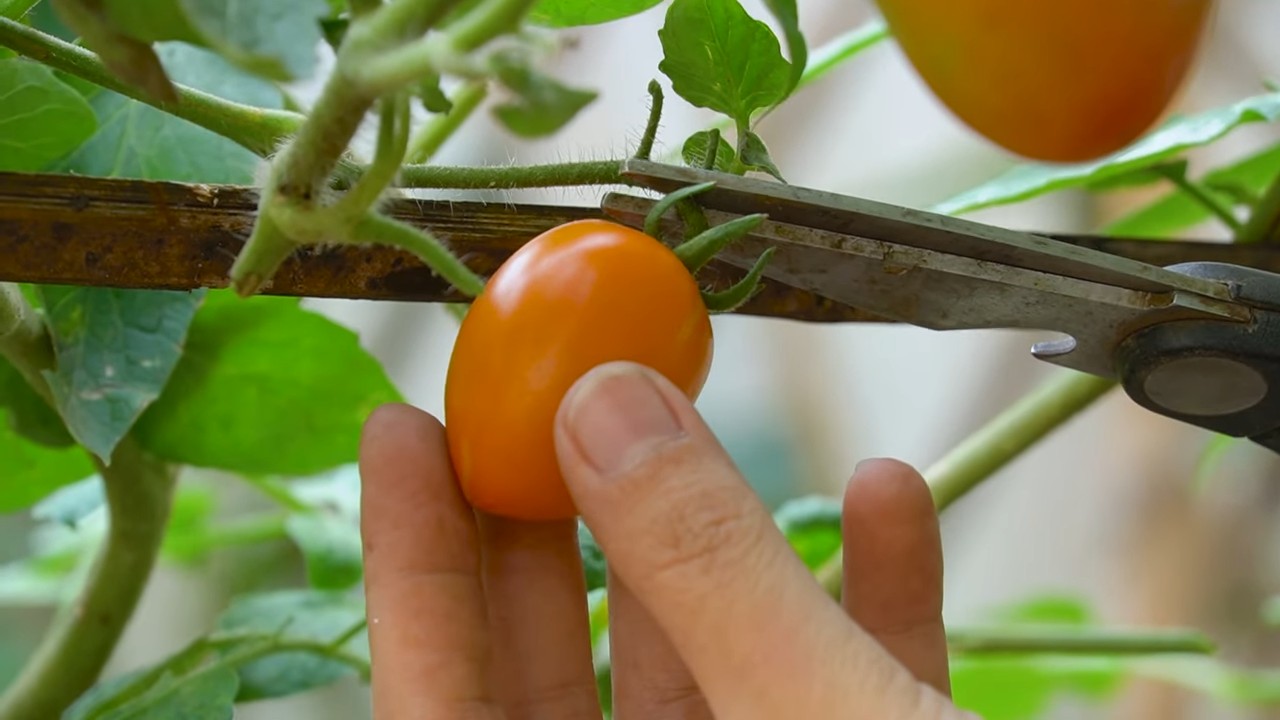
3. Ausgeizen: Das Ausgeizen ist ein wichtiger Schritt, um die Tomatenpflanzen gesund und produktiv zu halten. Entferne regelmäßig die Seitentriebe, die sich in den Blattachseln bilden. Diese Triebe nehmen der Pflanze unnötig Kraft und Energie.
* Suche nach den Seitentrieben, die zwischen dem Haupttrieb und den Blättern wachsen.
* Breche die Seitentriebe vorsichtig mit den Fingern ab oder schneide sie mit einer Gartenschere ab.
* Achte darauf, die Triebe frühzeitig zu entfernen, wenn sie noch klein sind.
4. Mulchen: Bedecke den Boden um die Tomatenpflanzen mit Mulch. Mulch hilft, die Feuchtigkeit im Boden zu halten, Unkraut zu unterdrücken und den Boden zu düngen. Du kannst Stroh, Grasschnitt oder Holzhackschnitzel als Mulch verwenden.
5. Schutz vor Krankheiten und Schädlingen: Tomatenpflanzen können anfällig für verschiedene Krankheiten und Schädlinge sein. Achte auf Anzeichen von Problemen und handle schnell.
* Krankheiten: Die häufigste Krankheit bei Tomaten ist die Kraut- und Braunfäule. Sie wird durch einen Pilz verursacht und führt zu braunen Flecken auf den Blättern und Früchten. Entferne befallene Blätter und Früchte sofort und behandle die Pflanzen mit einem Fungizid.
* Schädlinge: Blattläuse, Weiße Fliegen und Tomatenwürmer können Tomatenpflanzen befallen. Sprühe die Pflanzen mit einem Insektizid oder verwende natürliche Schädlingsbekämpfungsmittel wie Neemöl.
6. Bestäubung: In manchen Fällen kann es notwendig sein, die Tomatenblüten von Hand zu bestäuben. Das ist besonders wichtig, wenn die Pflanzen in einem Gewächshaus stehen oder wenn es wenig Wind gibt.
* Schüttle die Blüten vorsichtig oder verwende einen Pinsel, um den Pollen von einer Blüte zur nächsten zu übertragen.
Phase 4: Die Ernte
Endlich ist es soweit: Die Tomaten sind reif und können geerntet werden! Das ist der Lohn für all die Mühe und Arbeit.
1. Reife erkennen: Tomaten sind reif, wenn sie ihre typische Farbe haben (rot, gelb, orange usw.) und sich leicht vom Stiel lösen
Conclusion
So, there you have it! Growing tomatoes at home isn’t just a gardening project; it’s an investment in flavor, freshness, and a deeper connection to your food. We’ve explored a simple yet effective DIY trick that can significantly boost your tomato yield and overall plant health. This isn’t about complicated techniques or expensive equipment; it’s about harnessing the power of readily available resources and a little bit of know-how to achieve remarkable results.
Why is this DIY trick a must-try? Because it addresses some of the most common challenges faced by home tomato growers. It promotes stronger root development, which translates to more robust plants capable of absorbing nutrients and water more efficiently. It encourages earlier flowering and fruit set, meaning you’ll be enjoying those juicy, sun-ripened tomatoes sooner than you thought possible. And perhaps most importantly, it enhances the overall resilience of your plants, making them better equipped to withstand pests, diseases, and environmental stressors.
But the beauty of this DIY approach lies in its adaptability. Feel free to experiment with variations to suit your specific needs and preferences. For instance, if you’re growing tomatoes in containers, you might consider adding a slow-release fertilizer to the planting mix to provide a steady stream of nutrients throughout the growing season. Or, if you’re dealing with particularly acidic soil, you could incorporate some lime to raise the pH level and make essential nutrients more accessible to your plants.
Consider trying different types of organic matter to enrich your soil. Compost, well-rotted manure, and even coffee grounds can provide valuable nutrients and improve soil structure. Remember to research the specific needs of the tomato varieties you’re growing, as some may have different nutrient requirements than others.
Don’t be afraid to get creative with your support systems, too. While traditional tomato cages are a popular option, you could also try using stakes, trellises, or even repurposed materials like old ladders or fencing. The key is to provide adequate support for your plants as they grow and prevent the fruit from touching the ground, which can lead to rot.
Ultimately, the success of your tomato-growing endeavor depends on your willingness to experiment, observe, and adapt. Pay close attention to your plants, learn from your mistakes, and don’t be afraid to try new things. And most importantly, have fun!
We wholeheartedly encourage you to try this DIY trick for growing tomatoes at home and witness the difference it can make. We are confident that you’ll be amazed by the results. Once you’ve given it a try, we’d love to hear about your experience. Share your photos, tips, and stories in the comments section below. Let’s create a community of passionate tomato growers who are dedicated to sharing their knowledge and helping each other succeed. Happy gardening!
Frequently Asked Questions (FAQ)
What exactly is the DIY trick you’re referring to?
The DIY trick we’ve been discussing involves enriching the soil with organic matter and providing adequate support for your tomato plants. This includes amending the soil with compost, well-rotted manure, or other organic materials to improve its fertility and drainage. It also involves using stakes, cages, or trellises to support the plants as they grow and prevent the fruit from touching the ground. While seemingly simple, these steps are crucial for promoting healthy growth, maximizing yield, and preventing common tomato problems.
What kind of organic matter is best for growing tomatoes?
The best type of organic matter for growing tomatoes depends on your soil type and the specific needs of your plants. Compost is a great all-around option, as it provides a balanced blend of nutrients and improves soil structure. Well-rotted manure is another excellent choice, but be sure to use aged manure to avoid burning the roots of your plants. Other options include leaf mold, grass clippings (untreated with herbicides), and even coffee grounds. Experiment with different types of organic matter to see what works best for you.
How often should I water my tomato plants?
Tomato plants need consistent moisture, especially during hot, dry weather. Water deeply and regularly, aiming to keep the soil consistently moist but not waterlogged. A good rule of thumb is to water when the top inch of soil feels dry to the touch. Avoid watering the foliage, as this can promote fungal diseases. Instead, water at the base of the plant, using a soaker hose or drip irrigation system if possible.
What are some common tomato pests and diseases, and how can I prevent them?
Common tomato pests include aphids, whiteflies, tomato hornworms, and spider mites. Common diseases include early blight, late blight, septoria leaf spot, and blossom end rot. To prevent these problems, choose disease-resistant tomato varieties, practice good sanitation (remove diseased leaves and debris), provide adequate air circulation, and avoid overwatering. You can also use organic pest control methods, such as insecticidal soap or neem oil, to control pests. For diseases, copper-based fungicides can be effective if applied early.
How do I know when my tomatoes are ripe?
The best way to tell if a tomato is ripe is to look at its color and feel its texture. Ripe tomatoes should be uniformly colored (depending on the variety) and slightly soft to the touch. They should also have a pleasant aroma. Avoid picking tomatoes that are still green or hard, as they will not ripen properly off the vine.
Can I grow tomatoes in containers?
Yes, you can definitely grow tomatoes in containers! Choose a large container (at least 20 gallons) with good drainage holes. Use a high-quality potting mix and provide adequate support for your plants. Container-grown tomatoes may need more frequent watering and fertilization than those grown in the ground.
What if my tomato plants aren’t producing fruit?
There are several reasons why your tomato plants might not be producing fruit. Common causes include lack of pollination, insufficient sunlight, nutrient deficiencies, and extreme temperatures. To improve fruit set, try hand-pollinating your plants by gently shaking the flowers. Make sure your plants are getting at least 6-8 hours of sunlight per day. Fertilize regularly with a balanced fertilizer. And if temperatures are consistently above 90°F or below 55°F, consider providing shade or protection from the cold.
How can I improve the flavor of my homegrown tomatoes?
The flavor of your homegrown tomatoes depends on several factors, including the variety you choose, the soil quality, and the amount of sunlight they receive. Choose tomato varieties that are known for their flavor. Amend your soil with plenty of organic matter to improve its fertility. And make sure your plants are getting at least 6-8 hours of sunlight per day. You can also try adding a small amount of Epsom salts to the soil to improve the sweetness of your tomatoes.
Is it necessary to prune tomato plants?
Pruning tomato plants can help improve air circulation, reduce disease risk, and encourage fruit production. However, it’s not always necessary. Determinate tomato varieties (those that grow to a certain size and then stop) generally don’t need to be pruned. Indeterminate tomato varieties (those that continue to grow throughout the season) benefit from pruning, especially the removal of suckers (the small shoots that grow between the main stem and the branches).
What are some good companion plants for tomatoes?
Good companion plants for tomatoes include basil, marigolds, carrots, onions, and garlic. Basil helps repel tomato hornworms and other pests. Marigolds deter nematodes and other soil pests. Carrots and onions improve soil health. And garlic helps prevent fungal diseases. Planting these companion plants alongside your tomatoes can help create a healthier and more productive garden.
Leave a Comment