

Grow Sweet Potatoes Soil Bags: Imagine harvesting a bounty of sweet, earthy sweet potatoes right from your own backyard, without the need for a sprawling garden! Sounds too good to be true? Well, get ready to be amazed because I’m about to share a game-changing DIY trick that will have you growing sweet potatoes like a pro, even if you only have a small patio or balcony.
Sweet potatoes, with their vibrant orange flesh and naturally sweet flavor, have been a staple in diets around the world for centuries. Originating in Central and South America, they’ve journeyed across continents, becoming a beloved ingredient in everything from savory stews to decadent desserts. But did you know that you don’t need acres of land to enjoy the fruits (or rather, roots!) of your labor?
In today’s fast-paced world, many of us are craving a connection to nature and a way to grow our own food. But space constraints and busy schedules often get in the way. That’s where this ingenious DIY trick comes in. By learning how to grow sweet potatoes soil bags, you can bypass the limitations of traditional gardening and create a thriving sweet potato patch in a compact space. This method is perfect for apartment dwellers, urban gardeners, or anyone looking for a simple and effective way to enjoy fresh, homegrown sweet potatoes. So, let’s dive in and discover how you can transform ordinary soil bags into a sweet potato paradise!
Süßkartoffeln im Pflanzsack anbauen: Eine einfache DIY-Anleitung
Hallo liebe Gartenfreunde! Habt ihr Lust, eure eigenen Süßkartoffeln anzubauen, aber wenig Platz im Garten? Keine Sorge, ich zeige euch, wie ihr das ganz einfach in Pflanzsäcken hinbekommt! Es ist ein super Projekt, das nicht nur Spaß macht, sondern euch auch mit leckeren, selbstgezogenen Süßkartoffeln belohnt. Los geht’s!
Was ihr für den Anbau von Süßkartoffeln im Pflanzsack benötigt:
* Pflanzsäcke: Wählt Pflanzsäcke mit einem Volumen von mindestens 40 Litern. Größer ist besser, da Süßkartoffeln Platz zum Wachsen brauchen. Stoffpflanzsäcke sind ideal, da sie eine gute Drainage gewährleisten und die Wurzeln atmen lassen.
* Süßkartoffel-Setzlinge (Slips): Diese könnt ihr entweder online bestellen, im Gartencenter kaufen oder sogar selbst ziehen (dazu später mehr!). Achtet darauf, gesunde, kräftige Setzlinge auszuwählen.
* Hochwertige Pflanzerde: Eine gut durchlässige, nährstoffreiche Erde ist entscheidend für den Erfolg. Ich empfehle eine Mischung aus Gartenerde, Kompost und etwas Sand oder Perlit.
* Kompost oder organischer Dünger: Süßkartoffeln sind hungrig! Kompost oder organischer Dünger versorgen sie mit den nötigen Nährstoffen.
* Gießkanne oder Schlauch: Regelmäßiges Gießen ist wichtig, besonders während der heißen Sommermonate.
* Mulch (optional): Mulch hilft, die Feuchtigkeit im Boden zu halten und Unkraut zu unterdrücken. Stroh, Holzhackschnitzel oder Grasschnitt eignen sich gut.
* Gartenschere oder Messer: Zum eventuellen Kürzen der Setzlinge.
* Geduld und Liebe: Das Wichtigste!
Schritt-für-Schritt-Anleitung: Süßkartoffeln im Pflanzsack pflanzen
1. Pflanzsäcke vorbereiten:
* Sucht euch einen sonnigen Standort für eure Pflanzsäcke aus. Süßkartoffeln lieben die Sonne!
* Füllt die Pflanzsäcke zu etwa zwei Dritteln mit eurer vorbereiteten Pflanzerde.
* Mischt Kompost oder organischen Dünger unter die Erde. Achtet darauf, die Dosierungsanleitung auf der Verpackung zu beachten.
* Gießt die Erde gründlich an, sodass sie sich setzt.
2. Süßkartoffel-Setzlinge vorbereiten:
* Nehmt eure Süßkartoffel-Setzlinge vorsichtig aus der Verpackung.
* Wenn die Setzlinge sehr lang sind, könnt ihr sie etwas kürzen, um das Anwachsen zu erleichtern. Schneidet sie einfach mit einer Gartenschere oder einem Messer ab.
* Entfernt die unteren Blätter der Setzlinge, damit sie beim Einpflanzen nicht in der Erde vergraben werden.
3. Süßkartoffel-Setzlinge einpflanzen:
* Macht mit den Fingern oder einem kleinen Spaten Löcher in die Erde, die tief genug sind, um die Wurzeln der Setzlinge aufzunehmen.
* Pflanzt die Setzlinge in die Löcher und bedeckt die Wurzeln mit Erde. Achtet darauf, dass die Blätter nicht mit Erde bedeckt sind.
* Drückt die Erde um die Setzlinge herum leicht an.
* Gießt die Setzlinge nach dem Einpflanzen gründlich an.
4. Pflege der Süßkartoffeln im Pflanzsack:
* Gießen: Gießt die Süßkartoffeln regelmäßig, besonders während der heißen Sommermonate. Die Erde sollte immer leicht feucht sein, aber nicht nass. Vermeidet Staunässe, da dies zu Wurzelfäule führen kann.
* Düngen: Düngt die Süßkartoffeln alle paar Wochen mit Komposttee oder einem organischen Flüssigdünger.
* Unkraut jäten: Entfernt regelmäßig Unkraut, das in den Pflanzsäcken wächst.
* Mulchen (optional): Tragt eine Schicht Mulch um die Pflanzen herum auf, um die Feuchtigkeit im Boden zu halten und Unkraut zu unterdrücken.
* Rankhilfe (optional): Süßkartoffeln bilden lange Ranken. Wenn ihr möchtet, könnt ihr ihnen eine Rankhilfe anbieten, an der sie hochklettern können. Das ist aber nicht unbedingt notwendig.
Süßkartoffel-Setzlinge selbst ziehen:
Wenn ihr eure eigenen Süßkartoffel-Setzlinge ziehen möchtet, ist das auch kein Problem! Es ist ein bisschen mehr Aufwand, aber es lohnt sich.
1. Süßkartoffel vorbereiten:
* Wählt eine gesunde, unbeschädigte Süßkartoffel aus.
* Schneidet die Süßkartoffel in zwei Hälften oder lasst sie ganz.
2. Süßkartoffel in Wasser stellen:
* Steckt Zahnstocher in die Seiten der Süßkartoffel, sodass sie im Wasserglas oder -behälter gehalten wird.
* Füllt den Behälter mit Wasser, sodass die untere Hälfte der Süßkartoffel bedeckt ist.
* Stellt den Behälter an einen warmen, hellen Ort, aber nicht in direktes Sonnenlicht.
3. Warten und pflegen:
* Wechselt das Wasser alle paar Tage.
* Nach einigen Wochen sollten sich an der Süßkartoffel Triebe (Slips) bilden.
4. Slips abnehmen und bewurzeln:
* Sobald die Slips etwa 15-20 cm lang sind, könnt ihr sie vorsichtig von der Süßkartoffel abbrechen oder abschneiden.
* Stellt die Slips in ein Glas Wasser, sodass sich Wurzeln bilden können.
* Nach etwa einer Woche sollten sich ausreichend Wurzeln gebildet haben, um die Slips in Pflanzsäcke oder den Garten zu pflanzen.
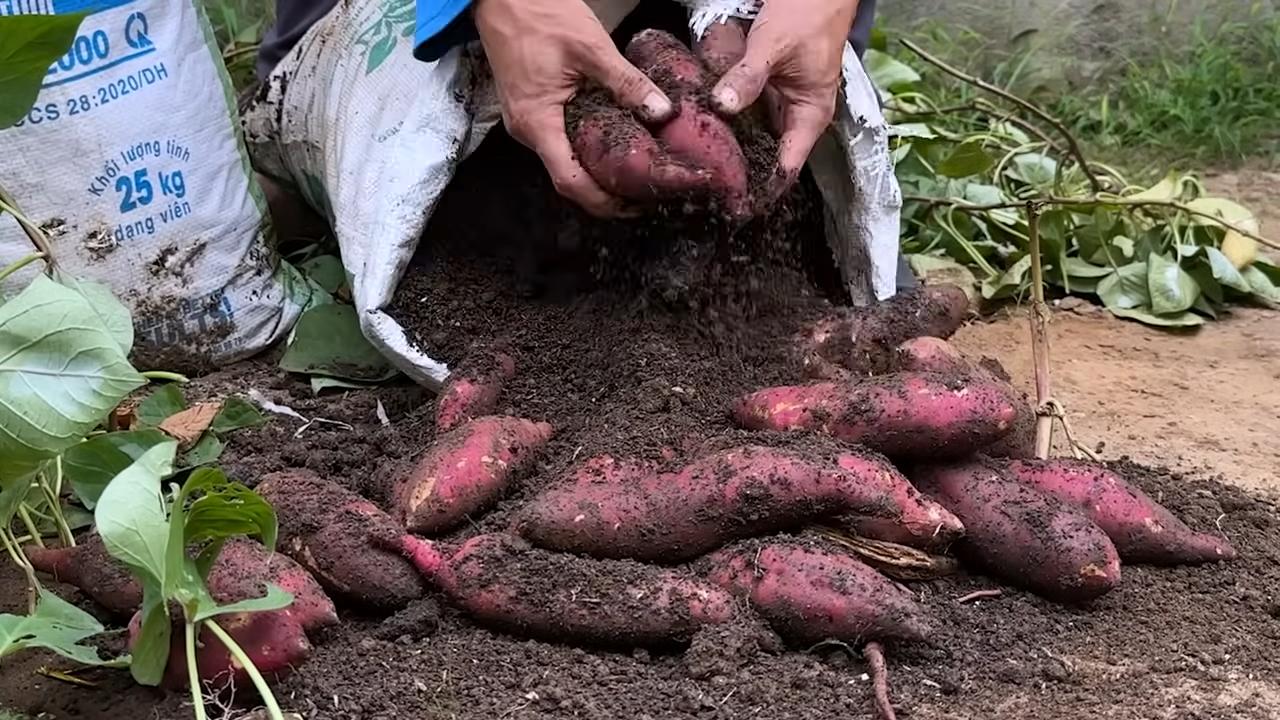
Erntezeit: Wann sind die Süßkartoffeln reif?
Die Erntezeit für Süßkartoffeln ist normalerweise im Herbst, etwa 90-120 Tage nach dem Pflanzen der Setzlinge.
* Anzeichen der Reife: Die Blätter der Süßkartoffelpflanze beginnen gelb zu werden und abzusterben.
* Ernte: Grabt vorsichtig um die Pflanze herum und hebt die Süßkartoffeln aus der Erde. Achtet darauf, die Knollen nicht zu beschädigen.
* Trocknen: Lasst die geernteten Süßkartoffeln einige Tage an einem warmen, trockenen Ort trocknen. Dadurch härtet die Schale aus und die Süßkartoffeln sind länger haltbar.
Tipps und Tricks für den erfolgreichen Anbau von Süßkartoffeln im Pflanzsack:
* Wählt den richtigen Standort: Süßkartoffeln brauchen mindestens 6 Stunden Sonne pro Tag.
* Verwendet hochwertige Erde: Eine gut durchlässige, nährstoffreiche Erde ist entscheidend für den Erfolg.
* Gießt regelmäßig: Die Erde sollte immer leicht feucht sein, aber nicht nass.
* Düngt regelmäßig: Süßkartoffeln sind hungrig!
* Schützt die Pflanzen vor Schädlingen: Achtet auf Schädlinge wie Blattläuse oder Kartoffelkäfer und bekämpft sie gegebenenfalls.
* Habt Geduld: Süßkartoffeln brauchen Zeit zum Wachsen.
Mögliche Probleme und Lösungen:
* Gelbe Blätter: Können ein Zeichen für Nährstoffmangel oder Überwässerung sein. Düngt die Pflanzen oder passt die Bewässerung an.
* Wurzelfäule: Wird durch Staunässe verursacht. Sorgt für eine gute Drainage und vermeidet Überwässerung.
* Schädlinge: Bekämpft Schädlinge mit natürlichen Mitteln oder Insektiziden.
Fazit:
Der Anbau von Süßkartoffeln im Pflanzsack ist eine tolle Möglichkeit, auch auf kleinem Raum eigene Süßkartoffeln zu ernten. Mit etwas Geduld und Pflege werdet ihr mit einer reichen Ernte belohnt. Ich wünsche euch viel Erfolg und Spaß beim Gärtnern! Las

Conclusion
So, there you have it! Growing sweet potatoes in soil bags is not just a gardening trend; it’s a game-changer for anyone looking to maximize their yield, minimize space, and enjoy the unparalleled satisfaction of harvesting their own homegrown goodness. We’ve walked you through the simple steps, highlighted the benefits, and hopefully, inspired you to ditch the traditional garden bed (at least for your sweet potatoes!) and embrace this innovative method.
Why is this DIY trick a must-try? Because it offers a trifecta of advantages: convenience, control, and cost-effectiveness. You’re not limited by the constraints of your existing garden soil; you can create the perfect growing medium tailored specifically for sweet potatoes. You have complete control over drainage and nutrient levels, leading to healthier plants and more abundant harvests. And let’s be honest, the initial investment in soil bags is far less daunting than tilling a large plot of land.
But the beauty of this method lies in its adaptability. Feel free to experiment with different soil mixes. Some gardeners swear by adding extra compost for an extra boost of nutrients, while others incorporate perlite for enhanced drainage. Consider adding a layer of mulch on top of the soil to retain moisture and suppress weeds. You can even try different varieties of sweet potatoes to see which ones thrive best in your local climate and soil conditions. Beauregard, Covington, and Japanese sweet potatoes are all excellent choices to start with.
Don’t be afraid to get creative with your setup. If you live in an area with limited sunlight, consider moving your soil bags around throughout the day to maximize sun exposure. You can also use trellises or stakes to support the vines as they grow, preventing them from sprawling too much and taking up valuable space.
Ultimately, the best way to discover the magic of growing sweet potatoes in soil bags is to simply try it yourself. We encourage you to take the plunge, get your hands dirty, and experience the joy of nurturing these delicious and nutritious root vegetables from seedling to harvest.
And most importantly, we want to hear about your experiences! Share your tips, tricks, and triumphs in the comments below. Let us know what worked for you, what challenges you faced, and what you learned along the way. Your insights will not only help other gardeners but also contribute to a growing community of sweet potato enthusiasts. Let’s cultivate a shared passion for sustainable gardening and delicious homegrown food, one soil bag at a time. Remember, mastering the art of growing sweet potatoes in soil bags is within everyone’s reach, regardless of their gardening experience. So, grab your soil bags, your sweet potato slips, and get ready to embark on a rewarding gardening adventure!
Frequently Asked Questions (FAQ)
What type of soil is best for growing sweet potatoes in soil bags?
The ideal soil mix for sweet potatoes in soil bags is a well-draining, loose, and fertile blend. A good starting point is a mix of equal parts compost, peat moss (or coconut coir), and perlite or vermiculite. The compost provides essential nutrients, the peat moss or coconut coir helps retain moisture, and the perlite or vermiculite ensures proper drainage. Avoid heavy clay soils, as they can compact and hinder root development. You can also purchase pre-mixed potting soil specifically formulated for vegetables, but be sure to amend it with extra compost for added nutrients. Remember, sweet potatoes prefer slightly acidic soil with a pH between 5.5 and 6.8. You can test your soil pH using a home testing kit and adjust it accordingly with lime (to raise the pH) or sulfur (to lower the pH).
How often should I water my sweet potatoes grown in soil bags?
Watering frequency depends on several factors, including the weather, the size of your soil bags, and the type of soil you’re using. Generally, you should water your sweet potatoes when the top inch of soil feels dry to the touch. During hot, dry weather, you may need to water them daily, while during cooler, wetter periods, you can water them less frequently. Avoid overwatering, as this can lead to root rot. Ensure that your soil bags have adequate drainage holes to prevent water from pooling at the bottom. A good rule of thumb is to water deeply and thoroughly, allowing the water to drain out of the bottom of the bag. Monitor your plants closely and adjust your watering schedule as needed. Wilting leaves can indicate either underwatering or overwatering, so check the soil moisture before adding more water.
How much sunlight do sweet potatoes need when grown in soil bags?
Sweet potatoes thrive in full sun, requiring at least 6-8 hours of direct sunlight per day. Choose a location for your soil bags that receives ample sunlight throughout the day. If you live in an area with intense afternoon sun, you may want to provide some shade during the hottest part of the day to prevent the leaves from scorching. If you’re growing your sweet potatoes indoors or in a partially shaded area, you may need to supplement with artificial lighting, such as grow lights. Rotate your soil bags regularly to ensure that all sides of the plants receive equal sunlight. Insufficient sunlight can result in leggy growth, reduced yields, and smaller sweet potatoes.
When is the best time to plant sweet potato slips in soil bags?
The best time to plant sweet potato slips in soil bags is after the last frost, when the soil has warmed up to at least 65°F (18°C). Sweet potatoes are sensitive to cold temperatures, so it’s important to wait until the weather is consistently warm before planting. In most regions, this is typically in late spring or early summer. You can start your sweet potato slips indoors 6-8 weeks before the last frost to get a head start on the growing season. Harden off the slips gradually by exposing them to outdoor conditions for a few hours each day before transplanting them into your soil bags. Planting too early can result in stunted growth or even death of the plants.
How do I harvest sweet potatoes from soil bags?
Sweet potatoes are typically ready to harvest about 90-120 days after planting, depending on the variety and growing conditions. A good indicator that your sweet potatoes are ready to harvest is when the leaves start to turn yellow and the vines begin to die back. To harvest, gently tip the soil bag over and carefully remove the sweet potatoes from the soil. Avoid damaging the skins, as this can shorten their storage life. Cure the sweet potatoes by placing them in a warm, humid location (80-85°F and 85-90% humidity) for 7-10 days. This process allows the skins to harden and the starches to convert to sugars, resulting in a sweeter flavor. After curing, store the sweet potatoes in a cool, dry, and well-ventilated location (55-60°F) for several months.
Can I reuse the soil from my sweet potato soil bags?
Yes, you can reuse the soil from your sweet potato soil bags, but it’s important to amend it with fresh compost and other nutrients before planting again. Sweet potatoes are heavy feeders, so they deplete the soil of nutrients over the growing season. Adding compost will replenish these nutrients and improve the soil structure. You may also want to consider adding a slow-release fertilizer to provide a steady supply of nutrients throughout the next growing season. Before reusing the soil, remove any remaining plant debris, such as roots and stems. You can also solarize the soil by covering it with clear plastic for several weeks during the hottest part of the summer to kill any soilborne diseases or pests.
What are some common pests and diseases that affect sweet potatoes grown in soil bags?
Some common pests that can affect sweet potatoes include sweet potato weevils, flea beetles, and aphids. Diseases that can affect sweet potatoes include fusarium wilt, black rot, and scurf. To prevent pests and diseases, use disease-free slips, practice crop rotation, and maintain good soil drainage. You can also use organic pest control methods, such as insecticidal soap or neem oil, to control pests. If you notice any signs of disease, remove the affected plants immediately to prevent the spread of the disease. Regularly inspect your plants for any signs of pests or diseases and take action promptly to prevent serious problems.
Can I grow other vegetables in soil bags after growing sweet potatoes?
Yes, you can grow other vegetables in soil bags after growing sweet potatoes, but it’s important to choose vegetables that have different nutrient requirements. Legumes, such as beans and peas, are a good choice because they can fix nitrogen in the soil, which can benefit subsequent crops. Leafy greens, such as lettuce and spinach, are also a good choice because they don’t require as much nitrogen as other vegetables. Avoid planting heavy feeders, such as tomatoes and peppers, in the same soil bags after growing sweet potatoes, as they will deplete the soil of nutrients. Amend the soil with fresh compost and fertilizer before planting any new vegetables.
Leave a Comment