

Grow Cantaloupe in Grow Bags? Absolutely! Imagine biting into a juicy, homegrown cantaloupe, bursting with flavor, knowing you nurtured it from seed to sweet perfection, all within the cozy confines of your own backyard – or even your balcony! For centuries, cultivating melons has been a symbol of abundance and summer’s bounty, tracing back to ancient Egypt and beyond. But let’s be honest, not everyone has acres of farmland. That’s where the magic of grow bags comes in!
I know what you’re thinking: “Cantaloupes need space!” And traditionally, you’d be right. But with these clever DIY tricks, I’m going to show you how to successfully grow cantaloupe in grow bags, even if you’re short on space. This isn’t just about convenience; it’s about accessibility. It’s about empowering you to enjoy fresh, organic produce, regardless of your living situation. Plus, grow bags offer excellent drainage and aeration, leading to healthier, happier plants. So, ditch the store-bought melons and get ready to embark on a rewarding gardening adventure. Let’s unlock the secrets to a thriving cantaloupe harvest, one grow bag at a time!
Cantaloupe-Anbau im Pflanzsack: Dein DIY-Leitfaden für eine süße Ernte
Hey Gartenfreunde! Habt ihr Lust auf saftige, selbstangebaute Cantaloupe-Melonen, aber wenig Platz im Garten? Keine Sorge, ich zeige euch, wie ihr diese köstlichen Früchte auch im Pflanzsack erfolgreich anbauen könnt. Es ist einfacher als ihr denkt und macht super viel Spaß!
Warum Cantaloupe im Pflanzsack?
* Platzsparend: Ideal für Balkone, Terrassen oder kleine Gärten.
* Bessere Kontrolle: Du hast die volle Kontrolle über die Bodenqualität und Bewässerung.
* Weniger Schädlinge: Pflanzsäcke können helfen, bodenbürtige Schädlinge fernzuhalten.
* Frühere Ernte: Pflanzsäcke erwärmen sich schneller, was zu einem früheren Wachstum und einer früheren Ernte führen kann.
* Leicht zu bewegen: Du kannst die Pflanzsäcke bei Bedarf einfach umstellen.
Was du brauchst: Die Materialliste
Bevor wir loslegen, hier eine Liste mit allem, was du für dein Cantaloupe-Pflanzsack-Projekt benötigst:
* Pflanzsack: Wähle einen großen Pflanzsack (mindestens 45-50 Liter Volumen). Stoffpflanzsäcke sind ideal, da sie eine gute Drainage und Belüftung ermöglichen.
* Cantaloupe-Samen oder Jungpflanzen: Du kannst entweder Samen vorziehen oder direkt Jungpflanzen kaufen. Ich empfehle, mit Jungpflanzen zu beginnen, wenn du ungeduldig bist.
* Hochwertige Blumenerde: Verwende eine gut durchlässige Blumenerde, die reich an organischen Stoffen ist.
* Kompost: Kompost verbessert die Bodenstruktur und liefert wichtige Nährstoffe.
* Langzeitdünger: Ein Langzeitdünger versorgt deine Cantaloupe-Pflanzen über einen längeren Zeitraum mit Nährstoffen.
* Gartenschere: Zum Beschneiden der Pflanzen.
* Gießkanne oder Gartenschlauch: Zum Bewässern.
* Rankhilfe (optional): Cantaloupe-Pflanzen können ranken, daher kann eine Rankhilfe hilfreich sein, um Platz zu sparen und die Früchte vom Boden fernzuhalten.
* Mulch (optional): Mulch hilft, die Feuchtigkeit im Boden zu halten und Unkraut zu unterdrücken.
* Geduld und Liebe: Das Wichtigste!
Schritt-für-Schritt-Anleitung: So pflanzt du deine Cantaloupe im Pflanzsack
Jetzt geht’s ans Eingemachte! Folge diesen Schritten, um deine Cantaloupe-Melonen erfolgreich im Pflanzsack anzubauen:
1. Vorbereitung des Pflanzsacks
1. Pflanzsack auswählen: Wie bereits erwähnt, ist die Größe entscheidend. Ein Pflanzsack mit mindestens 45-50 Litern Volumen ist ideal. Stoffpflanzsäcke sind meine erste Wahl, da sie eine gute Drainage gewährleisten und die Wurzeln atmen lassen.
2. Drainage verbessern: Auch wenn Stoffpflanzsäcke gut drainieren, kannst du den Boden des Pflanzsacks mit einer Schicht Kies oder Blähton auslegen. Das verhindert Staunässe.
3. Erde mischen: Mische die Blumenerde mit Kompost im Verhältnis 2:1. Das bedeutet, zwei Teile Blumenerde und ein Teil Kompost. Füge den Langzeitdünger gemäß den Anweisungen auf der Verpackung hinzu. Ich verwende gerne organischen Langzeitdünger, da er die Pflanzen schonend mit Nährstoffen versorgt.
4. Pflanzsack befüllen: Fülle den Pflanzsack mit der Erdmischung bis etwa 5-10 cm unter den Rand.
2. Cantaloupe pflanzen
1. Samen vorziehen (optional): Wenn du mit Samen beginnst, säe sie etwa 4-6 Wochen vor dem letzten Frost in kleinen Töpfen vor. Halte die Erde feucht und stelle die Töpfe an einen warmen, hellen Ort.
2. Jungpflanzen vorbereiten: Wenn du Jungpflanzen gekauft hast, wässere sie vor dem Einpflanzen gründlich.
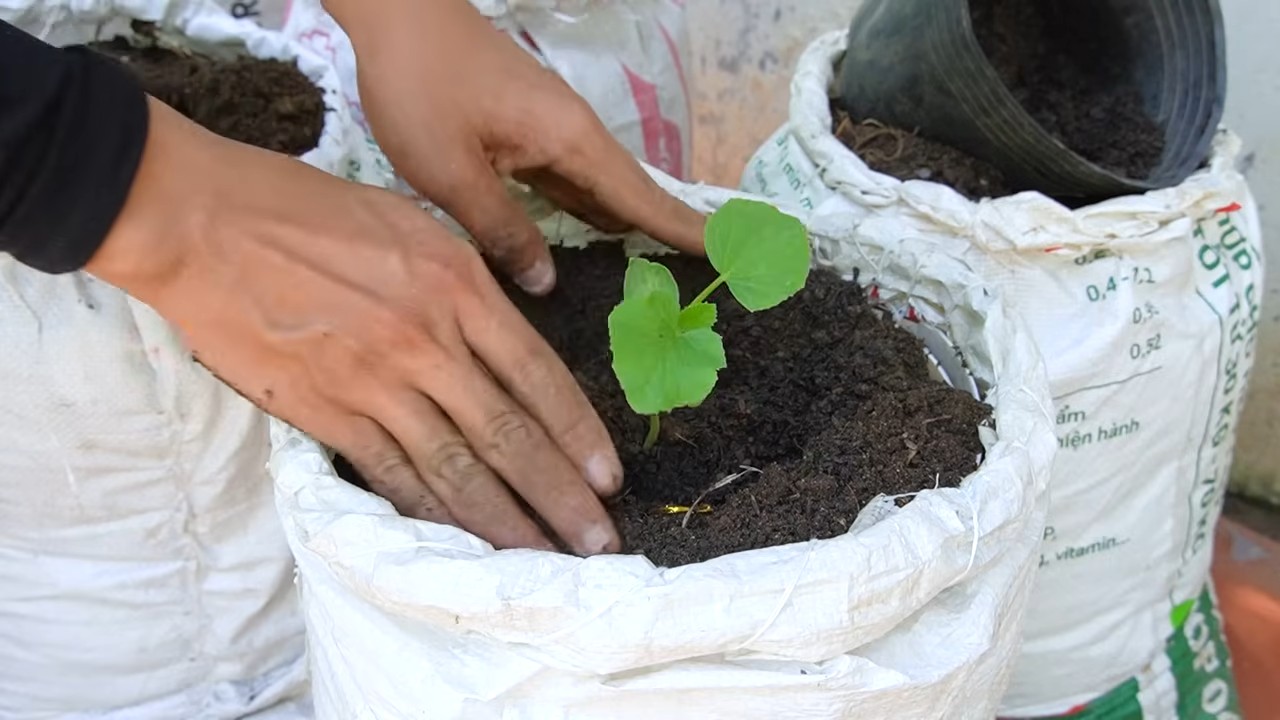
3. Pflanzloch graben: Grabe ein Loch in die Mitte des Pflanzsacks, das groß genug ist, um den Wurzelballen der Cantaloupe-Pflanze aufzunehmen.
4. Pflanze einsetzen: Nimm die Pflanze vorsichtig aus dem Topf und setze sie in das Pflanzloch. Achte darauf, dass der Wurzelballen nicht beschädigt wird. Die Oberseite des Wurzelballens sollte mit der Erdoberfläche abschließen.
5. Loch auffüllen: Fülle das Loch mit der Erdmischung auf und drücke die Erde leicht an.
6. Angießen: Gieße die Pflanze gründlich an, bis das Wasser aus dem Boden des Pflanzsacks abläuft.
3. Pflege deiner Cantaloupe-Pflanzen
1. Bewässerung: Cantaloupe-Pflanzen benötigen regelmäßige Bewässerung, besonders während der Fruchtbildung. Gieße die Pflanzen, wenn sich die oberste Erdschicht trocken anfühlt. Vermeide es, die Blätter zu benetzen, um Pilzkrankheiten vorzubeugen. Am besten gießt du früh morgens.
2. Düngung: Obwohl du bereits Langzeitdünger verwendet hast, kann es sinnvoll sein, die Pflanzen während der Wachstumsperiode zusätzlich zu düngen. Verwende einen Flüssigdünger, der reich an Kalium und Phosphor ist, um die Fruchtbildung zu fördern. Ich dünge meine Pflanzen alle zwei Wochen.
3. Beschneiden: Cantaloupe-Pflanzen können sehr buschig werden. Beschneide die Pflanzen regelmäßig, um die Luftzirkulation zu verbessern und die Fruchtbildung zu fördern. Entferne Seitentriebe, die keine Blüten tragen.
4. Rankhilfe (optional): Wenn du eine Rankhilfe verwendest, leite die Triebe der Pflanze daran entlang. Das spart Platz und verhindert, dass die Früchte auf dem Boden liegen.
5. Mulchen (optional): Eine Schicht Mulch um die Pflanze herum hilft, die Feuchtigkeit im Boden zu halten und Unkraut zu unterdrücken. Ich verwende gerne Stroh oder Holzhackschnitzel.
6. Schutz vor Schädlingen und Krankheiten: Achte auf Anzeichen von Schädlingen oder Krankheiten. Blattläuse, Spinnmilben und Mehltau können Cantaloupe-Pflanzen befallen. Bei Bedarf kannst du biologische Schädlingsbekämpfungsmittel oder Fungizide verwenden.
4. Erntezeit!
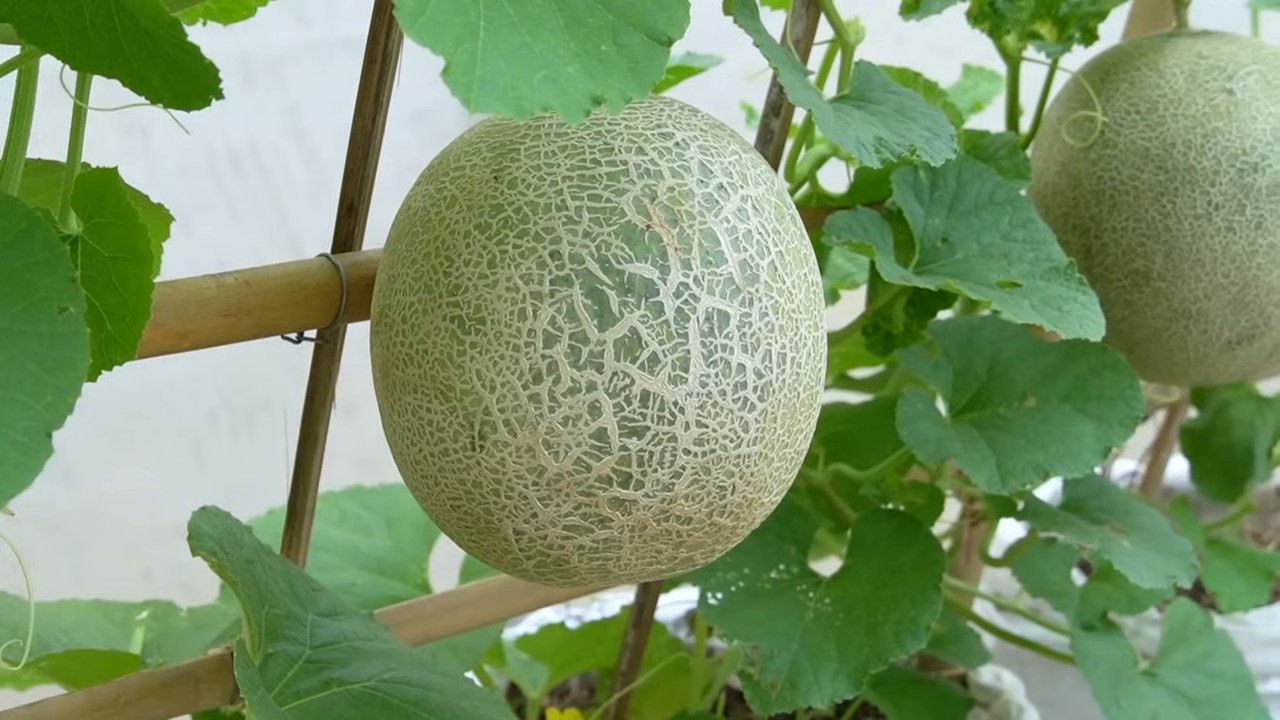
1. Reife erkennen: Die Reife einer Cantaloupe-Melone erkennst du an folgenden Anzeichen:
* Die Farbe der Schale verändert sich von grün zu gelblich-braun.
* Die Melone verströmt einen süßen Duft.
* Der Stiel löst sich leicht von der Frucht.
2. Ernten: Schneide die reife Melone vorsichtig mit einer Gartenschere vom Stiel ab.
3. Genießen: Lass dir deine selbstangebaute Cantaloupe-Melone schmecken! Sie ist pur ein Genuss, aber auch in Salaten oder Smoothies ein Highlight.
Zusätzliche Tipps für eine erfolgreiche Ernte
* Sonnenlicht: Cantaloupe-Pflanzen benötigen mindestens 6-8 Stunden Sonnenlicht pro Tag. Stelle den Pflanzsack an einen sonnigen Standort.
* Bestäubung: Cantaloupe-Pflanzen sind auf Bestäubung angewiesen, um Früchte zu bilden. Wenn du wenig Bienen in deinem Garten hast, kannst du die Blüten von Hand bestäuben. Verwende dazu einen kleinen Pinsel, um den Pollen von einer Blüte zur anderen zu übertragen.
* Geduld: Cantaloupe-Pflanzen brauchen Zeit, um zu wachsen und Früchte zu bilden. Sei geduldig und gib nicht auf!
Häufige Probleme und Lösungen
* Gelbe Blätter: Gelbe Blätter können ein Zeichen für Überwässerung, Nährstoffmangel oder Krankheiten sein. Überprüfe die Bewässerung und dünge die Pflanzen bei Bedarf.
* Kleine Früchte: Kleine Früchte können ein Zeichen für unzureichende Bestäubung oder Nährstoffmangel sein. Bestäube die Blüten von
Conclusion
So, there you have it! Growing cantaloupe in grow bags isn’t just a trendy gardening experiment; it’s a game-changer for anyone looking to enjoy the sweet, juicy taste of homegrown cantaloupe, regardless of their space limitations. We’ve walked you through the entire process, from selecting the right grow bag and preparing the perfect soil mix to nurturing your seedlings and harvesting your prize-winning melons.
But why is this DIY trick a must-try? The answer is multifaceted. First and foremost, grow bags offer unparalleled drainage and aeration, preventing the root rot that can plague cantaloupe plants in traditional gardens. This alone can dramatically increase your chances of a successful harvest. Secondly, the portability of grow bags allows you to chase the sun, ensuring your cantaloupe receives the 6-8 hours of direct sunlight it craves. This is particularly beneficial for those with less-than-ideal garden locations. Finally, the contained environment of a grow bag makes it easier to manage soil nutrients and prevent the spread of soilborne diseases.
Beyond the basic method, there’s plenty of room for experimentation and personalization. Consider trying different cantaloupe varieties to discover your favorite flavor profile. ‘Athena’ and ‘Hales Best Jumbo’ are popular choices, but don’t be afraid to venture into heirloom varieties for a truly unique taste. You can also experiment with companion planting. Marigolds, for example, can help deter pests, while basil can improve the overall health of your cantaloupe plants. Another variation is to use a trellis to support the vines, especially if you’re growing larger varieties. This will not only save space but also improve air circulation around the plants, further reducing the risk of disease.
Don’t forget the importance of consistent watering and fertilization. Cantaloupe are heavy feeders, so regular applications of a balanced fertilizer are essential for optimal growth and fruit production. Keep a close eye on your plants for any signs of pests or diseases, and take action promptly to prevent problems from escalating.
Growing cantaloupe in grow bags is a rewarding experience that connects you with nature and provides you with delicious, healthy food. It’s a testament to the fact that you don’t need acres of land to enjoy the fruits (or in this case, melons) of your labor.
We’re confident that with a little effort and attention, you can successfully grow cantaloupe in grow bags and enjoy a bountiful harvest. So, grab your grow bags, gather your supplies, and get ready to embark on this exciting gardening adventure.
We’d love to hear about your experiences! Share your tips, tricks, and photos in the comments below. Let’s create a community of grow bag cantaloupe enthusiasts and learn from each other. What variety did you choose? What challenges did you face? What successes did you celebrate? Your feedback will not only help other readers but also inspire us to continue exploring innovative gardening techniques. Happy growing!
Frequently Asked Questions (FAQ)
What size grow bag is best for cantaloupe?
The ideal size grow bag for cantaloupe is typically between 15 and 25 gallons. This provides ample space for the root system to develop and support the growth of the plant and its fruit. Smaller grow bags may restrict root growth, leading to smaller melons or reduced yields. Larger grow bags, while not necessarily harmful, may be more difficult to move and manage. Consider the mature size of the cantaloupe variety you’re growing when selecting your grow bag size.
How often should I water my cantaloupe in a grow bag?
Watering frequency depends on several factors, including the weather, the size of the plant, and the type of soil mix you’re using. Generally, you should water your cantaloupe when the top inch of soil feels dry to the touch. During hot, dry weather, this may mean watering daily, or even twice a day. In cooler, more humid conditions, you may only need to water every other day. The key is to monitor the soil moisture and adjust your watering schedule accordingly. Avoid overwatering, as this can lead to root rot. Grow bags allow for better drainage than traditional pots, but it’s still important to ensure the soil doesn’t become waterlogged.
What type of soil mix is best for cantaloupe in grow bags?
A well-draining, nutrient-rich soil mix is essential for growing healthy cantaloupe in grow bags. A good starting point is a mix of equal parts compost, peat moss (or coconut coir), and perlite. Compost provides essential nutrients, peat moss (or coconut coir) helps retain moisture, and perlite improves drainage and aeration. You can also add a slow-release fertilizer to the mix to provide a steady supply of nutrients throughout the growing season. Avoid using garden soil, as it can be too heavy and compact, hindering root growth.
How much sunlight do cantaloupe need in grow bags?
Cantaloupe require at least 6-8 hours of direct sunlight per day to thrive. Choose a location for your grow bag that receives ample sunlight throughout the day. If you live in a particularly hot climate, you may want to provide some afternoon shade to prevent the plants from overheating. The portability of grow bags makes it easy to move your plants to follow the sun or provide shade as needed.
When should I fertilize my cantaloupe plants in grow bags?
Start fertilizing your cantaloupe plants about two weeks after transplanting them into the grow bag. Use a balanced fertilizer (e.g., 10-10-10) diluted to half strength. Fertilize every two to three weeks throughout the growing season, increasing the frequency to weekly once the plants begin to flower and set fruit. You can also supplement with a liquid seaweed or fish emulsion fertilizer to provide additional micronutrients. Avoid over-fertilizing, as this can lead to excessive vegetative growth at the expense of fruit production.
How do I prevent pests and diseases when growing cantaloupe in grow bags?
Prevention is key when it comes to pests and diseases. Start by using disease-resistant cantaloupe varieties. Ensure good air circulation around the plants by spacing them adequately and pruning any overcrowded foliage. Regularly inspect your plants for signs of pests or diseases, such as aphids, squash bugs, or powdery mildew. If you spot any problems, take action promptly. Insecticidal soap or neem oil can be effective against many common pests. For fungal diseases, consider using a copper-based fungicide. Companion planting with marigolds or basil can also help deter pests.
How do I know when my cantaloupe is ripe?
Several indicators can help you determine when your cantaloupe is ripe. The skin color will change from green to a tan or yellowish hue. The stem will begin to crack and separate from the fruit. The melon will also develop a sweet aroma. Gently press on the blossom end of the melon; it should feel slightly soft and springy. If the melon meets all of these criteria, it’s likely ripe and ready to harvest.
Can I grow cantaloupe in grow bags in a greenhouse?
Yes, you can absolutely grow cantaloupe in grow bags in a greenhouse. In fact, a greenhouse can provide an ideal environment for cantaloupe, offering protection from the elements and extending the growing season. Ensure the greenhouse has adequate ventilation to prevent excessive humidity, which can lead to fungal diseases. You may also need to provide supplemental lighting if the greenhouse doesn’t receive enough natural sunlight.
What are some common problems when growing cantaloupe in grow bags and how can I fix them?
Some common problems include:
* **Poor fruit set:** This can be caused by lack of pollination. Hand-pollinate the flowers by transferring pollen from the male flowers to the female flowers using a small brush.
* **Blossom end rot:** This is caused by calcium deficiency. Amend the soil with calcium or use a calcium-rich fertilizer.
* **Powdery mildew:** This is a fungal disease that can be treated with a copper-based fungicide or neem oil.
* **Pests:** Common pests include aphids, squash bugs, and vine borers. Use insecticidal soap, neem oil, or hand-pick the pests off the plants.
Can I reuse grow bags for growing cantaloupe next year?
Yes, you can reuse grow bags, but it’s important to properly clean and sanitize them first. Remove any remaining soil and plant debris. Wash the grow bags with soap and water, and then disinfect them with a solution of bleach and water (1 part bleach to 9 parts water). Rinse the grow bags thoroughly and allow them to dry completely before storing them. Consider replacing the soil mix each year to ensure optimal nutrient levels and prevent the buildup of soilborne diseases.

Leave a Comment