

Grow Snake Gourd Easily and transform your garden into a vibrant, productive space! Have you ever dreamt of harvesting your own exotic vegetables, impressing your neighbors with your gardening prowess? Well, you’re in the right place! This DIY guide is packed with simple, effective tricks to help you cultivate these fascinating gourds, even if you’re a beginner gardener.
The snake gourd, also known as chichinda in some regions, boasts a rich history, deeply rooted in Asian cuisines and traditional medicine. For centuries, it’s been a staple in dishes across India, Southeast Asia, and beyond. Beyond its culinary uses, it’s also been valued for its medicinal properties. But you don’t need to be a seasoned botanist to enjoy the benefits of this unique vegetable.
Why should you try this DIY project? Because growing your own food is incredibly rewarding! Not only will you have access to fresh, organic produce, but you’ll also experience the joy of nurturing something from seed to harvest. Plus, with rising grocery prices, learning to grow snake gourd easily in your backyard can be a budget-friendly and sustainable solution. I’m excited to share these simple hacks that will help you achieve a bountiful harvest. Let’s get started!
Schlangenhaargurke einfach selbst anbauen: Dein DIY-Leitfaden
Hallo Gartenfreunde! Habt ihr schon mal von der Schlangenhaargurke gehört? Diese faszinierende Pflanze, auch bekannt als Trichosanthes cucumerina, ist nicht nur ein Hingucker in jedem Garten, sondern liefert auch leckere, essbare Früchte. Ich zeige euch, wie ihr diese exotische Schönheit ganz einfach selbst anbauen könnt. Keine Angst, es ist einfacher als ihr denkt!
Was du für den Anbau der Schlangenhaargurke brauchst
Bevor wir loslegen, hier eine Liste der Dinge, die du benötigst:
* Samen der Schlangenhaargurke: Diese bekommst du im Fachhandel oder online. Achte auf eine gute Qualität.
* Anzuchttöpfe oder -schalen: Für die Voranzucht im Haus.
* Anzuchterde: Sie ist nährstoffarm und ideal für junge Pflanzen.
* Größere Töpfe oder ein Beet: Für die spätere Auspflanzung.
* Gartenerde: Am besten eine Mischung aus Kompost und Blumenerde.
* Rankhilfe: Die Schlangenhaargurke ist ein Kletterer und braucht Unterstützung.
* Gießkanne oder Gartenschlauch: Zum Bewässern.
* Gartengeräte: Spaten, Schaufel, eventuell eine kleine Hacke.
* Dünger: Organischer Dünger ist ideal, z.B. Kompost oder Hornspäne.
* Geduld: Pflanzen brauchen Zeit zum Wachsen!
Die Vorbereitung: So legst du den Grundstein für eine reiche Ernte
Die richtige Vorbereitung ist das A und O für einen erfolgreichen Anbau. Hier zeige ich dir, wie du die Samen vorbereitest und die Jungpflanzen vorziehst.
Schritt 1: Die Samen vorbereiten
1. Samen einweichen: Lege die Samen für 24 Stunden in lauwarmes Wasser. Das hilft, die Keimung zu beschleunigen.
2. Stratifizierung (optional): Einige Gärtner empfehlen, die Samen vor der Aussaat zu stratifizieren. Das bedeutet, sie für ein paar Wochen in den Kühlschrank zu legen. Das simuliert die kalten Wintermonate und kann die Keimung verbessern. Ich habe gute Erfahrungen damit gemacht, aber es ist kein Muss. Lege die Samen dafür in feuchten Sand oder Küchenpapier und verpacke sie in einem Plastikbeutel.
3. Aussaatzeitpunkt: Starte die Voranzucht am besten im März oder April. So haben die Pflanzen genügend Zeit, bis zum Auspflanzen im Mai kräftig zu werden.
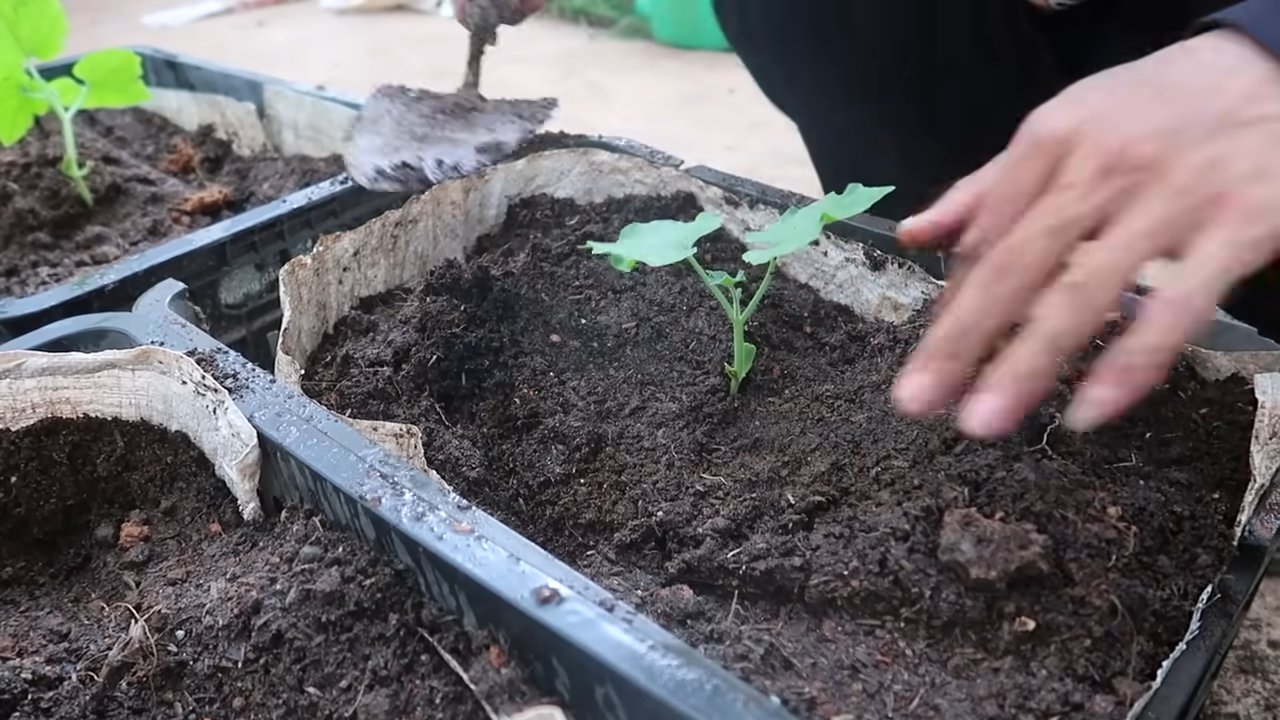
Schritt 2: Die Voranzucht im Haus
1. Anzuchttöpfe befüllen: Fülle die Anzuchttöpfe oder -schalen mit Anzuchterde.
2. Samen aussäen: Lege pro Topf ein bis zwei Samen etwa 1-2 cm tief in die Erde.
3. Angießen: Gieße die Erde vorsichtig an, sodass sie feucht, aber nicht nass ist.
4. Warm stellen: Stelle die Töpfe an einen warmen, hellen Ort. Eine Temperatur von 20-25°C ist ideal. Ein Mini-Gewächshaus oder eine Fensterbank über der Heizung sind perfekt.
5. Feucht halten: Halte die Erde gleichmäßig feucht, aber vermeide Staunässe.
6. Geduld haben: Die Keimung kann je nach Sorte und Bedingungen 1-3 Wochen dauern.
Die Auspflanzung: Ab ins Freie!
Sobald die Jungpflanzen kräftig genug sind und keine Frostgefahr mehr besteht (meist Mitte Mai), können sie ins Freie umziehen.
Schritt 1: Den richtigen Standort wählen
1. Sonnig und warm: Die Schlangenhaargurke liebt die Sonne. Wähle einen Standort, der mindestens 6 Stunden Sonne pro Tag bekommt.
2. Windgeschützt: Ein windgeschützter Standort ist ideal, da die langen Triebe leicht brechen können.
3. Gut durchlässiger Boden: Der Boden sollte gut durchlässig und nährstoffreich sein.
Schritt 2: Das Beet vorbereiten
1. Boden lockern: Lockere den Boden gründlich auf und entferne Unkraut.
2. Kompost einarbeiten: Arbeite reichlich Kompost oder gut verrotteten Mist in den Boden ein. Das verbessert die Bodenstruktur und versorgt die Pflanzen mit Nährstoffen.
3. Pflanzlöcher ausheben: Hebe Pflanzlöcher aus, die etwas größer sind als die Wurzelballen der Jungpflanzen.
4. Abstand halten: Pflanze die Jungpflanzen in einem Abstand von etwa 50-60 cm zueinander.
Schritt 3: Die Jungpflanzen einsetzen
1. Jungpflanzen vorsichtig aus den Töpfen nehmen: Drücke vorsichtig von unten gegen den Topf, um die Jungpflanze herauszulösen. Achte darauf, die Wurzeln nicht zu beschädigen.
2. In die Pflanzlöcher setzen: Setze die Jungpflanzen in die Pflanzlöcher und fülle die Löcher mit Erde auf.
3. Angießen: Gieße die Pflanzen gründlich an.
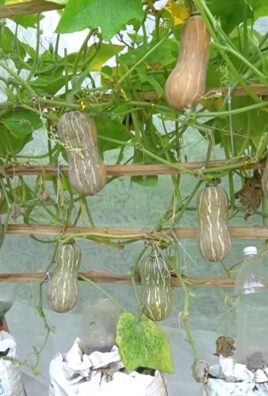
Schritt 4: Rankhilfe anbringen
1. Stabile Rankhilfe: Die Schlangenhaargurke braucht eine stabile Rankhilfe, an der sie sich festhalten kann. Ein Spalier, ein Zaun oder ein Rankgitter sind ideal.
2. Rankhilfe befestigen: Befestige die Rankhilfe fest im Boden.
3. Pflanzen anleiten: Leite die jungen Triebe vorsichtig an der Rankhilfe entlang.
Die Pflege: So bleiben deine Schlangenhaargurken gesund und ertragreich
Die richtige Pflege ist entscheidend für eine reiche Ernte. Hier sind meine Tipps:
* Regelmäßig gießen: Die Schlangenhaargurke braucht viel Wasser, besonders während der Blütezeit und Fruchtbildung. Gieße regelmäßig, aber vermeide Staunässe. Am besten gießt du morgens, damit die Blätter über den Tag abtrocknen können.
* Düngen: Dünge die Pflanzen regelmäßig mit organischem Dünger, z.B. Kompost oder Hornspäne. Beginne etwa 2-3 Wochen nach der Auspflanzung und wiederhole die Düngung alle 4-6 Wochen.
* Mulchen: Eine Mulchschicht aus Stroh oder Rasenschnitt hilft, die Feuchtigkeit im Boden zu halten und Unkraut zu unterdrücken.
* Ausgeizen: Entferne regelmäßig Seitentriebe, um die Fruchtbildung zu fördern. Konzentriere dich auf die Haupttriebe.
* Schädlinge und Krankheiten: Achte auf Schädlinge wie Blattläuse oder Spinnmilben. Bei Bedarf kannst du biologische Schädlingsbekämpfungsmittel einsetzen. Auch Pilzkrankheiten können auftreten, besonders bei feuchtem Wetter. Sorge für eine gute Belüftung und entferne befallene Blätter.
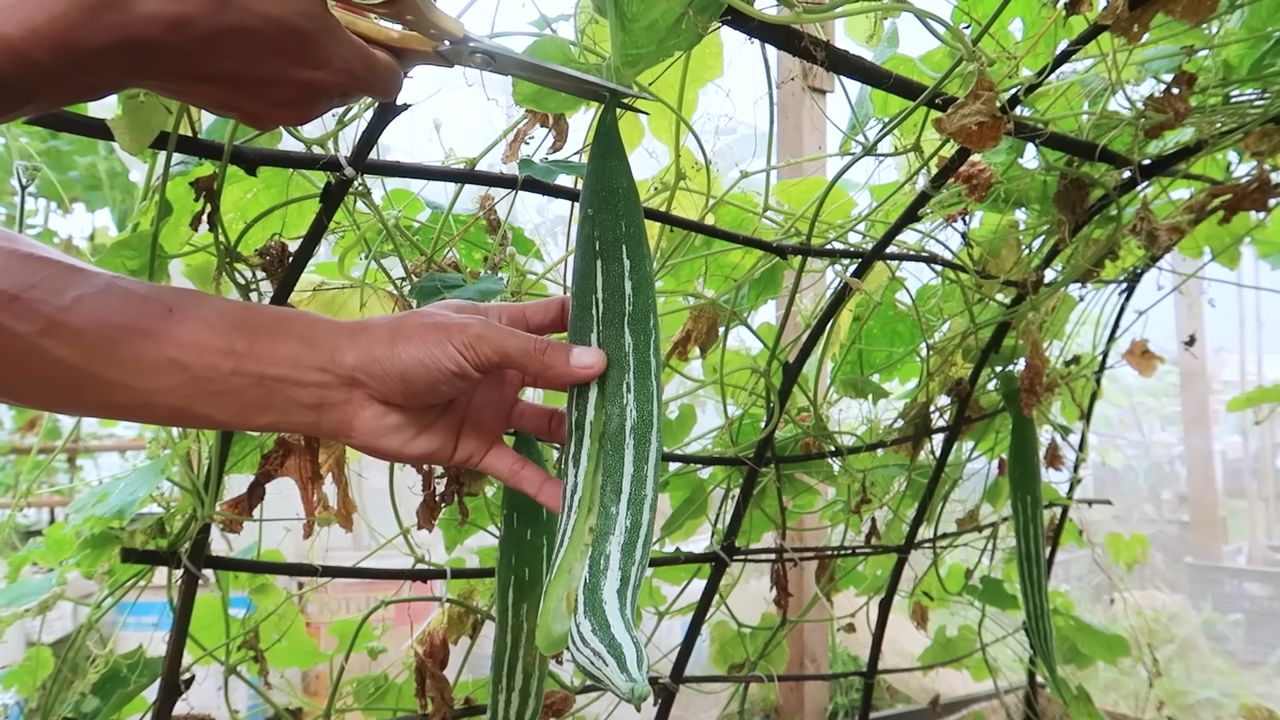
Die Ernte: Der Lohn deiner Mühe
Die Erntezeit der Schlangenhaargurke beginnt in der Regel im Sommer, etwa 2-3 Monate nach der Aussaat.
* Erntezeitpunkt: Ernte die Früchte, wenn sie noch jung und zart sind. Sie sollten etwa 30-50 cm lang sein. Je älter die Früchte werden, desto bitterer können sie schmecken.
* Erntetechnik: Schneide die Früchte mit einem scharfen Messer oder einer Schere ab.
* Lagerung: Die Schlangenhaargurken sind nicht lange haltbar. Am besten verarbeitest du sie sofort oder lagerst sie im Kühlschrank.
Verwendung der Schlangenhaargurke: Vielseitig und lecker
Die Schlangenhaargurke ist vielseitig verwendbar. Du kannst sie roh in Salaten essen, dünsten, braten oder in Currys verwenden. Sie hat einen milden, leicht süßlichen Geschmack. In der asiatischen Küche ist sie sehr beliebt.
Rezeptidee: Schlangenhaargurken-Curry
1. Schneide die Schlangenhaargurke in Scheiben.
2. Brate Zwiebeln, Knoblauch und Ingwer in Öl an.
3. Gib Curry
Conclusion
So, there you have it! Growing snake gourd doesn’t have to be a daunting task. By implementing this simple yet effective DIY trick, you’re not just planting a seed; you’re cultivating a thriving vine that will reward you with an abundance of these fascinating and delicious vegetables. This method, focusing on optimized soil preparation and strategic support structures, significantly increases your chances of success, even if you’re a beginner gardener.
Why is this DIY trick a must-try? Because it addresses the two critical factors that often hinder snake gourd growth: poor soil drainage and inadequate support. Snake gourds are heavy feeders and require well-draining soil rich in organic matter. Our method ensures just that, providing the roots with the nutrients they need to flourish. Furthermore, these vigorous climbers need a sturdy trellis or support system to prevent the fruits from rotting on the ground and to maximize sunlight exposure. This DIY approach provides that essential vertical space.
But don’t stop there! Feel free to experiment with variations to personalize your snake gourd growing experience. Consider adding different types of organic matter to your soil mix, such as composted manure or leaf mold, to further enrich the soil. You can also try different trellis designs to see what works best for your garden space and aesthetic preferences. Some gardeners even train their snake gourds to grow over arches or pergolas, creating a stunning visual display.
Another variation to consider is companion planting. Planting beneficial herbs and flowers near your snake gourds can help deter pests and attract pollinators. Marigolds, basil, and nasturtiums are excellent choices for companion plants.
Remember, gardening is all about learning and adapting. Don’t be afraid to experiment and find what works best for you and your local climate. The most important thing is to get started and enjoy the process.
We are confident that this DIY trick will significantly improve your success rate when growing snake gourd. It’s a simple, cost-effective, and highly rewarding method that will allow you to harvest fresh, homegrown snake gourds right from your own backyard.
So, what are you waiting for? Grab your seeds, prepare your soil, and build your trellis. It’s time to embark on your snake gourd growing adventure!
We’d love to hear about your experiences! Share your photos, tips, and challenges in the comments below. Let’s create a community of snake gourd enthusiasts and learn from each other. Happy gardening! Let us know if this **DIY trick** helped you grow snake gourd easily.
Frequently Asked Questions (FAQ)
What kind of soil is best for growing snake gourd?
Snake gourds thrive in well-draining, fertile soil that is rich in organic matter. A slightly acidic to neutral pH (6.0-7.0) is ideal. Amend your soil with compost, well-rotted manure, or other organic materials to improve drainage and fertility. If your soil is heavy clay, consider adding sand or perlite to improve drainage. Avoid soils that are compacted or waterlogged, as this can lead to root rot. A good soil mix would be equal parts garden soil, compost, and well-rotted manure.
How much sunlight do snake gourds need?
Snake gourds require at least 6-8 hours of direct sunlight per day to thrive. Choose a planting location that receives ample sunlight throughout the day. If you live in a particularly hot climate, some afternoon shade may be beneficial to prevent the leaves from scorching. Insufficient sunlight can lead to poor growth, reduced flowering, and smaller fruit.
How often should I water my snake gourd plants?
Water your snake gourd plants regularly, especially during hot and dry weather. Keep the soil consistently moist, but avoid overwatering, which can lead to root rot. Water deeply at the base of the plant, rather than overhead, to prevent fungal diseases. A good rule of thumb is to water when the top inch of soil feels dry to the touch. Mulching around the plants can help retain moisture and suppress weeds.
What kind of trellis or support system is best for snake gourds?
Snake gourds are vigorous climbers and require a sturdy trellis or support system to grow properly. A trellis made of wood, bamboo, or metal is ideal. The trellis should be at least 6-8 feet tall to accommodate the plant’s growth. You can also use a fence or pergola as a support structure. Ensure that the support system is strong enough to support the weight of the mature plant and its fruits. Train the vines to climb the trellis by gently guiding them and tying them with soft twine or plant ties.
How do I pollinate snake gourd flowers?
Snake gourds have separate male and female flowers. Pollination is typically carried out by insects, but you may need to hand-pollinate the flowers if insect activity is low. To hand-pollinate, use a small paintbrush to collect pollen from the male flower and transfer it to the stigma of the female flower. The female flower can be identified by the small fruit that is already present at the base of the flower. Hand-pollinate in the early morning when the flowers are open.
When can I harvest snake gourds?
Snake gourds are typically ready to harvest about 2-3 months after planting. The fruits should be firm and green, and the skin should be smooth. Harvest the fruits when they are about 1-2 feet long, depending on the variety. Use a sharp knife or pruning shears to cut the fruit from the vine. Overripe fruits will become tough and bitter.
What are some common pests and diseases that affect snake gourds?
Common pests that affect snake gourds include aphids, spider mites, and squash bugs. These pests can be controlled with insecticidal soap, neem oil, or by hand-picking them off the plants. Common diseases include powdery mildew and downy mildew. These diseases can be prevented by providing good air circulation, avoiding overhead watering, and applying a fungicide if necessary.
Can I grow snake gourds in containers?
Yes, you can grow snake gourds in containers, but you will need a large container (at least 20 gallons) to accommodate the plant’s root system. Use a well-draining potting mix and provide a sturdy trellis for the plant to climb. Container-grown snake gourds may require more frequent watering and fertilization than those grown in the ground.
How do I store snake gourds?
Snake gourds can be stored in the refrigerator for up to a week. Wrap the fruits in plastic wrap or store them in a plastic bag to prevent them from drying out. You can also freeze snake gourds for longer storage. Blanch the sliced or diced snake gourd in boiling water for 2-3 minutes, then cool it in ice water before freezing.
What are some ways to cook snake gourds?
Snake gourds can be used in a variety of dishes, including curries, stir-fries, soups, and stews. They have a mild, slightly sweet flavor and a tender texture. The young fruits are more tender and flavorful than the mature fruits. Peel the skin before cooking and remove the seeds if they are large. Snake gourds can also be grated and used in fritters or pancakes.


Leave a Comment