

Home Mushroom Growing Tips: Unlock the secrets to cultivating your own delicious and nutritious fungi right in the comfort of your home! Have you ever dreamed of harvesting fresh, gourmet mushrooms just steps from your kitchen? Imagine the satisfaction of adding homegrown shiitakes to your stir-fry or earthy oyster mushrooms to your pasta dish. This isn’t just a culinary adventure; it’s a journey into a fascinating world that connects us to the ancient practice of mushroom cultivation.
For centuries, cultures around the globe have revered mushrooms, not only for their culinary value but also for their medicinal properties and spiritual significance. From the ancient Egyptians who considered mushrooms a delicacy reserved for royalty to the Chinese who have long utilized them in traditional medicine, mushrooms have held a special place in human history. Now, you too can participate in this rich tradition!
Why should you dive into home mushroom growing tips? Because it’s easier than you think! Forget the misconception that mushroom cultivation is complex and requires specialized equipment. With the right guidance and a few simple techniques, you can transform a small space in your home into a thriving mushroom farm. Not only will you enjoy a constant supply of fresh, organic mushrooms, but you’ll also reduce your reliance on store-bought produce and connect with nature in a meaningful way. Plus, it’s a fantastic way to impress your friends and family with your newfound skills! Let’s get started and explore the wonderful world of home mushroom cultivation together!
Pilzzucht zu Hause: Dein umfassender DIY-Leitfaden
Hallo Pilzfreunde! Habt ihr euch jemals gefragt, wie es wäre, eure eigenen köstlichen Pilze zu Hause zu züchten? Es ist einfacher als ihr denkt und unglaublich befriedigend. In diesem Artikel zeige ich euch, wie ihr mit einfachen Mitteln und ein wenig Geduld eure eigenen Pilze anbauen könnt. Lasst uns eintauchen!
Was du für den Start brauchst
Bevor wir loslegen, hier eine Liste der Dinge, die du benötigst:
* Pilzbrut: Das ist das “Saatgut” für deine Pilze. Du kannst sie online oder in spezialisierten Gartencentern kaufen. Beliebte Sorten für Anfänger sind Austernpilze, Shiitake und Kräuterseitlinge.
* Substrat: Das ist das Material, auf dem deine Pilze wachsen werden. Je nach Pilzart kannst du Stroh, Sägemehl, Kaffeesatz oder sogar alte Zeitungen verwenden.
* Behälter: Eimer, Plastiktüten, Gläser oder spezielle Pilzzuchtbeutel – wähle, was für dich am besten passt.
* Sprühflasche: Um die Feuchtigkeit zu halten.
* Desinfektionsmittel: Alkohol oder Bleichmittel, um alles sauber zu halten.
* Handschuhe: Um Kontamination zu vermeiden.
* Optional: Ein Thermometer und ein Hygrometer, um Temperatur und Luftfeuchtigkeit zu überwachen.
Die Grundlagen der Pilzzucht
Bevor wir ins Detail gehen, hier ein paar wichtige Punkte, die du beachten solltest:
* Sauberkeit ist entscheidend: Pilze sind anfällig für Kontaminationen. Desinfiziere alles gründlich, bevor du beginnst.
* Feuchtigkeit ist dein Freund: Pilze brauchen eine hohe Luftfeuchtigkeit, um zu wachsen.
* Geduld ist eine Tugend: Es kann einige Wochen dauern, bis deine Pilze erntereif sind.
* Die richtige Umgebung: Die meisten Pilze bevorzugen einen dunklen, kühlen und feuchten Ort.
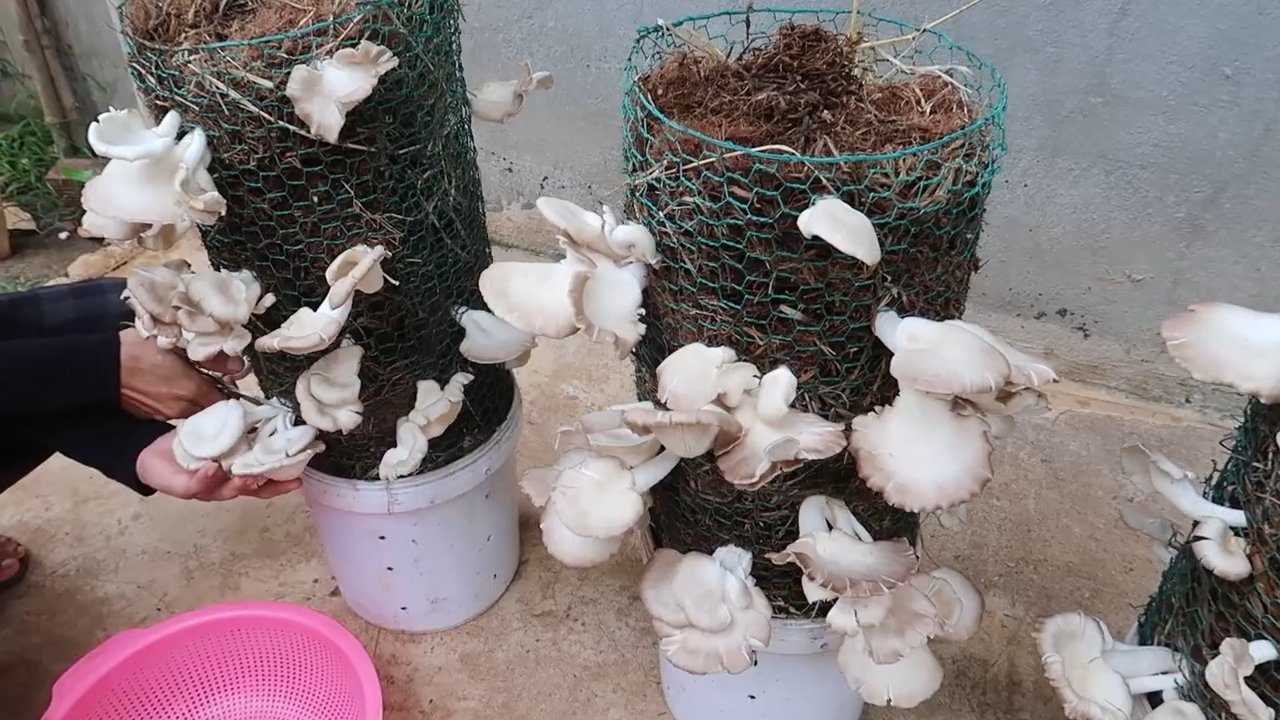
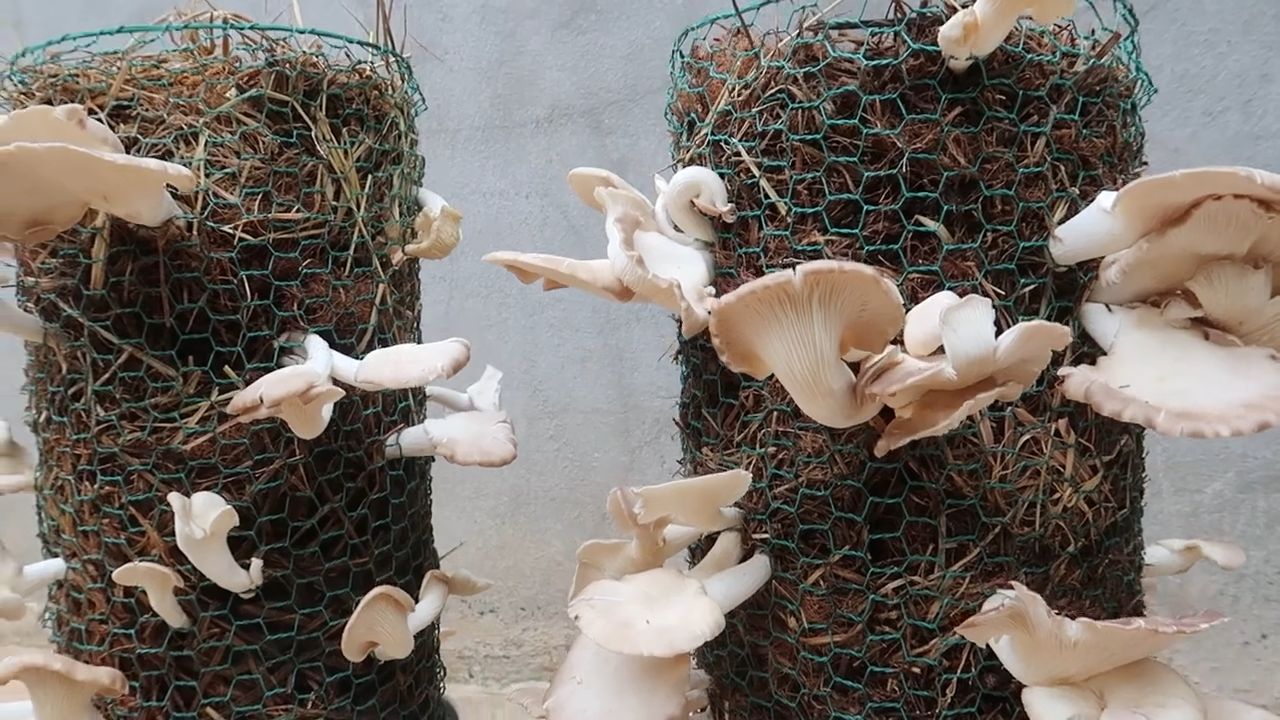
Austernpilze auf Stroh züchten: Eine einfache Methode für Anfänger
Austernpilze sind eine großartige Wahl für Anfänger, da sie relativ einfach zu züchten sind und schnell wachsen. Hier ist, wie du es machst:
1. Das Stroh vorbereiten
1. Stroh schneiden: Schneide das Stroh in etwa 5-10 cm lange Stücke. Das erleichtert die Handhabung und das Packen.
2. Pasteurisieren: Das Stroh muss pasteurisiert werden, um unerwünschte Mikroorganismen abzutöten. Fülle einen großen Topf oder eine Wanne mit Wasser und erhitze es auf etwa 70-80°C. Lege das Stroh hinein und lasse es für 60-90 Minuten ziehen. Das Wasser sollte nicht kochen, da das Stroh sonst zu weich wird.
3. Abkühlen lassen: Lasse das Stroh abkühlen, bis du es anfassen kannst. Es sollte feucht, aber nicht tropfnass sein. Drücke überschüssiges Wasser aus.
2. Den Behälter vorbereiten und beimpfen
1. Behälter auswählen: Du kannst einen Eimer, eine Plastiktüte oder einen speziellen Pilzzuchtbeutel verwenden. Wenn du einen Eimer verwendest, bohre ein paar Löcher für die Belüftung.
2. Behälter desinfizieren: Reinige den Behälter gründlich mit Desinfektionsmittel und lasse ihn trocknen.
3. Schichtweise beimpfen: Lege eine Schicht Stroh in den Behälter, gefolgt von einer Schicht Pilzbrut. Wiederhole diesen Vorgang, bis der Behälter voll ist. Die letzte Schicht sollte Stroh sein. Achte darauf, dass die Pilzbrut gleichmäßig verteilt ist.
4. Behälter verschließen: Verschließe den Behälter locker, um die Feuchtigkeit zu halten, aber dennoch etwas Luftzirkulation zu ermöglichen. Wenn du eine Plastiktüte verwendest, verschließe sie mit einem Gummiband oder einer Klammer.
3. Inkubation und Fruchtung
1. Inkubationsphase: Stelle den Behälter an einen dunklen, kühlen Ort (18-24°C). Die Pilzbrut wird nun das Stroh besiedeln. Dies kann 2-3 Wochen dauern. Du wirst sehen, wie sich ein weißes, flaumiges Myzel auf dem Stroh ausbreitet.
2. Fruchtungsphase: Sobald das Stroh vollständig mit Myzel bedeckt ist, ist es Zeit für die Fruchtung. Stelle den Behälter an einen helleren Ort (aber nicht in direktes Sonnenlicht) und sorge für eine hohe Luftfeuchtigkeit (80-90%). Besprühe das Stroh regelmäßig mit Wasser.
3. Belüftung: Sorge für ausreichend Belüftung, um Schimmelbildung zu vermeiden. Du kannst den Behälter täglich kurz öffnen, um frische Luft hineinzulassen.
4. Pilze ernten: Nach einigen Tagen werden sich kleine Pilzköpfe bilden. Ernte die Pilze, wenn sie ausgewachsen sind, aber bevor sie Sporen abwerfen. Drehe die Pilze vorsichtig ab oder schneide sie mit einem Messer ab.
Shiitake auf Sägemehl züchten: Eine etwas anspruchsvollere Methode
Shiitake-Pilze sind etwas anspruchsvoller als Austernpilze, aber der Aufwand lohnt sich. Hier ist, wie du sie auf Sägemehl züchten kannst:
1. Das Sägemehl vorbereiten
1. Sägemehl auswählen: Verwende Hartholz-Sägemehl, wie Buche oder Eiche. Vermeide Sägemehl von behandeltem Holz.
2. Sägemehl mischen: Mische das Sägemehl mit etwa 20% Weizenkleie oder Reiskleie, um die Nährstoffversorgung zu verbessern.
3. Befeuchten: Befeuchte das Sägemehl, bis es feucht, aber nicht tropfnass ist. Du solltest es zusammendrücken können, ohne dass Wasser herausläuft.
4. Sterilisieren: Das Sägemehl muss sterilisiert werden, um Kontaminationen zu vermeiden. Fülle das Sägemehl in hitzebeständige Beutel oder Gläser und sterilisiere es im Dampfdrucktopf für 90 Minuten bei 15 PSI.
2. Beimpfen und Inkubation
1. Abkühlen lassen: Lasse das sterilisierte Sägemehl abkühlen, bis es handwarm ist.
2. Beimpfen: Öffne den Beutel oder das Glas und gib die Pilzbrut hinzu. Verwende etwa 5-10% des Gewichts des Sägemehls an Pilzbrut.
3. Mischen: Mische die Pilzbrut gründlich mit dem Sägemehl.
4. Verschließen: Verschließe den Beutel oder das Glas mit einem Filter, um die Belüftung zu ermöglichen.
5. Inkubation: Stelle den Beutel oder das Glas an einen dunklen, kühlen Ort (20-25°C). Die Pilzbrut wird nun das Sägemehl besiedeln. Dies kann 2-3 Monate dauern. Du wirst sehen, wie sich ein weißes, flaumiges Myzel auf dem Sägemehl ausbreitet.
3. Fruchtung
1. Schockieren: Um die Fruchtung anzuregen, musst du das Myzel “schockieren”. Lege den Beutel oder das Glas für 24 Stunden in den Kühlschrank.
2. Einweichen: Weiche das Myzel für 24 Stunden in kaltem Wasser ein.
3. Fruchtungsumgebung: Stelle das Myzel an einen helleren Ort (aber nicht in direktes Sonnenlicht) und sorge für eine hohe Luftfeuchtigkeit (80-90%). Besprühe das Myzel regelmäßig mit Wasser.
4. Belüftung: Sorge für ausreichend Belüftung, um Schimmelbildung zu vermeiden.
5. Pilze ernten: Nach einigen Tagen werden sich kleine Pilzköpfe bilden. Ernte die Pilze, wenn sie ausgewachsen sind, aber bevor sie Sporen abwerfen. Drehe die Pilze vorsichtig ab oder schneide sie mit einem Messer ab.
Kaffeesatz als Substrat: Eine nachhaltige Option
Kaffeesatz ist ein großartiges Sub
Conclusion
So, there you have it! Transforming your home into a thriving mushroom farm is not only achievable but also incredibly rewarding. We’ve explored the simple yet effective methods for cultivating your own delicious and nutritious fungi, proving that you don’t need acres of land or a degree in mycology to enjoy the fruits (or rather, the mushrooms) of your labor.
Why is this DIY trick a must-try? Because it puts you in control of your food source, reduces your reliance on commercially grown mushrooms (often shipped long distances), and offers a fascinating glimpse into the world of fungi. Imagine the satisfaction of harvesting your own oyster mushrooms for a creamy pasta sauce, or adding freshly grown shiitakes to a savory stir-fry. The possibilities are endless!
Beyond the basic techniques we’ve covered, there’s a whole world of mushroom growing to explore. Consider experimenting with different substrates. While coffee grounds are a fantastic starting point, you could also try straw, wood chips, or even cardboard. Each substrate will yield slightly different results, affecting the flavor and texture of your mushrooms.
Another exciting variation is to explore different mushroom varieties. Oyster mushrooms are relatively easy to grow and come in a range of colors, from pearl white to blue to pink. Shiitake mushrooms offer a more robust flavor and require a bit more patience, but the reward is well worth the effort. Lion’s mane mushrooms, with their unique texture and brain-boosting properties, are another fascinating option for the adventurous home grower.
Don’t be afraid to get creative with your growing environment. While a dark, humid space is ideal, you can adapt your setup to suit your home. A plastic tub with air holes can create a mini-greenhouse effect, while a humidifier can help maintain the necessary moisture levels. Monitoring the temperature and humidity is key to successful **home mushroom growing**.
We understand that embarking on this journey might seem daunting at first, but we encourage you to take the plunge. Start small, be patient, and don’t be discouraged by initial setbacks. Every mushroom grower, even the most experienced, has faced challenges along the way. The key is to learn from your mistakes and keep experimenting.
Most importantly, we want to hear about your experiences! Share your successes, your failures, and your tips with us and the wider community. Post photos of your mushroom harvests, ask questions, and inspire others to embark on their own home mushroom growing adventures. Together, we can cultivate a thriving community of home-grown fungi enthusiasts. So, grab your supplies, get your hands dirty, and prepare to be amazed by the magic of mushrooms! Happy growing!
Frequently Asked Questions (FAQ)
What are the easiest types of mushrooms to grow at home for beginners?
Oyster mushrooms are generally considered the easiest for beginners due to their rapid growth, tolerance of various substrates (like coffee grounds and straw), and relatively low maintenance requirements. They are also quite forgiving of minor environmental fluctuations. Shiitake mushrooms are a step up in difficulty, requiring more patience and specific wood substrates, but are still manageable for beginners who are willing to put in the extra effort. Avoid more demanding varieties like morels or truffles until you have gained more experience.
What kind of space do I need to grow mushrooms at home?
You don’t need a lot of space! A small, dark, and humid area is ideal. This could be a basement, a closet, a spare room, or even under the sink. The key is to maintain a consistent temperature (ideally between 60-75°F for oyster mushrooms) and high humidity (around 80-90%). You can use a humidifier, a spray bottle, or a plastic tub with air holes to create the necessary humidity. The size of your growing area will depend on the scale of your operation. A small container of coffee grounds can fit easily on a shelf, while larger straw bales will require more floor space.
How long does it take to grow mushrooms at home?
The time it takes to grow mushrooms varies depending on the variety and the growing conditions. Oyster mushrooms are known for their rapid growth, often fruiting within a week or two of colonization. Shiitake mushrooms, on the other hand, can take several months to colonize the substrate before fruiting. Be patient and monitor your mushrooms closely. Look for signs of contamination (mold or unusual colors) and adjust your growing conditions as needed.
What are the signs of contamination, and how can I prevent it?
Contamination is a common problem in mushroom growing, but it can be prevented with proper hygiene and sterilization techniques. Signs of contamination include mold (especially green, black, or orange mold), unusual colors or smells, and a slimy or mushy texture. To prevent contamination, sterilize your substrate thoroughly before inoculation. Use clean containers and tools, and wash your hands before handling your mushrooms. Maintain good air circulation to prevent the buildup of moisture, which can encourage mold growth. If you do notice contamination, remove the affected area immediately to prevent it from spreading.
What kind of substrate should I use for growing mushrooms at home?
The best substrate depends on the type of mushroom you are growing. Oyster mushrooms are versatile and can be grown on a variety of substrates, including coffee grounds, straw, wood chips, and even cardboard. Shiitake mushrooms prefer hardwood logs or sawdust. Lion’s mane mushrooms can be grown on sawdust or supplemented hardwood substrates. Research the specific requirements of the mushroom variety you are growing to choose the appropriate substrate.
How do I harvest mushrooms, and how long will they keep?
Harvest mushrooms when the caps are fully formed but before they start to drop spores. For oyster mushrooms, harvest the entire cluster by twisting or cutting it off at the base. For shiitake mushrooms, cut the stem close to the log. Freshly harvested mushrooms will keep in the refrigerator for several days. Store them in a paper bag to allow them to breathe and prevent them from becoming slimy. You can also dry or freeze mushrooms for longer-term storage.
Is it safe to eat home-grown mushrooms?
Yes, it is generally safe to eat home-grown mushrooms, as long as you have properly identified the species and followed safe growing practices. Only consume mushrooms that you are 100% certain are edible. If you are unsure, consult with an expert or discard the mushrooms. Avoid eating mushrooms that show signs of contamination or decay. Always cook mushrooms thoroughly before eating them.
Can I grow mushrooms indoors year-round?
Yes, you can grow mushrooms indoors year-round, as long as you can control the temperature and humidity. Indoor growing allows you to create a consistent environment that is not affected by seasonal changes. You may need to use a humidifier or a heater to maintain the ideal growing conditions.
What are the benefits of growing my own mushrooms?
There are many benefits to growing your own mushrooms, including:
* Fresh, delicious, and nutritious food
* Reduced reliance on commercially grown mushrooms
* A sustainable and environmentally friendly way to produce food
* A fascinating and rewarding hobby
* Control over the growing process and the quality of your mushrooms
* A unique and educational experience for children and adults alike
Where can I find more information about home mushroom growing?
There are many resources available online and in libraries about home mushroom growing. Look for books, articles, and videos that provide detailed instructions and tips. Join online forums and communities to connect with other mushroom growers and share your experiences. Consider taking a workshop or class to learn from experienced growers. With a little research and effort, you can become a successful home mushroom grower and enjoy the many benefits of this rewarding hobby.


Leave a Comment