

Mushroom Growing at Home might sound like something reserved for seasoned horticulturalists, but I’m here to tell you it’s surprisingly accessible and incredibly rewarding! Forget those bland, pre-packaged mushrooms from the grocery store. Imagine harvesting your own plump, flavorful fungi, bursting with freshness, right from your kitchen counter. Intrigued? You should be!
For centuries, mushrooms have held a revered place in various cultures, from ancient medicinal practices in the East to culinary delicacies in Europe. The Romans, for example, considered mushrooms “food of the gods.” While we might not go quite that far, there’s no denying their unique taste and nutritional benefits. But beyond the historical allure, why should *you* consider mushroom growing at home? Well, for starters, it’s a fantastic way to reduce your carbon footprint by sourcing food locally (literally, in your home!). Plus, it’s a fascinating educational experience, especially if you have kids. And let’s be honest, who wouldn’t love bragging rights for growing their own gourmet ingredients?
This DIY guide will demystify the process, breaking down everything you need to know to cultivate your own delicious mushrooms, even if you’ve never gardened a day in your life. We’ll cover everything from choosing the right mushroom variety to creating the ideal growing environment, ensuring you’ll be enjoying a bountiful harvest in no time. So, grab your gardening gloves (or not, it’s that easy!), and let’s embark on this exciting fungal adventure together!
Pilzzucht zu Hause: Dein eigener Pilzgarten
Hallo Pilzfreunde! Habt ihr euch jemals gefragt, wie diese köstlichen, frischen Pilze in den Supermarkt kommen? Ich habe mich das auch gefragt und beschlossen, es selbst herauszufinden! Pilzzucht zu Hause ist einfacher als man denkt und unglaublich lohnend. In diesem Artikel zeige ich euch, wie ihr euren eigenen kleinen Pilzgarten anlegen könnt. Keine Angst, es ist wirklich nicht schwer!
Was du für den Start brauchst
Bevor wir loslegen, hier eine Liste der Dinge, die du benötigst. Keine Sorge, vieles davon hast du vielleicht schon zu Hause!
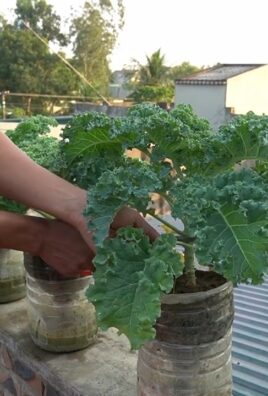
* Pilzbrut: Das ist das “Saatgut” für deine Pilze. Du kannst sie online oder in Gartencentern kaufen. Beliebte Sorten für Anfänger sind Austernpilze, Shiitake oder Kräuterseitlinge.
* Substrat: Das ist das Material, auf dem deine Pilze wachsen. Je nach Pilzart kann das Stroh, Holzspäne, Kaffeesatz oder sogar Pappe sein.
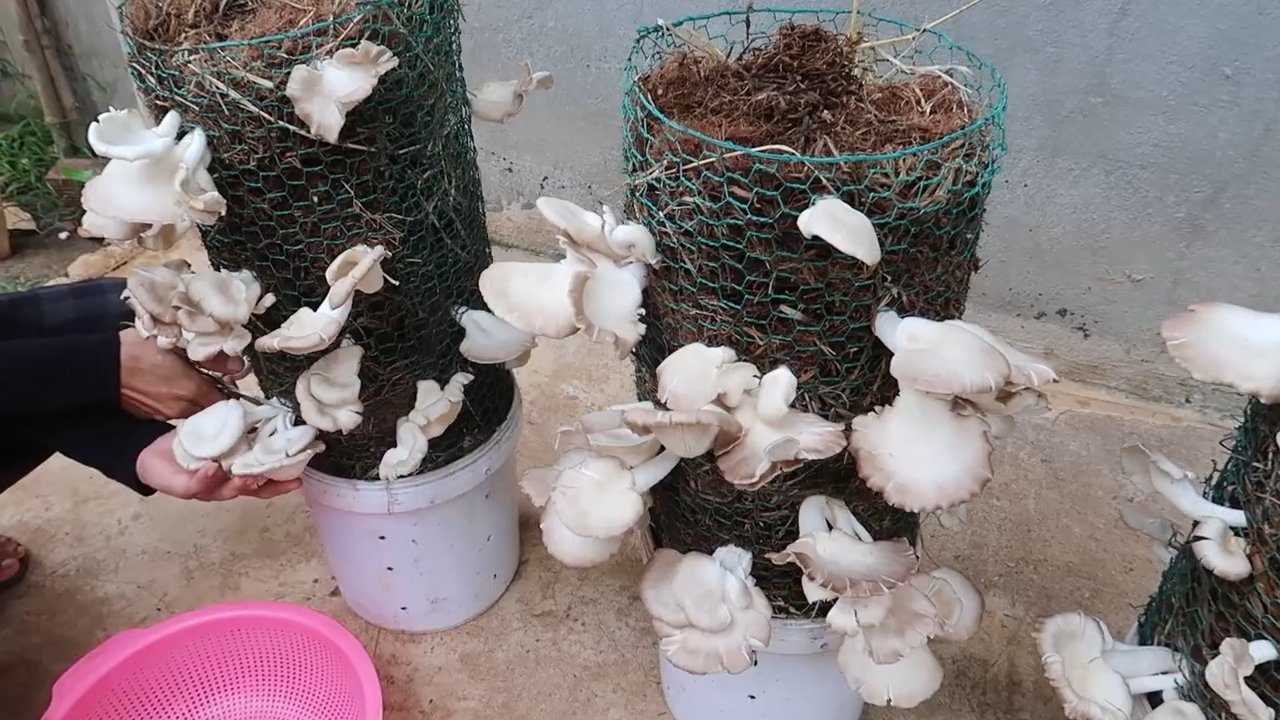
* Behälter: Eimer, Plastiktüten, Gläser – wähle, was für dein Substrat und deinen Platz am besten geeignet ist.
* Sprühflasche: Um die Feuchtigkeit zu halten.
* Handschuhe: Für die Hygiene.
* Optional: Alkohol zur Desinfektion, Plastikfolie oder Frischhaltefolie.
Die richtige Pilzart wählen
Die Wahl der richtigen Pilzart ist entscheidend für deinen Erfolg. Einige Pilze sind einfacher zu züchten als andere. Hier sind ein paar Empfehlungen für Anfänger:
* Austerpilze (Pleurotus ostreatus): Sie sind schnellwachsend, tolerant gegenüber verschiedenen Substraten und relativ einfach zu züchten.
* Shiitake (Lentinula edodes): Sie brauchen zwar etwas länger, sind aber sehr aromatisch und lohnen sich auf jeden Fall.
* Kräuterseitlinge (Pleurotus eryngii): Sie sind etwas anspruchsvoller, aber mit etwas Geduld auch für Anfänger geeignet.
Das richtige Substrat vorbereiten
Das Substrat ist die Grundlage für dein Pilzwachstum. Es liefert die Nährstoffe, die die Pilze zum Wachsen benötigen. Die Vorbereitung des Substrats ist ein wichtiger Schritt, um Kontaminationen zu vermeiden.
Substratoptionen und ihre Vorbereitung:
* Stroh: Stroh ist ein beliebtes Substrat für Austernpilze. Es muss pasteurisiert werden, um unerwünschte Mikroorganismen abzutöten.
* Pasteurisierung: Stroh in einem großen Topf oder Behälter mit Wasser bedecken und für 60-90 Minuten erhitzen (ca. 70-80°C). Das Wasser sollte nicht kochen. Nach dem Abkühlen das überschüssige Wasser abgießen. Das Stroh sollte feucht, aber nicht nass sein.
* Holzspäne: Holzspäne eignen sich gut für Shiitake und Kräuterseitlinge. Sie können ebenfalls pasteurisiert werden, aber auch sterilisiert werden.
* Pasteurisierung: Wie beim Stroh, Holzspäne in Wasser erhitzen.
* Sterilisation: Holzspäne in hitzebeständigen Beuteln oder Gläsern füllen und im Dampfdrucktopf (Autoklav) für 90 Minuten bei 121°C sterilisieren.
* Kaffeesatz: Kaffeesatz ist ein tolles Substrat für Austernpilze und eine super Möglichkeit, Abfall zu recyceln! Kaffeesatz ist bereits pasteurisiert, da er beim Brühen erhitzt wird.
* Wichtig: Verwende nur frischen Kaffeesatz (innerhalb von 24 Stunden), um Kontaminationen zu vermeiden.
* Pappe: Pappe ist ein weiteres recyceltes Substrat, das sich gut für Austernpilze eignet.
* Vorbereitung: Pappe in kleine Stücke reißen und in heißem Wasser einweichen, bis sie weich ist. Das überschüssige Wasser ausdrücken.
Schritt-für-Schritt-Anleitung zur Pilzzucht
Jetzt geht’s ans Eingemachte! Hier ist eine detaillierte Anleitung, wie du deine Pilze züchten kannst:
1. Desinfektion: Bevor du beginnst, desinfiziere deine Arbeitsfläche und deine Hände gründlich. Verwende Alkohol, um die Oberflächen abzuwischen. Trage Handschuhe, um Kontaminationen zu vermeiden.
2. Substrat und Brut mischen: Mische das vorbereitete Substrat mit der Pilzbrut. Das Verhältnis sollte etwa 1:10 (Brut zu Substrat) betragen. Das bedeutet, dass du für 10 Teile Substrat 1 Teil Brut benötigst. Verteile die Brut gleichmäßig im Substrat.
3. Behälter befüllen: Fülle das Substrat-Brut-Gemisch in deinen Behälter. Drücke es leicht an, aber nicht zu fest.
4. Inkubation: Decke den Behälter mit Plastikfolie oder Frischhaltefolie ab, um die Feuchtigkeit zu halten. Stelle den Behälter an einen dunklen, warmen Ort (ca. 20-25°C). Die Inkubationszeit variiert je nach Pilzart. Austernpilze brauchen etwa 2-3 Wochen, Shiitake etwas länger.
5. Beobachtung: Überprüfe den Behälter regelmäßig. Du solltest sehen, wie das Myzel (das Pilzgeflecht) das Substrat durchwächst. Es sieht aus wie weiße, flaumige Fäden.
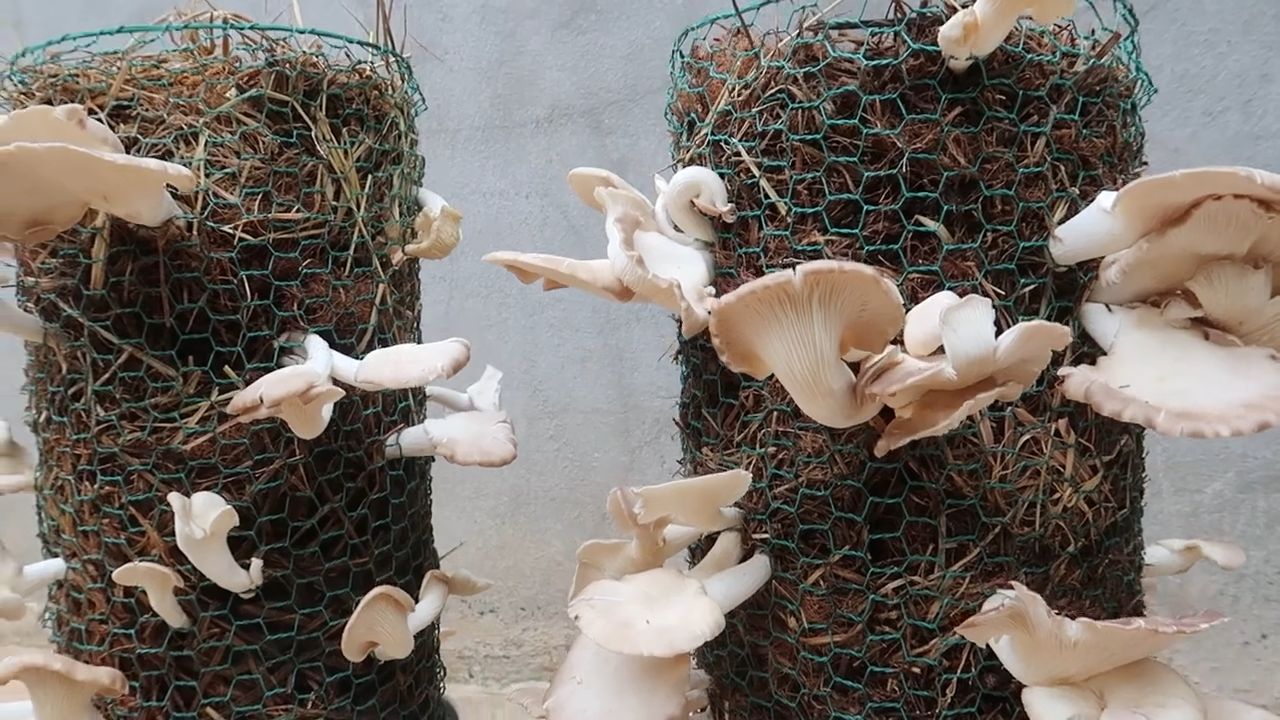
6. Fruiting (Fruchtkörperbildung): Sobald das Substrat vollständig vom Myzel durchwachsen ist, ist es Zeit für die Fruchtkörperbildung. Stelle den Behälter an einen helleren Ort (aber nicht in direktes Sonnenlicht) und senke die Temperatur etwas (ca. 15-20°C). Erhöhe die Luftfeuchtigkeit, indem du den Behälter regelmäßig mit Wasser besprühst.
7. Ernte: Die Pilze sind erntereif, wenn sie ihre typische Form und Größe erreicht haben. Schneide sie vorsichtig am Stiel ab.
Häufige Probleme und Lösungen
Auch bei der Pilzzucht kann es zu Problemen kommen. Hier sind ein paar häufige Probleme und wie du sie lösen kannst:
* Kontamination: Wenn du grüne, schwarze oder andere unerwünschte Farben auf deinem Substrat siehst, ist es wahrscheinlich kontaminiert. Entferne die kontaminierten Stellen sofort oder entsorge das gesamte Substrat. Achte beim nächsten Mal auf eine bessere Hygiene.
* Trockenheit: Wenn das Substrat zu trocken ist, können die Pilze nicht richtig wachsen. Besprühe das Substrat regelmäßig mit Wasser, um die Feuchtigkeit zu halten.
* Zu wenig Licht: Wenn die Pilze lang und dünn werden, bekommen sie wahrscheinlich zu wenig Licht. Stelle den Behälter an einen helleren Ort.
* Zu hohe Temperatur: Wenn die Pilze nicht wachsen, kann es an einer zu hohen Temperatur liegen. Senke die Temperatur etwas.
Tipps und Tricks für eine erfolgreiche Pilzzucht
Hier sind noch ein paar zusätzliche Tipps, die dir helfen können, erfolgreich Pilze zu züchten:
* Hygiene ist das A und O: Achte auf eine saubere Arbeitsumgebung und desinfiziere deine Hände und Werkzeuge regelmäßig.
* Geduld: Pilzzucht braucht Zeit. Sei geduldig und gib nicht auf, wenn es nicht sofort klappt.
* Experimentiere: Probiere verschiedene Substrate und Pilzarten aus, um herauszufinden, was für dich am besten funktioniert.
* Dokumentiere: Notiere dir, was du gemacht hast und wie es funktioniert hat. So kannst du aus deinen Fehlern lernen und deine Erfolge wiederholen.
* Austausch: Tausche dich mit anderen Pilzzüchtern aus. Es gibt viele Online-Foren und Gruppen, in denen du Fragen stellen und Erfahrungen austauschen kannst.
Nach der Ernte
Nach der ersten Ernte kannst du oft noch weitere Ernten erzielen. Besprühe das Substrat weiterhin mit Wasser und halte die Bedingungen optimal. Mit etwas Glück kannst du mehrere Ernten von einem Substrat erhalten.
Ich hoffe, diese Anleitung hat dir geholfen, den Einstieg in die Pilzzucht zu Hause zu finden. Es ist ein faszinierendes Hobby, das dich mit köstlichen, frischen Pilzen belohnt. Viel Spaß beim Züchten!
Conclusion
Embarking on the journey of mushroom growing at home might seem daunting at first, but the rewards – fresh, flavorful fungi at your fingertips – are well worth the effort. This DIY trick, focusing on simplicity and accessibility, opens the door to a world of culinary possibilities and a deeper connection with the natural world. Forget expensive kits and complicated setups; with readily available materials and a little patience, you can cultivate your own delicious mushrooms right in your own home.
What makes this method a must-try? It’s the perfect blend of affordability, sustainability, and educational value. You’re not just growing food; you’re learning about the fascinating life cycle of fungi and gaining a new appreciation for the intricate processes that sustain our ecosystem. Plus, imagine the satisfaction of serving a dish featuring mushrooms you nurtured from spore to plate!
But the adventure doesn’t stop there. Once you’ve mastered the basics, the possibilities for experimentation are endless. Try different substrates like coffee grounds, straw, or even shredded cardboard to see how they affect the yield and flavor of your mushrooms. Explore different varieties of mushrooms suitable for home cultivation, such as oyster mushrooms (a great beginner-friendly option), shiitake, or even the more challenging but rewarding lion’s mane. You can even experiment with different fruiting chambers, from simple plastic tubs to more elaborate setups with humidity control.
Consider adding beneficial companion plants to your growing area. Herbs like basil or parsley can help deter pests and create a more balanced ecosystem. You can also explore different lighting conditions to optimize mushroom growth. Some varieties thrive in low light, while others benefit from a bit more indirect sunlight.
Don’t be afraid to experiment and adapt the method to suit your specific environment and preferences. The beauty of DIY is the freedom to customize and create something truly unique.
We wholeheartedly encourage you to give this DIY mushroom growing trick a try. It’s a rewarding and educational experience that will transform the way you think about food and the natural world. And most importantly, don’t keep your newfound knowledge to yourself! Share your experiences, successes, and even your failures with the community. Post photos of your mushroom harvests, share tips and tricks, and ask questions. Let’s learn and grow together! Your insights could inspire others to embark on their own mushroom growing adventures.
So, grab your supplies, prepare your substrate, and get ready to witness the magic of mushroom cultivation firsthand. You might just surprise yourself with what you can achieve. Happy growing!
Frequently Asked Questions (FAQ)
What types of mushrooms are easiest to grow at home using this method?
Oyster mushrooms are generally considered the easiest and most forgiving for beginners. They are fast-growing, relatively tolerant of variations in temperature and humidity, and can thrive on a wide range of substrates, including straw, coffee grounds, and even cardboard. Shiitake mushrooms are another popular choice, although they require a bit more patience and attention to detail. They typically grow on hardwood logs or sawdust and take longer to fruit than oyster mushrooms. Lion’s mane mushrooms are gaining popularity for their unique texture and flavor, but they can be more challenging to cultivate and require specific growing conditions. Ultimately, the best type of mushroom to grow depends on your experience level, the resources available to you, and your personal preferences.
What is the best substrate to use for growing mushrooms at home?
The best substrate depends on the type of mushroom you’re growing. Oyster mushrooms thrive on a variety of substrates, including straw, coffee grounds, and cardboard. Straw is a readily available and inexpensive option, but it needs to be properly pasteurized to prevent contamination. Coffee grounds are a great way to recycle waste and provide a nutrient-rich substrate for oyster mushrooms. Cardboard is another sustainable option, but it should be shredded and soaked in water before use. Shiitake mushrooms typically grow on hardwood logs or sawdust. Hardwood logs provide a natural and long-lasting substrate, but they require more space and time to fruit. Sawdust is a more convenient option for indoor cultivation, but it needs to be supplemented with nutrients. Lion’s mane mushrooms prefer a substrate of hardwood sawdust supplemented with bran or other nutrients.
How do I prevent contamination in my mushroom growing setup?
Contamination is a common challenge in mushroom growing, but there are several steps you can take to minimize the risk. First, ensure that your substrate is properly pasteurized or sterilized to kill any competing microorganisms. Pasteurization involves heating the substrate to a temperature that kills harmful bacteria and fungi without destroying beneficial microbes. Sterilization involves heating the substrate to a higher temperature to kill all microorganisms. Second, maintain a clean and sanitary growing environment. Wipe down surfaces with a disinfectant solution and avoid introducing contaminants into your growing area. Third, use sterile techniques when handling your substrate and mushroom spawn. Wear gloves and a mask to prevent contamination from your hands and breath. Fourth, monitor your growing setup regularly for signs of contamination, such as mold or unusual odors. If you detect contamination, remove the affected area immediately to prevent it from spreading.
How long does it take for mushrooms to grow at home?
The time it takes for mushrooms to grow depends on the type of mushroom, the substrate used, and the growing conditions. Oyster mushrooms are among the fastest-growing mushrooms, typically fruiting within a few weeks of inoculation. Shiitake mushrooms take longer to fruit, typically requiring several months to a year. Lion’s mane mushrooms also take several weeks to months to fruit. The temperature, humidity, and light levels in your growing environment can also affect the growth rate of your mushrooms. Maintaining optimal growing conditions will help to ensure a faster and more abundant harvest.
What are the ideal temperature and humidity levels for growing mushrooms at home?
The ideal temperature and humidity levels vary depending on the type of mushroom you’re growing. Oyster mushrooms typically prefer temperatures between 60-75°F (15-24°C) and humidity levels between 85-95%. Shiitake mushrooms prefer cooler temperatures between 50-65°F (10-18°C) and humidity levels between 80-90%. Lion’s mane mushrooms prefer temperatures between 65-75°F (18-24°C) and humidity levels between 85-95%. You can use a thermometer and hygrometer to monitor the temperature and humidity in your growing environment. To increase humidity, you can mist your mushrooms regularly or use a humidifier. To decrease humidity, you can increase ventilation.
Where is the best place to grow mushrooms at home?
The best place to grow mushrooms at home is a cool, dark, and humid environment. A basement, closet, or spare room are all good options. Avoid areas that are exposed to direct sunlight or extreme temperatures. You can also grow mushrooms outdoors in a shaded area, such as under a tree or in a greenhouse. Ensure that your growing area is well-ventilated to prevent the buildup of carbon dioxide.
How do I know when my mushrooms are ready to harvest?
Mushrooms are typically ready to harvest when the caps have fully opened and the gills are visible. The exact timing depends on the type of mushroom. Oyster mushrooms are ready to harvest when the caps are still slightly curled downwards. Shiitake mushrooms are ready to harvest when the caps have flattened out and the edges have started to curl upwards. Lion’s mane mushrooms are ready to harvest when the spines are fully developed and have started to turn slightly yellow. Harvest your mushrooms by gently twisting them off the substrate.
Can I grow mushrooms from store-bought mushrooms?
While technically possible, growing mushrooms directly from store-bought mushrooms is generally not recommended. Store-bought mushrooms are often treated with chemicals to prevent spoilage, which can inhibit their ability to grow. Additionally, they may not be the same variety as the mushrooms you’re trying to cultivate. It’s best to start with mushroom spawn or a mushroom growing kit to ensure a successful harvest.
What should I do if my mushrooms don’t grow?
If your mushrooms don’t grow, there could be several reasons why. First, check the temperature and humidity levels in your growing environment to ensure that they are within the optimal range for the type of mushroom you’re growing. Second, make sure that your substrate is properly hydrated. Third, check for signs of contamination, such as mold or unusual odors. Fourth, be patient. Some mushrooms take longer to fruit than others. If you’ve ruled out all other possibilities, it may simply be a matter of waiting.
Leave a Comment