

Grow cantaloupe tips are what you need to unlock a world of sweet, juicy goodness right in your own backyard! Imagine biting into a perfectly ripe cantaloupe, bursting with flavor, knowing you nurtured it from seed to table. Forget those bland, store-bought melons – this year, we’re taking control and cultivating our own cantaloupe paradise.
For centuries, cantaloupe has been cherished across cultures, from ancient Egypt to the royal gardens of Europe. Its sweet aroma and refreshing taste have made it a symbol of summer and abundance. But you don’t need to be a pharaoh or a king to enjoy this delicious fruit. With a few simple tricks and a little DIY spirit, anyone can successfully grow cantaloupe tips into thriving plants.
Why bother with the effort? Because the taste of a homegrown cantaloupe is simply unmatched. Plus, you’ll know exactly what went into growing it, avoiding harmful pesticides and ensuring the freshest possible flavor. I’m here to guide you through the process, sharing my favorite DIY hacks and proven techniques to help you achieve a bountiful harvest. Get ready to roll up your sleeves and transform your garden into a cantaloupe haven!
So züchtest du süße Cantaloupe-Melonen: Mein DIY-Leitfaden für Anfänger
Ich liebe Cantaloupe-Melonen! Ihr süßer, saftiger Geschmack ist einfach unschlagbar, besonders an heißen Sommertagen. Und was noch besser ist: Du kannst sie ganz einfach selbst anbauen! Ich zeige dir, wie du mit ein paar einfachen Schritten und etwas Geduld deine eigenen köstlichen Cantaloupe-Melonen ernten kannst. Keine Angst, es ist einfacher, als du denkst!
Was du brauchst:
* Cantaloupe-Melonen-Samen (am besten eine Sorte, die für dein Klima geeignet ist)
* Anzuchttöpfe oder Eierkartons
* Anzuchterde
* Gartenerde (gut durchlässig und nährstoffreich)
* Kompost oder gut verrotteter Mist
* Gießkanne oder Schlauch mit Brausekopf
* Mulch (Stroh, Holzhackschnitzel oder ähnliches)
* Pflanzstäbe oder Rankgitter (optional, aber empfehlenswert)
* Gartenschere
* Geduld und Liebe!
Phase 1: Die Vorbereitung – So startest du richtig
Bevor wir loslegen, ist es wichtig, dass wir alles vorbereiten. Das ist die halbe Miete!
1. Samen auswählen: Wähle Cantaloupe-Melonen-Samen, die für dein Klima geeignet sind. Informiere dich, welche Sorten in deiner Region gut wachsen. Es gibt viele verschiedene Sorten, von kleinen, süßen Melonen bis hin zu größeren, aromatischeren. Ich persönlich mag die ‘Hales Best Jumbo’ Sorte sehr gerne, weil sie zuverlässig große, saftige Früchte liefert.
2. Anzuchtgefäße vorbereiten: Fülle deine Anzuchttöpfe oder Eierkartons mit Anzuchterde. Drücke die Erde leicht an, aber nicht zu fest. Die Erde sollte feucht, aber nicht nass sein.
3. Samen säen: Lege in jeden Topf oder jede Zelle zwei bis drei Samen. Bedecke die Samen mit einer dünnen Schicht Erde (ca. 1 cm).
4. Gießen: Befeuchte die Erde vorsichtig mit einer Gießkanne oder einem Schlauch mit Brausekopf. Achte darauf, dass die Erde gleichmäßig feucht ist, aber nicht durchnässt.
5. Warm und hell stellen: Stelle die Anzuchttöpfe an einen warmen und hellen Ort. Eine Fensterbank mit viel Sonnenlicht ist ideal. Die optimale Keimtemperatur liegt zwischen 21 und 27 Grad Celsius. Du kannst auch eine Heizmatte verwenden, um die Keimung zu beschleunigen.
6. Feuchtigkeit halten: Halte die Erde feucht, indem du sie regelmäßig besprühst. Vermeide Staunässe, da dies zu Schimmelbildung führen kann.
Phase 2: Die Aufzucht – So pflegst du deine kleinen Pflänzchen
Jetzt heißt es, die kleinen Pflänzchen gut zu pflegen, damit sie stark und gesund werden.
1. Beobachten: Beobachte deine Pflänzchen täglich. Sobald die ersten Keimlinge erscheinen (normalerweise nach 7-14 Tagen), entferne die schwächeren Pflänzchen, so dass nur ein kräftiges Pflänzchen pro Topf übrig bleibt.
2. Gießen: Gieße die Pflänzchen regelmäßig, aber nicht zu viel. Die Erde sollte immer leicht feucht sein. Vermeide es, die Blätter zu benetzen, da dies zu Pilzkrankheiten führen kann.
3. Drehen: Drehe die Anzuchttöpfe regelmäßig, damit die Pflänzchen gleichmäßig wachsen und sich nicht zum Licht hin neigen.
4. Düngen: Sobald die Pflänzchen ihre ersten richtigen Blätter entwickelt haben, kannst du sie mit einem verdünnten Flüssigdünger düngen. Verwende einen Dünger, der reich an Stickstoff, Phosphor und Kalium ist. Ich verwende gerne einen organischen Dünger auf Algenbasis.
5. Abhärten: Bevor du die Pflänzchen ins Freie pflanzt, musst du sie abhärten. Das bedeutet, dass du sie langsam an die Bedingungen im Freien gewöhnst. Stelle die Pflänzchen für ein paar Stunden pro Tag ins Freie, beginnend mit einer Stunde und steigere die Zeit jeden Tag. Achte darauf, dass die Pflänzchen vor direkter Sonneneinstrahlung und starkem Wind geschützt sind.
Phase 3: Das Auspflanzen – So finden deine Melonen ein neues Zuhause
Endlich ist es soweit! Deine kleinen Pflänzchen dürfen ins Freie.
1. Wähle den richtigen Zeitpunkt: Cantaloupe-Melonen sind wärmeliebend und vertragen keinen Frost. Pflanze sie erst ins Freie, wenn keine Frostgefahr mehr besteht und die Bodentemperatur mindestens 18 Grad Celsius beträgt. In den meisten Regionen ist das Mitte bis Ende Mai der Fall.
2. Wähle den richtigen Standort: Cantaloupe-Melonen brauchen einen sonnigen Standort mit gut durchlässigem Boden. Der Boden sollte reich an Nährstoffen sein.
3. Boden vorbereiten: Bereite den Boden vor, indem du ihn lockerst und mit Kompost oder gut verrottetem Mist anreicherst. Grabe ein Loch, das etwas größer ist als der Wurzelballen der Pflanze.
4. Pflanzen: Nimm die Pflänzchen vorsichtig aus den Anzuchttöpfen und setze sie in die vorbereiteten Löcher. Achte darauf, dass der Wurzelballen nicht beschädigt wird. Fülle die Löcher mit Erde auf und drücke sie leicht an.
5. Gießen: Gieße die Pflänzchen gründlich an.
6. Mulchen: Bedecke den Boden um die Pflänzchen mit Mulch. Mulch hilft, die Feuchtigkeit im Boden zu halten, Unkraut zu unterdrücken und die Bodentemperatur zu regulieren. Ich verwende gerne Stroh oder Holzhackschnitzel.
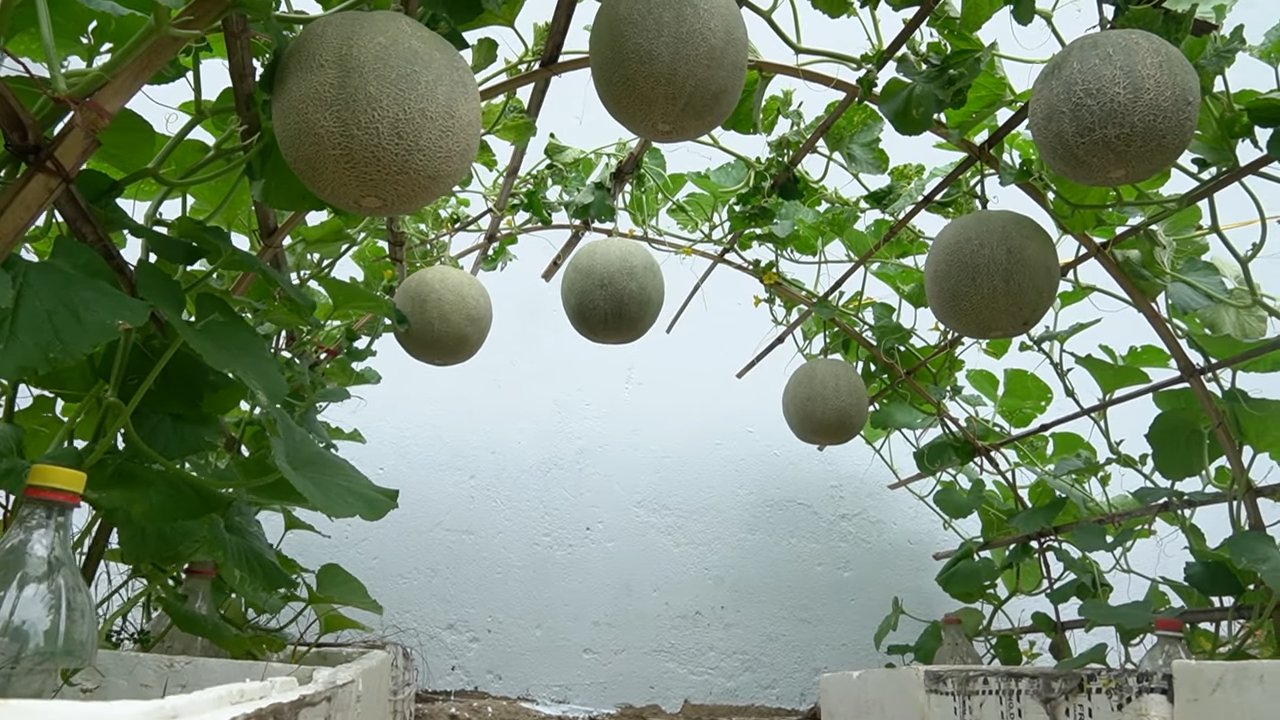
7. Rankhilfe anbringen (optional): Cantaloupe-Melonen können ziemlich groß werden und brauchen möglicherweise eine Rankhilfe. Du kannst Pflanzstäbe oder Rankgitter verwenden, um die Pflanzen zu stützen. Das hilft auch, die Früchte vom Boden fernzuhalten und Fäulnis zu verhindern.
Phase 4: Die Pflege – So bringst du deine Melonen zum Wachsen und Gedeihen
Jetzt heißt es, die Melonen gut zu pflegen, damit sie prächtig wachsen und süße Früchte tragen.
1. Gießen: Gieße die Melonen regelmäßig, besonders während trockener Perioden. Achte darauf, dass der Boden immer leicht feucht ist. Vermeide es, die Blätter zu benetzen, da dies zu Pilzkrankheiten führen kann. Gieße am besten früh am Morgen, damit die Blätter tagsüber abtrocknen können.
2. Düngen: Dünge die Melonen alle zwei bis drei Wochen mit einem verdünnten Flüssigdünger. Verwende einen Dünger, der reich an Kalium ist, um die Fruchtbildung zu fördern.
3. Unkraut jäten: Halte den Bereich um die Melonen frei von Unkraut. Unkraut konkurriert mit den Melonen um Nährstoffe und Wasser.
4. Schädlinge und Krankheiten bekämpfen: Beobachte die Melonen regelmäßig auf Schädlinge und Krankheiten. Blattläuse, Schnecken und Mehltau können Probleme verursachen. Bei Bedarf kannst du biologische Schädlingsbekämpfungsmittel oder Fungizide verwenden.
5. Ausgeizen (optional): Einige Gärtner entfernen Seitentriebe, um die Energie der Pflanze auf die Fruchtbildung zu konzentrieren. Das ist aber nicht unbedingt notwendig. Wenn du dich dafür entscheidest, Seitentriebe zu entfernen, schneide sie vorsichtig mit einer Gartenschere ab.
6. Früchte schützen: Wenn die Melonen größer werden, kannst du sie mit Stroh oder Holzbrettern unterlegen, um sie vor Bodenkontakt und Fäulnis zu schützen.
Phase 5: Die Ernte – So erkennst du, wann deine Melonen reif sind
Der schönste Moment: Die Ernte! Aber wie erkennst du, wann deine Cantaloupe-Melonen reif sind?
1. Duft: Reife Cantaloupe-Melonen haben einen süßen, aromatischen Duft.
2. Farbe: Die Schale der Melone sollte sich von grün nach gelblich-braun verfärben.
3. Stiel: Der Stiel, der
Conclusion
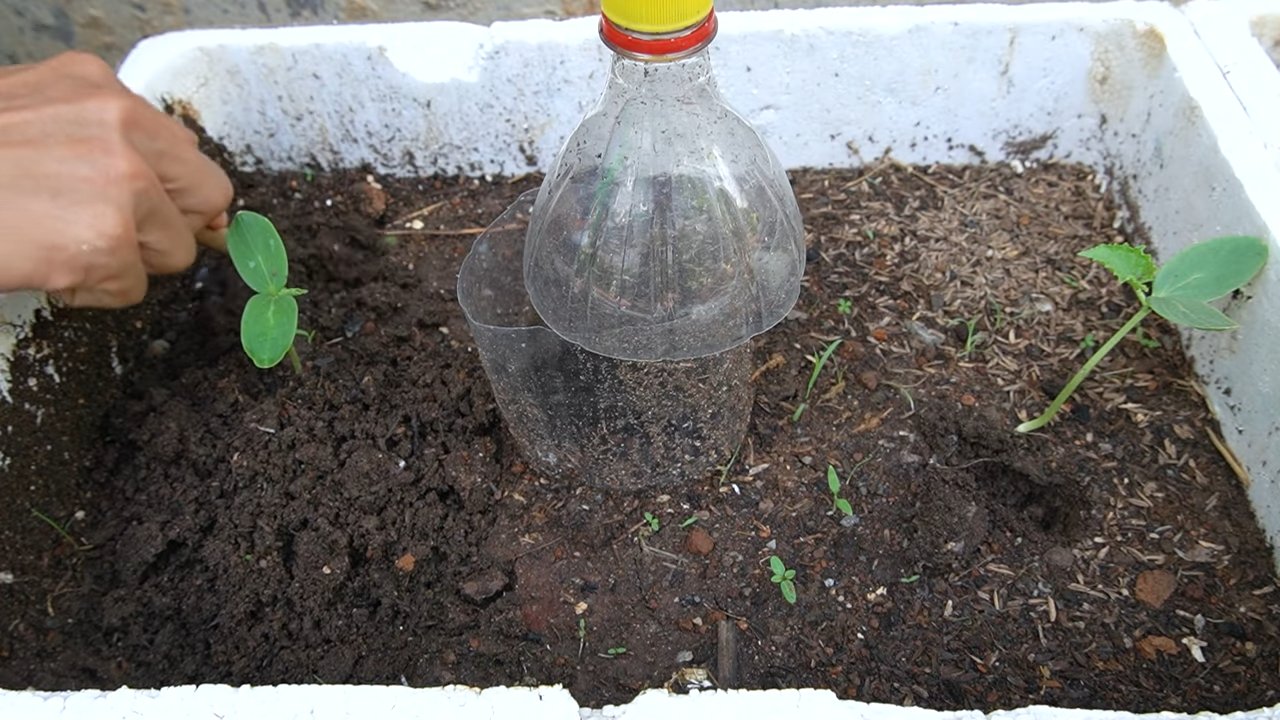
So, there you have it! Mastering the art of growing cantaloupe doesn’t require a green thumb blessed by the gardening gods. It’s about understanding the plant’s needs, providing the right environment, and employing a few clever DIY tricks to maximize your yield. We’ve explored how to create a mini-greenhouse effect using simple materials, how to craft a DIY watering system for consistent hydration, and how to build a trellis for vertical growth, saving space and improving air circulation.
These DIY solutions are more than just cost-effective; they’re empowering. They allow you to take control of your garden, adapt to your specific climate and space constraints, and truly connect with the process of nurturing your own food. Imagine the satisfaction of biting into a juicy, sweet cantaloupe that you grew yourself, knowing that you played an active role in its creation. That’s a reward that money simply can’t buy.
But the benefits extend beyond personal gratification. By implementing these techniques, you’re also contributing to a more sustainable lifestyle. You’re reducing your reliance on commercially grown produce, minimizing your carbon footprint, and potentially even saving money on your grocery bill. Plus, you’ll have the freshest, most flavorful cantaloupe imaginable, free from the chemicals and preservatives often found in store-bought varieties.
Don’t be afraid to experiment and adapt these methods to suit your own unique circumstances. Perhaps you’ll discover that using a different type of plastic for your mini-greenhouse works even better in your region. Or maybe you’ll find that adding a layer of mulch around your plants helps to retain moisture and suppress weeds more effectively. The possibilities are endless!
Consider these variations to further enhance your cantaloupe growing experience:
* Companion Planting: Plant basil or marigolds near your cantaloupe to deter pests and attract beneficial insects.
* Soil Enrichment: Amend your soil with compost or well-rotted manure to provide essential nutrients for healthy growth.
* Sun Protection: In extremely hot climates, consider providing some afternoon shade to prevent sunburn on the fruits.
* Pollination Assistance: If you’re not seeing enough bees in your garden, you can hand-pollinate your cantaloupe flowers using a small paintbrush.
Ultimately, the key to success lies in observation and adaptation. Pay close attention to your plants, monitor their growth, and adjust your techniques as needed. Don’t be discouraged if you encounter challenges along the way. Gardening is a learning process, and every mistake is an opportunity to grow (pun intended!).
We wholeheartedly encourage you to try these DIY tricks for growing cantaloupe. We’re confident that you’ll be amazed by the results. And more importantly, we want to hear about your experiences! Share your successes, your challenges, and your own innovative solutions in the comments below. Let’s create a community of cantaloupe enthusiasts who are passionate about growing their own delicious, homegrown fruit. What are you waiting for? Get out there and start growing!
Frequently Asked Questions (FAQ)
What is the best time to start growing cantaloupe?
The ideal time to start growing cantaloupe depends on your climate. Cantaloupe thrives in warm weather and requires a long growing season (typically 75-90 days). In cooler climates, start seeds indoors 4-6 weeks before the last expected frost. In warmer climates, you can direct sow seeds into the garden after the danger of frost has passed and the soil has warmed to at least 60°F (15°C).
How much sun does cantaloupe need?
Cantaloupe requires at least 6-8 hours of direct sunlight per day to produce sweet, flavorful fruit. Choose a sunny location in your garden where your plants will receive ample sunlight throughout the day. If you live in an area with intense summer heat, providing some afternoon shade can help prevent sunburn on the fruits.
What kind of soil is best for growing cantaloupe?
Cantaloupe prefers well-drained, fertile soil with a pH of 6.0 to 6.8. Amend your soil with compost or well-rotted manure before planting to improve drainage, fertility, and water retention. Avoid heavy clay soils, as they can become waterlogged and inhibit root growth.
How often should I water my cantaloupe plants?
Cantaloupe plants need consistent moisture, especially during fruit development. Water deeply and regularly, aiming to keep the soil consistently moist but not waterlogged. Avoid overhead watering, as this can promote fungal diseases. The DIY watering system described earlier in the article can be a great way to ensure consistent hydration. Reduce watering as the fruits begin to ripen to concentrate the sugars and enhance their sweetness.
How do I know when my cantaloupe is ripe?
There are several indicators that a cantaloupe is ripe:
* Color: The skin color will change from green to a tan or yellowish hue.
* Aroma: The cantaloupe will have a sweet, musky aroma, especially near the stem end.
* Stem: The stem will begin to crack and separate easily from the fruit. This is known as “slipping.”
* Sound: When you tap on the cantaloupe, it should sound hollow.
Once the cantaloupe is ripe, gently twist it from the vine.
What are some common pests and diseases that affect cantaloupe?
Common pests that can affect cantaloupe include aphids, squash bugs, cucumber beetles, and vine borers. Common diseases include powdery mildew, downy mildew, and fusarium wilt. To prevent pest and disease problems, practice good garden hygiene, such as removing plant debris and weeds. Use insecticidal soap or neem oil to control pests, and apply fungicides to prevent or treat fungal diseases. Crop rotation can also help to prevent soilborne diseases.
Can I grow cantaloupe in containers?
Yes, you can grow cantaloupe in containers, but you’ll need a large container (at least 20 gallons) with good drainage. Choose a dwarf or bush variety of cantaloupe that is better suited for container growing. Provide a trellis or support for the vines to climb. Water and fertilize regularly, as container-grown plants tend to dry out and deplete nutrients more quickly.
How can I improve pollination of my cantaloupe plants?
Cantaloupe plants rely on bees and other pollinators to transfer pollen from male to female flowers. To attract more pollinators to your garden, plant flowers that are rich in nectar and pollen, such as sunflowers, zinnias, and lavender. Avoid using pesticides that can harm pollinators. If you’re not seeing enough bees in your garden, you can hand-pollinate your cantaloupe flowers using a small paintbrush. Gently transfer pollen from the male flowers (which have a long, thin stem) to the female flowers (which have a small fruit at the base).
What are some tips for growing sweeter cantaloupe?
Several factors can influence the sweetness of your cantaloupe:
* Sunlight: Ensure your plants receive at least 6-8 hours of direct sunlight per day.
* Watering: Reduce watering as the fruits begin to ripen to concentrate the sugars.
* Fertilizer: Avoid over-fertilizing with nitrogen, as this can promote leafy growth at the expense of fruit sweetness. Use a fertilizer that is higher in phosphorus and potassium.
* Variety: Choose a cantaloupe variety that is known for its sweetness.
* Harvesting: Harvest your cantaloupe at the peak of ripeness for the best flavor.
How do I store cantaloupe after harvesting?
Whole cantaloupe can be stored at room temperature for a few days. Once cut, store the cantaloupe in the refrigerator in an airtight container for up to 5 days. To prevent the cantaloupe from drying out, wrap the cut surface with plastic wrap.
Leave a Comment