

DIY Tomato Garden Family projects are a fantastic way to bring fresh, flavorful tomatoes right to your table, and I’m so excited to share some simple yet effective tricks to help you cultivate a thriving tomato patch! Forget those bland, store-bought tomatoes – imagine biting into a juicy, sun-ripened tomato that you nurtured from seedling to fruit. That’s the magic of home gardening!
Growing your own tomatoes isn’t just a modern trend; it’s a practice with deep roots. Tomatoes, originating in South America, were initially viewed with suspicion in Europe, but eventually, their vibrant color and delicious taste won everyone over. Now, they’re a staple in cuisines worldwide, and what better way to enjoy them than by growing your own?
But let’s be honest, sometimes getting those perfect tomatoes can feel like a challenge. Pests, diseases, and unpredictable weather can all throw a wrench in your gardening plans. That’s where these DIY tricks come in! I’m going to show you some easy-to-implement hacks that will help you overcome common tomato-growing obstacles, maximize your yield, and create a DIY Tomato Garden Family project that everyone can enjoy. From simple soil amendments to clever pest control strategies, these tips will empower you to grow the best tomatoes you’ve ever tasted. So, grab your gardening gloves, and let’s get started!
Dein eigener Familiengarten: Tomatenanbau leicht gemacht!
Hallo liebe Gartenfreunde! Ich zeige euch heute, wie ihr ganz einfach einen eigenen Tomatengarten für die ganze Familie anlegen könnt. Es ist gar nicht so schwer, wie es vielleicht klingt, und das Ergebnis – frische, saftige Tomaten direkt aus dem eigenen Garten – ist einfach unschlagbar! Lasst uns loslegen!
Was du für deinen Tomatengarten brauchst:
* Tomatensamen oder Jungpflanzen: Wähle Sorten, die dir und deiner Familie schmecken. Es gibt so viele verschiedene Sorten, von kleinen Cherrytomaten bis hin zu großen Fleischtomaten.
* Anzuchterde: Für die Anzucht der Samen.
* Töpfe oder Anzuchtschalen: Für die Anzucht.
* Pflanzerde: Für das Auspflanzen in den Garten oder größere Töpfe.
* Gartengeräte: Spaten, Schaufel, Gießkanne, eventuell eine kleine Hacke.
* Tomatenstäbe oder Rankgitter: Um die Pflanzen zu stützen.
* Dünger: Spezieller Tomatendünger oder Kompost.
* Geduld und Liebe: Das Wichtigste überhaupt!
Die Anzucht: Der Grundstein für eine reiche Ernte
Die Anzucht ist der erste Schritt zu deinem eigenen Tomatengarten. Du kannst entweder Tomatensamen aussäen oder direkt Jungpflanzen kaufen. Ich persönlich ziehe es vor, die Samen selbst auszusäen, weil es einfach mehr Spaß macht und man die Pflanzen von Anfang an begleiten kann.
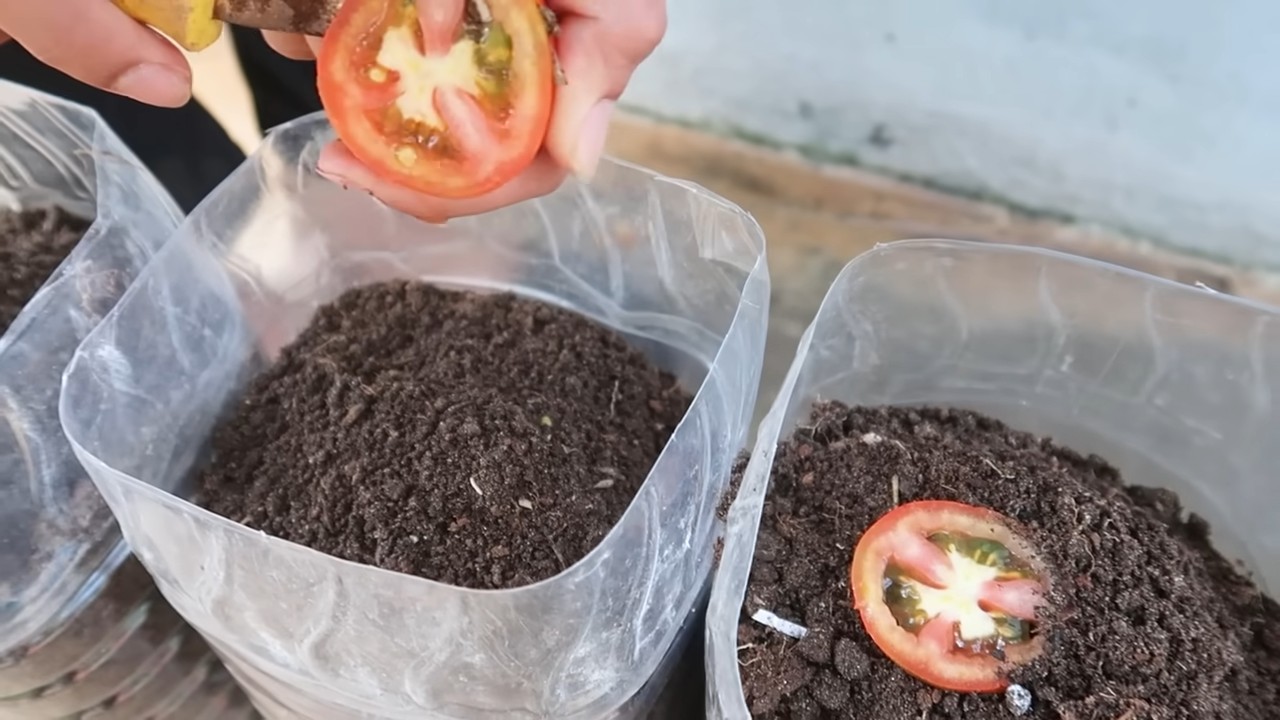
Schritt-für-Schritt-Anleitung für die Anzucht:
1. Vorbereitung der Anzuchtschalen: Fülle die Anzuchtschalen oder kleinen Töpfe mit Anzuchterde. Drücke die Erde leicht an.
2. Aussaat der Samen: Lege pro Töpfchen ein bis zwei Tomatensamen auf die Erde. Bedecke die Samen mit einer dünnen Schicht Erde (ca. 0,5 cm).
3. Bewässerung: Befeuchte die Erde vorsichtig mit einer Sprühflasche. Die Erde sollte feucht, aber nicht nass sein.
4. Standort: Stelle die Anzuchtschalen an einen warmen und hellen Ort. Ideal ist eine Fensterbank mit viel Sonnenlicht.
5. Abdeckung: Decke die Anzuchtschalen mit Frischhaltefolie oder einem Deckel ab, um die Luftfeuchtigkeit zu erhöhen. Lüfte die Abdeckung täglich kurz, um Schimmelbildung zu vermeiden.
6. Geduld haben: Nach etwa ein bis zwei Wochen sollten die ersten Keimlinge zu sehen sein. Sobald die Keimlinge da sind, kannst du die Abdeckung entfernen.
7. Pikieren: Wenn die kleinen Tomatenpflanzen ihre ersten richtigen Blätter (neben den Keimblättern) entwickelt haben, ist es Zeit zum Pikieren. Das bedeutet, dass du die Pflanzen vorsichtig aus den Anzuchtschalen nimmst und in größere Töpfe umpflanzt. Achte darauf, die Wurzeln nicht zu beschädigen.
Das Auspflanzen: Ab ins Freie!
Sobald die Tomatenpflanzen kräftig genug sind und die Temperaturen es zulassen (nach den Eisheiligen Mitte Mai), können sie ins Freie gepflanzt werden.
Schritt-für-Schritt-Anleitung für das Auspflanzen:
1. Vorbereitung des Bodens: Wähle einen sonnigen Standort für deinen Tomatengarten. Lockere den Boden gut auf und entferne Unkraut. Mische Kompost oder organischen Dünger unter die Erde, um die Pflanzen mit Nährstoffen zu versorgen.
2. Pflanzlöcher ausheben: Hebe Pflanzlöcher aus, die etwas größer sind als die Töpfe, in denen die Tomatenpflanzen stehen.
3. Tomatenpflanzen einsetzen: Nimm die Tomatenpflanzen vorsichtig aus den Töpfen und setze sie in die Pflanzlöcher. Achte darauf, dass der Wurzelballen vollständig mit Erde bedeckt ist. Du kannst die Pflanzen etwas tiefer setzen, als sie vorher im Topf standen, da sie dann zusätzliche Wurzeln bilden und stabiler werden.
4. Gießen: Gieße die Tomatenpflanzen nach dem Einsetzen gründlich an.
5. Tomatenstäbe setzen: Setze direkt nach dem Einpflanzen Tomatenstäbe oder Rankgitter neben die Pflanzen. So haben sie von Anfang an Halt und können nicht umknicken.
6. Abstand halten: Achte darauf, genügend Abstand zwischen den Pflanzen zu lassen (ca. 50-60 cm), damit sie ausreichend Platz zum Wachsen haben.
Die Pflege: Damit deine Tomaten prächtig gedeihen
Die richtige Pflege ist entscheidend für eine reiche Tomatenernte. Hier sind ein paar Tipps, die du beachten solltest:
* Regelmäßiges Gießen: Tomaten brauchen viel Wasser, besonders während der heißen Sommermonate. Gieße die Pflanzen am besten morgens oder abends, wenn die Sonne nicht so stark scheint. Vermeide es, die Blätter zu gießen, da dies Pilzkrankheiten fördern kann. Gieße stattdessen direkt an die Wurzeln.
* Düngen: Dünge die Tomatenpflanzen regelmäßig mit speziellem Tomatendünger oder Kompost. Beginne damit etwa zwei Wochen nach dem Auspflanzen und wiederhole die Düngung alle zwei bis drei Wochen.
* Ausgeizen: Das Ausgeizen ist ein wichtiger Schritt, um eine reiche Ernte zu erzielen. Dabei werden die Seitentriebe (Geiztriebe) entfernt, die sich in den Blattachseln bilden. Diese Triebe nehmen der Pflanze unnötig Kraft und Energie, die sie besser in die Fruchtbildung stecken kann.
* Wie man ausgeizt: Breche oder schneide die Geiztriebe vorsichtig ab, sobald sie eine Länge von etwa 5-10 cm erreicht haben. Achte darauf, den Haupttrieb nicht zu beschädigen.
* Wann man ausgeizt: Ausgeizen solltest du regelmäßig, am besten einmal pro Woche.
* Mulchen: Das Mulchen des Bodens um die Tomatenpflanzen herum hat viele Vorteile. Es hilft, die Feuchtigkeit im Boden zu halten, Unkrautwachstum zu unterdrücken und den Boden vor Erosion zu schützen. Du kannst zum Mulchen Stroh, Rasenschnitt oder Holzhackschnitzel verwenden.
* Krankheiten und Schädlinge: Achte auf Anzeichen von Krankheiten oder Schädlingen. Die häufigste Krankheit bei Tomaten ist die Kraut- und Braunfäule. Vorbeugend kannst du die Pflanzen mit einem biologischen Pflanzenschutzmittel behandeln. Bei Schädlingsbefall (z.B. Blattläuse) kannst du ebenfalls biologische Mittel einsetzen.
Spezielle Tipps für den Anbau im Topf:
Wenn du keinen Garten hast, kannst du Tomaten auch problemlos im Topf anbauen. Hier sind ein paar zusätzliche Tipps:
* Topfgröße: Wähle einen ausreichend großen Topf (mindestens 10 Liter Volumen).
* Drainage: Achte darauf, dass der Topf ein Abzugsloch hat, damit überschüssiges Wasser ablaufen kann.
* Erde: Verwende hochwertige Pflanzerde.
* Standort: Stelle den Topf an einen sonnigen und windgeschützten Ort.
* Gießen und Düngen: Gieße und dünge die Tomatenpflanzen im Topf regelmäßig, da die Erde schneller austrocknet und die Nährstoffe schneller verbraucht werden.
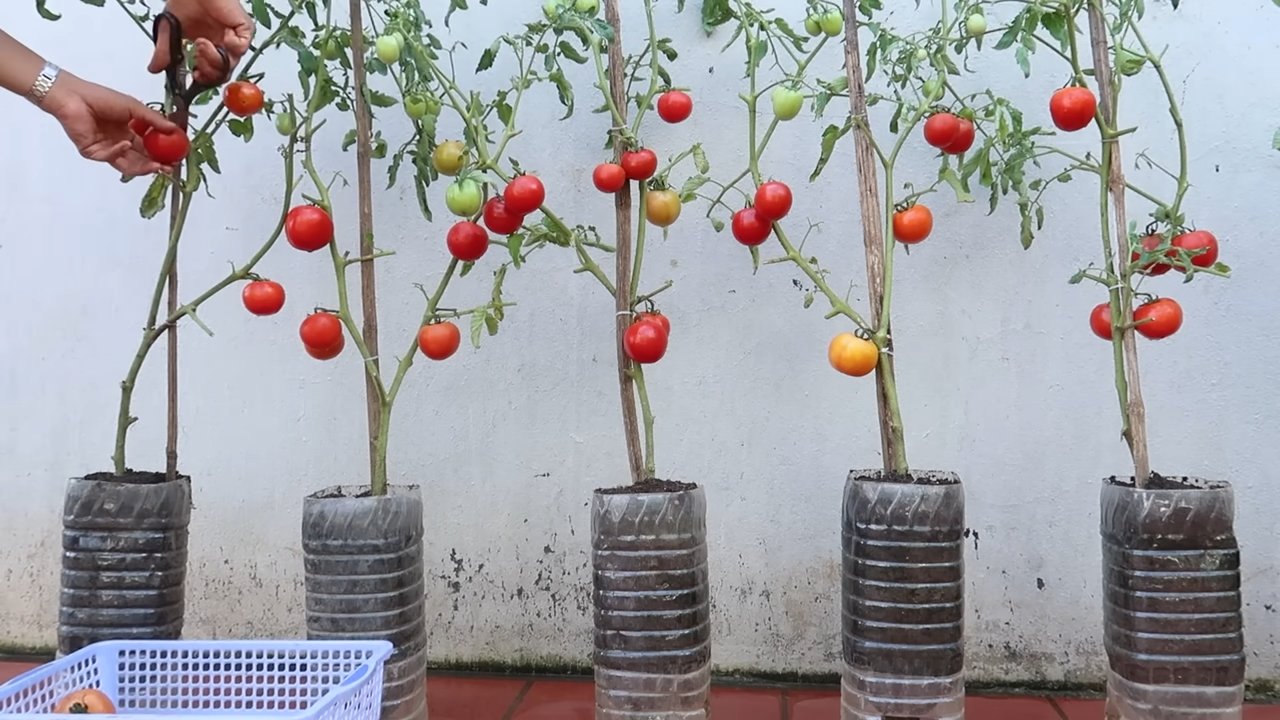
Die Ernte: Der Lohn für deine Mühe
Endlich ist es soweit: Die Tomaten sind reif und können geerntet werden!
* Reife erkennen: Reife Tomaten haben eine intensive Farbe (je nach Sorte rot, gelb, orange oder grün) und lassen sich leicht vom Stiel lösen.
* Ernten: Pflücke die reifen Tomaten vorsichtig ab.
* Genießen: Genieße deine selbst angebauten Tomaten frisch vom Strauch, in Salaten, Saucen oder Suppen.
Zusätzliche Tipps für eine erfolgreiche Tomatenernte:
* Sortenwahl: Wähle Tomatensorten, die für dein Klima und deine Anbaubedingungen geeignet sind. Informiere dich im Fachhandel oder im Internet über die verschiedenen Sorten.
* Frucht
Conclusion
So, there you have it! Transforming your backyard into a thriving DIY tomato garden is not just a fun project; it’s an investment in fresh, flavorful produce, a connection to nature, and a rewarding experience for the whole family. We’ve walked you through the essential steps, from selecting the perfect tomato varieties to nurturing your plants for optimal growth. The beauty of this DIY approach is its adaptability. You’re not confined to a specific method or a pre-packaged kit. You have the freedom to customize your garden to suit your space, your preferences, and your family’s needs.
Think about the possibilities! Imagine juicy, sun-ripened tomatoes bursting with flavor, ready to be plucked straight from the vine and incorporated into your favorite dishes. Picture your children learning about the life cycle of plants, the importance of healthy eating, and the satisfaction of growing their own food. This isn’t just about tomatoes; it’s about creating lasting memories and fostering a love for the natural world.
Why is this DIY tomato garden a must-try? Because it empowers you to take control of your food source, reduce your reliance on store-bought produce, and enjoy the unparalleled taste of homegrown tomatoes. Plus, it’s a fantastic way to get outdoors, get your hands dirty, and spend quality time with your loved ones.
Variations and Suggestions:
* Vertical Gardening: If you’re short on space, consider vertical gardening techniques. Use trellises, cages, or hanging baskets to grow your tomatoes upwards, maximizing your yield in a small area.
* Companion Planting: Enhance your tomato garden by incorporating companion plants like basil, marigolds, and carrots. These plants can deter pests, attract beneficial insects, and improve the overall health of your tomato plants.
* Container Gardening: For those with limited outdoor space or who prefer a more portable option, container gardening is an excellent choice. Choose large containers with good drainage and use a high-quality potting mix.
* Heirloom Varieties: Explore the world of heirloom tomatoes! These unique varieties offer a wide range of flavors, colors, and textures, adding excitement and diversity to your harvest.
* Hydroponics: For the more adventurous gardener, consider hydroponics. This soil-less growing method can produce impressive results, especially in controlled environments.
We encourage you to embark on this exciting DIY tomato garden journey. Don’t be afraid to experiment, learn from your mistakes, and adapt your approach as needed. The most important thing is to have fun and enjoy the process.
Once you’ve harvested your first batch of homegrown tomatoes, we’d love to hear about your experience! Share your photos, tips, and stories with us in the comments section below. Let’s create a community of passionate tomato gardeners and inspire others to grow their own food. Your success story could be the motivation someone else needs to start their own DIY tomato garden adventure. So, get planting, get growing, and get ready to savor the delicious taste of homegrown tomatoes!
Frequently Asked Questions (FAQ)
Q1: What are the best tomato varieties for a beginner DIY tomato gardener?
A1: For beginners, determinate tomato varieties like Roma, Celebrity, and Bush Early Girl are excellent choices. These varieties are compact, require less pruning, and produce a concentrated harvest, making them easier to manage. Indeterminate varieties, such as Beefsteak, Brandywine, and Cherry tomatoes, require more staking and pruning but offer a continuous harvest throughout the growing season. Consider your space, climate, and desired tomato size when making your selection. Don’t be afraid to try a mix of both determinate and indeterminate varieties to experience the best of both worlds.
Q2: How much sunlight do tomato plants need in a DIY tomato garden?
A2: Tomato plants thrive in full sunlight, requiring at least 6-8 hours of direct sunlight per day. Choose a location for your DIY tomato garden that receives ample sunlight throughout the day. If you live in a particularly hot climate, some afternoon shade can be beneficial to prevent sunscald. If you’re growing tomatoes indoors, supplement with grow lights to ensure they receive sufficient light. Insufficient sunlight can lead to leggy plants, reduced fruit production, and bland-tasting tomatoes.
Q3: What type of soil is best for growing tomatoes in a DIY tomato garden?
A3: Tomatoes prefer well-draining, fertile soil with a slightly acidic pH (6.0-6.8). Amend your garden soil with compost, aged manure, or other organic matter to improve its drainage, fertility, and water-holding capacity. If you’re growing tomatoes in containers, use a high-quality potting mix specifically formulated for vegetables. Avoid using garden soil in containers, as it can become compacted and restrict root growth. Regular soil testing can help you determine the pH and nutrient levels of your soil, allowing you to make necessary adjustments.
Q4: How often should I water my tomato plants in a DIY tomato garden?
A4: Water tomato plants deeply and regularly, especially during hot, dry weather. Aim to keep the soil consistently moist but not waterlogged. Water at the base of the plants to avoid wetting the foliage, which can increase the risk of fungal diseases. The frequency of watering will depend on your climate, soil type, and the size of your plants. As a general rule, water deeply once or twice a week, or more often during periods of extreme heat. Mulching around your tomato plants can help retain moisture and reduce the need for frequent watering.
Q5: What are some common pests and diseases that affect tomato plants in a DIY tomato garden, and how can I prevent them?
A5: Common pests that affect tomato plants include aphids, whiteflies, tomato hornworms, and spider mites. Common diseases include early blight, late blight, Septoria leaf spot, and blossom end rot. To prevent pests and diseases, practice good garden hygiene, such as removing weeds and debris, providing adequate spacing between plants, and avoiding overhead watering. Use organic pest control methods, such as insecticidal soap, neem oil, or Bacillus thuringiensis (Bt), to control pests. Choose disease-resistant tomato varieties and apply a fungicide if necessary to prevent or control diseases. Blossom end rot is often caused by calcium deficiency, so ensure your soil is rich in calcium and water your plants consistently.
Q6: How do I prune tomato plants in a DIY tomato garden?
A6: Pruning tomato plants can improve air circulation, reduce disease risk, and encourage fruit production. For determinate varieties, minimal pruning is required. Simply remove any suckers (small shoots that grow between the main stem and branches) below the first flower cluster. For indeterminate varieties, prune regularly to remove suckers and maintain a single or double main stem. This will help direct the plant’s energy towards fruit production. Remove any yellowing or diseased leaves to improve air circulation and prevent the spread of disease.
Q7: When is the best time to harvest tomatoes from my DIY tomato garden?
A7: Tomatoes are typically ready to harvest when they are fully colored, slightly soft to the touch, and easily detach from the vine. The exact color will depend on the variety. Gently squeeze the tomato; if it gives slightly, it’s ripe. Avoid picking tomatoes that are still green or hard, as they will not ripen properly off the vine. Harvest tomatoes in the morning when they are cool and dry. Store ripe tomatoes at room temperature for the best flavor.
Q8: Can I save seeds from my homegrown tomatoes for future DIY tomato gardens?
A8: Yes, you can save seeds from heirloom tomato varieties for future gardens. However, seeds from hybrid varieties may not produce plants that are true to type. To save seeds, select ripe, healthy tomatoes and scoop out the seeds along with the surrounding pulp. Ferment the seeds in a jar of water for 3-4 days to remove the gelatinous coating. Rinse the seeds thoroughly and spread them out on a paper towel to dry completely. Store the dried seeds in an airtight container in a cool, dark place.
Q9: How can I extend the tomato growing season in my DIY tomato garden?
A9: To extend the tomato growing season, start your seeds indoors 6-8 weeks before the last expected frost. Use row covers or cold frames to protect your plants from frost in the spring and fall. Choose early-maturing tomato varieties to ensure a harvest before the first frost. Consider using a greenhouse or high tunnel to provide a controlled growing environment. You can also try growing tomatoes in containers that can be moved indoors during cold weather.
Q10: What are some creative ways to use my homegrown tomatoes from my DIY tomato garden?
A10: The possibilities are endless! Use your homegrown tomatoes to make fresh salads, sauces, salsas, soups, and sandwiches. Roast them with herbs and garlic for a delicious side dish. Can or freeze them for use throughout the year. Make homemade tomato juice or ketchup. Share your bounty with friends, family, and neighbors. Get creative in the kitchen and experiment with different recipes to showcase the unique flavor of your homegrown tomatoes.

Leave a Comment