

Growing Mustard Greens in Bottles: Sounds a little unconventional, right? But trust me, it’s a game-changer! Are you dreaming of fresh, peppery mustard greens but short on garden space? Or maybe you’re tired of battling garden pests for your precious harvest? Well, I’ve got the perfect DIY solution for you – a simple, space-saving, and surprisingly effective way to cultivate these delicious greens right in your own home using recycled bottles!
Mustard greens have a rich history, dating back thousands of years and holding a significant place in various cuisines, particularly in Asian and Southern U.S. cooking. They’re packed with vitamins and minerals, adding a healthy and flavorful kick to any meal. But let’s be honest, sometimes growing them can be a challenge, especially in urban environments or with limited gardening experience.
That’s where this DIY trick comes in! Growing Mustard Greens in Bottles is not just a fun project; it’s a practical solution for anyone wanting fresh, homegrown produce without the hassle of traditional gardening. Imagine having a constant supply of these vibrant greens right on your windowsill, ready to be snipped and added to your salads, stir-fries, or soups. This method minimizes weeding, reduces pest problems, and is incredibly budget-friendly. So, let’s ditch the store-bought greens and embark on this exciting and rewarding gardening adventure together!
Senfgrün im Upcycling-Stil: Anzucht in Plastikflaschen
Hey Leute! Habt ihr Lust auf frische, würzige Senfgrün-Blätter direkt aus eurer Küche oder vom Balkon? Und das Ganze auch noch super nachhaltig? Dann seid ihr hier genau richtig! Ich zeige euch, wie ihr Senfgrün ganz einfach in alten Plastikflaschen anbauen könnt. Das ist nicht nur kinderleicht, sondern auch eine tolle Möglichkeit, Plastikmüll zu reduzieren und eure eigenen, gesunden Zutaten zu ernten. Los geht’s!
Was ihr braucht:
* Leere Plastikflaschen (am besten 1,5 oder 2 Liter)
* Ein scharfes Messer oder eine Schere
* Erde (am besten Anzuchterde oder Blumenerde)
* Senfgrün-Samen (gibt’s im Gartencenter oder online)
* Wasser
* Optional: Sprühflasche
* Optional: Kleine Steine oder Kies für die Drainage
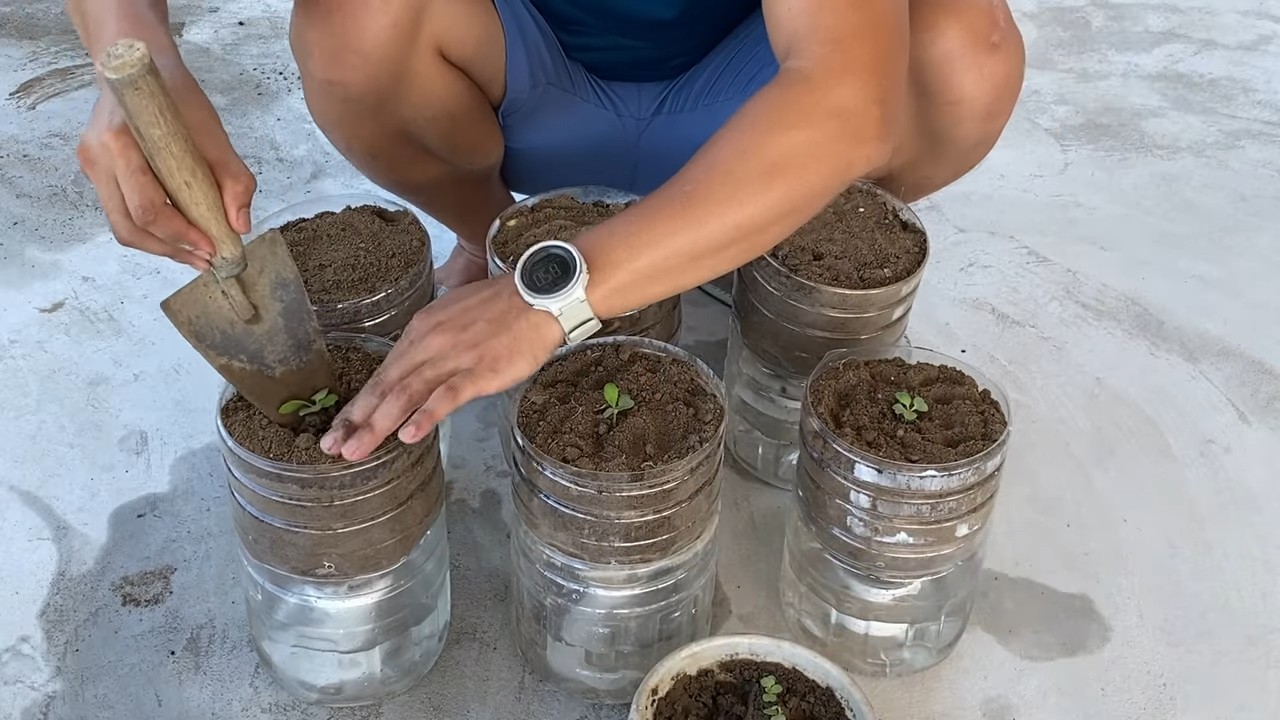
Vorbereitung der Flaschen:
1. Reinigung: Zuerst müsst ihr die Plastikflaschen gründlich reinigen. Entfernt alle Etiketten und spült sie mit warmem Wasser und Spülmittel aus. Achtet darauf, dass keine Spülmittelreste zurückbleiben.
2. Zuschneiden: Jetzt kommt der spannende Teil! Ihr habt zwei Möglichkeiten, die Flaschen zuzuschneiden:
* Variante 1: Horizontaler Schnitt: Schneidet die Flasche horizontal in der Mitte durch. Der obere Teil wird später umgedreht in den unteren Teil gesteckt. Das ist super, wenn ihr eine Art Mini-Gewächshaus haben wollt.
* Variante 2: Vertikaler Schnitt: Schneidet die Flasche vertikal auf einer Seite auf. Lasst aber am Boden noch ein Stück stehen, damit die Flasche nicht auseinanderfällt. So entsteht eine Art “offenes Beet”.
Ich persönlich finde die horizontale Variante etwas praktischer, weil sie besser vor Wind und Wetter schützt. Aber probiert einfach aus, was euch besser gefällt!
3. Drainagelöcher: Egal für welche Variante ihr euch entscheidet, ihr müsst unbedingt Drainagelöcher in den Boden der Flasche bohren oder schneiden. Das ist wichtig, damit überschüssiges Wasser ablaufen kann und die Wurzeln nicht faulen. Macht am besten 4-5 kleine Löcher.
4. Optional: Drainage-Schicht: Um die Drainage noch zu verbessern, könnt ihr eine Schicht kleine Steine oder Kies auf den Boden der Flasche legen, bevor ihr die Erde einfüllt.
Aussaat des Senfgrüns:
1. Erde einfüllen: Füllt die Flasche mit Erde. Lasst oben etwa 2-3 cm Platz. Drückt die Erde leicht an.
2. Samen aussäen: Verteilt die Senfgrün-Samen gleichmäßig auf der Erde. Achtet darauf, dass sie nicht zu dicht beieinander liegen.
3. Samen bedecken: Bedeckt die Samen mit einer dünnen Schicht Erde (ca. 0,5 cm).
4. Angießen: Gießt die Erde vorsichtig an. Am besten verwendet ihr dafür eine Sprühflasche, damit die Samen nicht weggespült werden. Die Erde sollte feucht, aber nicht nass sein.
Pflege des Senfgrüns:
1. Standort: Stellt die Flaschen an einen hellen, warmen Ort. Senfgrün braucht viel Licht, um gut zu wachsen. Ein sonniges Fensterbrett oder ein geschützter Platz auf dem Balkon sind ideal.
2. Gießen: Haltet die Erde immer feucht, aber vermeidet Staunässe. Gießt regelmäßig, aber nicht zu viel. Am besten kontrolliert ihr die Feuchtigkeit der Erde mit dem Finger. Wenn sie sich trocken anfühlt, ist es Zeit zum Gießen.
3. Belüftung (bei horizontaler Variante): Wenn ihr die horizontale Variante gewählt habt, solltet ihr den oberen Teil der Flasche regelmäßig abnehmen, um für Belüftung zu sorgen. Das verhindert Schimmelbildung.
4. Düngen (optional): Senfgrün ist nicht sehr anspruchsvoll und braucht normalerweise keine zusätzliche Düngung. Wenn ihr aber möchtet, könnt ihr ab und zu etwas organischen Flüssigdünger ins Gießwasser geben.
5. Schutz vor Schädlingen: Senfgrün ist relativ resistent gegen Schädlinge. Wenn ihr aber doch mal Blattläuse oder andere ungebetene Gäste entdeckt, könnt ihr sie mit einem Wasserstrahl abspülen oder mit einem biologischen Schädlingsbekämpfungsmittel behandeln.
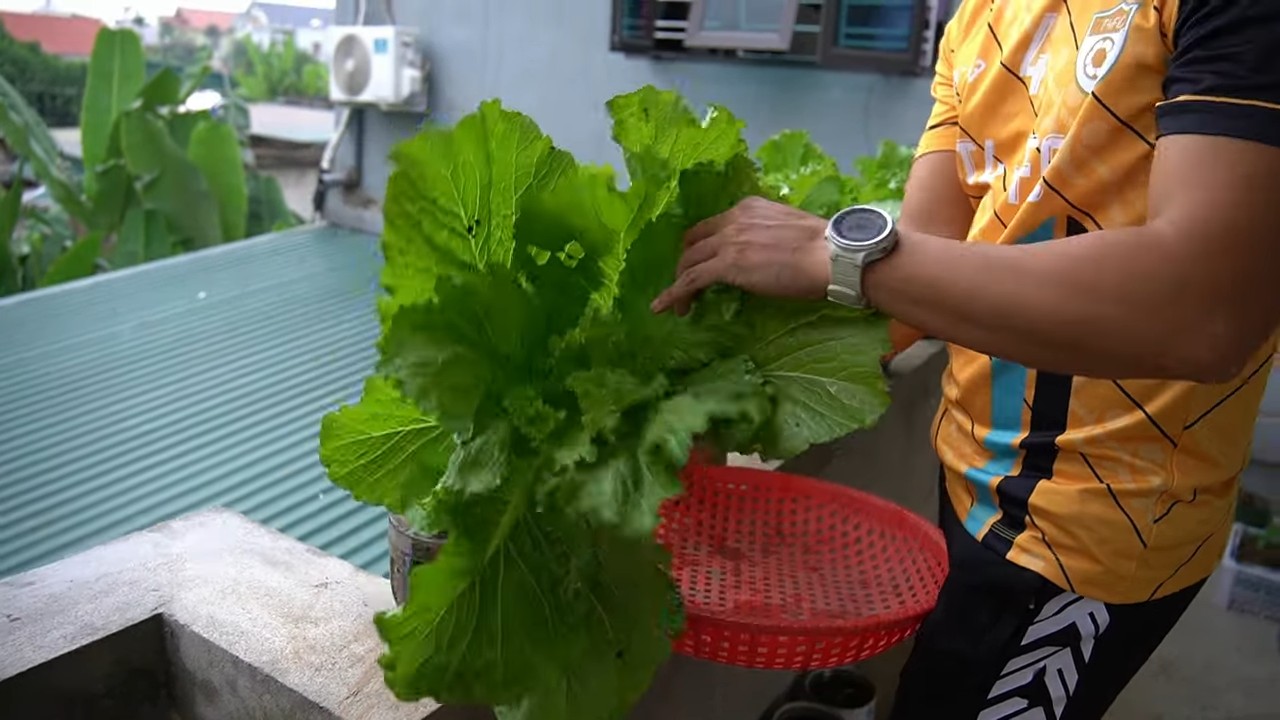
Ernte des Senfgrüns:
1. Erntezeitpunkt: Senfgrün ist relativ schnellwüchsig. Je nach Sorte und Standort könnt ihr die ersten Blätter schon nach 3-4 Wochen ernten.
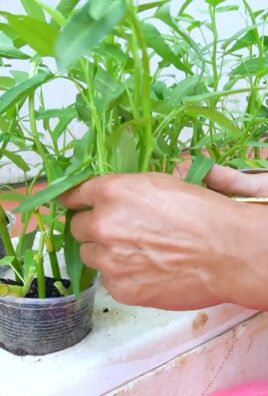
2. Erntemethode: Schneidet die Blätter mit einer Schere oder einem Messer ab. Lasst dabei die unteren Blätter stehen, damit die Pflanze weiterwachsen kann. Ihr könnt die Blätter mehrmals ernten.
3. Verwendung: Senfgrün ist super vielseitig! Ihr könnt es roh in Salaten verwenden, als würzige Zutat in Suppen und Eintöpfen oder kurz gedünstet als Beilage. Es schmeckt leicht scharf und pfeffrig.
Zusätzliche Tipps und Tricks:
* Sortenvielfalt: Es gibt verschiedene Senfgrün-Sorten mit unterschiedlichen Geschmacksrichtungen und Blattfarben. Probiert einfach mal verschiedene Sorten aus, um euren Favoriten zu finden!
* Aufeinanderfolgende Aussaat: Um immer frisches Senfgrün zu haben, könnt ihr alle paar Wochen neue Samen aussäen.
* Beschriftung: Beschriftet die Flaschen mit dem Namen der Sorte und dem Aussaatdatum. So behaltet ihr den Überblick.
* Kreative Gestaltung: Bemalt die Flaschen oder beklebt sie mit bunten Papieren. So werden sie zu einem echten Hingucker!
* Upcycling-Ideen: Ihr könnt nicht nur Plastikflaschen, sondern auch andere Behälter wie Joghurtbecher oder Konservendosen für die Anzucht von Senfgrün verwenden.
* Senfgrün als Gründüngung: Nach der Ernte könnt ihr die Pflanzenreste einfach in die Erde einarbeiten. Sie dienen als Gründüngung und verbessern die Bodenqualität.
Warum Senfgrün anbauen?
* Frische und Geschmack: Selbst angebautes Senfgrün schmeckt einfach besser als gekauftes!
* Gesundheit: Senfgrün ist reich an Vitaminen und Mineralstoffen.
* Nachhaltigkeit: Ihr reduziert Plastikmüll und spart Transportwege.
* Geld sparen: Selbst angebautes Senfgrün ist günstiger als gekauftes.
* Entspannung: Gärtnern ist eine tolle Möglichkeit, um Stress abzubauen und sich zu entspannen.
Ich hoffe, diese Anleitung hat euch gefallen und inspiriert, euer eigenes Senfgrün in Plastikflaschen anzubauen. Es ist wirklich kinderleicht und macht super viel Spaß! Wenn ihr Fragen habt, könnt ihr sie gerne in den Kommentaren stellen. Viel Erfolg und guten Appetit!
Conclusion
So, there you have it! Growing mustard greens in bottles is not just a quirky gardening experiment; it’s a genuinely rewarding and sustainable way to enjoy fresh, peppery greens right at your fingertips. We’ve walked you through the simple steps, highlighting the ease and accessibility of this method, even for those with limited space or gardening experience.
Why is this DIY trick a must-try? Because it democratizes access to fresh produce. Imagine the satisfaction of snipping off vibrant mustard greens, knowing they were grown with your own hands, in recycled bottles that would otherwise have ended up in a landfill. It’s a small act with a big impact, contributing to a more sustainable lifestyle and reducing your reliance on store-bought greens, which often travel long distances and lose their freshness along the way.
Beyond the environmental benefits, growing mustard greens in bottles is incredibly convenient. You can place your bottle gardens on a sunny windowsill, balcony, or even a small patio. They require minimal maintenance, making them perfect for busy individuals or those who are new to gardening. Plus, it’s a fantastic educational project for kids, teaching them about plant life cycles, responsibility, and the importance of healthy eating.
But the beauty of this method lies in its adaptability. Feel free to experiment with different bottle sizes and shapes. Clear plastic bottles work best for sunlight penetration, but you can also use colored bottles for a more decorative effect. Just be mindful that darker bottles might absorb more heat.
Consider these variations to personalize your bottle garden:
* Succession Planting: Plant new seeds every few weeks to ensure a continuous harvest of fresh mustard greens.
* Companion Planting: While mustard greens thrive on their own, you can experiment with planting them alongside other compatible herbs like chives or parsley in larger bottle setups.
* Vertical Gardens: Get creative and create a vertical garden by hanging multiple bottle gardens on a wall or fence. This is a great way to maximize space and add a touch of greenery to your surroundings.
* Nutrient Boost: Occasionally, add a diluted liquid fertilizer to the water to provide your mustard greens with an extra boost of nutrients. Look for organic options to keep your garden sustainable.
* Spicy Mix: Try different varieties of mustard greens! Some are milder, while others pack a serious peppery punch. Experiment to find your favorite flavor profile.
We are confident that once you try growing mustard greens in bottles, you’ll be hooked. It’s a simple, sustainable, and satisfying way to enjoy fresh, healthy greens.
So, grab some bottles, seeds, and soil, and get started today! We encourage you to share your experiences with us. Post photos of your bottle gardens on social media using #BottleGreens and let us know what you’ve learned. We can’t wait to see your creations and hear your success stories. Happy gardening!
Frequently Asked Questions (FAQ)
What kind of bottles are best for growing mustard greens?
Clear plastic bottles, like those used for water or soda, are generally the best choice. They allow maximum sunlight penetration, which is essential for healthy growth. However, you can also use colored bottles for a more decorative look. Just be aware that darker bottles might absorb more heat, potentially affecting the soil temperature. Make sure to thoroughly clean and sanitize any used bottles before planting to prevent the spread of diseases.
How often should I water my mustard greens in bottles?
The frequency of watering depends on several factors, including the size of the bottle, the type of soil, the weather conditions, and the stage of growth. As a general rule, check the soil moisture daily. If the top inch of soil feels dry to the touch, it’s time to water. Water thoroughly until excess water drains out of the drainage holes. Avoid overwatering, as this can lead to root rot. During hot weather, you may need to water more frequently.
What type of soil should I use for growing mustard greens in bottles?
A well-draining potting mix is ideal for growing mustard greens in bottles. Avoid using garden soil, as it can be too heavy and compact, hindering drainage and root growth. Look for a potting mix that contains a blend of peat moss, perlite, and vermiculite. You can also add some compost to the mix to provide extra nutrients.
How much sunlight do mustard greens need when grown in bottles?
Mustard greens thrive in full sun, which means they need at least 6 hours of direct sunlight per day. If you don’t have a sunny spot, you can supplement with artificial grow lights. Place your bottle gardens near a south-facing window or under grow lights for optimal growth.
How long does it take for mustard greens to grow in bottles?
Mustard greens are relatively fast-growing. You can typically start harvesting leaves within 3-4 weeks of planting. The exact time will depend on the variety of mustard greens, the growing conditions, and the temperature.
Can I grow other vegetables in bottles using the same method?
Yes, you can grow other vegetables in bottles using a similar method. Leafy greens like lettuce, spinach, and kale are particularly well-suited for bottle gardening. You can also try growing herbs like basil, parsley, and chives. Choose varieties that are compact and don’t require a lot of space.
How do I prevent pests and diseases from affecting my mustard greens in bottles?
To prevent pests and diseases, start with clean bottles and fresh potting mix. Regularly inspect your plants for any signs of infestation or disease. If you notice any problems, address them promptly. You can use organic pest control methods like insecticidal soap or neem oil to control pests. Ensure good air circulation around your plants to prevent fungal diseases.
How do I harvest mustard greens from bottles?
You can harvest mustard greens by snipping off the outer leaves as needed. This allows the plant to continue producing new leaves. Avoid harvesting more than one-third of the plant at a time. Harvest in the morning when the leaves are crisp and fresh.
Can I reuse the soil from my bottle gardens?
It’s generally not recommended to reuse the soil from your bottle gardens, as it may contain pests, diseases, or depleted nutrients. However, if you choose to reuse the soil, you can sterilize it by baking it in the oven at 200°F (93°C) for 30 minutes. You should also amend the soil with fresh compost or fertilizer to replenish nutrients.
What are the benefits of growing mustard greens in bottles compared to traditional gardening?
Growing mustard greens in bottles offers several advantages over traditional gardening, including:
* Space-saving: Bottle gardens are ideal for small spaces like apartments, balconies, or patios.
* Portability: You can easily move your bottle gardens to different locations as needed.
* Sustainability: Bottle gardening promotes recycling and reduces waste.
* Accessibility: It’s a simple and affordable way to grow your own food.
* Pest control: Bottle gardens are less susceptible to pests and diseases compared to traditional gardens.
* Educational: It’s a great way to teach children about gardening and healthy eating.
Is growing mustard greens in bottles organic?
Yes, growing mustard greens in bottles can be organic if you use organic potting mix, organic fertilizer, and organic pest control methods. Avoid using synthetic fertilizers or pesticides.
What do I do with the mustard greens once I harvest them?
Mustard greens are incredibly versatile! You can eat them raw in salads, sauté them with garlic and olive oil, add them to soups and stews, or even use them in stir-fries. They have a peppery flavor that adds a delicious kick to any dish. Store harvested mustard greens in the refrigerator for up to a week.
Leave a Comment