

Growing tomatoes at home can feel like a daunting task, but trust me, it’s more rewarding than you might think! Imagine biting into a juicy, sun-ripened tomato you nurtured from a tiny seed – the taste is simply unmatched. Forget those bland, store-bought varieties; this year, let’s bring the vibrant flavors of homegrown tomatoes to your table.
For centuries, tomatoes have held a special place in cultures around the world. Originating in South America, they were initially viewed with suspicion in Europe, but eventually, their deliciousness won everyone over. Today, tomatoes are a staple in countless cuisines, from Italian pasta sauces to refreshing summer salads. But why settle for ordinary when you can cultivate extraordinary?
This DIY guide is your secret weapon for achieving tomato-growing success, even if you have limited space or experience. We’ll explore simple yet effective tricks and hacks that will help you avoid common pitfalls, maximize your yield, and enjoy a bountiful harvest. Growing tomatoes at home doesn’t have to be complicated. I’m here to show you how to make it fun, easy, and incredibly satisfying. Get ready to roll up your sleeves and transform your garden (or even your balcony!) into a tomato paradise!
Tomatenanbau im eigenen Garten: Dein umfassender DIY-Leitfaden
Hallo liebe Gartenfreunde! Ich freue mich riesig, euch heute in die wunderbare Welt des Tomatenanbaus einzuführen. Es gibt kaum etwas Befriedigenderes, als eine saftige, sonnengereifte Tomate aus dem eigenen Garten zu ernten. Und glaubt mir, es ist einfacher, als ihr vielleicht denkt! Dieser Leitfaden ist vollgepackt mit Tipps und Tricks, die euch vom Samen bis zur Ernte begleiten. Lasst uns loslegen!
Die Grundlagen: Was Tomaten zum Wachsen brauchen
Bevor wir ins Detail gehen, ist es wichtig zu verstehen, was Tomaten wirklich brauchen, um zu gedeihen. Hier eine kurze Übersicht:
* Sonne: Tomaten lieben die Sonne! Mindestens 6-8 Stunden direkte Sonneneinstrahlung pro Tag sind ideal.
* Boden: Gut durchlässiger, nährstoffreicher Boden ist entscheidend. Tomaten sind Starkzehrer und brauchen ausreichend Nahrung.
* Wasser: Regelmäßige Bewässerung ist wichtig, besonders während der Fruchtbildung. Vermeidet aber Staunässe!
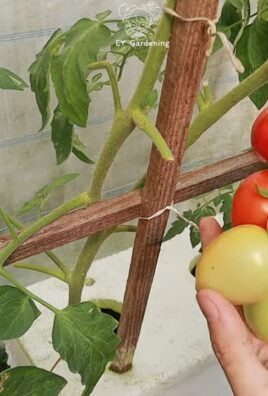
* Unterstützung: Tomatenpflanzen können ziemlich groß und schwer werden. Eine Rankhilfe oder ein Tomatenkäfig ist unerlässlich.
* Wärme: Tomaten sind wärmeliebend. Temperaturen unter 10°C können das Wachstum stark beeinträchtigen.
Phase 1: Die Anzucht (ca. 6-8 Wochen vor dem letzten Frost)
Die Anzucht ist der erste Schritt und gibt uns einen Vorsprung, bevor das Wetter warm genug für das Auspflanzen ist.
Benötigte Materialien:
* Tomatensamen (wählt eure Lieblingssorten!)
* Anzuchterde (spezielle Erde für Keimlinge ist ideal)
* Anzuchtgefäße (kleine Töpfe, Anzuchtschalen oder Eierkartons funktionieren gut)
* Sprühflasche
* Helle Fensterbank oder Pflanzenlampe
* Mini-Gewächshaus (optional, aber hilfreich)
Schritt-für-Schritt-Anleitung:
1. Vorbereitung der Anzuchtgefäße: Füllt eure Anzuchtgefäße mit Anzuchterde. Drückt die Erde leicht an, aber nicht zu fest.
2. Aussaat der Samen: Legt 1-2 Samen pro Gefäß auf die Erde. Bedeckt die Samen mit einer dünnen Schicht Erde (ca. 0,5 cm).
3. Bewässerung: Befeuchtet die Erde vorsichtig mit einer Sprühflasche. Die Erde sollte feucht, aber nicht nass sein.
4. Standort: Stellt die Anzuchtgefäße an einen hellen, warmen Ort. Eine Fensterbank mit viel Sonnenlicht ist ideal. Wenn ihr keine helle Fensterbank habt, könnt ihr eine Pflanzenlampe verwenden.
5. Mini-Gewächshaus (optional): Wenn ihr ein Mini-Gewächshaus habt, stellt die Anzuchtgefäße hinein. Das Gewächshaus sorgt für eine höhere Luftfeuchtigkeit und beschleunigt die Keimung.
6. Keimung: Die Keimung dauert in der Regel 7-14 Tage. Haltet die Erde während dieser Zeit feucht.
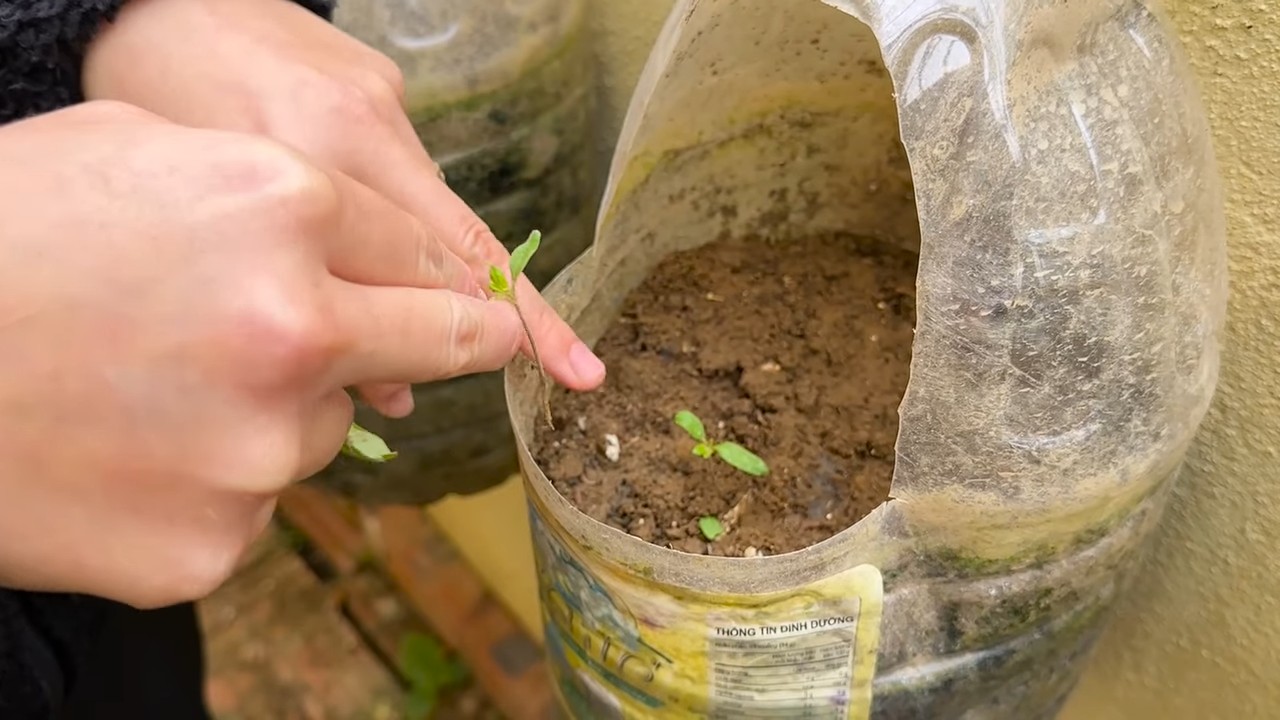
7. Pikieren: Sobald die Keimlinge ihre ersten richtigen Blätter (nach den Keimblättern) entwickelt haben, ist es Zeit zum Pikieren. Das bedeutet, dass ihr die Keimlinge in größere Töpfe umpflanzt.
* Füllt größere Töpfe (ca. 8-10 cm Durchmesser) mit Blumenerde.
* Lockert die Erde um die Keimlinge vorsichtig mit einem Pikierstab oder einem Löffel.
* Hebt die Keimlinge vorsichtig aus der Erde und pflanzt sie in die neuen Töpfe. Achtet darauf, die Wurzeln nicht zu beschädigen.
* Setzt die Keimlinge etwas tiefer in die Erde, als sie vorher standen. Das fördert die Wurzelbildung.
* Gießt die Keimlinge nach dem Pikieren vorsichtig an.
8. Weiterpflege: Stellt die pikierten Keimlinge wieder an einen hellen, warmen Ort. Gießt sie regelmäßig und düngt sie alle 2-3 Wochen mit einem Flüssigdünger für Tomaten.
Phase 2: Vorbereitung des Gartens und Auspflanzen
Nachdem eure Tomatenpflanzen kräftig genug sind, ist es Zeit, sie ins Freie zu pflanzen.
Benötigte Materialien:
* Tomatenpflanzen (mindestens 15-20 cm hoch)
* Gartenwerkzeug (Spaten, Schaufel, Gartenschere)
* Kompost oder anderer organischer Dünger
* Tomatenstäbe oder Tomatenkäfige
* Mulchmaterial (Stroh, Holzhackschnitzel)
Schritt-für-Schritt-Anleitung:
1. Vorbereitung des Bodens: Wählt einen sonnigen Standort für eure Tomaten. Lockert den Boden gründlich auf und entfernt Unkraut. Mischt Kompost oder anderen organischen Dünger unter die Erde, um sie mit Nährstoffen anzureichern.
2. Abhärten der Pflanzen: Bevor ihr die Tomatenpflanzen ins Freie pflanzt, solltet ihr sie abhärten. Das bedeutet, dass ihr sie für einige Tage stundenweise ins Freie stellt, um sie an die Sonne und den Wind zu gewöhnen.
3. Auspflanzen: Pflanzt die Tomatenpflanzen, sobald keine Frostgefahr mehr besteht (in der Regel Mitte Mai).
* Grabt Löcher, die etwas größer sind als die Wurzelballen der Pflanzen.
* Setzt die Pflanzen in die Löcher und füllt sie mit Erde auf. Achtet darauf, dass die Pflanzen nicht zu tief sitzen. Die untersten Blätter sollten knapp über der Erde sein.
* Gießt die Pflanzen nach dem Auspflanzen gründlich an.
4. Anbringen von Rankhilfen: Bringt sofort nach dem Auspflanzen Tomatenstäbe oder Tomatenkäfige an. Die Pflanzen werden schnell wachsen und brauchen Unterstützung.
5. Mulchen: Verteilt eine Schicht Mulchmaterial (Stroh, Holzhackschnitzel) um die Pflanzen. Das Mulchmaterial hält den Boden feucht, unterdrückt Unkraut und schützt die Pflanzen vor Spritzwasser.
Phase 3: Pflege während der Wachstumsperiode
Die richtige Pflege ist entscheidend für eine reiche Ernte.
Wichtige Pflegemaßnahmen:
* Bewässerung: Gießt die Tomatenpflanzen regelmäßig, besonders während der Fruchtbildung. Vermeidet Staunässe, da dies zu Pilzkrankheiten führen kann. Gießt am besten morgens, damit die Blätter tagsüber abtrocknen können.
* Düngung: Düngt die Tomatenpflanzen alle 2-3 Wochen mit einem Flüssigdünger für Tomaten. Achtet darauf, die Dosierungsempfehlungen des Herstellers zu beachten.
* Ausgeizen: Entfernt regelmäßig die Seitentriebe (Geiztriebe), die sich in den Blattachseln bilden. Das Ausgeizen fördert das Wachstum der Haupttriebe und sorgt für eine bessere Belüftung der Pflanzen.
* Anbinden: Bindet die Tomatenpflanzen regelmäßig an die Rankhilfen an. Das verhindert, dass die Triebe abbrechen.
* Krankheits- und Schädlingskontrolle: Achtet auf Anzeichen von Krankheiten oder Schädlingen. Bei Bedarf könnt ihr biologische Pflanzenschutzmittel einsetzen.
Phase 4: Die Ernte
Endlich ist es soweit! Die Früchte eurer Arbeit können geerntet werden.
Erntezeitpunkt:
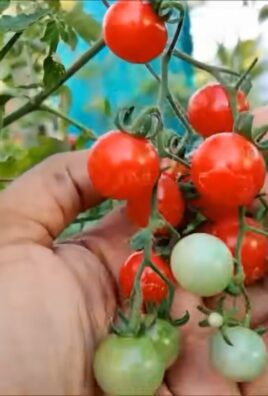
* Tomaten sind reif, wenn sie ihre typische Farbe (rot, gelb, orange, etc.) erreicht haben und leicht weich sind.
* Die Tomaten sollten sich leicht vom Stiel lösen lassen.
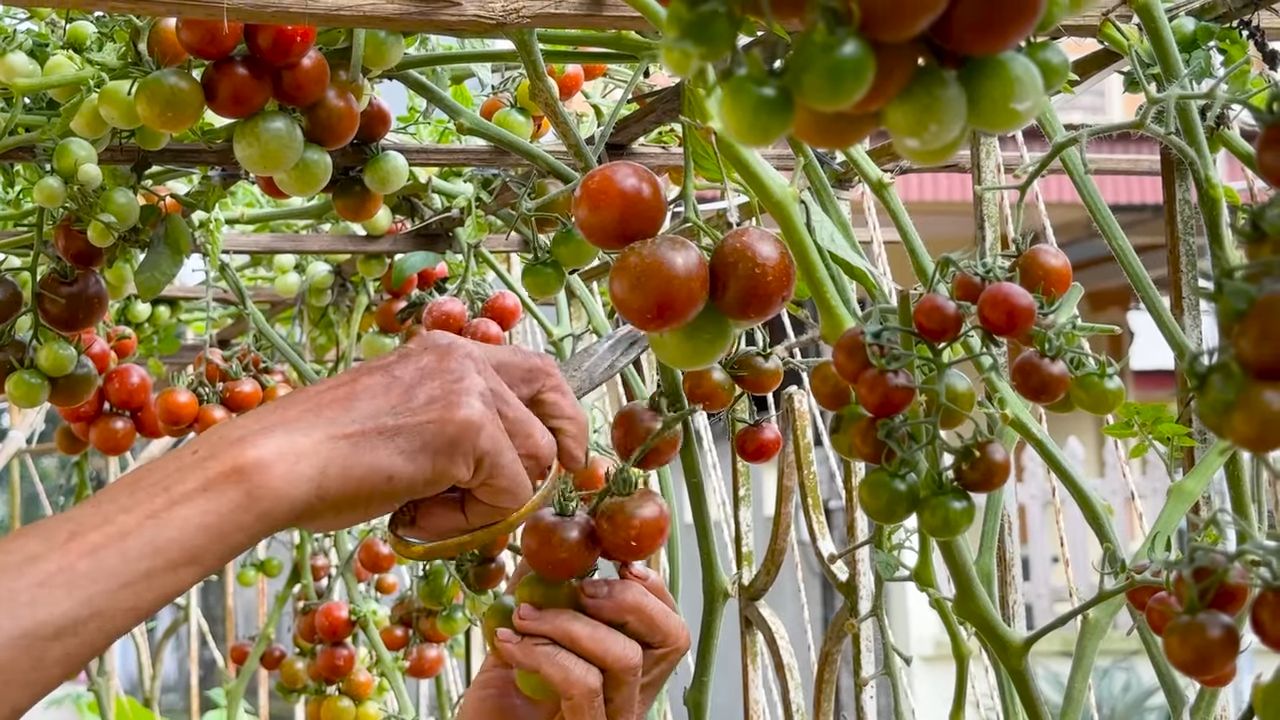
Erntetipps:
* Erntet die Tomaten am besten an einem sonnigen Tag.
* Verwendet eine Gartenschere, um die Tomaten vom Stiel zu schneiden.
* Lagert die Tomaten an einem kühlen, dunklen Ort.
Zusätzliche Tipps und Tricks für eine erfolgreiche Tomatenernte
* Sortenwahl: Wählt Tomatensorten, die für euer Klima und eure Platzverhältnisse geeignet sind. Es gibt eine riesige
Conclusion
So, there you have it! Growing tomatoes at home isn’t just a gardening trend; it’s a gateway to fresher, tastier, and more rewarding meals. We’ve explored a simple yet powerful DIY trick that can significantly boost your tomato yield and overall plant health. This method, focusing on [mention the specific DIY trick discussed in the main article, e.g., “deep planting” or “removing suckers”], is a game-changer for both novice and experienced gardeners alike.
Why is this a must-try? Because it addresses some of the most common challenges faced when growing tomatoes. It encourages stronger root development, leading to more resilient plants that can better withstand environmental stressors and nutrient deficiencies. Imagine biting into a juicy, sun-ripened tomato that you nurtured from a tiny seedling – the satisfaction is unparalleled!
But don’t stop there! Experiment with different tomato varieties to discover your favorites. Try heirloom tomatoes for their unique flavors and colors, or opt for cherry tomatoes for a prolific harvest of bite-sized treats. Consider companion planting – basil, marigolds, and carrots are excellent choices for deterring pests and improving soil health around your tomato plants. You can also explore different soil amendments like compost tea or bone meal to further enrich the soil and provide your tomatoes with the nutrients they need to thrive.
Ready to transform your garden and your plate? We wholeheartedly encourage you to give this DIY trick a try. It’s easy, affordable, and the results speak for themselves. Don’t be afraid to get your hands dirty and embrace the joys of growing your own food.
And most importantly, we want to hear about your experience! Share your photos, tips, and stories in the comments below. Let’s build a community of tomato-growing enthusiasts and learn from each other’s successes and challenges. Together, we can unlock the secrets to a bountiful tomato harvest and enjoy the delicious rewards of our labor. Happy gardening!
Frequently Asked Questions (FAQs)
Q: What if I don’t have a lot of space for growing tomatoes?
A: That’s perfectly fine! One of the great things about growing tomatoes is that they can be adapted to various spaces. If you have limited space, consider growing tomatoes in containers. Choose a large pot (at least 15-20 gallons) with good drainage. Dwarf or bush varieties of tomatoes are particularly well-suited for container gardening. You can also explore vertical gardening techniques, such as using tomato cages or trellises, to maximize space. Even a small balcony or patio can become a thriving tomato garden with a little creativity. Remember to provide adequate sunlight and water, and your container tomatoes will flourish.
Q: How often should I water my tomato plants?
A: Watering frequency depends on several factors, including the weather, soil type, and the size of your plants. As a general rule, water deeply and less frequently, rather than shallowly and often. Aim to keep the soil consistently moist but not waterlogged. Check the soil moisture by sticking your finger about an inch or two into the soil. If it feels dry, it’s time to water. During hot, dry weather, you may need to water daily, while during cooler, wetter periods, you can water less frequently. Using a soaker hose or drip irrigation can help deliver water directly to the roots, minimizing water waste and reducing the risk of fungal diseases.
Q: What are some common tomato pests and diseases, and how can I prevent them?
A: Tomatoes are susceptible to a variety of pests and diseases, but with proactive measures, you can minimize their impact. Common pests include aphids, tomato hornworms, and whiteflies. Regularly inspect your plants for signs of infestation and take action promptly. You can use insecticidal soap, neem oil, or hand-pick pests off the plants. Common diseases include early blight, late blight, and blossom end rot. To prevent these diseases, ensure good air circulation around your plants, avoid overhead watering, and use disease-resistant tomato varieties. Mulching around the base of the plants can also help prevent soil-borne diseases. For blossom end rot, ensure consistent watering and add calcium to the soil if needed.
Q: When is the best time to harvest my tomatoes?
A: The best time to harvest tomatoes is when they are fully colored, slightly soft to the touch, and easily detach from the vine. The exact color will depend on the variety of tomato you are growing. Gently squeeze the tomato; it should give slightly but not be mushy. If the tomato is difficult to pull off the vine, it’s not quite ripe yet. Harvest tomatoes in the morning when they are at their coolest. Ripe tomatoes can be stored at room temperature for a few days or in the refrigerator for longer storage.
Q: Can I grow tomatoes indoors?
A: Yes, you can grow tomatoes indoors, but it requires some extra effort. Tomatoes need at least 6-8 hours of direct sunlight per day, so you’ll likely need to supplement with grow lights. Choose a sunny window or use full-spectrum grow lights to provide adequate light. Select dwarf or bush varieties that are well-suited for indoor growing. Use a large pot with good drainage and a high-quality potting mix. Water regularly and fertilize with a tomato-specific fertilizer. You may also need to hand-pollinate the flowers to ensure fruit set. While indoor tomato growing can be challenging, it’s definitely possible with the right conditions and care.
Q: What kind of fertilizer should I use for my tomato plants?
A: Tomato plants are heavy feeders and require a balanced fertilizer to thrive. Look for a fertilizer that is specifically formulated for tomatoes, or one that has a higher phosphorus (P) and potassium (K) content than nitrogen (N). A fertilizer with an N-P-K ratio of 5-10-5 or 5-10-10 is a good choice. Apply fertilizer according to the package instructions, typically every 2-3 weeks during the growing season. You can also supplement with organic fertilizers like compost tea or fish emulsion. Avoid over-fertilizing, as this can lead to excessive foliage growth and reduced fruit production.
Q: How do I deal with blossom end rot on my tomatoes?
A: Blossom end rot is a common problem in tomatoes, characterized by a dark, leathery spot on the bottom of the fruit. It’s caused by a calcium deficiency, which can be due to inconsistent watering, poor soil drainage, or a lack of calcium in the soil. To prevent blossom end rot, ensure consistent watering, especially during hot, dry weather. Improve soil drainage by adding organic matter to the soil. You can also add calcium to the soil by incorporating bone meal or crushed eggshells. If you already have tomatoes with blossom end rot, remove them from the plant to encourage the development of healthy fruit.
Q: What are some good companion plants for tomatoes?
A: Companion planting can be a great way to improve the health and productivity of your tomato plants. Some good companion plants for tomatoes include basil, marigolds, carrots, onions, garlic, and nasturtiums. Basil repels tomato hornworms and other pests, while marigolds deter nematodes and other soil pests. Carrots improve soil aeration, and onions and garlic repel aphids and other insects. Nasturtiums attract beneficial insects that prey on tomato pests. Avoid planting tomatoes near brassicas (such as cabbage and broccoli) or fennel, as these can inhibit tomato growth.
Leave a Comment