

Growing corn on concrete might sound like an impossible feat, a horticultural oxymoron! But what if I told you that with a little ingenuity and some DIY magic, you could actually harvest sweet, juicy corn even without a traditional garden plot? Forget sprawling acres; we’re talking about bringing the farm to your patio, balcony, or even your driveway!
For centuries, corn has been a staple crop, deeply woven into the fabric of countless cultures. From the ancient civilizations of Mesoamerica, where it was revered as a sacred gift, to its modern-day role as a global food source, corn’s journey is a testament to its resilience and adaptability. But traditionally, growing corn required vast fields and fertile soil. What if you don’t have access to that?
That’s where this DIY guide comes in. Many of us dream of fresh, homegrown produce but are limited by space or soil conditions. Maybe you live in an apartment with only a concrete balcony, or perhaps your backyard is more rock than loam. Whatever the reason, this article will empower you to overcome those obstacles and experience the joy of harvesting your own corn. We’ll explore clever container gardening techniques, soil amendments, and even some surprising hacks that will have you growing corn on concrete – or at least, as if you were! Get ready to unleash your inner urban farmer and transform that barren concrete into a thriving mini-cornfield!
Mais Anbauen auf Beton: Ein DIY-Projekt für den Urbanen Gärtner
Hey Leute! Habt ihr auch genug von dem tristen Grau in eurem Hinterhof oder auf eurem Balkon? Wollt ihr ein bisschen Grün und vielleicht sogar etwas Essbares in eure urbane Umgebung bringen, aber habt nur Beton zur Verfügung? Keine Sorge, ich zeige euch, wie ihr Mais direkt auf Beton anbauen könnt! Ja, ihr habt richtig gehört! Es ist zwar nicht die traditionellste Methode, aber mit ein bisschen Kreativität und den richtigen Schritten, könnt ihr euren eigenen kleinen Maisacker mitten in der Stadt erschaffen.
Was ihr braucht:
* Große Pflanzgefäße: Wählt robuste Behälter, die mindestens 60 cm tief und breit sind. Mais braucht Platz für seine Wurzeln. Denkt an große Kübel, Mörtelwannen oder sogar recycelte Fässer.
* Hochwertige Pflanzerde: Das A und O! Verwendet eine gut durchlässige, nährstoffreiche Erde. Ich empfehle eine Mischung aus Gartenerde, Kompost und Kokosfaser.
* Drainagematerial: Kies, Blähton oder Tonscherben, um Staunässe zu vermeiden.
* Mais-Saatgut: Wählt eine Sorte, die für den Anbau in Behältern geeignet ist. Zwergmais oder frühe Sorten sind ideal.
* Dünger: Ein Langzeitdünger oder regelmäßige Flüssigdüngergaben sind wichtig, um den Mais mit ausreichend Nährstoffen zu versorgen.
* Gießkanne oder Gartenschlauch: Für die regelmäßige Bewässerung.
* Mulchmaterial: Stroh, Holzhackschnitzel oder Rindenmulch, um die Feuchtigkeit im Boden zu halten und Unkraut zu unterdrücken.
* Pflanzstäbe oder Bambusstäbe: Um die Maispflanzen bei Bedarf zu stützen.
* Geduld und Liebe: Das Wichtigste überhaupt!
Vorbereitung der Pflanzgefäße:
1. Reinigung: Beginnt damit, eure Pflanzgefäße gründlich zu reinigen. Entfernt jeglichen Schmutz, Staub oder alte Pflanzenreste.
2. Drainage: Legt eine Schicht Drainagematerial (Kies, Blähton oder Tonscherben) auf den Boden der Gefäße. Diese Schicht sorgt dafür, dass überschüssiges Wasser abfließen kann und verhindert Staunässe, die für Mais schädlich ist. Eine Schicht von etwa 5-10 cm ist ideal.
3. Erde einfüllen: Füllt die Pflanzgefäße mit eurer vorbereiteten Pflanzerde. Lasst etwa 5-10 cm Platz bis zum Rand des Gefäßes. Die Erde sollte locker und luftig sein. Drückt sie nicht zu fest an.
4. Bewässerung: Gießt die Erde vor dem Pflanzen gründlich an. So setzt sich die Erde und die Samen haben einen guten Start.
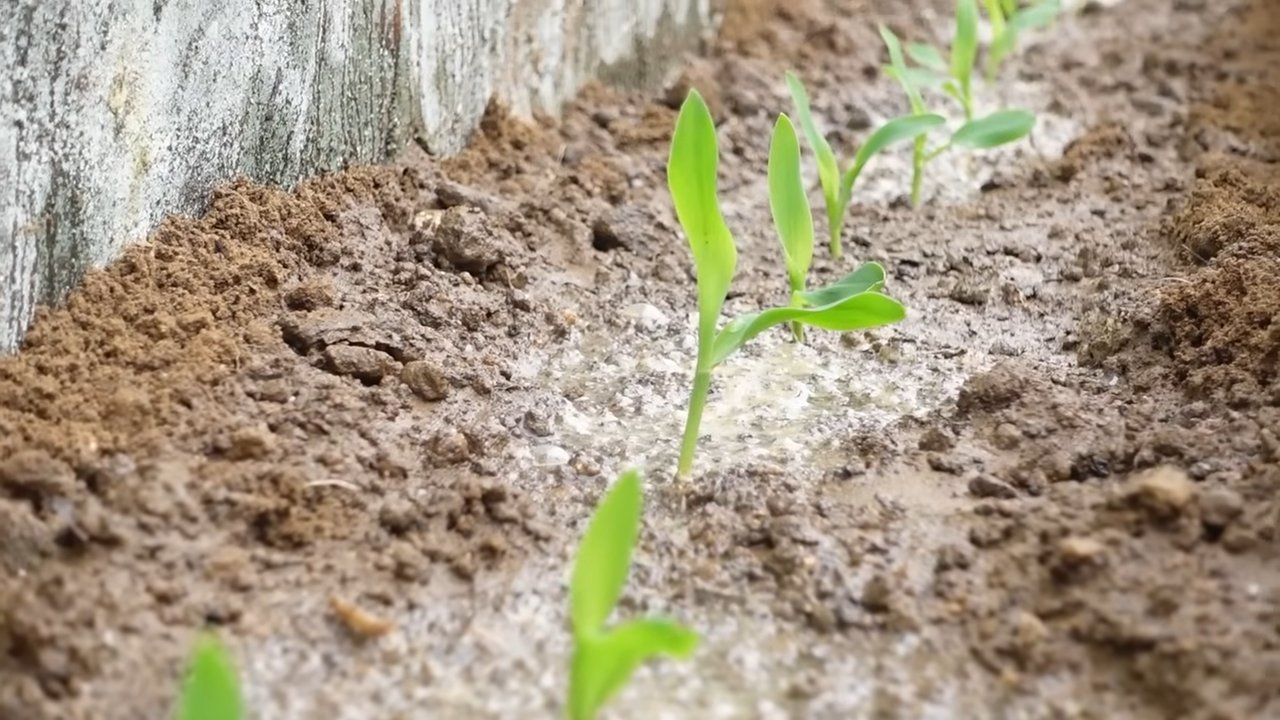
Aussaat des Mais:
1. Saatgut vorbereiten: Legt die Maiskörner vor der Aussaat für etwa 24 Stunden in lauwarmes Wasser. Das beschleunigt die Keimung.
2. Aussaat: Macht mit dem Finger oder einem kleinen Werkzeug kleine Löcher in die Erde (etwa 2-3 cm tief). Der Abstand zwischen den Löchern sollte etwa 15-20 cm betragen. Pflanzt in jedes Loch 2-3 Maiskörner. Das erhöht die Wahrscheinlichkeit, dass mindestens ein Korn keimt.
3. Abdecken: Bedeckt die Löcher mit Erde und drückt sie leicht an.
4. Bewässerung: Gießt die Erde vorsichtig an, ohne die Samen auszuspülen.
5. Standort: Stellt die Pflanzgefäße an einen sonnigen Standort. Mais braucht mindestens 6-8 Stunden Sonne pro Tag.
Pflege des Mais:
1. Bewässerung: Achtet darauf, dass die Erde immer feucht, aber nicht nass ist. Gießt regelmäßig, besonders an heißen Tagen. Vermeidet es, die Blätter zu benetzen, um Pilzkrankheiten vorzubeugen.
2. Düngung: Düngt den Mais regelmäßig mit einem Langzeitdünger oder Flüssigdünger. Beginnt etwa 2-3 Wochen nach der Keimung. Mais ist ein Starkzehrer und benötigt viele Nährstoffe, besonders Stickstoff, Phosphor und Kalium.
3. Ausdünnen: Wenn mehrere Samen in einem Loch gekeimt sind, entfernt die schwächsten Pflanzen, sobald sie einige Zentimeter groß sind. Lasst nur die stärkste Pflanze pro Loch stehen.
4. Stützen: Wenn die Maispflanzen größer werden, können sie bei Wind umknicken. Stützt sie mit Pflanzstäben oder Bambusstäben. Bindet die Pflanzen locker an die Stäbe.
5. Mulchen: Bringt eine Schicht Mulchmaterial (Stroh, Holzhackschnitzel oder Rindenmulch) um die Maispflanzen herum auf. Das hält die Feuchtigkeit im Boden, unterdrückt Unkraut und schützt die Wurzeln vor extremen Temperaturen.
6. Schutz vor Schädlingen: Achtet auf Schädlinge wie Blattläuse oder Maiszünsler. Bei Bedarf könnt ihr biologische Schädlingsbekämpfungsmittel einsetzen.
Bestäubung:
Mais ist windbestäubt. Das bedeutet, dass der Pollen von den männlichen Blüten (Fahnen) auf die weiblichen Blüten (Seidenfäden) gelangen muss, um die Körner zu befruchten.
1. Hilfe bei der Bestäubung: Wenn ihr nur wenige Maispflanzen habt, könnt ihr die Bestäubung unterstützen, indem ihr die Fahnen vorsichtig schüttelt oder den Pollen mit einem Pinsel auf die Seidenfäden übertragt.
2. Mehrere Pflanzen: Um eine gute Bestäubung zu gewährleisten, solltet ihr mindestens 4-5 Maispflanzen zusammen anbauen.
Ernte:
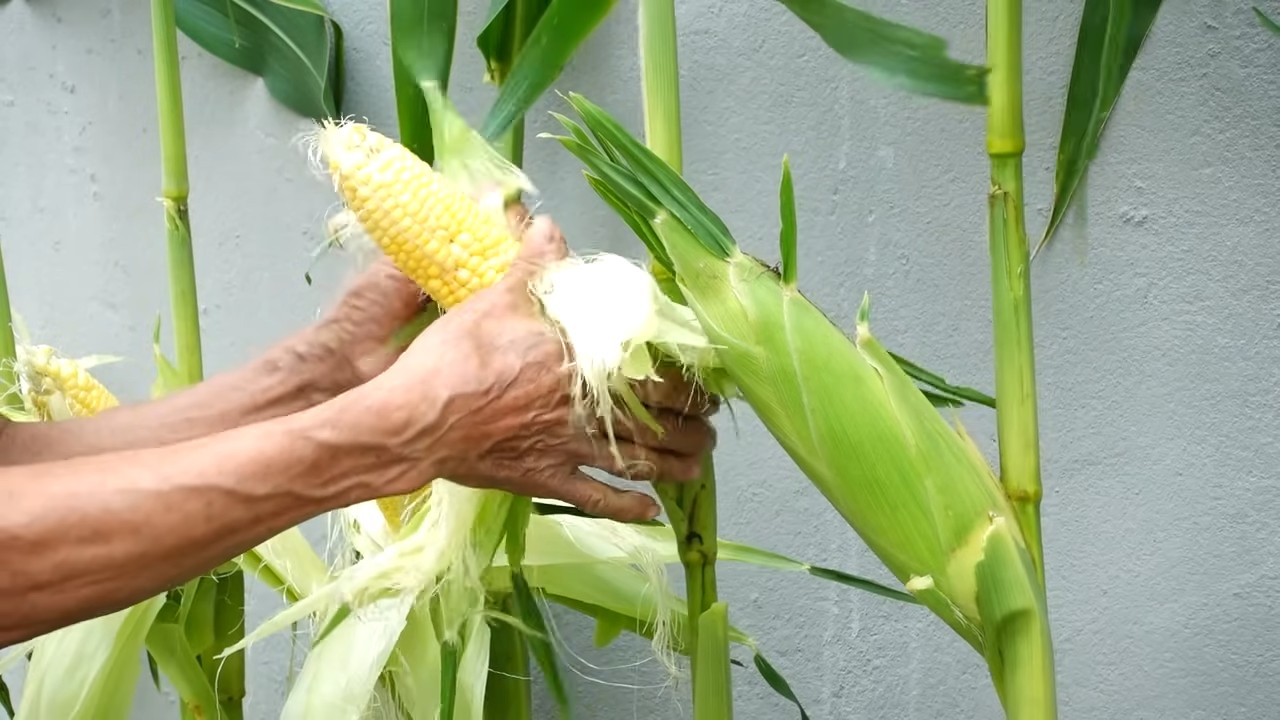
1. Reifezeichen: Die Maiskolben sind reif, wenn die Seidenfäden braun und trocken sind und die Kolben sich fest anfühlen.
2. Ernte: Brecht die Maiskolben vorsichtig von den Pflanzen ab.
3. Verarbeitung: Ihr könnt den Mais sofort essen, grillen, kochen oder einfrieren.
Zusätzliche Tipps:
* Sortenwahl: Wählt eine Maissorte, die für den Anbau in Behältern geeignet ist. Zwergmais oder frühe Sorten sind ideal. Informiert euch im Fachhandel oder online über die verschiedenen Sorten.
* Fruchtfolge: Baut Mais nicht jedes Jahr im selben Pflanzgefäß an. Wechselt die Pflanzen, um den Boden nicht einseitig auszulaugen.
* Winterharte Gefäße: Wenn ihr die Pflanzgefäße im Winter draußen stehen lassen wollt, achtet darauf, dass sie frostfest sind.
* Kreativität: Seid kreativ bei der Gestaltung eures urbanen Maisackers! Ihr könnt die Pflanzgefäße bemalen, mit anderen Pflanzen kombinieren oder eine kleine Vogelscheuche aufstellen.
Herausforderungen und Lösungen:
* Platzmangel: Wenn ihr wenig Platz habt, könnt ihr Zwergmaissorten anbauen oder die Pflanzen enger zusammenstellen.
* Wenig Sonne: Wählt einen Standort, der so sonnig wie möglich ist. Wenn das nicht möglich ist, könnt ihr Pflanzenlampen verwenden.
* Schädlinge: Kontrolliert die Pflanzen regelmäßig auf Schädlinge und bekämpft sie bei Bedarf mit biologischen Mitteln.
* Staunässe: Achtet auf eine gute Drainage und vermeidet es, die Pflanzen zu überwässern.
Warum Maisanbau auf Beton?
Klar, es ist vielleicht nicht die einfachste Art, Mais anzubauen, aber es ist eine tolle Möglichkeit, um:
* Unbenutzten Raum zu nutzen: Verwandelt euren tristen Beton in einen grünen Garten.
* Eigene Lebensmittel anzubauen: Genießt frischen, selbst angebauten Mais.
* Die Umwelt zu schonen: Reduziert den Transportweg von Lebensmitteln.
* Etwas Neues zu lernen: Gärtnern ist eine tolle Möglichkeit, um sich mit der Natur zu verbinden und etwas Neues zu lernen.
* Spaß zu haben: Es macht einfach Spaß, zu sehen, wie die kleinen Maispflanzen wachsen und gedeihen!
Conclusion
So, there you have it! Growing corn on concrete might sound like an impossible feat, a horticultural oxymoron, but with this simple DIY trick, you can absolutely cultivate your own delicious, homegrown corn, even without access to a traditional garden. We’ve shown you how to transform a seemingly barren space into a thriving mini-farm, bringing the taste of summer right to your doorstep (or balcony!).
This method isn’t just about defying expectations; it’s about embracing resourcefulness and sustainability. By utilizing containers and a carefully crafted soil mix, you’re minimizing water waste, controlling soil quality, and maximizing yield in a limited space. Plus, imagine the satisfaction of harvesting your own sweet corn, knowing you nurtured it from seed to table, all on a concrete surface!
But the beauty of this DIY project lies in its adaptability. Feel free to experiment with different corn varieties. While we’ve focused on sweeter, shorter-season types ideal for container growing, you might want to try a colorful ornamental corn for a striking visual display. Consider adding companion plants like beans or squash to your containers to create a miniature “Three Sisters” garden, improving soil health and attracting beneficial insects.
Don’t be afraid to adjust the soil mix to suit your specific climate and corn variety. If you live in a particularly hot and dry area, adding more moisture-retentive materials like vermiculite or coconut coir can be beneficial. Conversely, in cooler, wetter climates, ensure adequate drainage by incorporating more perlite or coarse sand.
This DIY corn growing method is a game-changer for urban gardeners and anyone with limited space. It’s a testament to the power of ingenuity and a reminder that fresh, homegrown food is within reach, no matter where you live.
We wholeheartedly encourage you to give this DIY trick a try. It’s a rewarding experience that connects you with nature, provides fresh produce, and adds a touch of green to even the most urban environments.
Once you’ve harvested your first batch of concrete-grown corn, we’d love to hear about your experience! Share your photos, tips, and variations in the comments below. Let’s build a community of concrete corn growers and inspire others to embrace the joy of urban farming. What worked well for you? What challenges did you face? Your insights will help others succeed and further refine this innovative growing method. Happy growing!
Frequently Asked Questions (FAQ)
1. What type of corn is best suited for growing on concrete in containers?
The best corn varieties for container growing on concrete are shorter-season, dwarf, or compact varieties. These types mature quickly and don’t require as much space as traditional field corn. Look for varieties specifically labeled as “container-friendly” or “patio corn.” Some popular choices include ‘On Deck’, ‘Golden Bantam’, and ‘Trinity’. These varieties typically reach a height of 4-5 feet, making them manageable in containers. Avoid taller, late-maturing varieties, as they may not have enough time to fully develop in a container environment, and their size can make them unstable on a concrete surface, especially in windy conditions. Remember to check the seed packet for specific recommendations regarding spacing and growing conditions for each variety.
2. What size container do I need for growing corn on concrete?
A minimum of 10-15 gallons per plant is recommended. Corn plants have extensive root systems and require ample space to develop properly. A larger container will also help retain moisture and prevent the soil from drying out too quickly, especially on a hot concrete surface. Choose containers that are at least 12-18 inches in diameter and depth. Ensure the containers have adequate drainage holes to prevent waterlogging, which can lead to root rot. You can use plastic, terracotta, or even repurposed containers, as long as they meet the size and drainage requirements. Consider the weight of the filled containers, especially if you’re placing them on a balcony or rooftop.
3. What kind of soil mix should I use for growing corn on concrete?
A well-draining and nutrient-rich soil mix is crucial for successful corn cultivation in containers. Avoid using garden soil, as it tends to compact and doesn’t provide adequate drainage. A good mix consists of equal parts of the following:
* **Potting soil:** Provides a base for the mix and retains moisture.
* **Compost:** Adds essential nutrients and improves soil structure.
* **Perlite or Vermiculite:** Enhances drainage and aeration.
You can also add a slow-release fertilizer to the mix to provide a steady supply of nutrients throughout the growing season. Consider adding a small amount of bone meal to provide phosphorus, which is essential for root development. The ideal pH for corn is between 6.0 and 6.8. Test your soil mix and adjust accordingly if necessary.
4. How often should I water corn grown on concrete?
Corn grown in containers on concrete requires frequent watering, especially during hot and dry weather. The concrete surface can radiate heat, causing the soil to dry out quickly. Check the soil moisture daily by sticking your finger about an inch into the soil. If it feels dry, it’s time to water. Water deeply until water drains out of the drainage holes. Avoid overhead watering, as it can lead to fungal diseases. Instead, water at the base of the plants. Mulching around the base of the plants with straw or wood chips can help retain moisture and regulate soil temperature.
5. How much sunlight does corn need when grown on concrete?
Corn requires at least 6-8 hours of direct sunlight per day to thrive. Choose a location on your concrete surface that receives ample sunlight throughout the day. If you live in a particularly hot climate, providing some afternoon shade can help prevent the plants from overheating. Monitor the plants for signs of sunscald, such as bleached or burned leaves. If necessary, provide temporary shade during the hottest part of the day.
6. How do I pollinate corn grown on concrete?
Corn is wind-pollinated, so if you’re growing multiple plants close together, natural pollination should occur. However, if you’re growing only a few plants or if the weather is calm, you may need to hand-pollinate. To hand-pollinate, gently shake the tassels (the male flowers at the top of the plant) to release pollen. Then, brush the pollen onto the silks (the female flowers that emerge from the developing ears of corn). Repeat this process every day for several days to ensure adequate pollination. You’ll know pollination is successful when the silks turn brown and dry.
7. How do I know when my corn is ready to harvest when growing on concrete?
The time to harvest corn depends on the variety and growing conditions. Generally, corn is ready to harvest about 20-25 days after the silks appear. A good indicator is when the silks turn brown and dry. You can also check the kernels by peeling back the husk and piercing a kernel with your fingernail. If the liquid is milky, the corn is ready to harvest. If the liquid is clear, it’s not quite ready. If the liquid is doughy, it’s overripe. To harvest, grasp the ear firmly and twist it downward.
8. Can I grow other vegetables with corn in the same container on concrete?
Yes, companion planting can be beneficial for corn grown in containers. The “Three Sisters” method, which involves growing corn, beans, and squash together, is a classic example. The corn provides a trellis for the beans, the beans fix nitrogen in the soil, and the squash provides ground cover to suppress weeds and retain moisture. Other good companion plants for corn include sunflowers, marigolds, and herbs like basil and oregano. Avoid planting corn near tomatoes or brassicas (cabbage, broccoli, cauliflower), as they can compete for nutrients.
9. What are some common pests and diseases that affect corn grown on concrete, and how can I prevent them?
Common pests that can affect corn include corn earworms, aphids, and spider mites. Diseases include corn smut and fungal leaf spots. To prevent pests and diseases, practice good sanitation by removing any dead or diseased leaves. Inspect your plants regularly for signs of infestation or disease. Use organic pest control methods, such as insecticidal soap or neem oil, to control pests. Ensure good air circulation to prevent fungal diseases. Avoid overwatering, as this can create a favorable environment for fungal growth.
10. Can I reuse the soil from my corn containers on concrete for other plants?
Yes, you can reuse the soil, but it’s important to amend it before planting other crops. Corn is a heavy feeder, so the soil may be depleted of nutrients. Add compost, aged manure, or a slow-release fertilizer to replenish the nutrients. You may also want to test the soil pH and adjust it accordingly. If you suspect the soil may be contaminated with pests or diseases, sterilize it by baking it in the oven or solarizing it in the sun.

Leave a Comment