

DIY kale plastic bottles – sounds a little crazy, right? But trust me, it’s a game-changer for anyone wanting fresh, homegrown kale without a ton of space or a hefty gardening budget! I’m so excited to share this simple yet incredibly effective method with you. For centuries, humans have sought innovative ways to cultivate food, from ancient terraced farming to modern hydroponics. This DIY project taps into that same spirit of ingenuity, adapting readily available materials to nurture delicious, nutritious greens.
Why kale, and why plastic bottles? Well, kale is a nutritional powerhouse, packed with vitamins and antioxidants. But let’s be honest, buying it at the store can get expensive, and sometimes it’s not as fresh as you’d like. That’s where this hack comes in! This DIY kale plastic bottles method is perfect for apartment dwellers, balcony gardeners, or anyone looking to reduce waste and grow their own food sustainably. Plus, it’s a fantastic way to teach kids about gardening and recycling. Imagine the satisfaction of harvesting your own vibrant, leafy greens, knowing you grew them yourself with a little bit of creativity and resourcefulness. Let’s dive in and get our hands dirty (figuratively speaking, of course – the bottles keep things pretty clean!).
DIY: Grünkohl Anbau in Plastikflaschen – Dein Mini-Garten für Zuhause
Hey Gartenfreunde! Habt ihr auch genug von teurem Grünkohl aus dem Supermarkt? Oder vielleicht einfach keinen Platz für ein riesiges Gemüsebeet? Keine Sorge, ich zeige euch, wie ihr mit einfachen Plastikflaschen euren eigenen kleinen Grünkohl-Garten zaubern könnt. Das ist nicht nur super nachhaltig, sondern macht auch richtig Spaß! Los geht’s!
Was du brauchst:
* Plastikflaschen: Am besten eignen sich große PET-Flaschen (z.B. von Wasser oder Saft). Je größer, desto besser, aber auch kleinere Flaschen funktionieren.
* Grünkohl-Samen: Die gibt’s im Gartencenter oder online. Achtet auf eine Sorte, die euch schmeckt!
* Anzuchterde: Spezielle Erde für die Anzucht von Pflanzen. Sie ist nährstoffarm und locker, ideal für die Keimung.
* Blumenerde: Wenn die Pflänzchen größer sind, brauchen sie mehr Nährstoffe.
* Schere oder Messer: Zum Schneiden der Plastikflaschen.
* Bohrer oder Nagel: Für die Drainage-Löcher.
* Gießkanne oder Sprühflasche: Zum Bewässern.
* Optional: Kleine Steine oder Kies für die Drainage.
* Optional: Etiketten und Stift zum Beschriften der Flaschen.
Die Vorbereitung: Die Basis für deinen Grünkohl-Garten
Bevor wir mit dem Pflanzen loslegen, müssen wir die Plastikflaschen vorbereiten. Das ist ganz einfach, versprochen!
1. Flaschen reinigen: Spüle die Plastikflaschen gründlich mit warmem Wasser und Spülmittel aus. Entferne alle Etiketten und Klebereste. Das ist wichtig, damit keine Schadstoffe in die Erde gelangen.
2. Flaschen zuschneiden: Hier gibt es verschiedene Möglichkeiten, je nachdem, wie du deinen Mini-Garten gestalten möchtest:
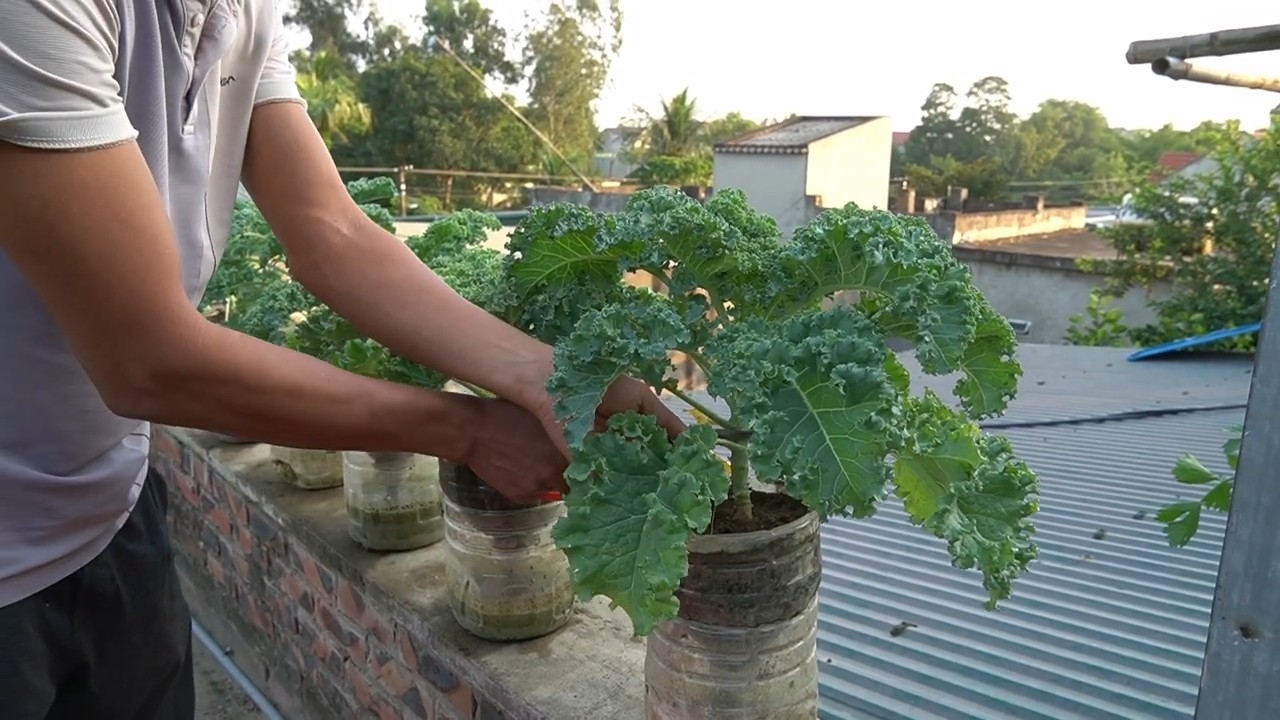
* Variante 1: Hängende Gärten: Schneide die Flasche horizontal in der Mitte durch. Den oberen Teil (mit dem Flaschenhals) kannst du später umgedreht in den unteren Teil stecken. So entsteht ein kleiner Topf mit Selbstbewässerungseffekt.
* Variante 2: Stehende Töpfe: Schneide die Flasche einfach oben ab, so dass ein offener Topf entsteht.
* Variante 3: Lange Pflanzkästen: Schneide die Flasche längs auf, so dass eine Art Rinne entsteht. Diese Variante eignet sich gut, wenn du mehrere Pflanzen nebeneinander setzen möchtest.
Wichtig: Achte darauf, dass die Schnittkanten nicht scharf sind. Du kannst sie eventuell mit Schleifpapier etwas glätten.
3. Drainage-Löcher bohren: Bohre oder steche mit einem Nagel mehrere kleine Löcher in den Boden der Flaschen. Das ist super wichtig, damit überschüssiges Wasser ablaufen kann und die Wurzeln nicht faulen. Wenn du die hängende Variante gewählt hast, bohre auch Löcher in den Deckel des Flaschenhalses.
4. Optional: Drainage-Schicht einfüllen: Fülle eine dünne Schicht kleine Steine oder Kies in den Boden der Flaschen. Das verbessert die Drainage zusätzlich.
Die Aussaat: Der Grünkohl kommt in die Erde
Jetzt kommt der spannende Teil: Wir säen die Grünkohl-Samen aus!
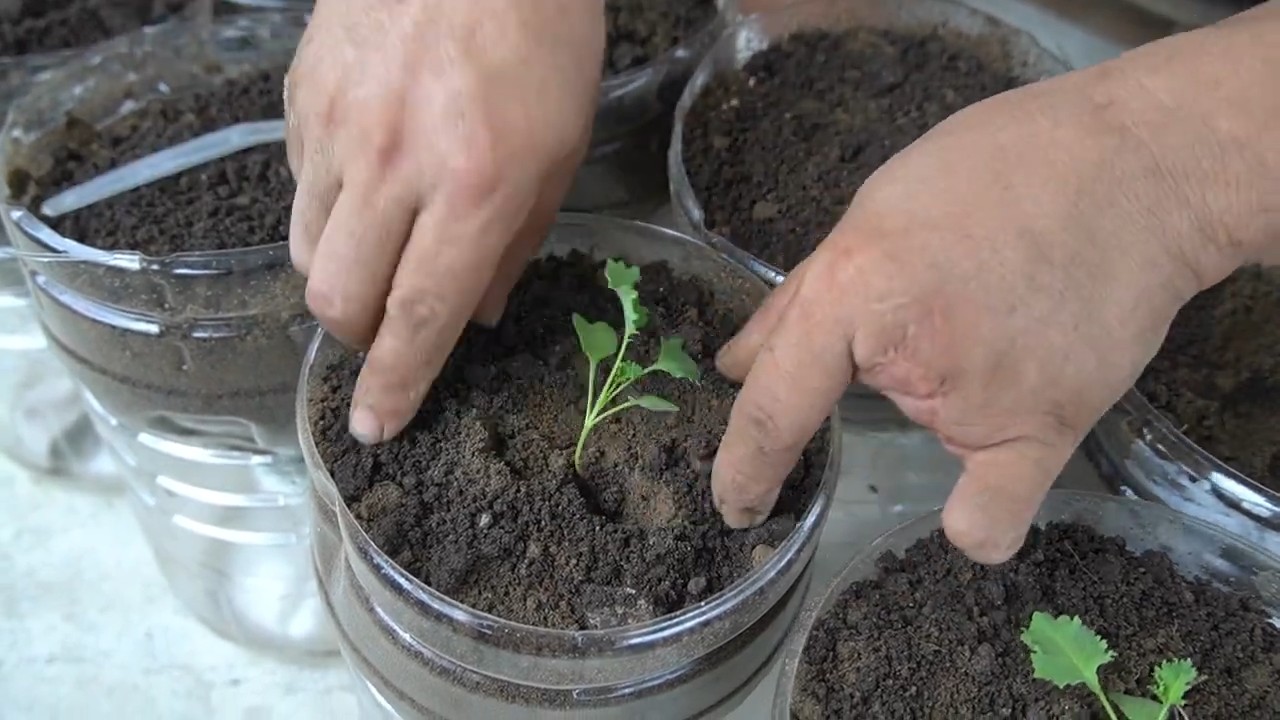
1. Anzuchterde einfüllen: Fülle die vorbereiteten Flaschen mit Anzuchterde. Lass oben etwa 2-3 cm Platz.
2. Samen aussäen: Verteile die Grünkohl-Samen gleichmäßig auf der Erde. Drücke sie leicht an.
3. Mit Erde bedecken: Bedecke die Samen mit einer dünnen Schicht Anzuchterde (ca. 0,5 cm).
4. Bewässern: Befeuchte die Erde vorsichtig mit einer Gießkanne oder Sprühflasche. Die Erde sollte feucht, aber nicht nass sein.
5. Standort wählen: Stelle die bepflanzten Flaschen an einen hellen und warmen Ort. Ideal ist ein Fensterbrett oder ein Gewächshaus.
6. Feuchtigkeit halten: Halte die Erde in den nächsten Tagen feucht. Am besten sprühst du sie regelmäßig mit Wasser ein.
Die Pflege: Damit dein Grünkohl prächtig gedeiht
Nach ein paar Tagen sollten die ersten kleinen Grünkohl-Pflänzchen sprießen. Jetzt ist es wichtig, sie gut zu pflegen, damit sie groß und stark werden.
1. Pikieren: Wenn die Pflänzchen etwa 5-7 cm groß sind und mehrere Blätter haben, ist es Zeit zum Pikieren. Das bedeutet, dass du sie in größere Töpfe umpflanzt.
* Fülle die größeren Töpfe (oder die vorbereiteten Plastikflaschen) mit Blumenerde.
* Hebe die kleinen Pflänzchen vorsichtig mit einem Pikierstab oder einem Löffel aus der Anzuchterde.
* Setze die Pflänzchen einzeln in die neuen Töpfe. Achte darauf, dass die Wurzeln nicht beschädigt werden.
* Fülle die Töpfe mit Erde auf und drücke sie leicht an.
* Gieße die Pflänzchen vorsichtig an.
2. Düngen: Grünkohl ist ein Starkzehrer und braucht viele Nährstoffe. Dünge die Pflanzen regelmäßig mit einem organischen Dünger. Am besten eignet sich Kompost oder ein spezieller Gemüsedünger.
3. Bewässern: Gieße die Pflanzen regelmäßig, aber vermeide Staunässe. Die Erde sollte immer leicht feucht sein.
4. Standort: Grünkohl braucht viel Sonne. Stelle die Pflanzen an einen sonnigen Standort.
5. Schädlinge: Achte auf Schädlinge wie Blattläuse oder Kohlweißlinge. Bei Befall kannst du die Pflanzen mit einem natürlichen Insektizid behandeln.
Die Ernte: Dein selbstgezogener Grünkohl ist fertig!
Nach einigen Wochen kannst du endlich deinen selbstgezogenen Grünkohl ernten!
1. Erntezeitpunkt: Grünkohl ist erntereif, wenn die Blätter groß genug sind. Du kannst die äußeren Blätter nach Bedarf ernten. Die Pflanze wächst dann weiter und bildet neue Blätter.
2. Erntemethode: Schneide die Blätter mit einem scharfen Messer oder einer Schere ab. Achte darauf, dass du die Herzblätter in der Mitte der Pflanze nicht beschädigst.
3. Verwendung: Grünkohl ist super vielseitig! Du kannst ihn kochen, dünsten, braten oder roh in Salaten verwenden. Er ist reich an Vitaminen und Mineralstoffen und schmeckt einfach lecker!
Zusätzliche Tipps und Tricks:
* Sortenwahl: Es gibt viele verschiedene Grünkohl-Sorten. Informiere dich, welche Sorte am besten zu deinen Bedürfnissen passt. Es gibt z.B. Sorten mit krausen oder glatten Blättern, mit unterschiedlichen Farben und Geschmacksrichtungen.
* Überwinterung: Grünkohl ist winterhart und kann auch im Winter im Freien bleiben. Er verträgt sogar Frost. Durch den Frost wird der Grünkohl sogar noch süßer.
* Schnecken: Schnecken lieben Grünkohl! Schütze deine Pflanzen vor Schnecken, indem du Schneckenkorn streust oder Schneckenzäune aufstellst.
* Beschriftung: Beschrifte die Flaschen mit dem Namen der Grünkohl-Sorte und dem Aussaatdatum. So behältst du den Überblick.
* Upcycling: Verwende auch andere Plastikbehälter wie Joghurtbecher oder Eisdosen für die Anzucht.
* Kreativität: Sei kreativ bei der Gestaltung deines Mini-Gartens! Du kannst die Flaschen bemalen, mit Mustern versehen oder mit anderen Materialien dekorieren.
Ich hoffe, diese Anleitung hat dir geholfen, deinen eigenen Grünkohl-Garten in Plastikflaschen anzulegen. Viel Spaß beim Gärtnern und guten Appetit! Lass mich wissen, wie es läuft!
Conclusion
So, there you have it! Transforming discarded plastic bottles into thriving kale gardens is not just a quirky DIY project; it’s a sustainable solution that empowers you to grow your own nutritious greens, regardless of space constraints or gardening experience. This method of **DIY kale** cultivation offers a multitude of benefits, from reducing plastic waste and minimizing your carbon footprint to providing you with fresh, organic produce right at your fingertips.
Think about it: no more trips to the grocery store for wilted, overpriced kale. No more wondering about the pesticides and chemicals used in commercial farming. With this simple, ingenious technique, you’re in complete control of your kale’s journey from seed to plate. You’re actively participating in a circular economy, giving new life to materials that would otherwise end up in landfills.
But the advantages extend beyond environmental responsibility and cost savings. Growing your own kale is incredibly rewarding. Witnessing the tiny seeds sprout and flourish into vibrant, leafy greens is a truly magical experience. It connects you to the natural world and fosters a deeper appreciation for the food you consume. Plus, the satisfaction of harvesting your own homegrown kale and incorporating it into delicious meals is unparalleled.
This DIY kale project is also incredibly versatile. Feel free to experiment with different varieties of kale, from the classic curly kale to the more tender and flavorful Tuscan kale (also known as Lacinato or dinosaur kale). You can also adapt the size and shape of your plastic bottle planters to suit your specific needs and preferences. For instance, larger bottles can accommodate more kale plants, while smaller bottles are perfect for growing kale seedlings or herbs alongside your kale.
Consider adding companion plants like marigolds or basil to your kale planters. These plants not only enhance the aesthetic appeal of your garden but also help to deter pests and attract beneficial insects. You can also experiment with different soil mixtures to optimize the growth of your kale. A well-draining soil that is rich in organic matter is ideal.
Don’t be afraid to get creative with your DIY kale garden. Paint your plastic bottle planters with vibrant colors, decorate them with recycled materials, or even create a vertical garden by hanging them on a wall or fence. The possibilities are endless!
We wholeheartedly encourage you to give this DIY kale trick a try. It’s a fun, easy, and rewarding project that will transform your relationship with food and the environment. Once you’ve experienced the joy of harvesting your own homegrown kale, you’ll never look at plastic bottles the same way again.
And most importantly, we want to hear about your experiences! Share your photos, tips, and stories with us in the comments section below. Let’s inspire each other to create a more sustainable and delicious world, one plastic bottle and one kale plant at a time. What challenges did you face? What successes did you celebrate? What innovative variations did you come up with? Your feedback is invaluable and will help us refine and improve this DIY kale guide for future gardeners. So, grab your plastic bottles, your kale seeds, and your gardening gloves, and let’s get growing!
Frequently Asked Questions (FAQ)
What type of plastic bottles are best for growing kale?
Ideally, you should use food-grade plastic bottles, such as those that have contained water, juice, or soda. Look for the recycling symbol with a number inside, typically 1 (PET or PETE) or 2 (HDPE). These plastics are generally considered safe for growing food. Avoid using bottles that have contained harsh chemicals or cleaning products, as these may contaminate your kale. Thoroughly wash and rinse the bottles before using them.
How do I prepare the plastic bottles for planting?
First, clean the bottles thoroughly with soap and water to remove any residue. Then, depending on the size of the bottle and the number of kale plants you want to grow, cut the bottle in half horizontally or create drainage holes in the bottom. If you’re cutting the bottle in half, you can invert the top half into the bottom half to create a self-watering system. Make sure to leave enough space for the kale roots to grow.
What kind of soil should I use for growing kale in plastic bottles?
Kale thrives in well-draining soil that is rich in organic matter. A good potting mix specifically designed for vegetables is ideal. You can also create your own soil mix by combining equal parts of compost, peat moss (or coconut coir), and perlite or vermiculite. This will provide your kale with the nutrients it needs to grow strong and healthy.
How often should I water my kale plants in plastic bottles?
The frequency of watering will depend on the climate, the size of the bottle, and the type of soil you’re using. Generally, you should water your kale plants whenever the top inch of soil feels dry to the touch. Avoid overwatering, as this can lead to root rot. Ensure that the drainage holes in the bottom of the bottle are functioning properly to prevent water from accumulating.
Where should I place my DIY kale garden?
Kale needs at least 6 hours of sunlight per day to thrive. Choose a location that receives plenty of sunlight, such as a sunny windowsill, balcony, or patio. If you live in a hot climate, provide some afternoon shade to prevent the kale from wilting. You can also use grow lights if you don’t have access to enough natural sunlight.
How do I fertilize my kale plants in plastic bottles?
Kale is a heavy feeder and benefits from regular fertilization. You can use a liquid fertilizer specifically designed for vegetables, following the instructions on the label. Alternatively, you can add compost tea or worm castings to the soil every few weeks to provide your kale with a slow-release source of nutrients.
What are some common pests and diseases that affect kale, and how can I prevent them?
Common pests that affect kale include aphids, cabbage worms, and flea beetles. You can prevent these pests by inspecting your plants regularly and removing any pests you find by hand. You can also use insecticidal soap or neem oil to control infestations. Common diseases that affect kale include powdery mildew and black rot. You can prevent these diseases by ensuring good air circulation around your plants and avoiding overwatering.
Can I grow kale indoors in plastic bottles?
Yes, you can grow kale indoors in plastic bottles, but you’ll need to provide it with adequate light. Place your kale plants near a sunny window or use grow lights to supplement the natural light. You’ll also need to ensure that the temperature is consistent and that the humidity is not too high.
How long does it take for kale to grow in plastic bottles?
Kale typically takes about 50-75 days to mature, depending on the variety and growing conditions. You can start harvesting the outer leaves of your kale plants once they reach a size of about 6-8 inches. Continue harvesting the outer leaves as needed, and the plant will continue to produce new leaves.
What are some creative ways to use my homegrown kale?
The possibilities are endless! You can add kale to smoothies, salads, soups, stews, and stir-fries. You can also bake kale chips, sauté kale with garlic and olive oil, or use kale as a topping for pizza or pasta. Get creative and experiment with different recipes to find your favorite ways to enjoy your homegrown kale.
What if my kale starts to bolt (go to seed)?
Bolting occurs when kale is exposed to prolonged periods of hot weather. The leaves become bitter and the plant focuses on producing seeds. To prevent bolting, try to provide some shade during the hottest part of the day. If your kale does bolt, you can still harvest the leaves, but they may not taste as good. You can also collect the seeds for planting next season.
Leave a Comment