

Hanging garden celery growing might sound like something out of a fairytale, but trust me, it’s a totally achievable and incredibly rewarding DIY project! Forget those bland, store-bought stalks – imagine snipping fresh, crisp celery right from your own hanging garden, adding a burst of flavor to your salads, soups, and snacks.
Humans have been cultivating celery for centuries, with its roots tracing back to ancient Mediterranean civilizations where it was initially valued for its medicinal properties. While we’ve come a long way from using it solely as a remedy, the joy of growing your own food remains a timeless tradition. But why stick to the conventional garden bed when you can elevate your gardening game – literally?
In today’s world, space is often a premium, and many of us are looking for creative ways to bring nature into our homes, even without a sprawling backyard. That’s where the magic of hanging gardens comes in! This DIY project is perfect for apartment dwellers, balcony gardeners, or anyone looking to add a unique and visually stunning element to their living space. Plus, growing your own celery allows you to control the growing environment, ensuring you have access to fresh, organic produce free from harmful pesticides. I’m excited to share some simple yet effective tricks and hacks that will transform your space and bring the joy of hanging garden celery growing to your life!
DIY Hängegarten-Sellerie: Dein eigener, frischer Vorrat!
Hey Gartenfreunde! Habt ihr Lust auf frischen Sellerie, aber wenig Platz? Dann ist dieser DIY Hängegarten-Sellerie genau das Richtige für euch! Ich zeige euch, wie ihr mit einfachen Mitteln und ein bisschen Geduld euren eigenen Sellerie anbauen könnt – und das platzsparend in der Luft!
Was du brauchst:
* Einen Selleriekopf (mit Wurzelansatz, am besten aus dem Supermarkt)
* Ein scharfes Messer
* Ein Glas oder eine Schale (etwas größer als der Selleriekopf)
* Wasser
* Eine Sprühflasche
* Erde (am besten Anzuchterde)
* Einen Topf oder Behälter (mit Abzugslöchern)
* Eine Schere oder ein Messer
* Stabile Schnur oder Draht
* Einen Haken oder eine Aufhängungsmöglichkeit
* Optional: Flüssigdünger für Gemüse
Sellerie-Regeneration: Der Start in dein Hängegarten-Abenteuer
Bevor wir mit dem eigentlichen Hängegarten loslegen, müssen wir den Sellerie zum Leben erwecken. Keine Sorge, das ist einfacher als es klingt!
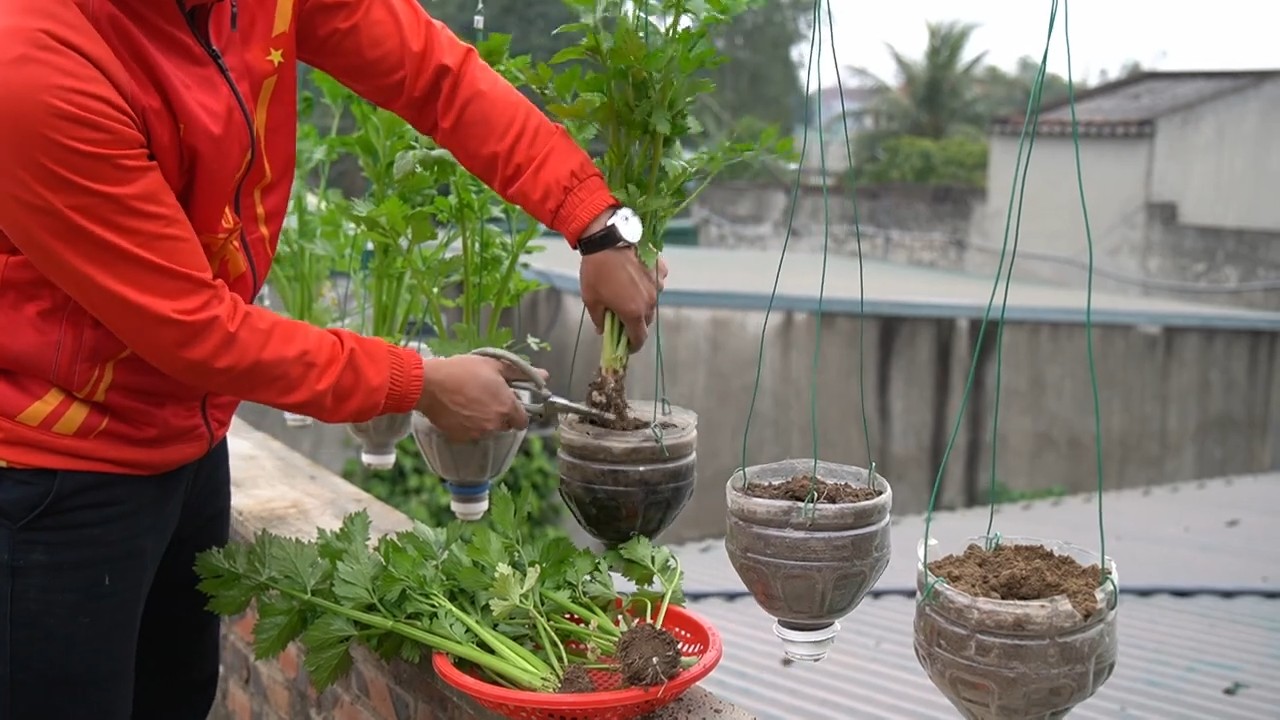
1. Selleriekopf vorbereiten: Nimm deinen Selleriekopf und schneide ihn etwa 5-7 cm oberhalb des Wurzelansatzes ab. Du brauchst nur den unteren Teil mit den Wurzeln. Den oberen Teil kannst du natürlich für Suppen oder andere Gerichte verwenden – Zero Waste ist angesagt!
2. Ins Wasser stellen: Stelle den abgeschnittenen Sellerie-Wurzelansatz in ein Glas oder eine Schale mit Wasser. Achte darauf, dass der untere Teil gut bedeckt ist, aber die Schnittfläche nicht im Wasser liegt, sonst fault er.
3. Der richtige Standort: Stelle das Glas an einen hellen, aber nicht direkt sonnigen Ort. Ein Fensterbrett ist ideal.
4. Wasser wechseln: Wechsle das Wasser alle 1-2 Tage, damit es frisch bleibt und sich keine Bakterien bilden.
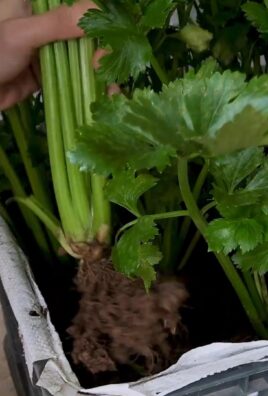
5. Geduld haben: Nach ein paar Tagen (ca. 3-7) solltest du sehen, wie neue Wurzeln wachsen und kleine grüne Triebe aus dem Selleriekopf sprießen. Das ist ein gutes Zeichen!
Die Vorbereitung des Hängegefäßes
Jetzt, wo dein Sellerie wieder zum Leben erwacht, kümmern wir uns um das Zuhause, in dem er in der Luft schweben wird.
1. Wahl des Gefäßes: Suche dir einen Topf oder Behälter aus, der groß genug für den Sellerie ist. Er sollte mindestens 15-20 cm Durchmesser haben, damit die Wurzeln genügend Platz haben. Wichtig: Der Topf muss Abzugslöcher haben, damit überschüssiges Wasser ablaufen kann und Staunässe vermieden wird.
2. Löcher für die Aufhängung bohren: Bohre (oder schneide, je nach Material des Topfes) drei bis vier Löcher gleichmäßig verteilt am oberen Rand des Topfes. Diese Löcher dienen zur Befestigung der Aufhängung. Achte darauf, dass die Löcher stabil genug sind, um das Gewicht des Topfes mit Erde und Pflanze zu tragen.
3. Aufhängung vorbereiten: Schneide drei oder vier gleich lange Stücke Schnur oder Draht zu. Die Länge hängt davon ab, wie tief du den Hängegarten haben möchtest. Bedenke, dass du noch etwas Spielraum zum Knoten brauchst.
4. Schnüre befestigen: Fädle die Schnüre durch die Löcher und verknote sie fest. Achte darauf, dass die Knoten gut halten und nicht verrutschen.
5. Zusammenbinden: Binde die oberen Enden der Schnüre zusammen, sodass eine Schlaufe entsteht. An dieser Schlaufe wird der Hängegarten später aufgehängt.
Der Umzug in den Hängegarten
Jetzt kommt der spannende Teil: Wir pflanzen den Sellerie in seinen neuen Hängegarten!
1. Topf befüllen: Fülle den Topf mit Anzuchterde. Lasse etwa 2-3 cm Platz bis zum Rand.
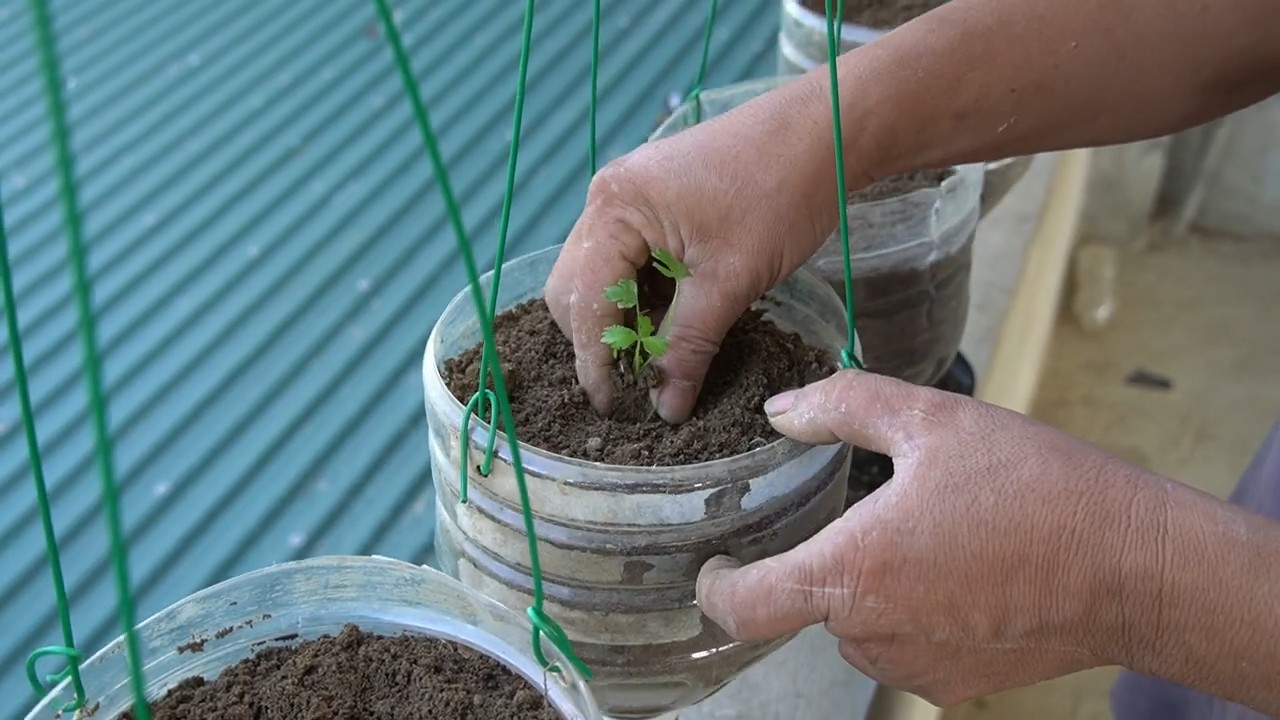
2. Sellerie einpflanzen: Grabe ein kleines Loch in die Mitte der Erde. Nimm den Sellerie vorsichtig aus dem Wasser und setze ihn in das Loch. Achte darauf, dass die Wurzeln gut bedeckt sind.
3. Andrücken: Drücke die Erde um den Sellerie herum leicht an.
4. Angießen: Gieße den Sellerie vorsichtig an, sodass die Erde gut durchfeuchtet ist. Vermeide Staunässe.
5. Aufhängen: Hänge den Hängegarten an einem Haken oder einer anderen geeigneten Aufhängung auf. Achte darauf, dass der Standort hell ist, aber nicht in der prallen Sonne liegt.
Pflege deines Hängegarten-Selleries
Damit dein Sellerie im Hängegarten prächtig gedeiht, braucht er regelmäßige Pflege.
* Gießen: Gieße den Sellerie regelmäßig, aber vermeide Staunässe. Die Erde sollte immer leicht feucht sein. An heißen Tagen kann es nötig sein, täglich zu gießen.
* Düngen: Dünge den Sellerie alle 2-3 Wochen mit einem Flüssigdünger für Gemüse. Beachte dabei die Dosierungsanleitung auf der Verpackung.
* Besprühen: Besprühe die Blätter des Selleries regelmäßig mit Wasser. Das erhöht die Luftfeuchtigkeit und beugt Schädlingen vor.
* Schädlinge kontrollieren: Achte auf Schädlinge wie Blattläuse oder Schnecken. Bei Befall kannst du natürliche Schädlingsbekämpfungsmittel einsetzen.
* Ernten: Du kannst die äußeren Selleriestangen ernten, sobald sie groß genug sind. Schneide sie einfach mit einem scharfen Messer ab. Der Sellerie wird weiterwachsen und neue Stangen bilden.
Zusätzliche Tipps für deinen Hängegarten-Sellerie
* Der richtige Standort: Sellerie mag es hell, aber nicht zu heiß. Ein halbschattiger Standort ist ideal. Vermeide pralle Mittagssonne.
* Regelmäßiges Drehen: Drehe den Hängegarten regelmäßig, damit der Sellerie von allen Seiten gleichmäßig Licht bekommt.
* Überwinterung: Sellerie ist nicht winterhart. Wenn du ihn überwintern möchtest, solltest du ihn ins Haus holen und an einen kühlen, hellen Ort stellen.
* Aussaat: Du kannst auch Sellerie aus Samen ziehen. Das ist etwas aufwendiger, aber es lohnt sich!
* Kreativität: Sei kreativ bei der Gestaltung deines Hängegartens! Du kannst verschiedene Töpfe und Behälter verwenden und sie mit bunten Farben bemalen.
Ich hoffe, diese Anleitung hilft dir dabei, deinen eigenen Hängegarten-Sellerie anzulegen. Es ist ein tolles Projekt, das nicht nur Spaß macht, sondern dir auch frischen Sellerie direkt vor die Haustür bringt. Viel Erfolg und happy gardening!
Conclusion
So, there you have it! Transforming humble celery scraps into a thriving, space-saving hanging garden is not just a fun project; it’s a testament to the power of resourcefulness and a fantastic way to enjoy fresh produce right at your fingertips. This DIY trick offers a multitude of benefits, from reducing food waste and saving money to adding a touch of green elegance to your home.
Why is this a must-try? Because it’s incredibly simple, surprisingly effective, and deeply satisfying. Imagine the joy of snipping off fresh celery stalks for your salads, soups, or smoothies, knowing that you cultivated them yourself from what would have otherwise been discarded. It’s a small act with a big impact, both on your wallet and on the environment.
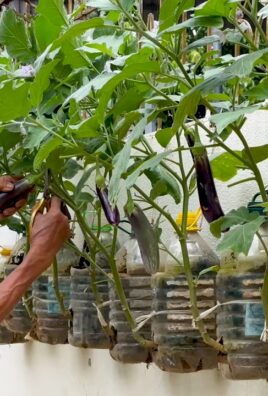
But the beauty of this project lies in its adaptability. Feel free to experiment with different containers. While we’ve focused on hanging planters, you could easily adapt this method to window boxes, vertical gardens, or even repurposed plastic bottles. Consider adding companion plants like herbs such as parsley or chives to your hanging garden for a more diverse and flavorful harvest. You can also try different varieties of celery to see which ones thrive best in your specific environment. Perhaps a vibrant red celery or a more delicate Pascal celery would be a delightful addition.
Don’t be afraid to get creative with your setup. Add decorative elements to your hanging planters, such as colorful ribbons, painted designs, or even small, weather-resistant figurines. Make it a reflection of your personal style and a conversation starter for guests.
We wholeheartedly encourage you to embark on this rewarding journey of creating your own hanging garden celery. It’s a project that’s perfect for beginners and seasoned gardeners alike. The process is straightforward, the materials are readily available, and the results are undeniably impressive.
Once you’ve given it a try, we’d love to hear about your experience! Share your photos, tips, and challenges in the comments section below. Let’s build a community of resourceful gardeners who are passionate about sustainable living and delicious, homegrown produce. Your insights could inspire others to take the plunge and discover the joys of growing their own celery from scraps.
Remember, gardening is a journey of learning and experimentation. Don’t be discouraged if your first attempt isn’t perfect. Every setback is an opportunity to learn and improve. With a little patience and care, you’ll be enjoying fresh, homegrown celery in no time. So, grab your celery scraps, gather your supplies, and get ready to transform your space into a vibrant, edible oasis. Happy gardening!
Frequently Asked Questions (FAQ)
1. How long does it take for celery to regrow from scraps?
The time it takes for celery to regrow from scraps can vary depending on several factors, including the variety of celery, the growing conditions (temperature, sunlight, water), and the overall health of the original celery stalk. Generally, you can expect to see new growth within 1-2 weeks. Small leaves will start to emerge from the center of the base. Within 3-4 weeks, you should have a noticeable amount of new growth that can be transplanted into a larger container or your hanging garden. Keep in mind that this is an estimated timeframe, and some celery scraps may take longer to sprout. Patience is key!
2. What kind of soil is best for growing celery in a hanging garden?
Celery thrives in rich, well-draining soil that retains moisture. A good potting mix specifically formulated for vegetables is ideal. You can also create your own soil mix by combining equal parts of compost, peat moss (or coconut coir), and perlite or vermiculite. Compost provides essential nutrients, peat moss or coconut coir helps retain moisture, and perlite or vermiculite improves drainage. Ensure the soil is loose and airy to allow for proper root development. Avoid using heavy clay soil, as it can become waterlogged and hinder growth.
3. How much sunlight does celery need in a hanging garden?
Celery requires at least 6 hours of direct sunlight per day to thrive. Choose a location for your hanging garden that receives ample sunlight throughout the day. If you don’t have a spot that gets full sun, you can supplement with grow lights. Insufficient sunlight can result in leggy growth and reduced yields. Observe your celery plants regularly and adjust their position as needed to ensure they are receiving adequate sunlight.
4. How often should I water my hanging garden celery?
Celery needs consistent moisture to grow well. Water your hanging garden celery regularly, especially during hot and dry weather. The soil should be kept consistently moist but not waterlogged. Check the soil moisture by sticking your finger about an inch deep into the soil. If it feels dry, it’s time to water. Water deeply, allowing the water to drain out of the bottom of the container. Avoid overhead watering, as it can increase the risk of fungal diseases. Consider using a self-watering planter or adding water-retaining crystals to the soil to help maintain consistent moisture levels.
5. How do I fertilize my hanging garden celery?
Celery is a heavy feeder and benefits from regular fertilization. Start fertilizing your celery plants about 2-3 weeks after transplanting them into your hanging garden. Use a balanced liquid fertilizer diluted to half strength. Apply the fertilizer every 2-3 weeks during the growing season. You can also amend the soil with compost or aged manure to provide a slow-release source of nutrients. Avoid over-fertilizing, as it can lead to excessive foliage growth and reduced stalk development.
6. What are some common pests and diseases that affect celery, and how can I prevent them?
Celery can be susceptible to several pests and diseases, including aphids, celery leaf miners, and fungal diseases like early blight and late blight. To prevent pest and disease problems, practice good garden hygiene. Remove any dead or diseased leaves promptly. Ensure good air circulation around your plants. Inspect your plants regularly for signs of pests or diseases. If you spot any problems, take action immediately. For aphids, you can try spraying your plants with a strong stream of water or using insecticidal soap. For celery leaf miners, you can cover your plants with row covers to prevent the adult flies from laying eggs. For fungal diseases, avoid overhead watering and apply a fungicide if necessary.
7. Can I grow celery indoors in a hanging garden?
Yes, you can grow celery indoors in a hanging garden, but you’ll need to provide adequate light. Place your hanging garden near a sunny window that receives at least 6 hours of direct sunlight per day. If you don’t have enough natural light, you can supplement with grow lights. Indoor celery may not grow as large as outdoor celery, but you can still harvest the stalks for use in cooking.
8. How do I harvest celery from my hanging garden?
You can harvest celery stalks from your hanging garden as needed. Simply cut the outer stalks near the base of the plant with a sharp knife. Leave the inner stalks to continue growing. You can also harvest the entire plant at once if desired. Celery is best harvested when the stalks are crisp and firm.
9. Can I regrow celery multiple times from the same base?
Yes, you can typically regrow celery multiple times from the same base. After harvesting the stalks, leave the base in the soil and continue to water and fertilize it. New growth will emerge from the center of the base. However, the subsequent harvests may be smaller than the initial harvest. Eventually, the base will lose its vigor and stop producing new growth.
10. What are some creative ways to use my homegrown celery?
Besides the usual salads and soups, homegrown celery can be used in a variety of creative ways. Try juicing it for a refreshing and healthy beverage. Add it to stir-fries for a crunchy texture and subtle flavor. Use it as a crudité for dipping in hummus or other dips. Pickle it for a tangy and flavorful snack. Or, dehydrate it and grind it into a powder to use as a seasoning. The possibilities are endless!
Leave a Comment