

Dragon Fruit Propagation Cuttings: Ever dreamed of having your own exotic dragon fruit vine cascading over your garden fence, bursting with vibrant pink fruit? I know I have! And guess what? It’s totally achievable, even if you don’t have a green thumb the size of Texas. Forget spending a fortune at the grocery store – with a little know-how, you can cultivate your own dragon fruit paradise right in your backyard.
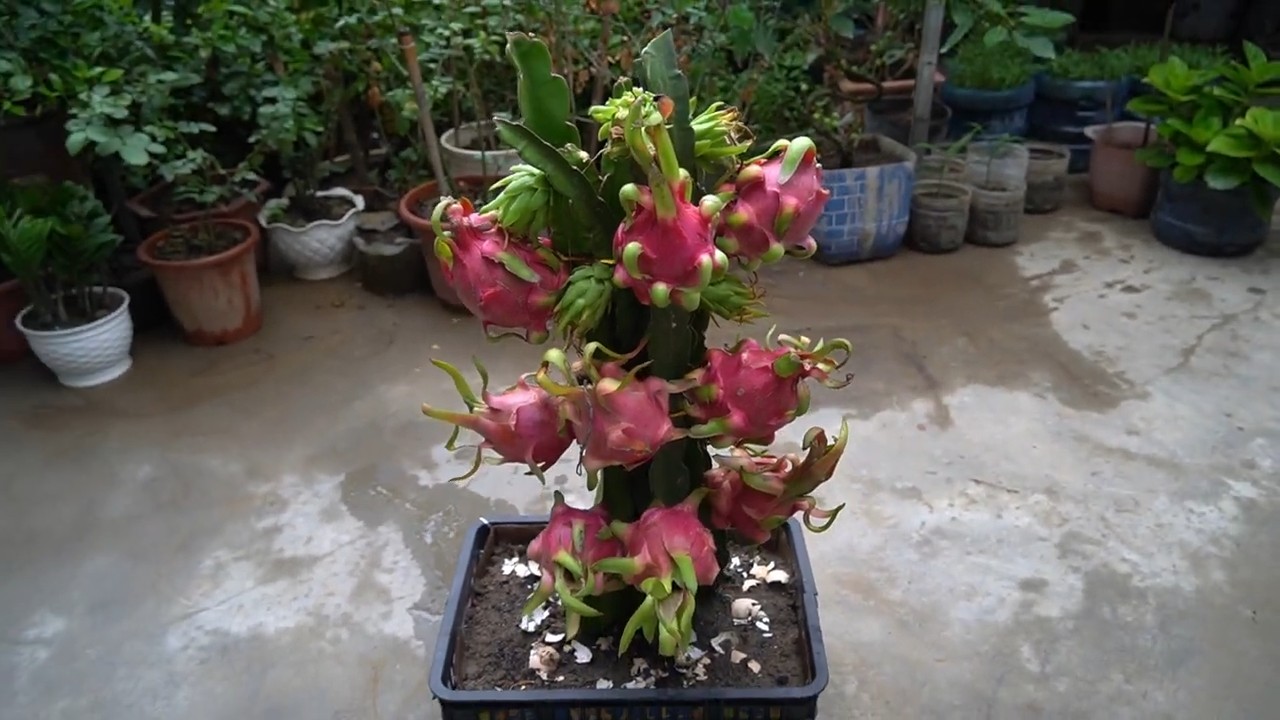
Dragon fruit, also known as pitaya, has a rich history rooted in Central and South America, where it was a staple food for centuries. Its cultivation has since spread across the globe, prized not only for its delicious flavor but also for its stunning visual appeal. Imagine the bragging rights when you tell your friends you grew this beauty yourself!
But why dragon fruit propagation cuttings, you ask? Well, it’s the easiest and most cost-effective way to get started. Seeds can be finicky and take ages to mature, but cuttings? They’re ready to root and grow with just a little TLC. Plus, it’s incredibly rewarding to watch a simple cutting transform into a thriving plant. This DIY guide will walk you through every step, from selecting the perfect cutting to nurturing it into a fruit-bearing beauty. So, grab your gardening gloves, and let’s get started on your dragon fruit adventure!
Drachenfrucht-Vermehrung: So ziehst du deine eigenen Pflanzen aus Stecklingen
Hey Pflanzenfreunde! Habt ihr euch jemals gefragt, wie man diese exotische, leuchtend pinke Drachenfrucht vermehren kann? Ich zeige euch heute, wie ihr das ganz einfach selbst zu Hause machen könnt, und zwar mit Stecklingen. Es ist wirklich nicht schwer und macht super viel Spaß!
Was du brauchst:
* Drachenfrucht-Stecklinge: Am besten von einer gesunden, etablierten Pflanze. Sie sollten mindestens 20-30 cm lang sein.
* Scharfes Messer oder Gartenschere: Unbedingt sauber und desinfiziert, um Krankheiten zu vermeiden.
* Bewurzelungshormon (optional): Hilft, die Wurzelbildung zu beschleunigen.
* Töpfe: Am besten mit guter Drainage.
* Kakteenerde oder gut durchlässige Blumenerde: Drachenfrüchte mögen keine Staunässe.
* Wasser: Zum Befeuchten der Erde.
* Geduld: Die Wurzelbildung kann etwas dauern.
* Handschuhe: Zum Schutz deiner Hände vor Dornen.
Die Vorbereitung der Stecklinge
Bevor wir mit dem Einpflanzen loslegen, müssen wir die Stecklinge vorbereiten. Das ist ein wichtiger Schritt, um sicherzustellen, dass sie gut anwachsen.
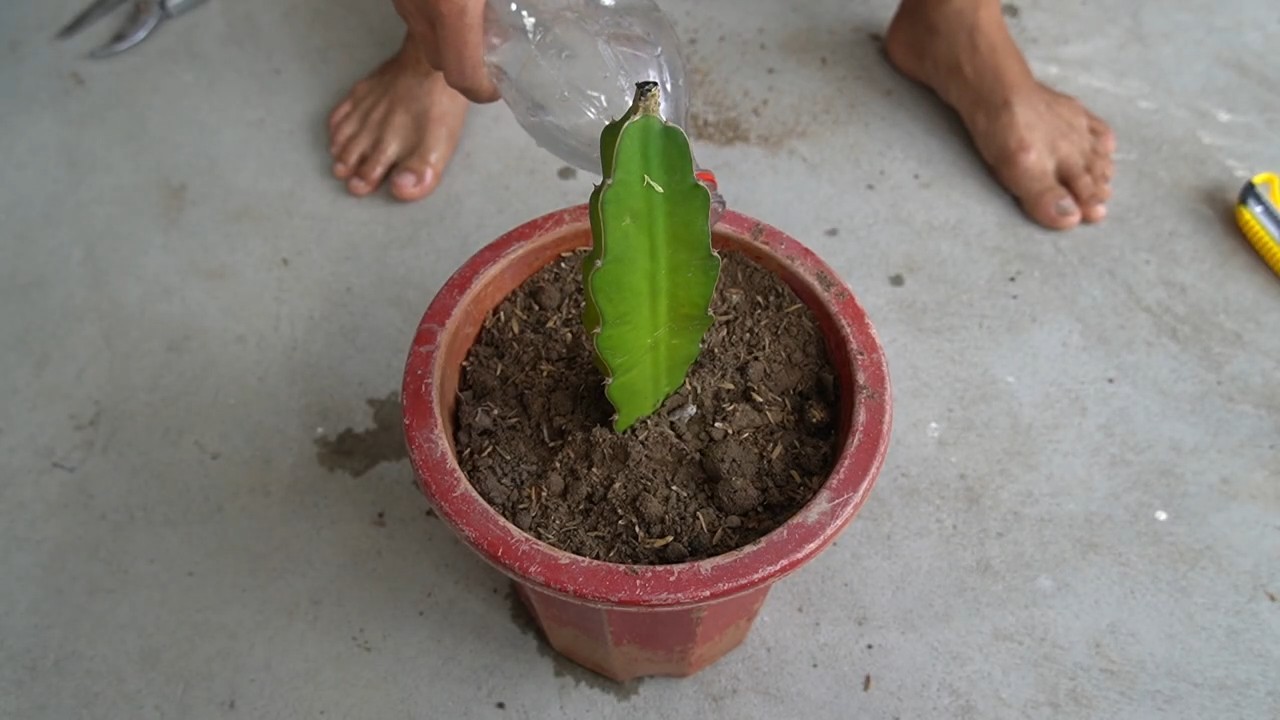
1. Stecklinge auswählen: Suche dir gesunde, kräftige Triebe von deiner Drachenfruchtpflanze aus. Sie sollten keine Anzeichen von Krankheiten oder Schädlingsbefall aufweisen. Am besten sind Triebe, die schon etwas älter und verholzter sind.
2. Stecklinge schneiden: Mit einem scharfen, desinfizierten Messer oder einer Gartenschere schneidest du die Triebe ab. Achte darauf, einen sauberen Schnitt zu machen, um die Pflanze nicht zu verletzen. Die Stecklinge sollten, wie gesagt, etwa 20-30 cm lang sein.
3. Trocknen lassen: Das ist ein ganz wichtiger Schritt! Lege die Stecklinge für etwa 7-10 Tage an einen trockenen, schattigen Ort. Dadurch bildet sich an der Schnittfläche eine Kallus (eine Art Narbengewebe), die das Eindringen von Pilzen und Bakterien verhindert und die Wurzelbildung fördert. Du wirst sehen, dass die Schnittfläche leicht eintrocknet und sich verhärtet.
4. Blätter entfernen: Entferne die unteren Blätter oder Dornen von den Stecklingen, damit sie nicht im Boden verrotten.
Das Einpflanzen der Stecklinge
Jetzt kommt der spannende Teil: das Einpflanzen!
1. Töpfe vorbereiten: Fülle die Töpfe mit Kakteenerde oder einer gut durchlässigen Blumenerde. Drachenfrüchte brauchen eine Erde, die gut abläuft, damit die Wurzeln nicht faulen.
2. Stecklinge einpflanzen: Stecke die Stecklinge etwa 5-7 cm tief in die Erde. Du kannst mehrere Stecklinge in einen Topf pflanzen, aber achte darauf, dass sie genügend Platz haben.
3. Bewurzelungshormon (optional): Wenn du möchtest, kannst du die Schnittfläche der Stecklinge vor dem Einpflanzen in Bewurzelungshormon tauchen. Das hilft, die Wurzelbildung zu beschleunigen, ist aber nicht unbedingt notwendig.
4. Angießen: Gieße die Stecklinge vorsichtig an, sodass die Erde leicht feucht ist. Vermeide Staunässe!
5. Standort wählen: Stelle die Töpfe an einen hellen, warmen Ort, aber nicht in die pralle Sonne. Ein halbschattiger Standort ist ideal.
Die Pflege der Stecklinge
Die Pflege der Stecklinge ist entscheidend für ihren Erfolg.
1. Gießen: Gieße die Stecklinge regelmäßig, aber nicht zu viel. Die Erde sollte immer leicht feucht sein, aber nicht nass. Lass die oberste Erdschicht zwischen den Wassergaben antrocknen.
2. Luftfeuchtigkeit: Drachenfrüchte mögen eine hohe Luftfeuchtigkeit. Du kannst die Luftfeuchtigkeit erhöhen, indem du die Stecklinge regelmäßig mit Wasser besprühst oder die Töpfe auf eine Schale mit feuchten Kieselsteinen stellst.
3. Düngen: Dünge die Stecklinge erst, wenn sie Wurzeln gebildet haben. Verwende einen Kakteendünger oder einen milden Flüssigdünger.
4. Kontrolle: Kontrolliere die Stecklinge regelmäßig auf Anzeichen von Krankheiten oder Schädlingen. Entferne befallene Blätter oder Triebe sofort.
5. Geduld haben: Die Wurzelbildung kann einige Wochen oder sogar Monate dauern. Hab Geduld und gib nicht auf! Du wirst sehen, irgendwann sprießen die ersten neuen Triebe.
Umpflanzen
Sobald die Stecklinge gut bewurzelt sind und neue Triebe bilden, kannst du sie in größere Töpfe umpflanzen.
1. Topf vorbereiten: Wähle einen Topf, der etwas größer ist als der vorherige. Fülle ihn mit Kakteenerde oder einer gut durchlässigen Blumenerde.
2. Steckling vorsichtig aus dem alten Topf nehmen: Sei dabei sehr vorsichtig, um die Wurzeln nicht zu beschädigen.
3. Steckling in den neuen Topf pflanzen: Setze den Steckling in den neuen Topf und fülle ihn mit Erde auf.
4. Angießen: Gieße den Steckling vorsichtig an.
5. Standort wählen: Stelle den Steckling an einen hellen, warmen Ort.
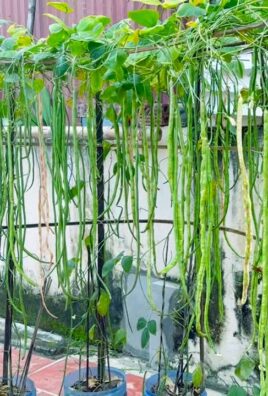
Unterstützung für deine Drachenfrucht
Drachenfrüchte sind Kletterpflanzen und brauchen eine Rankhilfe. Du kannst ihnen einen Pfahl, ein Spalier oder ein anderes stabiles Gerüst zur Verfügung stellen.
1. Rankhilfe auswählen: Wähle eine Rankhilfe, die stabil genug ist, um das Gewicht der Pflanze zu tragen.
2. Rankhilfe aufstellen: Stelle die Rankhilfe in den Topf oder in die Nähe der Pflanze.
3. Pflanze an der Rankhilfe befestigen: Befestige die Triebe der Pflanze vorsichtig an der Rankhilfe. Du kannst dafür Pflanzenbinder oder weiche Schnüre verwenden.
Überwinterung
Drachenfrüchte sind nicht winterhart und müssen im Winter an einen frostfreien Ort gebracht werden.
1. Pflanze vorbereiten: Reduziere das Gießen und Düngen im Herbst.
2. Pflanze ins Winterquartier bringen: Stelle die Pflanze an einen hellen, kühlen Ort (ca. 10-15 Grad Celsius).
3. Gießen: Gieße die Pflanze im Winter nur sparsam, sodass die Erde nicht ganz austrocknet.
4. Düngen: Dünge die Pflanze im Winter nicht.
5. Im Frühjahr wieder ins Freie bringen: Sobald die Temperaturen steigen, kannst du die Pflanze wieder ins Freie bringen. Gewöhne sie langsam an die Sonne, um Verbrennungen zu vermeiden.
Zusätzliche Tipps für den Erfolg
* Gute Drainage ist entscheidend: Drachenfrüchte vertragen keine Staunässe. Achte darauf, dass die Töpfe gute Drainagelöcher haben und verwende eine gut durchlässige Erde.
* Sonneneinstrahlung: Drachenfrüchte brauchen viel Sonne, um gut zu wachsen und Früchte zu tragen. Stelle sie an einen sonnigen Standort, aber schütze sie vor der Mittagssonne.
* Regelmäßiges Düngen: Dünge deine Drachenfrucht regelmäßig mit einem Kakteendünger oder einem milden Flüssigdünger.
* Bestäubung: Viele Drachenfruchtsorten sind selbststeril und brauchen eine Bestäubung durch eine andere Sorte, um Früchte zu tragen. Wenn du Früchte ernten möchtest, solltest du zwei verschiedene Sorten pflanzen. Du kannst die Blüten auch von Hand bestäuben.
* Schädlinge und Krankheiten: Achte auf Anzeichen von Schädlingen und Krankheiten und bekämpfe sie frühzeitig.
Ich hoffe, diese Anleitung hilft dir dabei, deine eigenen Drachenfruchtpflanzen zu vermehren. Es ist ein wirklich lohnendes Projekt und es macht super viel Spaß, die Pflanzen wachsen und gedeihen zu sehen. Viel Erfolg!
Conclusion
So, there you have it! Propagating dragon fruit from cuttings isn’t just a cost-effective way to expand your collection of this exotic fruit; it’s a deeply rewarding experience that connects you to the plant’s life cycle. Forget shelling out big bucks for mature plants when you can easily create your own thriving dragon fruit vines with a little patience and this simple DIY trick.
Why is this a must-try? Because it’s accessible, even for beginner gardeners. You don’t need specialized equipment or a green thumb of steel. All you need are healthy cuttings, a suitable growing medium, and a sunny spot. Plus, think of the satisfaction of nurturing a tiny cutting into a fruit-bearing powerhouse! Imagine harvesting your own vibrant, delicious dragon fruit, knowing you grew it from scratch. That’s a feeling that money simply can’t buy.
But the benefits extend beyond just the cost savings and personal satisfaction. Propagating from cuttings allows you to clone your favorite varieties. If you have a dragon fruit plant that produces particularly sweet or large fruit, you can replicate those desirable traits by propagating from its cuttings. This ensures you’ll have a consistent supply of high-quality fruit for years to come.
Looking for variations? Consider experimenting with different rooting hormones to see which one yields the best results for you. Some gardeners swear by honey as a natural rooting agent, while others prefer commercial hormone powders or liquids. You can also try different growing mediums, such as coco coir, perlite, or a combination of both. Each medium offers different drainage and aeration properties, so find what works best for your climate and growing conditions.
Another fun variation is to graft your dragon fruit cuttings onto different rootstocks. This can improve disease resistance, cold hardiness, or even fruit production. Grafting is a more advanced technique, but it’s definitely worth exploring if you’re looking to take your dragon fruit growing to the next level.
Don’t be intimidated by the process. Even if your first attempt isn’t a resounding success, don’t give up! Propagation is a learning process, and every failure is an opportunity to learn and improve. Keep experimenting, keep researching, and keep asking questions.
We wholeheartedly encourage you to try this **dragon fruit propagation** method. It’s a fun, affordable, and rewarding way to grow your own exotic fruit. And most importantly, don’t forget to share your experiences with us! We’d love to hear about your successes, your challenges, and any tips or tricks you’ve discovered along the way. Post pictures of your cuttings, share your propagation methods, and let’s create a community of dragon fruit enthusiasts! Happy growing!
Frequently Asked Questions (FAQ)
1. What is the best time of year to propagate dragon fruit from cuttings?
The ideal time to propagate dragon fruit from cuttings is during the warmer months, typically spring or early summer. This is when the plant is actively growing and has the best chance of rooting successfully. The warmer temperatures and longer daylight hours provide the optimal conditions for root development. However, if you have a controlled environment, such as a greenhouse or indoor grow space, you can propagate dragon fruit cuttings year-round. Just ensure that the temperature and humidity are consistently warm and that the cuttings receive adequate light.
2. How long does it take for dragon fruit cuttings to root?
The time it takes for dragon fruit cuttings to root can vary depending on several factors, including the variety of dragon fruit, the temperature, the humidity, and the rooting method used. Generally, you can expect to see roots developing within 2 to 4 weeks. However, it may take longer in cooler temperatures or if the humidity is low. To speed up the rooting process, you can use a rooting hormone and provide consistent moisture. Once the cuttings have developed a good root system, they can be transplanted into larger pots or directly into the ground.
3. What type of soil is best for rooting dragon fruit cuttings?
Dragon fruit cuttings need a well-draining soil mix to prevent rot. A good option is a mix of equal parts perlite, peat moss (or coco coir), and coarse sand. This combination provides good drainage, aeration, and moisture retention. You can also use a commercial cactus or succulent potting mix, as these are typically formulated to provide the drainage that dragon fruit plants need. Avoid using heavy clay soils, as these can retain too much moisture and lead to root rot.
4. How often should I water dragon fruit cuttings?
Water dragon fruit cuttings regularly, but be careful not to overwater them. The soil should be kept consistently moist, but not soggy. Water when the top inch of soil feels dry to the touch. During the warmer months, you may need to water more frequently than during the cooler months. It’s also important to ensure that the pot has good drainage to prevent water from accumulating at the bottom. Overwatering is a common cause of root rot in dragon fruit cuttings, so it’s always better to err on the side of underwatering.
5. How much sunlight do dragon fruit cuttings need?
Dragon fruit cuttings need bright, indirect sunlight to thrive. Avoid placing them in direct sunlight, as this can scorch the leaves. A location near an east-facing or west-facing window is ideal. If you don’t have access to natural light, you can use artificial grow lights to supplement the light. Dragon fruit cuttings need at least 6 hours of light per day to grow properly.
6. Can I use honey as a rooting hormone for dragon fruit cuttings?
Yes, honey can be used as a natural rooting hormone for dragon fruit cuttings. Honey contains enzymes and antibacterial properties that can help to promote root growth and prevent infection. To use honey as a rooting hormone, simply dip the cut end of the cutting into honey before planting it in the soil. You can also dilute the honey with water to create a rooting solution. While honey is a natural and effective rooting agent, it may not be as potent as commercial rooting hormones.
7. What are some common problems when propagating dragon fruit from cuttings?
Some common problems when propagating dragon fruit from cuttings include root rot, fungal infections, and pest infestations. Root rot is caused by overwatering and poor drainage. Fungal infections can occur in humid environments. Pest infestations can be prevented by keeping the cuttings clean and healthy. To prevent these problems, use a well-draining soil mix, water sparingly, and provide good air circulation. You can also use a fungicide or insecticide if necessary.
8. How do I know when my dragon fruit cutting is ready to be transplanted?
You’ll know your dragon fruit cutting is ready to be transplanted when it has developed a strong root system. This typically takes 2 to 4 weeks. You should be able to see roots emerging from the bottom of the pot or through the drainage holes. The cutting should also show signs of new growth, such as new leaves or shoots. Once the cutting has a strong root system and is actively growing, it can be transplanted into a larger pot or directly into the ground.
9. What size pot should I use for my dragon fruit cutting?
When transplanting your rooted dragon fruit cutting, choose a pot that is slightly larger than the root ball. A 6-inch to 8-inch pot is usually a good starting size. As the plant grows, you can gradually transplant it into larger pots. Dragon fruit plants can eventually grow quite large, so you may need to transplant them into very large containers or plant them directly in the ground.
10. How do I care for my dragon fruit plant after transplanting?
After transplanting your dragon fruit plant, water it thoroughly and place it in a sunny location. Dragon fruit plants need regular watering, especially during the growing season. Fertilize the plant every few weeks with a balanced fertilizer. Prune the plant regularly to encourage branching and fruit production. Dragon fruit plants also need support, such as a trellis or stake, to climb on. With proper care, your dragon fruit plant will thrive and produce delicious fruit for many years to come.
Leave a Comment