

Colored bell peppers growing in your own backyard? Imagine the vibrant hues popping against the green foliage, a miniature rainbow bursting with flavor and freshness! Forget those bland, store-bought peppers – we’re diving headfirst into the world of DIY gardening, and I’m so excited to share some amazing tricks that will have you harvesting a bumper crop of colorful bell peppers in no time.
For centuries, bell peppers have been a staple in cuisines around the globe, adding a touch of sweetness and a satisfying crunch to everything from stir-fries to salads. Originating in South America, these versatile veggies made their way across continents, becoming a beloved ingredient in countless dishes. But what if you could skip the grocery store and grow your own, knowing exactly where your food comes from and how it was nurtured?
That’s where these DIY gardening hacks come in! Let’s face it, gardening can sometimes feel overwhelming, especially when you’re aiming for those picture-perfect, vibrant colored bell peppers growing. But don’t worry, I’m here to demystify the process. Whether you’re a seasoned gardener or just starting out, these simple yet effective tips will help you overcome common challenges, maximize your yield, and enjoy the satisfaction of harvesting your own delicious, homegrown peppers. Get ready to transform your garden into a colorful paradise!
DIY: Bunte Paprika aus Samen ziehen – So klappt’s!
Hey Leute! Habt ihr euch jemals gefragt, wie ihr diese wunderschönen, farbenfrohen Paprika, die man im Supermarkt sieht, selbst anbauen könnt? Ich zeige euch, wie ihr das ganz einfach zu Hause hinbekommt! Es ist gar nicht so schwer, wie man denkt, und das Ergebnis ist einfach fantastisch. Stellt euch vor, ihr erntet eure eigenen roten, gelben, orangenen und sogar lilafarbenen Paprika! Los geht’s!
Was ihr braucht:
* Paprikasamen: Am besten von Bio-Paprika oder speziell für den Anbau geeignete Samen. Achtet auf verschiedene Farben!
* Anzuchterde: Diese ist nährstoffarm und ideal für die Keimung.
* Anzuchttöpfe oder -schalen: Kleine Töpfe oder Schalen mit Drainagelöchern sind perfekt.
* Mini-Gewächshaus oder Frischhaltefolie: Um die Luftfeuchtigkeit hoch zu halten.
* Sprühflasche: Zum Befeuchten der Erde.
* Pflanzetiketten und Stift: Um die verschiedenen Paprikasorten zu kennzeichnen.
* Geduld! Paprika brauchen etwas Zeit, um zu wachsen.
* Pikierstab oder Löffel: Zum Vereinzeln der Sämlinge.
* Gemüseerde: Für das spätere Umpflanzen.
* Dünger: Speziell für Gemüse oder Tomaten.
Die Vorbereitung: Der Grundstein für eine reiche Ernte
Bevor wir loslegen, ist es wichtig, alles vorzubereiten. Das spart Zeit und sorgt dafür, dass der Anbau reibungslos verläuft.
1. Samen auswählen: Ich empfehle, Samen von verschiedenen Paprikasorten zu kaufen. So habt ihr eine bunte Mischung und könnt verschiedene Geschmacksrichtungen genießen. Achtet darauf, dass die Samen frisch sind. Das Verfallsdatum sollte noch nicht überschritten sein.
2. Anzuchttöpfe vorbereiten: Füllt die Anzuchttöpfe oder -schalen mit Anzuchterde. Drückt die Erde leicht an, aber nicht zu fest. Sie sollte locker und luftig sein.
3. Mini-Gewächshaus vorbereiten: Wenn ihr ein Mini-Gewächshaus verwendet, reinigt es gründlich. Das verhindert die Ausbreitung von Krankheiten. Wenn ihr Frischhaltefolie verwendet, stellt sicher, dass sie sauber ist.
Aussaat: Der Start ins Paprika-Abenteuer
Jetzt kommt der spannende Teil: die Aussaat!
1. Samen aussäen: Legt in jeden Topf oder jede Schale 2-3 Samen. Die Samen sollten etwa 0,5 cm tief in die Erde gedrückt werden. Achtet darauf, dass die Samen nicht zu dicht beieinander liegen.
2. Mit Erde bedecken: Bedeckt die Samen vorsichtig mit einer dünnen Schicht Anzuchterde.
3. Befeuchten: Befeuchtet die Erde mit einer Sprühflasche. Die Erde sollte feucht, aber nicht nass sein. Vermeidet es, die Samen wegzuspülen.
4. Beschriften: Beschriftet die Töpfe oder Schalen mit den Namen der Paprikasorten. So behaltet ihr den Überblick.
5. Abdecken: Stellt die Töpfe oder Schalen in ein Mini-Gewächshaus oder deckt sie mit Frischhaltefolie ab. Das sorgt für eine hohe Luftfeuchtigkeit, die für die Keimung wichtig ist.
6. Standort: Stellt das Mini-Gewächshaus oder die abgedeckten Töpfe an einen warmen und hellen Ort. Die ideale Temperatur für die Keimung liegt zwischen 22 und 25 Grad Celsius. Direkte Sonneneinstrahlung sollte vermieden werden.
Die Keimung: Geduld ist gefragt
Die Keimung kann je nach Sorte und Temperatur einige Tage bis zu zwei Wochen dauern.
1. Feuchtigkeit kontrollieren: Kontrolliert regelmäßig die Feuchtigkeit der Erde. Sie sollte immer leicht feucht sein. Besprüht die Erde bei Bedarf mit Wasser.
2. Lüften: Lüftet das Mini-Gewächshaus oder die Frischhaltefolie regelmäßig, um Schimmelbildung zu vermeiden.
3. Warten: Habt Geduld! Die ersten Keimlinge werden sich bald zeigen.
Pikieren: Den Sämlingen mehr Platz geben
Sobald die Sämlinge ihre ersten richtigen Blätter (neben den Keimblättern) entwickelt haben, ist es Zeit, sie zu pikieren. Das bedeutet, dass ihr die Sämlinge in größere Töpfe umpflanzt, damit sie mehr Platz zum Wachsen haben.
1. Vorbereiten: Füllt größere Töpfe (ca. 8-10 cm Durchmesser) mit Gemüseerde.
2. Sämlinge vorsichtig ausheben: Löst die Sämlinge vorsichtig mit einem Pikierstab oder Löffel aus der Anzuchterde. Achtet darauf, die Wurzeln nicht zu beschädigen.
3. Einpflanzen: Pflanzt jeden Sämling in einen eigenen Topf mit Gemüseerde. Die Sämlinge sollten etwas tiefer eingepflanzt werden, als sie zuvor in der Anzuchterde standen.
4. Andrücken: Drückt die Erde um die Sämlinge herum leicht an.
5. Gießen: Gießt die Sämlinge vorsichtig an.
6. Standort: Stellt die pikierten Sämlinge an einen hellen und warmen Ort. Vermeidet direkte Sonneneinstrahlung.
Pflege: Die Sämlinge verwöhnen
Nach dem Pikieren brauchen die Sämlinge regelmäßige Pflege, um kräftig zu wachsen.
1. Gießen: Gießt die Sämlinge regelmäßig, aber nicht zu viel. Die Erde sollte immer leicht feucht sein. Vermeidet Staunässe.
2. Düngen: Düngt die Sämlinge alle zwei Wochen mit einem speziellen Gemüsedünger oder Tomatendünger. Achtet auf die Dosierungsanleitung auf der Verpackung.
3. Drehen: Dreht die Töpfe regelmäßig, damit die Sämlinge gleichmäßig wachsen und sich nicht zum Licht neigen.
4. Lüften: Sorgt für eine gute Belüftung, um Krankheiten vorzubeugen.
5. Beobachten: Beobachtet die Sämlinge regelmäßig auf Schädlinge oder Krankheiten. Bei Bedarf könnt ihr natürliche Schädlingsbekämpfungsmittel einsetzen.
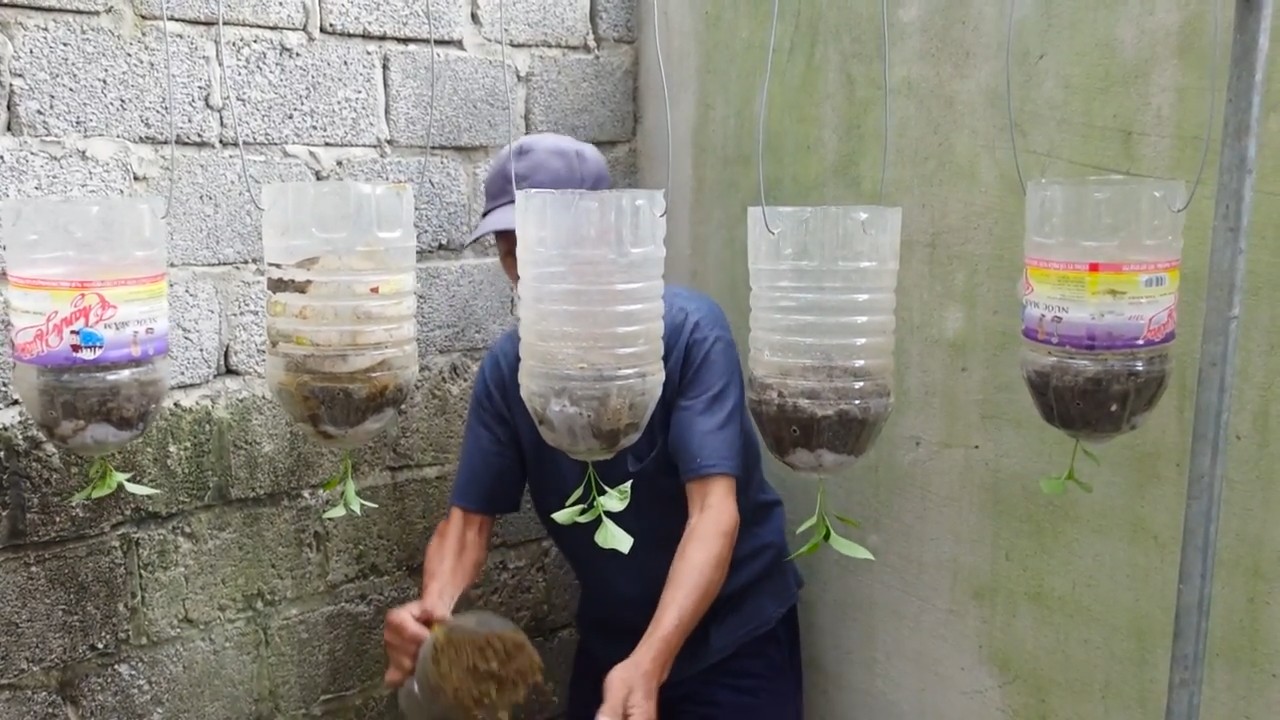
Auspflanzen: Ab ins Freie!
Sobald die Temperaturen steigen und keine Frostgefahr mehr besteht (in der Regel Mitte Mai nach den Eisheiligen), können die Paprikapflanzen ins Freie ausgepflanzt werden.
1. Abhärten: Bevor ihr die Pflanzen ins Freie pflanzt, solltet ihr sie einige Tage lang abhärten. Stellt sie tagsüber für einige Stunden ins Freie und holt sie abends wieder herein. So gewöhnen sie sich langsam an die veränderten Bedingungen.
2. Standort auswählen: Wählt einen sonnigen und windgeschützten Standort für die Paprikapflanzen. Der Boden sollte locker und nährstoffreich sein.
3. Pflanzlöcher vorbereiten: Grabt Pflanzlöcher, die etwas größer sind als die Töpfe, in denen die Paprikapflanzen stehen.
4. Pflanzen einsetzen: Setzt die Paprikapflanzen vorsichtig in die Pflanzlöcher. Achtet darauf, die Wurzeln nicht zu beschädigen.
5. Mit Erde auffüllen: Füllt die Pflanzlöcher mit Erde auf und drückt sie leicht an.
6. Gießen: Gießt die Paprikapflanzen gründlich an.
7. Stützen: Bei Bedarf könnt ihr die Paprikapflanzen mit Stäben stützen, um zu verhindern, dass sie umknicken.
Pflege im Freien: Für eine reiche Ernte sorgen
Auch im Freien brauchen die Paprikapflanzen regelmäßige Pflege.
1. Gießen: Gießt die Paprikapflanzen regelmäßig, besonders bei Trockenheit. Vermeidet Staunässe.
2. Düngen: Düngt die Paprikapflanzen alle zwei Wochen mit einem speziellen Gemüsedünger oder Tomatendünger.
3. Ausgeizen: Entfernt
Conclusion
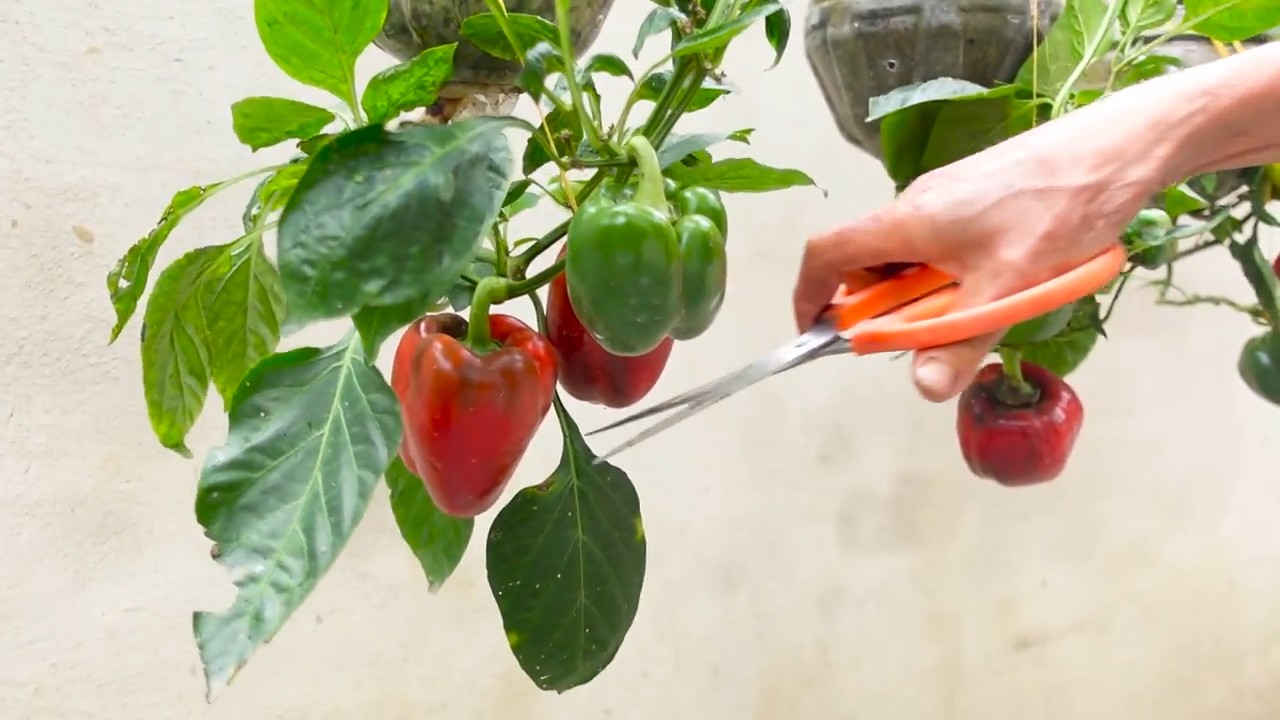
So, there you have it! Transforming ordinary green bell peppers into a vibrant rainbow of red, yellow, and orange is not only achievable but surprisingly simple. This DIY trick for ripening bell peppers at home is a game-changer for gardeners and pepper enthusiasts alike. No more waiting endlessly for those stubborn green peppers to change color on the vine, and no more settling for bland, unripe flavors.
This method offers a significant advantage over store-bought, artificially ripened peppers. You control the process, ensuring the peppers ripen naturally and develop their full, sweet flavor potential. The difference in taste is remarkable – a sweetness and depth that you simply won’t find in peppers that haven’t been allowed to mature properly.
Beyond the enhanced flavor, this technique also allows you to extend your harvest season. By picking the green peppers and bringing them indoors to ripen, you protect them from early frosts and other environmental factors that could damage them. This means you can enjoy fresh, homegrown bell peppers for a longer period.
Why is this a must-try? Because it empowers you to take control of your harvest, maximize flavor, and minimize waste. Imagine the satisfaction of serving a colorful bell pepper dish made entirely from your own garden, knowing that you nurtured those peppers from green to glorious ripeness.
Looking for variations? Experiment with different ripening environments. Some people find that placing the peppers in a paper bag with a ripe banana or apple accelerates the process due to the ethylene gas emitted by these fruits. You can also try different lighting conditions, although indirect sunlight is generally recommended. For those with limited space, consider ripening the peppers in a single layer on a tray, ensuring good air circulation.
Don’t be afraid to get creative! This DIY trick is adaptable to your specific needs and resources. The key is to provide the peppers with a warm, dark environment and a little patience.
We wholeheartedly encourage you to try this DIY trick for ripening bell peppers. It’s a rewarding experience that will transform your perception of homegrown peppers. And most importantly, share your results! We’d love to hear about your successes, challenges, and any variations you discover along the way. Post pictures of your beautifully ripened peppers on social media and tag us! Let’s create a community of pepper-ripening enthusiasts and spread the word about this fantastic technique. Happy growing and happy ripening!
Frequently Asked Questions (FAQ)
Q: How long does it take for green bell peppers to ripen using this method?
A: The ripening time can vary depending on several factors, including the initial maturity of the green pepper, the temperature, and the humidity of the ripening environment. Generally, you can expect the peppers to start showing signs of color change within 1-2 weeks. Full ripening, where the pepper is completely red, yellow, or orange, may take an additional 1-2 weeks. So, on average, it takes about 2-4 weeks for green bell peppers to fully ripen using this DIY method. Keep a close eye on your peppers and adjust the environment as needed to optimize the ripening process.
Q: What is the ideal temperature for ripening bell peppers indoors?
A: The ideal temperature range for ripening bell peppers indoors is between 65°F and 75°F (18°C and 24°C). This temperature range mimics the warm conditions that bell peppers experience during their natural ripening process in the garden. Avoid exposing the peppers to temperatures below 60°F (15°C), as this can slow down or even halt the ripening process. Similarly, avoid temperatures above 80°F (27°C), as this can cause the peppers to rot or develop blemishes. Maintaining a consistent temperature within the ideal range will ensure optimal ripening and the best flavor development.
Q: Do I need to provide light for the bell peppers to ripen indoors?
A: While bell peppers need sunlight to grow, they don’t require direct sunlight to ripen after being picked. In fact, indirect sunlight or even a dimly lit environment is preferable for ripening. Too much direct sunlight can cause the peppers to overheat and develop sunscald, which can damage the skin and affect the flavor. A dark, well-ventilated space is ideal. If you’re using a paper bag, the darkness is already taken care of. If you’re using a tray, place it in a room with minimal natural light.
Q: Can I use this method to ripen other types of peppers besides bell peppers?
A: While this method is primarily designed for bell peppers, it can also be used to ripen other types of peppers, such as jalapeños, banana peppers, and poblano peppers. However, the ripening time and the final color may vary depending on the specific pepper variety. For example, jalapeños typically ripen from green to red, while banana peppers ripen from yellow to orange or red. The key is to monitor the peppers closely and harvest them when they reach their desired color and level of ripeness.
Q: What if my bell peppers start to wrinkle or shrivel during the ripening process?
A: Wrinkling or shriveling can occur if the bell peppers are losing moisture during the ripening process. This is more likely to happen in dry environments. To prevent this, you can try increasing the humidity around the peppers. One way to do this is to place a bowl of water near the peppers or to lightly mist them with water every few days. You can also store the peppers in a slightly more humid environment, such as a cool basement or a pantry. However, be careful not to over-humidify the environment, as this can lead to mold growth.
Q: Is it safe to eat bell peppers that have been ripened indoors using this method?
A: Yes, it is perfectly safe to eat bell peppers that have been ripened indoors using this method. The ripening process is entirely natural and does not involve any harmful chemicals or additives. In fact, bell peppers ripened using this method often have a better flavor and texture than those that are artificially ripened in stores. Just be sure to wash the peppers thoroughly before eating them to remove any dirt or debris.
Q: Can I speed up the ripening process by using ethylene gas?
A: Yes, you can speed up the ripening process by exposing the bell peppers to ethylene gas, which is a natural plant hormone that promotes ripening. Ripe fruits like bananas and apples naturally produce ethylene gas. To use this method, simply place the green bell peppers in a paper bag with a ripe banana or apple. The ethylene gas emitted by the fruit will accelerate the ripening process. Be sure to check the peppers regularly and remove the banana or apple if it starts to rot.
Q: What should I do if my bell peppers start to rot during the ripening process?
A: If your bell peppers start to rot during the ripening process, it’s important to remove them immediately to prevent the rot from spreading to the other peppers. Rotting can be caused by several factors, including excessive humidity, poor ventilation, or damage to the pepper’s skin. To prevent rotting, make sure the peppers are stored in a well-ventilated environment and avoid over-humidifying the area. Also, handle the peppers carefully to avoid bruising or damaging the skin.
Q: How do I know when my bell peppers are fully ripe?
A: The best way to tell if your bell peppers are fully ripe is to look at their color and feel their texture. Fully ripe bell peppers will have a vibrant, uniform color, whether it’s red, yellow, or orange. They will also feel firm and slightly heavy for their size. Avoid peppers that are soft, wrinkled, or have blemishes. You can also taste a small piece of the pepper to check for sweetness. Fully ripe bell peppers will have a sweet, slightly fruity flavor.
Leave a Comment