

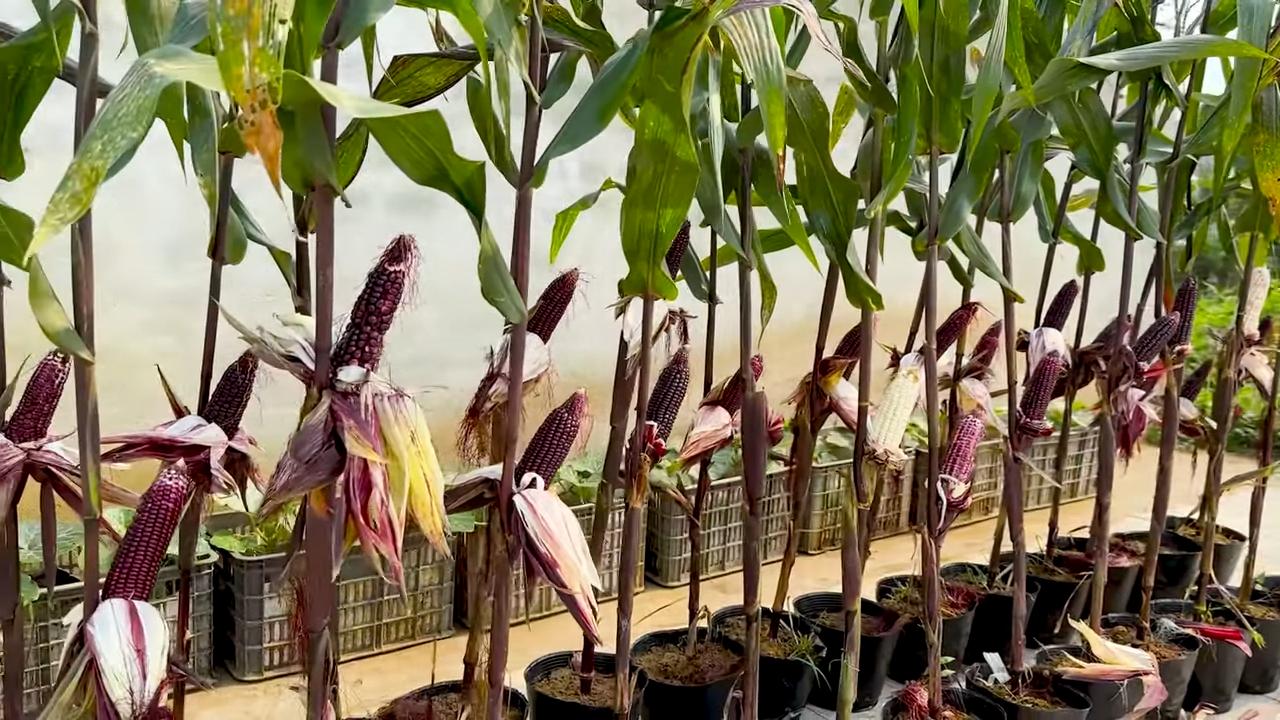
Rooftop Slab Corn Method: Imagine sinking your teeth into the sweetest, juiciest corn you’ve ever tasted, and knowing you grew it yourself… right on your rooftop! Sounds like a dream? It doesn’t have to be. This DIY guide unlocks the secrets to cultivating delicious corn, even without a traditional garden.
Growing corn has been a cornerstone of civilizations for millennia, deeply woven into the fabric of cultures across the Americas. From ancient rituals to modern-day feasts, corn represents sustenance, community, and the bounty of the earth. While traditionally grown in sprawling fields, the rooftop slab corn method offers a revolutionary way to bring this agricultural heritage to urban environments.
Why do you need this DIY trick? Well, space is a premium these days, especially in bustling cities. Many of us dream of fresh, homegrown produce but lack the yard to make it a reality. This method is perfect for apartment dwellers, urban homesteaders, or anyone looking to maximize their growing potential. Plus, imagine the satisfaction of harvesting your own corn, knowing you’ve bypassed the grocery store and connected directly with nature. I’m excited to show you how to transform your rooftop into a thriving corn patch!
Dachplatten-Maisanbau: Dein eigener kleiner Acker über den Wolken
Hey Leute! Habt ihr auch genug von den steigenden Lebensmittelpreisen und dem Gefühl, nicht zu wissen, woher euer Essen wirklich kommt? Ich auch! Deshalb habe ich mich entschieden, etwas dagegen zu unternehmen und meinen eigenen kleinen Acker über den Wolken zu erschaffen – auf meinem Dach! Und das Beste daran? Ich zeige euch, wie ihr das auch könnt! Wir bauen Mais an, direkt auf der Dachplatte. Klingt verrückt? Ist es vielleicht ein bisschen, aber es funktioniert!
Wichtiger Hinweis: Bevor wir loslegen, möchte ich betonen, dass die Sicherheit oberste Priorität hat. Überprüft unbedingt die Tragfähigkeit eures Daches, bevor ihr schwere Erde und Pflanzen darauf platziert. Konsultiert im Zweifelsfall einen Statiker. Außerdem solltet ihr euch über lokale Bauvorschriften informieren, um sicherzustellen, dass euer Dachgarten legal ist. Und denkt daran: Wasser kann ein Problem sein. Stellt sicher, dass ihr eine gute Drainage habt, um Wasserschäden zu vermeiden.
Benötigte Materialien und Werkzeuge
Bevor wir mit dem Anbau beginnen, brauchen wir natürlich das richtige Equipment. Hier ist eine Liste von Dingen, die ihr besorgen solltet:
* Große Pflanzgefäße oder Container: Ich empfehle, große, stabile Behälter zu verwenden, die mindestens 60 cm tief sind. Das gibt den Maiswurzeln genug Platz zum Wachsen. Achtet darauf, dass die Behälter Drainagelöcher haben.
* Hochwertige Pflanzerde: Verwendet eine gut durchlässige, nährstoffreiche Pflanzerde. Ich mische gerne Kompost und Kokosfasern unter, um die Erde noch lockerer und nährstoffreicher zu machen.
* Maiskörner: Wählt eine Maissorte, die für den Anbau in Containern geeignet ist. Zwergmaissorten sind oft eine gute Wahl.
* Drainagematerial: Kies, Blähton oder Tonscherben, um eine gute Drainage in den Behältern zu gewährleisten.
* Gartenvlies: Um die Drainagelöcher abzudecken und zu verhindern, dass Erde ausgespült wird.
* Gießkanne oder Gartenschlauch: Zum Bewässern der Pflanzen.
* Dünger: Ein organischer Dünger, der speziell für Gemüse geeignet ist.
* Pflanzschaufel oder Kelle: Zum Pflanzen der Maiskörner.
* Handschuhe: Zum Schutz eurer Hände.
* Eventuell: Rankhilfe: Je nach Maissorte kann eine Rankhilfe sinnvoll sein, um die Pflanzen zu stützen.
* Eventuell: Windschutz: Auf windigen Dächern kann ein Windschutz helfen, die Pflanzen vor Schäden zu schützen.
Schritt-für-Schritt-Anleitung zum Maisanbau auf dem Dach
Jetzt geht’s ans Eingemachte! Hier ist eine detaillierte Anleitung, wie ihr euren eigenen Mais auf dem Dach anbauen könnt:
1. Vorbereitung der Pflanzgefäße:
* Reinigt die Pflanzgefäße gründlich, um sicherzustellen, dass sie frei von Schmutz und Ablagerungen sind.
* Legt eine Schicht Drainagematerial (Kies, Blähton oder Tonscherben) auf den Boden der Behälter. Diese Schicht sollte etwa 5-10 cm dick sein.
* Bedeckt das Drainagematerial mit Gartenvlies, um zu verhindern, dass Erde in die Drainageschicht gelangt und diese verstopft.
2. Befüllen der Pflanzgefäße mit Erde:
* Füllt die Pflanzgefäße mit der vorbereiteten Pflanzerde. Lasst etwa 5-10 cm Platz bis zum Rand des Behälters.
* Drückt die Erde leicht an, aber nicht zu fest. Sie sollte locker und luftig bleiben.
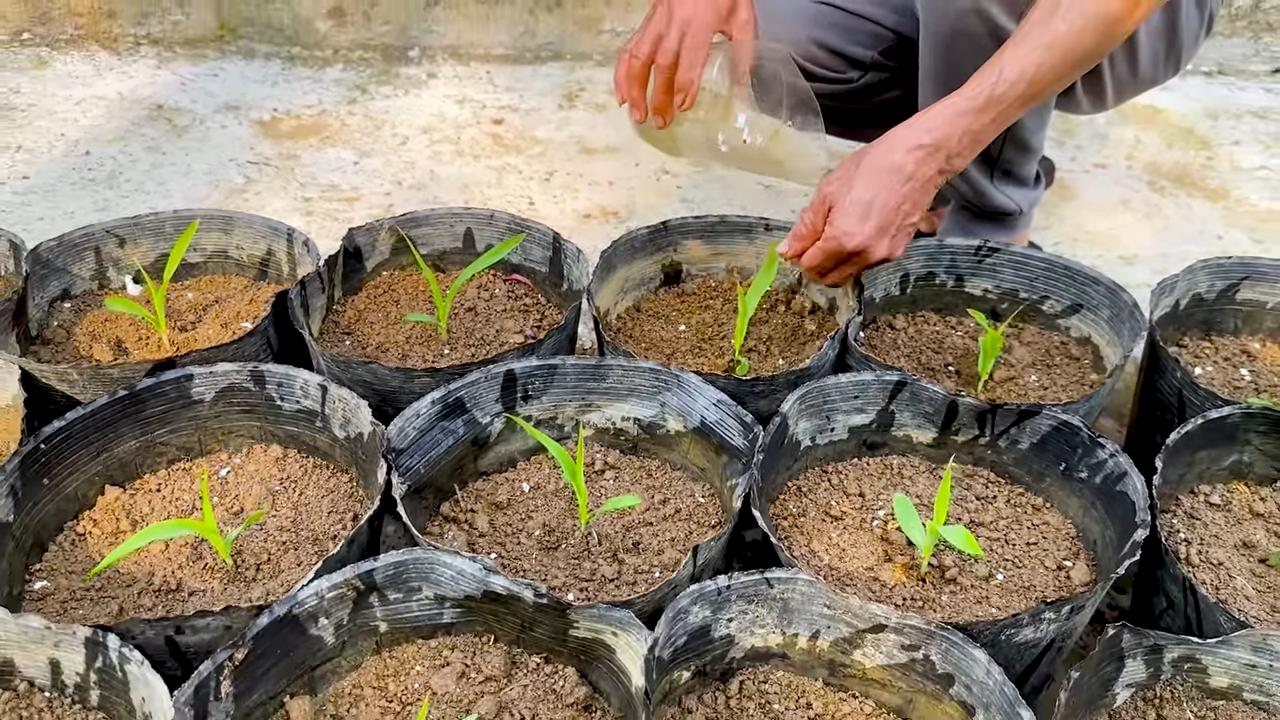
3. Aussaat der Maiskörner:
* Macht mit der Pflanzschaufel oder Kelle kleine Löcher in die Erde. Die Löcher sollten etwa 2-3 cm tief sein.
* Legt in jedes Loch 2-3 Maiskörner. Das erhöht die Wahrscheinlichkeit, dass mindestens ein Korn keimt.
* Bedeckt die Löcher mit Erde und drückt sie leicht an.
* Gießt die Erde vorsichtig an, um sie zu befeuchten.
4. Bewässerung und Pflege:
* Haltet die Erde feucht, aber nicht nass. Gießt regelmäßig, besonders bei trockenem Wetter.
* Vermeidet Staunässe, da dies zu Wurzelfäule führen kann.
* Sobald die Maispflanzen etwa 10-15 cm hoch sind, könnt ihr sie düngen. Verwendet einen organischen Dünger, der speziell für Gemüse geeignet ist. Befolgt die Anweisungen auf der Verpackung.
* Entfernt Unkraut regelmäßig, um sicherzustellen, dass die Maispflanzen genügend Nährstoffe und Platz haben.
5. Schutz vor Schädlingen und Krankheiten:
* Kontrolliert die Pflanzen regelmäßig auf Schädlinge und Krankheiten.
* Bei Bedarf könnt ihr biologische Schädlingsbekämpfungsmittel einsetzen.
* Achtet auf eine gute Belüftung, um Pilzkrankheiten vorzubeugen.
6. Ernte:
* Die Maiskolben sind reif, wenn die Seidenfäden braun und trocken sind und die Kolben sich prall anfühlen.
* Brecht die Kolben vorsichtig von den Pflanzen ab.
* Genießt euren selbst angebauten Mais!
Zusätzliche Tipps und Tricks für den erfolgreichen Dachplatten-Maisanbau
Hier sind noch ein paar zusätzliche Tipps, die euch helfen werden, euren Dachplatten-Maisanbau zum Erfolg zu führen:
* Wählt den richtigen Standort: Mais braucht viel Sonne, also wählt einen Standort auf eurem Dach, der mindestens 6-8 Stunden Sonnenlicht pro Tag bekommt.
* Achtet auf den Wind: Dächer können sehr windig sein. Stellt sicher, dass eure Pflanzen gut geschützt sind, entweder durch einen Windschutz oder durch die Wahl einer windgeschützten Ecke.
* Verwendet eine gute Drainage: Eine gute Drainage ist entscheidend, um Staunässe und Wurzelfäule zu vermeiden.
* Gießt regelmäßig: Mais braucht viel Wasser, besonders während der Wachstumsphase.
* Düngt regelmäßig: Düngt eure Pflanzen regelmäßig, um sicherzustellen, dass sie genügend Nährstoffe bekommen.
* Beobachtet eure Pflanzen: Beobachtet eure Pflanzen regelmäßig auf Schädlinge und Krankheiten. Je früher ihr Probleme erkennt, desto einfacher ist es, sie zu beheben.
* Habt Geduld: Der Maisanbau braucht Zeit. Seid geduldig und gebt nicht auf, wenn es nicht sofort klappt.
Häufige Probleme und Lösungen
Auch beim Dachplatten-Maisanbau können Probleme auftreten. Hier sind einige der häufigsten Probleme und wie ihr sie lösen könnt:
* Schlechte Keimung: Wenn die Maiskörner nicht keimen, kann das verschiedene Ursachen haben. Möglicherweise sind die Körner zu alt, die Erde zu trocken oder zu kalt. Verwendet frische Körner, haltet die Erde feucht und sorgt für eine warme Umgebung.
* Gelbe Blätter: Gelbe Blätter können ein Zeichen für Nährstoffmangel sein. Düngt eure Pflanzen mit einem organischen Dünger.
* Schädlinge: Mais kann von verschiedenen Schädlingen befallen werden, wie z.B. Blattläusen oder Maiszünsler. Verwendet biologische Schädlingsbekämpfungsmittel, um die Schädlinge zu bekämpfen.
* Pilzkrankheiten: Pilzkrankheiten können auftreten, wenn die Pflanzen zu feucht sind oder eine schlechte Belüftung haben. Sorgt für eine gute Belüftung und vermeidet Staunässe.
Fazit
Der Dachplatten-Maisanbau ist eine tolle Möglichkeit, um frisches, selbst angebautes Gemüse zu genießen und gleichzeitig etwas für die Umwelt zu tun. Es erfordert zwar etwas Arbeit und Planung, aber es lohnt sich auf jeden Fall! Mit dieser Anleitung und ein wenig Geduld könnt auch ihr euren eigenen kleinen Acker über den Wolken erschaffen. Also, worauf wartet ihr noch? Lasst uns loslegen und die Dächer begrünen! Ich wünsche euch viel Erfolg und eine reiche Ernte!
Conclusion
So, there you have it! The Rooftop Slab Corn Method – a game-changer for anyone who loves the taste of perfectly grilled corn but wants to skip the fuss and mess of traditional grilling. This isn’t just another cooking hack; it’s a revelation in simplicity and flavor. We’ve walked you through the process, highlighting how easy it is to achieve that smoky, slightly charred, and unbelievably juicy corn on the cob, all without the need for a grill, charcoal, or even a dedicated outdoor space.
Why is this a must-try? Because it delivers exceptional results with minimal effort. Think about it: no more battling with unevenly heated grills, no more constantly turning the corn to prevent burning, and no more smoky residue clinging to your clothes. The Rooftop Slab Corn Method offers a clean, efficient, and surprisingly effective way to cook corn that rivals, and in some cases surpasses, traditional grilling methods. The even heat distribution from the slab ensures that every kernel is cooked to perfection, resulting in a tender, flavorful bite every time.
But the beauty of this method lies not only in its simplicity but also in its versatility. Feel free to experiment with different types of slabs. While we’ve focused on using a rooftop slab (ensuring it’s clean and safe, of course!), you can also use a pizza stone, a cast iron griddle, or even a large baking sheet. Each material will impart a slightly different flavor and texture to the corn, allowing you to customize the results to your liking.
Consider these variations to elevate your Rooftop Slab Corn experience:
* Spice it up: Before placing the corn on the slab, brush it with a mixture of melted butter, chili powder, cumin, and a pinch of cayenne pepper for a spicy kick.
* Herbaceous delight: Infuse the corn with fresh herbs by placing sprigs of rosemary, thyme, or oregano between the corn and the slab. The heat will release the aromatic oils, creating a fragrant and flavorful corn on the cob.
* Sweet and savory: Drizzle the cooked corn with honey and sprinkle with crumbled feta cheese for a delightful sweet and savory combination.
* Garlic Parmesan: Brush the cooked corn with garlic butter and sprinkle generously with grated Parmesan cheese for a classic and crowd-pleasing flavor.
* Mexican Street Corn (Elote) Inspired: After cooking, slather the corn with mayonnaise, sprinkle with cotija cheese, chili powder, and a squeeze of lime juice for an authentic Elote experience.
The possibilities are truly endless! The Rooftop Slab Corn Method provides a blank canvas for your culinary creativity. Don’t be afraid to experiment with different seasonings, toppings, and flavor combinations to create your own signature corn on the cob.
We are confident that once you try this method, you’ll be hooked. It’s a simple, effective, and delicious way to enjoy perfectly grilled corn any time of year, regardless of whether you have access to a traditional grill.
So, what are you waiting for? Gather your corn, find a suitable slab, and get ready to experience the magic of the Rooftop Slab Corn Method. We encourage you to try this DIY trick and share your experiences with us! Let us know what variations you tried, what flavors you loved, and any tips or tricks you discovered along the way. Share your photos and stories on social media using #RooftopSlabCorn and let’s create a community of corn-loving enthusiasts! We can’t wait to see what you come up with!
Frequently Asked Questions (FAQ)
1. Is it safe to cook on a rooftop slab?
Safety is paramount. Before using any rooftop slab for cooking, ensure it is thoroughly cleaned and free of any contaminants. Avoid using slabs that are visibly damaged, cracked, or treated with chemicals. It’s best to use a slab that you know is made of food-safe materials, such as a clean paving stone or a pizza stone specifically designed for high-heat cooking. If you are unsure about the safety of your rooftop slab, it’s best to err on the side of caution and use an alternative cooking surface, such as a pizza stone or cast iron griddle. Always wear oven mitts or heat-resistant gloves when handling hot slabs.
2. What if I don’t have access to a rooftop slab? What are some alternatives?
No rooftop? No problem! The beauty of this method is its adaptability. Excellent alternatives include:
* Pizza Stone: A pizza stone is an ideal substitute, as it’s designed to withstand high temperatures and distribute heat evenly.
* Cast Iron Griddle: A cast iron griddle provides excellent heat retention and will impart a slightly smoky flavor to the corn.
* Large Baking Sheet: While not as effective as a stone or griddle, a large baking sheet can still be used in a pinch. Just be sure to preheat it thoroughly.
* Grill Pan: A grill pan on the stovetop can mimic the grilling effect, though it may not provide the same level of even cooking.
3. How do I clean the slab after cooking?
Cleaning your cooking slab is essential for maintaining its hygiene and longevity. Allow the slab to cool completely before attempting to clean it. Use a scraper or spatula to remove any stuck-on food particles. For stubborn residue, soak the slab in warm, soapy water for a few minutes, then scrub with a non-abrasive sponge or brush. Rinse thoroughly and allow the slab to air dry completely before storing it. Avoid using harsh chemicals or abrasive cleaners, as they can damage the surface of the slab. For cast iron, follow proper cast iron cleaning and seasoning procedures.
4. How long should I cook the corn?
Cooking time will vary depending on the thickness of the corn cobs and the temperature of your slab. As a general guideline, cook the corn for about 15-20 minutes, turning it occasionally to ensure even cooking. The corn is done when the kernels are tender and slightly charred. You can test for doneness by piercing a kernel with a fork; it should be easily pierced and release a milky liquid.
5. Can I use frozen corn on the cob?
While fresh corn on the cob is ideal for this method, you can use frozen corn in a pinch. Thaw the corn completely before placing it on the slab. Keep in mind that frozen corn may release more moisture during cooking, so you may need to adjust the cooking time accordingly.
6. What kind of corn works best for this method?
Any type of corn on the cob will work, but sweet corn varieties tend to be the most popular. Look for corn with plump, juicy kernels and bright green husks. Avoid corn with dry or shriveled kernels, as it may be past its prime.
7. Can I add any seasonings before cooking?
Absolutely! Feel free to experiment with different seasonings to enhance the flavor of your corn. Brush the corn with melted butter, olive oil, or your favorite marinade before placing it on the slab. Sprinkle with salt, pepper, garlic powder, onion powder, chili powder, or any other spices you enjoy.
8. How do I prevent the corn from sticking to the slab?
To prevent the corn from sticking, ensure the slab is properly preheated and lightly oiled before placing the corn on it. You can brush the slab with olive oil, vegetable oil, or melted butter. Turning the corn occasionally during cooking will also help prevent sticking.
9. Can I use this method indoors?
Yes, you can use this method indoors using a pizza stone, cast iron griddle, or baking sheet in your oven. Preheat your oven to a high temperature (around 450°F or 232°C) and follow the same cooking instructions as outlined above. Be sure to monitor the corn closely to prevent burning.
10. What are some other creative toppings I can use?
Get creative with your toppings! Some other delicious options include:
* Pesto and pine nuts
* Sun-dried tomato pesto and Parmesan cheese
* Buffalo sauce and blue cheese crumbles
* Sriracha mayo and sesame seeds
* Everything bagel seasoning and cream cheese
The possibilities are endless! Let your imagination run wild and create your own unique and flavorful corn on the cob creations. Remember, the Rooftop Slab Corn Method is all about having fun and enjoying delicious, perfectly grilled corn with minimal effort.

Leave a Comment