

Rooftop Kale Garden Easy Setup: Imagine stepping onto your roof and being greeted by a lush, vibrant garden overflowing with fresh, healthy kale. Sounds dreamy, right? Well, it doesn’t have to be just a dream! For centuries, urban dwellers have sought ways to bring nature closer, and rooftop gardening, particularly with nutrient-rich greens like kale, is a fantastic way to do just that. From ancient Babylonian hanging gardens to modern-day urban farms, the desire to cultivate our own food in limited spaces is deeply ingrained in our history.
But let’s be honest, the thought of setting up a rooftop garden can feel overwhelming. Where do you even begin? That’s where this DIY guide comes in! I’m going to walk you through an easy, step-by-step process to create your very own rooftop kale garden easy setup, even if you’re a complete beginner. Forget complicated instructions and expensive equipment. We’ll focus on simple, affordable solutions that will have you harvesting delicious kale in no time.
Why kale, you ask? Well, besides being incredibly nutritious, kale is surprisingly resilient and thrives in various conditions, making it perfect for rooftop environments. Plus, growing your own food is incredibly rewarding! You’ll not only enjoy fresh, organic kale but also reduce your carbon footprint and connect with nature in a meaningful way. So, are you ready to transform your rooftop into a thriving green oasis? Let’s get started!
Creating Your Own Rooftop Kale Garden: A Simple DIY Guide
Hey there, fellow gardening enthusiasts! Ever dreamed of having fresh, organic kale right outside your door? Well, if you have a rooftop, even a small one, you’re in luck! I’m going to walk you through creating your very own rooftop kale garden. It’s easier than you think, and the rewards are incredibly delicious and healthy. Let’s get started!
Choosing the Right Location and Assessing Your Rooftop
Before we even think about planting, we need to make sure your rooftop is suitable for a garden. Here’s what to consider:
* **Weight Capacity:** This is crucial! Rooftops aren’t designed to hold unlimited weight. You’ll need to figure out how much weight your roof can safely bear. Contact a structural engineer or your building manager to get this information. They can assess your roof’s load-bearing capacity and give you the green light (or suggest modifications).
* **Sunlight:** Kale needs at least 6 hours of direct sunlight per day. Observe your rooftop throughout the day to see where the sun shines the longest. South-facing rooftops are generally ideal, but east or west-facing can work too, depending on obstructions.
* **Water Access:** You’ll need a convenient water source. Lugging buckets of water up to your roof is no fun! Consider installing an outdoor faucet or using a long hose.
* **Wind Exposure:** Rooftops can be windy. Strong winds can damage your kale plants and dry out the soil quickly. We’ll need to think about windbreaks later.
* **Roofing Material:** Some roofing materials are more sensitive than others. Avoid placing containers directly on asphalt shingles, as they can damage the surface. Consider using a protective layer like rubber mats or wooden pallets.
Gathering Your Supplies
Now for the fun part – shopping! Here’s a list of what you’ll need:
* **Containers:** Choose containers that are at least 12 inches deep and wide. This gives the kale roots plenty of room to grow. You can use plastic pots, wooden boxes, or even repurposed containers like old tubs or barrels. Just make sure they have drainage holes!
* **Potting Mix:** Don’t use garden soil! It’s too heavy and doesn’t drain well in containers. Instead, use a high-quality potting mix specifically designed for container gardening. Look for a mix that contains peat moss, perlite, and vermiculite.
* **Kale Seeds or Seedlings:** You can start kale from seeds or buy seedlings from a nursery. Seedlings are faster, but seeds are cheaper. Choose varieties that are well-suited to your climate.
* **Fertilizer:** Kale is a heavy feeder, so you’ll need to fertilize it regularly. Use a balanced organic fertilizer or a fertilizer specifically formulated for leafy greens.
* **Watering Can or Hose:** For watering your plants.
* **Trowel or Shovel:** For planting.
* **Gloves:** To protect your hands.
* **Protective Layer (Optional):** Rubber mats or wooden pallets to protect your roofing material.
* **Windbreak Material (Optional):** Shade cloth, fencing, or tall plants to protect your kale from strong winds.
* **Measuring Tape:** To measure your space and plan your garden layout.
Step-by-Step Planting Guide
Alright, let’s get our hands dirty! Here’s how to plant your kale:
1. **Prepare Your Containers:** If you’re using new containers, make sure they have drainage holes. If you’re using old containers, clean them thoroughly with soap and water. Place your protective layer (rubber mats or wooden pallets) on your rooftop where you plan to put your containers. This will protect your roofing material and help with drainage.
2. **Fill Your Containers with Potting Mix:** Fill each container with potting mix, leaving about an inch of space at the top. Gently pat down the soil to remove any air pockets.
3. **Plant Your Kale Seeds or Seedlings:**
* **From Seeds:** Sow the seeds about ½ inch deep and 1 inch apart. Water gently. Keep the soil moist until the seeds germinate, which usually takes about 5-10 days. Once the seedlings emerge, thin them out so that they are about 6-8 inches apart.
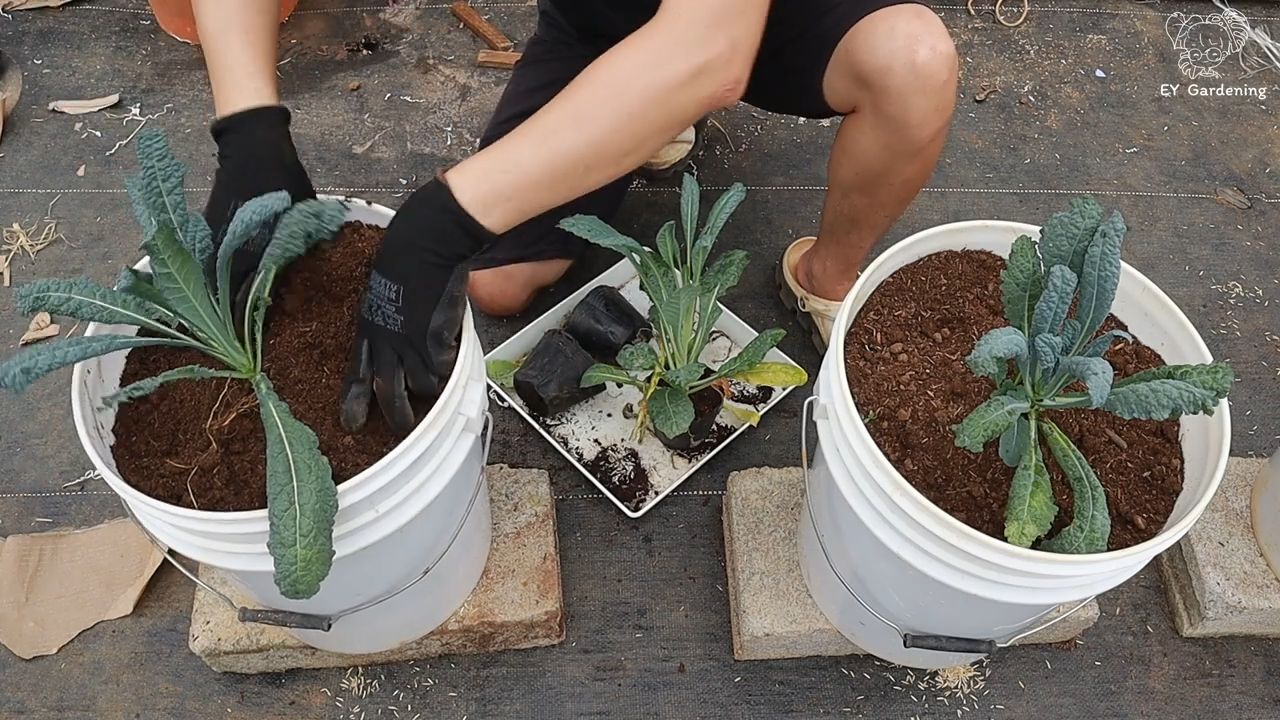
* **From Seedlings:** Dig a hole in the potting mix that is slightly larger than the root ball of the seedling. Gently remove the seedling from its container and loosen the roots. Place the seedling in the hole and backfill with potting mix. Water thoroughly. Space the seedlings about 6-8 inches apart.
4. **Water Thoroughly:** Water your newly planted kale thoroughly. Make sure the water drains out of the drainage holes.
5. **Fertilize:** Apply a balanced organic fertilizer or a fertilizer specifically formulated for leafy greens according to the package directions.
6. **Mulch (Optional):** Add a layer of mulch around your kale plants to help retain moisture and suppress weeds. You can use straw, shredded leaves, or wood chips.
Maintaining Your Rooftop Kale Garden
Now that your kale is planted, it’s time to keep it happy and healthy!
* **Watering:** Water your kale regularly, especially during hot, dry weather. Check the soil moisture by sticking your finger into the soil. If the top inch of soil is dry, it’s time to water. Water deeply, until the water drains out of the drainage holes. Avoid overwatering, as this can lead to root rot.
* **Fertilizing:** Fertilize your kale every 2-3 weeks with a balanced organic fertilizer or a fertilizer specifically formulated for leafy greens. Follow the package directions.
* **Pest Control:** Keep an eye out for pests like aphids, cabbage worms, and flea beetles. You can control these pests with organic methods like insecticidal soap, neem oil, or handpicking.
* **Weed Control:** Remove any weeds that pop up in your containers. Weeds compete with your kale for nutrients and water.
* **Wind Protection:** If your rooftop is windy, provide some wind protection for your kale plants. You can use shade cloth, fencing, or tall plants to create a windbreak.
* **Sun Protection (During Heat Waves):** During extreme heat, kale can benefit from some afternoon shade. Use shade cloth to protect your plants from the scorching sun.
* **Pruning:** Remove any yellowing or damaged leaves. This will help to keep your plants healthy and productive.
Harvesting Your Kale
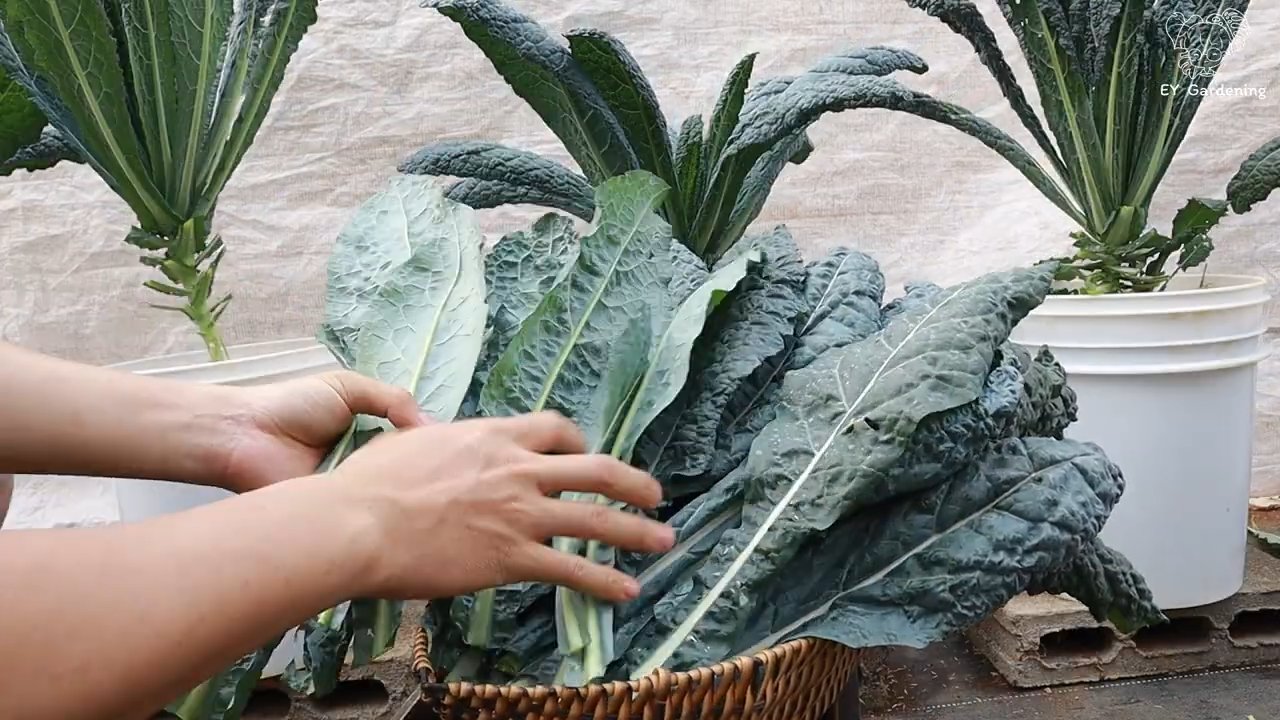
The best part! You can start harvesting kale leaves when they are about 6-8 inches long.
* **Harvesting Technique:** Harvest the outer leaves first, leaving the inner leaves to continue growing. You can harvest kale leaves continuously throughout the growing season.
* **Storage:** Store kale leaves in the refrigerator in a plastic bag for up to a week.
Addressing Common Rooftop Gardening Challenges
Rooftop gardening comes with its own set of unique challenges. Here’s how to tackle them:
* **Weight Restrictions:** As mentioned earlier, weight is a major concern. Use lightweight containers and potting mix. Consider using self-watering containers, which can reduce the need for frequent watering and thus reduce the overall weight. Distribute the weight evenly across your rooftop.
* **Wind:** Wind can be a major problem on rooftops. Use windbreaks to protect your plants. Choose sturdy containers that won’t blow over. You can also anchor your containers to the roof using ropes or straps.
* **Heat:** Rooftops can get very hot in the summer. Use light-colored containers to reflect heat. Water your plants regularly and provide shade during the hottest part of the day.
* **Drainage:** Proper drainage is essential for container gardening. Make sure your containers have drainage holes and that the potting mix drains well. Avoid overwatering.
* **Accessibility:** Getting water and supplies up to your rooftop can be challenging. Consider installing an outdoor faucet or using a long hose. Use a wheelbarrow or cart to transport heavy items.
Choosing the Right Kale Variety
There are many different varieties of kale to choose from, each with its own unique flavor and texture. Here are a few popular options:
* **Lacinato (Dinosaur) Kale:** This variety has dark green, slightly bumpy leaves with a mild, slightly sweet flavor. It’s a great choice for salads, soups, and stir-fries.
* **Curly Kale:** This variety has tightly curled, dark green leaves with a slightly bitter flavor. It’s a good choice for chips, smoothies, and cooked dishes.
* **Red Russian Kale:** This variety has flat, fringed leaves with a reddish-purple hue and a mild, slightly sweet flavor. It’s a beautiful and delicious addition to any garden.
* **Redbor Kale:** This variety has deeply ruffled, purple leaves with a mild, slightly sweet flavor. It’s a stunning ornamental kale that is also edible.
Extending Your Growing Season
Want to enjoy fresh kale for as long as possible? Here are a few tips for extending your growing season:
* **Start Seeds Indoors:** Start your kale seeds indoors 6-8 weeks before the last expected
Conclusion
So, there you have it! Creating your own rooftop kale garden is not just a trendy endeavor; it’s a genuinely rewarding experience that brings fresh, nutritious greens right to your doorstep. We’ve walked you through the simple steps to transform your underutilized rooftop space into a thriving source of delicious and healthy kale.
Why is this DIY trick a must-try? Because it empowers you to take control of your food source, reduces your carbon footprint, and provides you with the freshest possible ingredients for your meals. Imagine stepping outside and harvesting vibrant, crisp kale leaves just moments before adding them to your salad, smoothie, or stir-fry. The taste difference alone is worth the effort! Plus, you’ll know exactly where your food comes from and how it was grown, free from harmful pesticides and chemicals.
Beyond the basic setup, there are countless ways to personalize your rooftop kale garden. Consider experimenting with different varieties of kale, such as curly kale, dinosaur kale (lacinato), or red Russian kale. Each variety offers a unique flavor and texture profile, adding variety to your culinary creations. You can also companion plant your kale with other herbs and vegetables, such as rosemary, thyme, or even strawberries, to create a diverse and thriving ecosystem on your rooftop.
For those with limited space, vertical gardening techniques can maximize your yield. Utilize stacked planters, hanging baskets, or even repurposed pallets to create a visually stunning and space-efficient kale garden. Remember to choose a location that receives at least six hours of sunlight per day and to provide adequate drainage to prevent waterlogging.
Don’t be afraid to get creative with your container choices. Upcycled materials like old tires, wooden crates, or even plastic storage bins can be transformed into stylish and functional planters. Just be sure to drill drainage holes in the bottom to allow excess water to escape.
We understand that starting a garden can seem daunting, but trust us, the rewards are well worth the effort. The satisfaction of harvesting your own homegrown kale is unparalleled, and the health benefits are undeniable. Plus, gardening is a fantastic way to relieve stress, connect with nature, and beautify your living space.
We wholeheartedly encourage you to give this DIY rooftop kale garden a try. It’s a simple, affordable, and sustainable way to enhance your life and your diet. Once you’ve experienced the joy of growing your own kale, you’ll never look at store-bought greens the same way again.
And most importantly, we want to hear about your experiences! Share your photos, tips, and challenges with us in the comments below. Let’s build a community of rooftop kale gardeners and inspire others to embrace the joys of homegrown food. We are eager to see your rooftop kale garden and learn from your experiences. Happy gardening!
Frequently Asked Questions (FAQ)
What kind of kale is best for a rooftop garden?
The best type of kale for your rooftop garden depends on your personal preferences and climate. Curly kale is a classic choice, known for its ruffled leaves and slightly bitter flavor. Dinosaur kale (lacinato) has a milder, sweeter taste and a unique, almost prehistoric appearance. Red Russian kale offers a beautiful reddish-purple hue and a slightly peppery flavor. Consider your taste preferences and the amount of sunlight your rooftop receives when making your selection. Experimenting with different varieties is a great way to discover your favorites. Also, consider the size of the mature plant. Some kale varieties can grow quite large, so choose varieties that are suitable for container gardening if space is limited.
How much sunlight does my rooftop kale garden need?
Kale thrives in full sun, requiring at least six hours of direct sunlight per day. If your rooftop receives less than six hours of sunlight, you may need to supplement with grow lights. Insufficient sunlight can result in leggy, weak plants with poor leaf production. Observe your rooftop throughout the day to determine the areas that receive the most sunlight and position your kale plants accordingly. If you live in a particularly hot climate, providing some afternoon shade can help prevent the leaves from scorching.
What kind of soil should I use for my rooftop kale garden?
Use a high-quality potting mix that is well-draining and rich in organic matter. Avoid using garden soil, as it can become compacted in containers and hinder drainage. A good potting mix will provide the necessary nutrients and aeration for healthy kale growth. You can also amend your potting mix with compost or aged manure to further enrich the soil. Consider adding perlite or vermiculite to improve drainage and aeration.
How often should I water my rooftop kale garden?
Water your kale plants regularly, especially during hot, dry weather. The soil should be consistently moist but not waterlogged. Check the soil moisture by sticking your finger about an inch into the soil. If it feels dry, it’s time to water. Water deeply, allowing the water to drain out of the bottom of the container. Avoid overhead watering, as this can promote fungal diseases. Consider using a soaker hose or drip irrigation system to deliver water directly to the roots.
How do I fertilize my rooftop kale garden?
Kale is a heavy feeder and benefits from regular fertilization. Use a balanced organic fertilizer, such as fish emulsion or compost tea, every two to three weeks. Follow the instructions on the fertilizer packaging carefully. Avoid over-fertilizing, as this can burn the roots and damage the plants. You can also side-dress your kale plants with compost or aged manure every few weeks to provide a slow-release source of nutrients.
How do I protect my rooftop kale garden from pests?
Kale is susceptible to several common garden pests, such as aphids, cabbage worms, and flea beetles. Inspect your plants regularly for signs of infestation. Handpick pests whenever possible. You can also use organic pest control methods, such as insecticidal soap or neem oil. Covering your kale plants with row covers can also help prevent pests from reaching the plants. Attracting beneficial insects, such as ladybugs and lacewings, can also help control pest populations.
When can I harvest my rooftop kale?
You can begin harvesting kale leaves as soon as they are large enough to eat, typically when they are about 4-6 inches long. Harvest the outer leaves first, leaving the inner leaves to continue growing. This will encourage the plant to produce more leaves. Avoid harvesting more than one-third of the plant at a time. Kale is most flavorful after a light frost.
Can I grow kale on my rooftop during the winter?
Kale is a cold-hardy vegetable and can be grown on your rooftop during the winter in many climates. However, you may need to provide some protection from frost and snow. Covering your kale plants with row covers or a cold frame can help insulate them and protect them from the elements. In very cold climates, you may need to bring your kale plants indoors or into a greenhouse.
How do I deal with bolting in my rooftop kale garden?
Bolting is when a plant prematurely flowers and goes to seed. This can happen when kale is exposed to prolonged periods of hot weather. Bolting can make the leaves taste bitter. To prevent bolting, try to provide some shade during the hottest part of the day. You can also choose bolt-resistant varieties of kale. If your kale does bolt, you can still harvest the leaves, but they may not be as flavorful.
Is rooftop gardening safe?
Rooftop gardening can be safe with proper precautions. Ensure your roof can handle the added weight of the soil, containers, and plants. Consult with a structural engineer if you have any concerns. Use lightweight containers and potting mix to minimize the weight. Install a railing or other safety barrier around the perimeter of your rooftop. Be mindful of weather conditions, such as high winds, and take appropriate precautions to secure your plants and containers. Always use caution when working on your rooftop and avoid working alone.
Leave a Comment