

Vertical sweet potato growing: Ever dreamt of harvesting a bounty of sweet potatoes without sacrificing precious garden space? I know I have! Imagine vines cascading down a tower, bursting with those vibrant orange treasures. Forget sprawling vines taking over your entire backyard; this DIY project lets you maximize your yield in a minimal footprint.
The concept of vertical gardening isn’t new. From the Hanging Gardens of Babylon to modern-day urban farms, humans have always sought innovative ways to cultivate plants in limited spaces. Sweet potatoes, with their vigorous growth habits, are surprisingly well-suited for this technique. For centuries, sweet potatoes have been a staple in diets around the world, offering essential nutrients and a delicious, earthy flavor. But traditional in-ground growing can be challenging, especially for those of us with small gardens or poor soil.
That’s where this DIY vertical sweet potato growing trick comes in! This method not only saves space but also improves drainage, reduces pest problems, and makes harvesting a breeze. Plus, let’s be honest, it looks incredibly cool! I’m going to show you a simple, step-by-step guide to building your own vertical sweet potato tower, so you can enjoy a homegrown harvest even if you only have a balcony or patio. Get ready to impress your neighbors and enjoy the sweet taste of success!
DIY Vertical Sweet Potato Tower: Grow More in Less Space!
Hey there, fellow gardening enthusiasts! Are you dreaming of a bountiful sweet potato harvest but short on garden space? Well, I’ve got just the project for you: a DIY vertical sweet potato tower! This ingenious method lets you grow a ton of sweet potatoes in a surprisingly small footprint. It’s fun, it’s rewarding, and it’s a fantastic way to maximize your yield. Let’s get started!
What You’ll Need
Before we dive in, let’s gather all the necessary materials. This will make the whole process smoother and more enjoyable.
* Hardware Cloth (1/2 inch mesh): This will form the structure of our tower. I recommend getting a roll that’s at least 36 inches wide. The length will depend on how tall you want your tower, but I suggest starting with about 10 feet.
* Zip Ties: Lots of them! These are essential for securing the hardware cloth and creating a sturdy structure. I usually buy a pack of 100, just to be safe.
* Landscape Fabric: This will line the inside of the tower, preventing soil from escaping. You’ll need enough to completely line the inside of your hardware cloth cylinder.
* Potting Mix: A high-quality potting mix is crucial for healthy sweet potato growth. Avoid using garden soil, as it can compact and hinder root development. I prefer a mix that’s light, airy, and well-draining.
* Compost: Adding compost to your potting mix will provide essential nutrients for your sweet potatoes.
* Sweet Potato Slips: These are the sprouts that grow from sweet potatoes, and they’re what you’ll plant in your tower. You can purchase them online or at your local garden center. You can also easily grow your own!
* Watering Can or Hose: For watering your sweet potatoes, of course!
* Gloves: To protect your hands from the hardware cloth.
* Wire Cutters or Heavy-Duty Scissors: For cutting the hardware cloth.
* Measuring Tape: To ensure accurate measurements.
* Staple Gun (Optional): For extra security when attaching the landscape fabric.
Building the Tower: Step-by-Step Instructions
Okay, let’s get our hands dirty! Here’s how to build your very own vertical sweet potato tower:
1. Cut the Hardware Cloth: Using your measuring tape and wire cutters, cut a piece of hardware cloth that’s approximately 36 inches wide and 9 feet long. This will give you a tower that’s about 3 feet tall. Remember to wear gloves to protect your hands from the sharp edges of the hardware cloth.
2. Form the Cylinder: Carefully roll the hardware cloth into a cylinder shape. Overlap the edges by a few inches. This overlap is where you’ll secure the cylinder.
3. Secure the Cylinder with Zip Ties: Using your zip ties, secure the overlapping edges of the hardware cloth cylinder. Place zip ties every few inches along the entire length of the overlap. Make sure the zip ties are tight to create a strong and stable structure. Trim off the excess zip tie ends with your wire cutters.
4. Line the Cylinder with Landscape Fabric: Now, it’s time to line the inside of the hardware cloth cylinder with landscape fabric. This will prevent the soil from washing out. Cut a piece of landscape fabric that’s slightly larger than the inside of the cylinder.
5. Attach the Landscape Fabric: Carefully insert the landscape fabric into the cylinder, making sure it covers the entire inside surface. Fold the top edge of the fabric over the top of the hardware cloth and secure it with zip ties or staples (if you’re using a staple gun). Repeat this process for the bottom edge of the fabric. You want to create a secure liner that won’t tear or come loose.
6. Prepare Your Soil Mix: In a large container or wheelbarrow, mix your potting mix and compost. I usually use a ratio of about 2 parts potting mix to 1 part compost. Mix thoroughly until the compost is evenly distributed throughout the potting mix.
7. Start Filling the Tower: Now, it’s time to start filling your tower with the soil mix. Add a few inches of soil to the bottom of the tower.
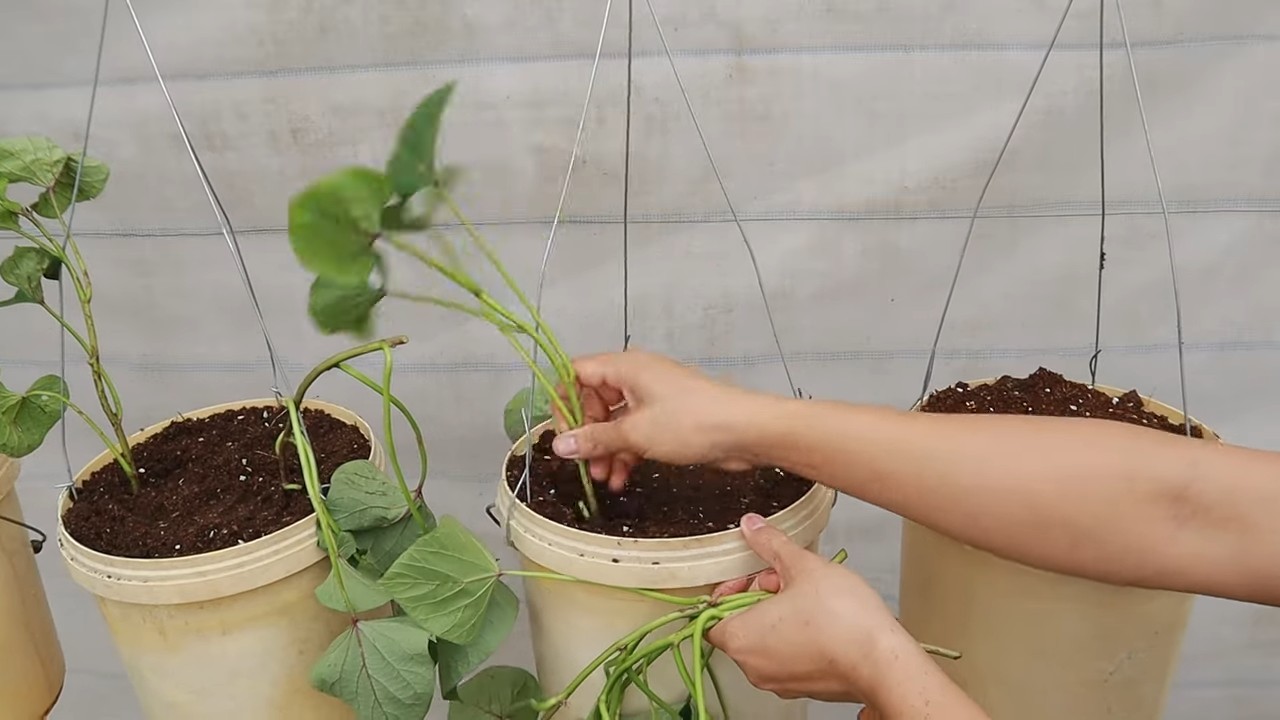
8. Plant Your Sweet Potato Slips (First Layer): Gently plant your sweet potato slips around the base of the tower, spacing them about 6-8 inches apart. Make sure the roots are well covered with soil.
9. Continue Filling and Planting: Continue adding soil and planting sweet potato slips in layers. As you add more soil, create small pockets or shelves around the inside of the tower where you can plant the slips. Space the slips about 6-8 inches apart in each layer.
10. Top Off the Tower: Once you’ve reached the top of the tower, fill it with soil and plant a few more sweet potato slips on top.
11. Water Thoroughly: After planting all your sweet potato slips, water the tower thoroughly. This will help settle the soil and encourage root growth.
Caring for Your Vertical Sweet Potato Tower
Now that your tower is built and planted, it’s important to provide proper care to ensure a successful harvest.
* Watering: Sweet potatoes need consistent moisture, especially during hot weather. Water your tower regularly, making sure the soil stays moist but not waterlogged. I usually water every day or two, depending on the weather conditions.
* Sunlight: Sweet potatoes thrive in full sun, so make sure your tower is located in a sunny spot that receives at least 6-8 hours of direct sunlight per day.
* Fertilizing: While compost provides a good base of nutrients, you may need to supplement with a balanced fertilizer during the growing season. Follow the instructions on the fertilizer package. I like to use a liquid fertilizer diluted in water every few weeks.
* Pest Control: Keep an eye out for pests such as aphids, flea beetles, and sweet potato weevils. If you notice any pests, take action immediately to prevent them from damaging your plants. Insecticidal soap or neem oil can be effective for controlling many common garden pests.
* Support: As your sweet potato vines grow, they may need some support. You can use stakes or trellises to help keep the vines off the ground. This will also improve air circulation and reduce the risk of disease.
Harvesting Your Sweet Potatoes
The moment we’ve all been waiting for! Sweet potatoes are typically ready to harvest about 90-120 days after planting. Here’s how to tell when it’s time to harvest:
* Check the Vines: The vines will start to turn yellow and die back. This is a sign that the sweet potatoes are maturing.
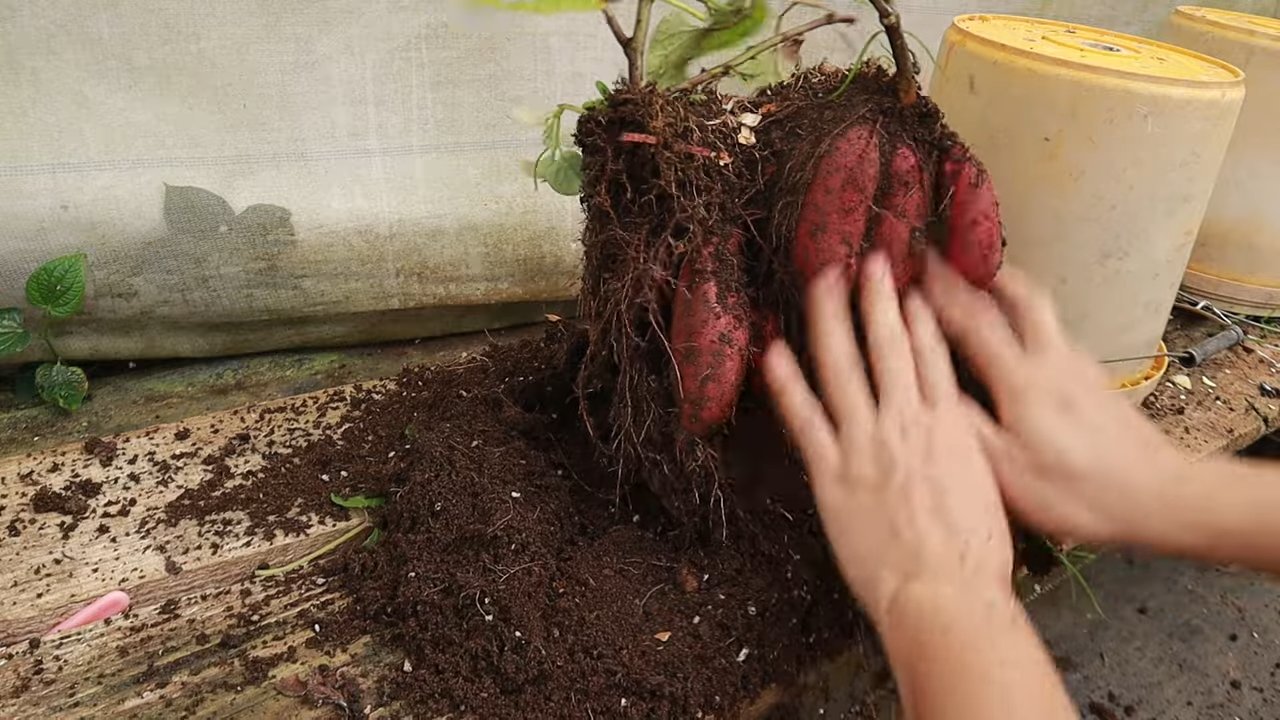
* Dig a Test Potato: Carefully dig around the base of one of the plants and pull up a sweet potato. If it’s the size you want and the skin is firm, it’s time to harvest.
* Harvest Carefully: Use a garden fork or shovel to carefully dig around the base of the tower and lift out the sweet potatoes. Be gentle to avoid damaging the potatoes.
* Curing: After harvesting, sweet potatoes need to be cured for about 7-10 days in a warm, humid place. This will help them develop their sweetness and improve their storage life. I usually cure mine in a shed or garage.
* Storage: Store your cured sweet potatoes in a cool, dry place. They should last for several months if stored properly.
Troubleshooting
Even with the best planning, sometimes things don’t go exactly as expected. Here are a few common problems you might encounter and how to address them:
* Yellowing Leaves: This could be a sign of nutrient deficiency, overwatering, or underwatering. Check the soil moisture and adjust your watering schedule accordingly. You may also need to fertilize your plants.
* Slow Growth: This could be due to insufficient sunlight, poor soil, or pests. Make sure your tower is in a sunny location and that you’re using a high-quality potting mix. Check for pests and take action if necessary.
* Rotting Potatoes: This is usually caused by overwatering or poor drainage. Make sure your tower has good drainage and avoid overwatering.
Tips and Tricks for Success
Here are a few extra tips and tricks to help you get the most out of your vertical sweet potato tower:
* Choose the Right Variety: Some sweet potato varieties are better suited for container gardening than others. Look for varieties that are compact and don’t produce excessively long vines.
* Start with Healthy Slips: Make sure you’re starting with healthy, vigorous sweet potato slips. Avoid slips that are yellowed, wilted, or have signs of disease.
* Rotate Your Crops: To prevent soilborne diseases, rotate your crops each year. Don’t plant sweet potatoes in the same spot year after year
Conclusion
So, there you have it! Vertical sweet potato growing isn’t just a gardening trend; it’s a game-changer for anyone looking to maximize their yield, conserve space, and add a touch of visual appeal to their garden or balcony. We’ve explored the ins and outs of this innovative technique, highlighting its efficiency, accessibility, and the sheer joy of harvesting sweet potatoes from a towering, verdant structure.
Why is this a must-try? Because it addresses several common gardening challenges simultaneously. Limited space? Vertical growing solves that. Want a higher yield? The concentrated environment encourages robust growth. Looking for a visually stunning garden feature? A sweet potato tower is a conversation starter. Plus, it’s incredibly rewarding to witness the transformation from a simple slip to a bountiful harvest.
But the beauty of vertical sweet potato growing lies in its adaptability. Feel free to experiment with different container types. While we’ve focused on using readily available materials like chicken wire and burlap, you could also explore using stacked tires, repurposed plastic containers, or even commercially available vertical planters. The key is to ensure adequate drainage and a nutrient-rich growing medium.
Consider also experimenting with different sweet potato varieties. While Beauregard is a popular choice, other varieties like Covington, Japanese sweet potatoes, or even ornamental sweet potato vines can add visual diversity to your vertical garden. Just remember to research the specific needs of each variety to ensure optimal growth.
Don’t be afraid to get creative with your support structure. Instead of a simple cylindrical tower, you could build a tiered structure or even a living wall. The possibilities are endless! You can also companion plant with herbs like basil or rosemary to deter pests and enhance the flavor of your sweet potatoes. Marigolds are also a great option for pest control.
The most important thing is to dive in and give it a try. Vertical sweet potato growing is a relatively low-risk, high-reward gardening endeavor. The initial setup might require a bit of effort, but the long-term benefits – a plentiful harvest of delicious sweet potatoes and a visually stunning garden – are well worth it.
We encourage you to embark on your own vertical sweet potato growing adventure. Document your progress, experiment with different techniques, and most importantly, share your experiences with us and the wider gardening community. Let us know what worked, what didn’t, and any tips or tricks you discovered along the way. Together, we can unlock the full potential of this innovative gardening method and enjoy the sweet rewards of our labor. So, grab your slips, gather your materials, and get ready to grow up! We are confident that you will find that **vertical sweet potato growing** is a rewarding and productive experience.
Frequently Asked Questions (FAQ)
What are the best sweet potato varieties for vertical growing?
While many sweet potato varieties can be grown vertically, some are better suited than others. Beauregard is a popular choice due to its vigorous growth and high yield. Covington is another excellent option, known for its disease resistance and smooth skin. Japanese sweet potatoes, with their purple skin and white flesh, can also thrive in vertical systems. Consider the size of the mature sweet potatoes when selecting a variety, as larger varieties may require more support. Also, consider the climate you are in. Some varieties are more suited to warmer climates than others.
How much sunlight do vertical sweet potatoes need?
Sweet potatoes are sun-loving plants and require at least 6-8 hours of direct sunlight per day to thrive. Insufficient sunlight can lead to stunted growth, reduced yields, and pale foliage. If you live in an area with limited sunlight, consider using grow lights to supplement natural light. Position your vertical garden in the sunniest spot available and monitor the plants closely for signs of sun stress, such as wilting or scorched leaves.
What type of soil is best for vertical sweet potato growing?
Sweet potatoes prefer well-draining, sandy loam soil that is rich in organic matter. Heavy clay soil can become waterlogged and inhibit root development. Amend your soil with compost, aged manure, or other organic materials to improve drainage and fertility. A slightly acidic soil pH of 6.0-6.5 is ideal. You can test your soil pH using a soil testing kit and adjust it accordingly with lime or sulfur.
How often should I water my vertical sweet potatoes?
Watering frequency depends on several factors, including the weather, the type of container you are using, and the stage of growth. Generally, sweet potatoes need consistent moisture, especially during the early stages of growth. Water deeply whenever the top inch of soil feels dry to the touch. Avoid overwatering, as this can lead to root rot. During hot, dry weather, you may need to water daily. Consider using a soaker hose or drip irrigation system to deliver water directly to the roots.
How do I fertilize my vertical sweet potatoes?
Sweet potatoes are heavy feeders and benefit from regular fertilization. Use a balanced fertilizer with a ratio of 10-10-10 or 5-10-10. Apply fertilizer every 2-3 weeks during the growing season, following the instructions on the fertilizer label. Avoid over-fertilizing, as this can lead to excessive vine growth at the expense of tuber development. You can also supplement with organic fertilizers such as compost tea or fish emulsion.
How do I prevent pests and diseases in my vertical sweet potato garden?
Prevention is key to managing pests and diseases in your vertical sweet potato garden. Choose disease-resistant varieties, practice crop rotation, and maintain good sanitation. Regularly inspect your plants for signs of pests or diseases. Common pests include aphids, flea beetles, and sweet potato weevils. Control pests with insecticidal soap, neem oil, or by handpicking them off the plants. Common diseases include fungal leaf spots and root rot. Prevent fungal diseases by ensuring good air circulation and avoiding overwatering.
When is the best time to harvest my vertical sweet potatoes?
Sweet potatoes are typically ready to harvest 90-120 days after planting. The leaves will begin to turn yellow and the vines will start to die back. To test for maturity, dig up a small sample sweet potato. If the skin is firm and the flesh is well-colored, the sweet potatoes are ready to harvest. Harvest on a dry day to prevent rot. Carefully dig around the base of the plant and lift the sweet potatoes out of the soil. Avoid damaging the sweet potatoes during harvest.
How do I cure and store my sweet potatoes?
Curing sweet potatoes is essential for developing their sweetness and improving their storage life. After harvesting, gently brush off any excess soil and place the sweet potatoes in a warm, humid place (80-85°F and 85-90% humidity) for 7-10 days. This allows the skins to harden and any minor cuts or bruises to heal. After curing, store the sweet potatoes in a cool, dry, and dark place (55-60°F) with good ventilation. Avoid storing sweet potatoes in the refrigerator, as this can cause them to develop a hard core. Properly cured and stored sweet potatoes can last for several months.
Can I grow sweet potatoes from store-bought sweet potatoes?
Yes, you can grow sweet potatoes from store-bought sweet potatoes, but it’s not always guaranteed to be successful. Choose organic sweet potatoes, as non-organic sweet potatoes may be treated with chemicals to prevent sprouting. Suspend the sweet potato in a jar of water, with the bottom half submerged. Place the jar in a warm, sunny location. After a few weeks, sprouts will begin to emerge from the sweet potato. Once the sprouts are several inches long, carefully twist them off and plant them in a pot of soil. Keep the soil moist and warm until the slips develop roots. Then, transplant the slips into your vertical garden.
What if my vertical sweet potato plant only produces vines and no sweet potatoes?
Several factors can contribute to a lack of sweet potato production. Insufficient sunlight, over-fertilization with nitrogen, and poor soil drainage can all inhibit tuber development. Ensure that your plants are receiving at least 6-8 hours of direct sunlight per day. Avoid using fertilizers that are high in nitrogen, as this will promote vine growth at the expense of tuber development. Improve soil drainage by amending with compost or other organic materials. Also, make sure you are using a variety that is suited to your climate and growing conditions. Finally, be patient! It can take several months for sweet potatoes to mature.

Leave a Comment