

Grow Potatoes in Plastic Bottles: Imagine harvesting a bounty of fresh, homegrown potatoes right from your balcony or patio, all thanks to a few recycled plastic bottles! Sounds too good to be true? Well, get ready to be amazed because this DIY project is not only incredibly simple but also a fantastic way to maximize your gardening space and minimize waste.
For centuries, cultivating potatoes has been a cornerstone of diets worldwide, from the Andean highlands where they originated to the bustling cities of today. But traditional potato farming often requires large plots of land. That’s where this clever hack comes in! This method of growing potatoes in plastic bottles is a modern twist on age-old agricultural practices, bringing the joy of fresh produce to even the smallest living spaces.
Why should you try this? Because let’s face it, who doesn’t love the taste of freshly dug potatoes? Plus, this DIY project is perfect for urban dwellers, apartment residents, or anyone with limited garden space. It’s also a fantastic way to teach kids about gardening and sustainability. I’m excited to show you how easy it is to grow potatoes in plastic bottles, providing you with a sustainable and rewarding gardening experience. Get ready to roll up your sleeves and transform those empty bottles into mini potato farms!
Grow Potatoes in Plastic Bottles: A Fun and Easy DIY Project!
Hey there, fellow gardening enthusiasts! Ever thought about growing potatoes in a plastic bottle? It’s a fantastic way to garden in small spaces, recycle, and watch the magic of potato growth unfold right before your eyes. I’ve done this myself, and trust me, it’s incredibly rewarding. Plus, harvesting is a breeze! Let’s dive into how you can create your own potato bottle garden.
What You’ll Need:
Before we get started, gather these essential supplies:
* Large Plastic Bottles: Think 2-liter soda bottles or even larger water bottles. The taller, the better, as this gives the potatoes room to grow. I usually aim for at least three bottles per potato plant.
* Seed Potatoes: These are potatoes specifically grown for planting. You can find them at your local garden center. Choose varieties that are known to do well in containers.
* Potting Soil: A good quality potting mix is crucial. Avoid using garden soil, as it can compact and hinder drainage.
* Sharp Knife or Scissors: For cutting the plastic bottles. Be careful!
* Drill or Nail: To create drainage holes.
* Water: For watering your potato plants.
* Optional: Compost or slow-release fertilizer for added nutrients.
Preparing the Bottles:
This is where we transform those plastic bottles into mini potato farms!
1. Clean the Bottles: Thoroughly wash the plastic bottles with soap and water to remove any residue. Rinse them well and let them dry completely. This helps prevent any mold or bacteria from affecting your potatoes.
2. Cut the First Bottle: Take your first bottle and carefully cut off the top, about 2-3 inches from the neck. This will create a pot for your initial planting. I like to use a sharp utility knife for this, but scissors work too. Just be extra cautious!
3. Drill Drainage Holes: In the bottom of the cut bottle, drill several drainage holes. This is super important to prevent waterlogging, which can rot your potato roots. I usually make about 4-5 holes, evenly spaced.
4. Prepare the Remaining Bottles: For the remaining bottles, cut off the bottom completely. These will act as extensions as your potato plant grows. You’ll want to cut them straight across to ensure they stack neatly.
Planting Your Seed Potato:
Now for the fun part – getting those potatoes in the ground (or, in this case, the bottle!).
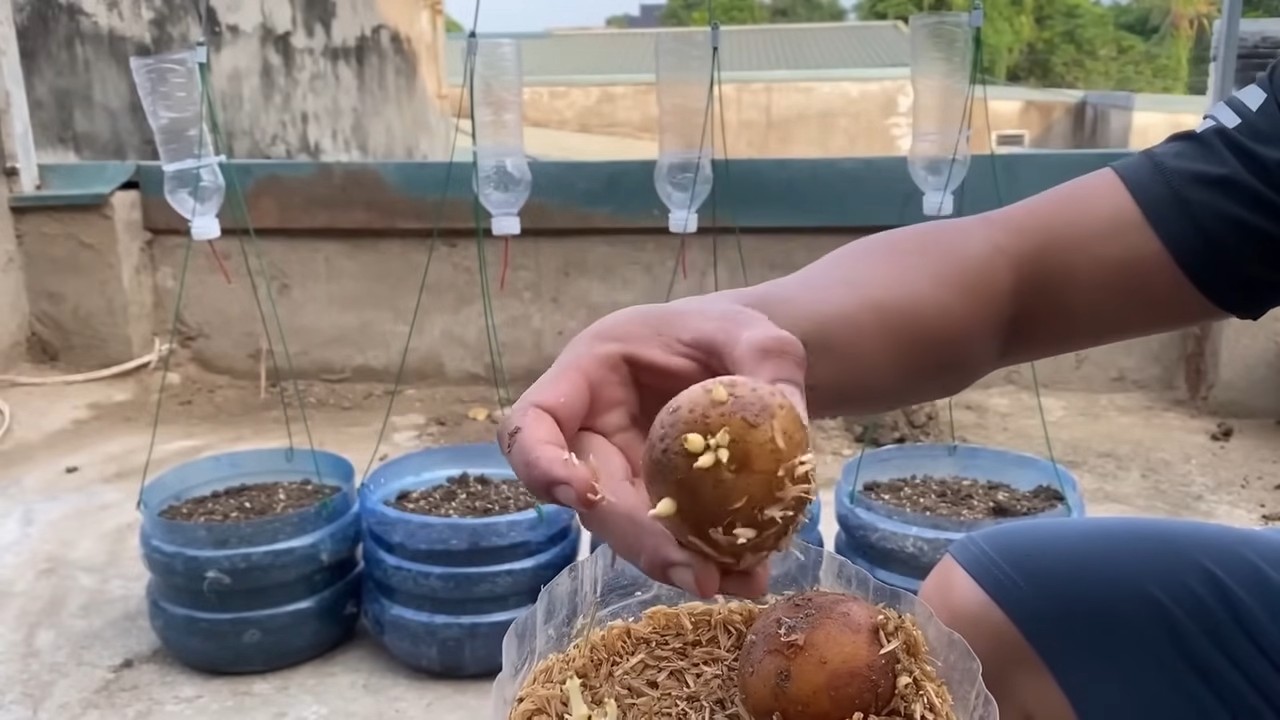
1. Chitting (Optional but Recommended): Chitting is the process of encouraging your seed potatoes to sprout before planting. This gives them a head start. To chit, place your seed potatoes in a cool, bright location for a few weeks until they develop short, green sprouts (eyes). I usually use an egg carton to keep them separated.
2. Cut the Seed Potato (If Necessary): If your seed potato is large (bigger than an egg), you can cut it into smaller pieces, ensuring each piece has at least one or two “eyes” (sprouts). Let the cut pieces dry for a day or two to prevent rotting.
3. Fill the First Bottle: Fill the cut bottle with about 4-6 inches of potting soil. I like to mix in a bit of compost at this stage for extra nutrients.
4. Plant the Seed Potato: Place the seed potato (or potato pieces) on top of the soil, with the sprouts facing upwards. Cover it with another 2-3 inches of potting soil.
5. Water Thoroughly: Gently water the soil until it’s moist but not soggy.
Caring for Your Potato Plant:
This is where patience and a little bit of attention come in.
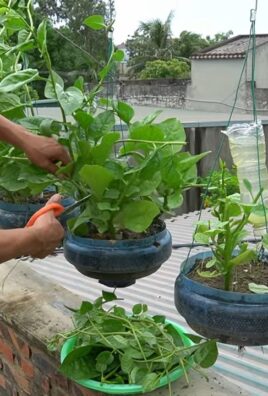
1. Location: Place your bottle potato garden in a sunny location that receives at least 6-8 hours of sunlight per day. Potatoes love sunshine!
2. Watering: Water regularly, keeping the soil consistently moist but not waterlogged. Check the soil moisture by sticking your finger in – if it feels dry an inch or two down, it’s time to water.
3. Fertilizing (Optional): If you didn’t add compost initially, you can fertilize your potato plant every few weeks with a balanced liquid fertilizer. Follow the instructions on the fertilizer packaging.
Earthing Up:
This is the key to maximizing your potato harvest!
1. Monitor Growth: As your potato plant grows, you’ll notice the stem emerging from the soil.
2. Add the Next Bottle: Once the stem reaches about 4-6 inches tall, it’s time to add the next bottle section. Carefully slide the cut bottle over the stem and onto the first bottle.
3. Fill with Soil: Fill the new bottle section with potting soil, burying the stem up to the top leaves. This encourages the plant to produce more potatoes along the buried stem.
4. Repeat the Process: Continue adding bottle sections and filling with soil as the plant grows taller. This process is called “earthing up,” and it’s crucial for maximizing your potato yield. I usually add a new section every 2-3 weeks.
Harvesting Your Potatoes:
The moment we’ve all been waiting for!
1. Timing: Potatoes are typically ready to harvest about 70-90 days after planting, depending on the variety. You’ll know they’re ready when the plant starts to flower and the foliage begins to yellow and die back.
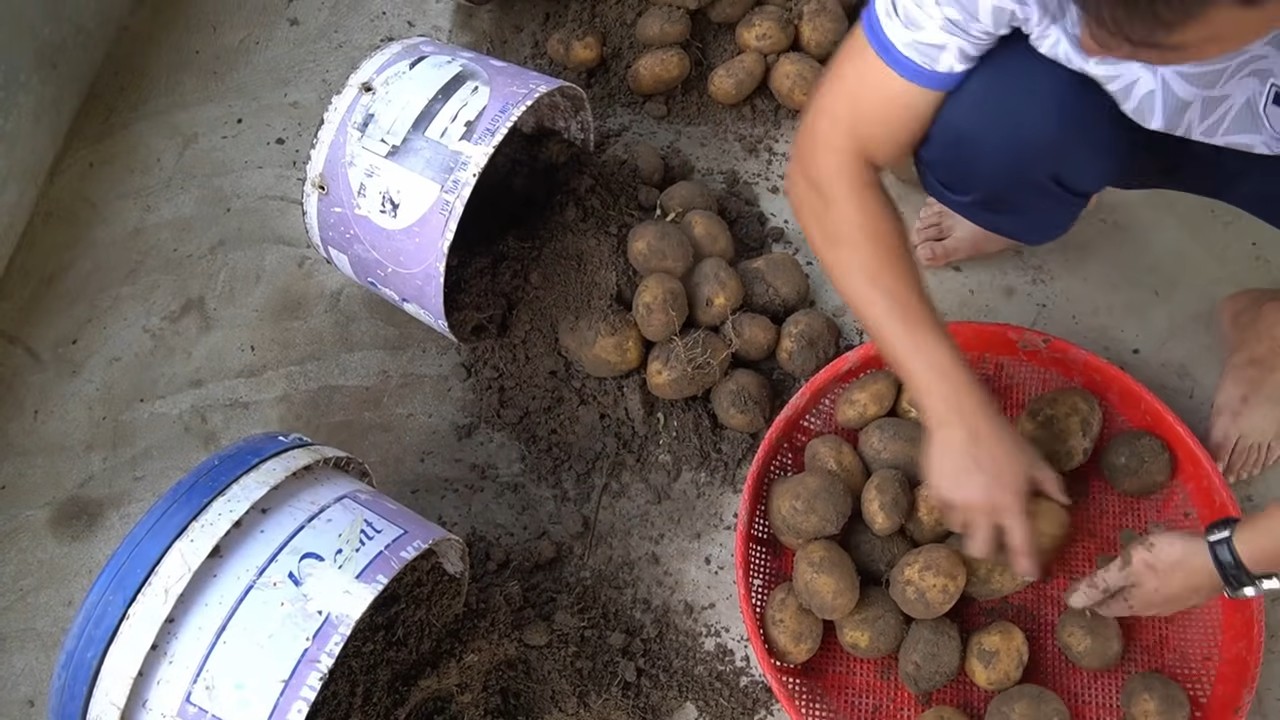
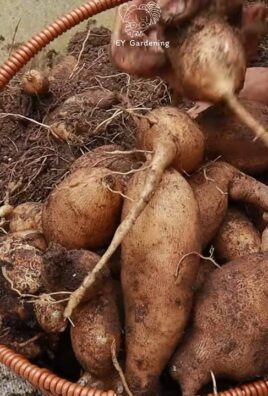
2. Harvesting: The beauty of growing potatoes in bottles is the easy harvest! Simply stop watering and let the plant dry out for a few days. Then, carefully tip the bottle over and slide out the soil and potatoes. You can also cut the bottle open if needed.
3. Enjoy Your Harvest: Wash your freshly harvested potatoes and enjoy them in your favorite recipes!
Troubleshooting:
Even with the best care, you might encounter a few challenges. Here are some common issues and how to address them:
* Yellowing Leaves: This could be a sign of overwatering, underwatering, or nutrient deficiency. Check the soil moisture and adjust your watering accordingly. If you suspect nutrient deficiency, fertilize with a balanced fertilizer.
* Pests: Keep an eye out for pests like aphids or potato beetles. You can control them with insecticidal soap or by hand-picking them off the plants.
* Disease: Potato blight is a common fungal disease that can affect potato plants. To prevent blight, ensure good air circulation and avoid overhead watering. If you notice signs of blight (brown spots on the leaves), remove the affected foliage immediately.
Tips for Success:
Here are a few extra tips to help you succeed with your bottle potato garden:
* Choose the Right Potato Variety: Some potato varieties are better suited for container growing than others. Look for varieties that are compact and produce smaller potatoes.
* Use High-Quality Potting Soil: Don’t skimp on the potting soil! A good quality potting mix will provide the necessary nutrients and drainage for your potato plants.
* Don’t Overwater: Overwatering is a common mistake that can lead to root rot. Make sure the soil is well-draining and only water when the top inch or two of soil feels dry.
* Rotate Your Crops: If you’re growing potatoes in the same bottles year after year, rotate your crops to prevent soilborne diseases.
* Have Fun! Gardening should be enjoyable. Don’t be afraid to experiment and learn from your mistakes.
Growing potatoes in plastic bottles is a fun, easy, and rewarding project that anyone can do. With a little bit of care and attention, you can enjoy a bountiful harvest of homegrown potatoes right from your own backyard (or balcony!). Happy gardening!
Conclusion
So, there you have it! Growing potatoes in plastic bottles isn’t just a quirky gardening experiment; it’s a genuinely effective and rewarding way to cultivate your own delicious spuds, even if you’re short on space or gardening experience. We’ve explored the step-by-step process, from selecting the right potato variety to harvesting your bounty, and hopefully, we’ve demystified the entire process.
The beauty of this method lies in its simplicity and accessibility. You’re repurposing materials that might otherwise end up in a landfill, reducing waste while simultaneously creating a sustainable food source. Plus, the vertical nature of the bottle garden makes it ideal for balconies, patios, or even sunny windowsills. Imagine the satisfaction of harvesting fresh, homegrown potatoes from your own little vertical farm!
But the benefits extend beyond mere convenience. Growing potatoes in plastic bottles allows for better control over the growing environment. You can easily monitor moisture levels, adjust soil composition, and protect your plants from pests and diseases. This level of control often translates to healthier, more productive plants and a more abundant harvest.
Don’t be afraid to experiment with different potato varieties to find your favorites. Consider using organic potting mix and fertilizers to ensure the best possible flavor and nutritional value. You can also try adding companion plants like marigolds or basil to your bottle garden to deter pests and attract beneficial insects.
For those looking to take their potato growing to the next level, consider these variations:
* Tiered Bottle Gardens: Create a multi-tiered system by stacking several bottles on top of each other, allowing for even more potato production in a small space.
* Hydroponic Bottle Gardens: Explore hydroponic techniques by using nutrient-rich water instead of soil. This can lead to faster growth and higher yields.
* Colored Bottles: Experiment with different colored bottles to see if they affect plant growth. Some studies suggest that certain colors can enhance photosynthesis.
Ultimately, the best way to learn is by doing. So, gather your plastic bottles, grab some seed potatoes, and embark on your own potato-growing adventure. We’re confident that you’ll be amazed by the results. The process of growing potatoes in plastic bottles is not only fun and educational, but it also provides a tangible connection to the food you eat.
We encourage you to share your experiences with us! Post photos of your bottle gardens on social media using #BottlePotatoGarden and let us know what you’ve learned. What varieties did you try? What challenges did you face? What tips do you have for other aspiring bottle gardeners? Your insights can help others discover the joys of growing their own food.
So, what are you waiting for? Get started today and experience the satisfaction of harvesting your own homegrown potatoes! You’ll be surprised at how easy and rewarding it is to grow potatoes in plastic bottles.
Frequently Asked Questions (FAQ)
What kind of plastic bottles are best for growing potatoes?
Ideally, you want to use opaque or dark-colored plastic bottles. Clear bottles allow too much light to reach the roots, which can inhibit growth and even turn the potatoes green (which makes them taste bitter and contain solanine, a toxic compound). Two-liter soda bottles or larger water bottles work well. Make sure the bottles are clean and free of any residue before using them. Avoid using bottles that have contained harsh chemicals.
How many seed potatoes can I plant in one bottle?
It depends on the size of the bottle and the size of the seed potatoes. Generally, one or two seed potatoes per two-liter bottle is a good starting point. If your seed potatoes are large, you might want to stick to just one. The goal is to give the potatoes enough space to grow without overcrowding. Overcrowding can lead to smaller potatoes and increased risk of disease.
What kind of soil should I use?
A well-draining potting mix is essential. Avoid using garden soil, as it can be too heavy and compact, hindering root growth. A mix of peat moss, perlite, and vermiculite is a good option. You can also add compost to provide extra nutrients. Ensure the soil is loose and airy to allow for proper drainage and aeration.
How often should I water my potato plants in plastic bottles?
Watering frequency depends on the weather and the type of soil you’re using. Generally, you should water when the top inch of soil feels dry to the touch. Avoid overwatering, as this can lead to root rot. Make sure the bottle has drainage holes to allow excess water to escape. During hot, dry weather, you may need to water more frequently.
How much sunlight do potato plants need?
Potato plants need at least six hours of direct sunlight per day. Choose a sunny location for your bottle garden. If you don’t have a spot that gets full sun, you can supplement with grow lights. Insufficient sunlight can lead to leggy growth and reduced potato production.
When is the best time to plant potatoes in plastic bottles?
The best time to plant potatoes is in early spring, after the last frost. You can also plant in late summer for a fall harvest. The ideal soil temperature for potato growth is between 60 and 70 degrees Fahrenheit. If you’re starting your potatoes indoors, you can plant them a few weeks before the last frost.
How long does it take to grow potatoes in plastic bottles?
It typically takes 70 to 80 days from planting to harvest. The exact time will depend on the potato variety, the growing conditions, and the weather. You’ll know your potatoes are ready to harvest when the foliage starts to turn yellow and die back.
How do I harvest potatoes from a plastic bottle?
Harvesting is the fun part! Simply cut open the bottle and carefully remove the soil. You should find a cluster of potatoes nestled within the roots. Gently brush off any excess soil and enjoy your homegrown harvest.
What are some common problems when growing potatoes in plastic bottles?
Some common problems include pests, diseases, and nutrient deficiencies. Aphids, potato beetles, and blight are common pests and diseases that can affect potato plants. To prevent these problems, use organic pest control methods, such as neem oil or insecticidal soap. Ensure your plants are getting adequate nutrients by fertilizing regularly with a balanced fertilizer.
Can I reuse the soil from my potato bottle garden?
It’s generally not recommended to reuse the soil from your potato bottle garden, especially if you’ve had any problems with pests or diseases. The soil may contain pathogens or pests that can affect future crops. It’s best to start with fresh potting mix each time you plant potatoes. You can compost the old soil to enrich your garden beds.
What kind of fertilizer should I use for potatoes in plastic bottles?
Use a balanced fertilizer with a ratio of 10-10-10 or 14-14-14. You can also use a fertilizer specifically formulated for potatoes. Apply the fertilizer according to the package directions. Avoid over-fertilizing, as this can lead to excessive foliage growth and reduced potato production.
Can I grow potatoes in plastic bottles indoors?
Yes, you can grow potatoes in plastic bottles indoors, but you’ll need to provide adequate light. Place your bottle garden near a sunny window or use grow lights to supplement natural light. Indoor potato plants may require more frequent watering and fertilization than outdoor plants.
What if my potato plants are not producing any potatoes?
There are several reasons why your potato plants might not be producing potatoes. Insufficient sunlight, poor soil, lack of nutrients, and overwatering are all potential causes. Make sure your plants are getting at least six hours of direct sunlight per day, using well-draining potting mix, fertilizing regularly, and watering only when the top inch of soil feels dry.
Can I grow different types of potatoes in plastic bottles?
Absolutely! Experiment with different potato varieties to find your favorites. Some popular varieties for container gardening include Yukon Gold, Red Pontiac, and fingerling potatoes. Consider the size and growth habit of the potato variety when choosing which ones to grow in plastic bottles.

Leave a Comment