

Cabbage in Plastic Bottles: Sounds a little crazy, right? But trust me, this ingenious DIY gardening trick is about to revolutionize your small-space gardening game! Forget sprawling fields; we’re talking about maximizing your yield, minimizing pests, and doing it all with materials you probably already have lying around.
For centuries, resourceful gardeners have sought innovative ways to cultivate crops in challenging environments. While the exact origins of bottle gardening are difficult to pinpoint, the spirit of ingenuity and making the most of limited resources is a timeless tradition found across cultures. Think of the hanging gardens of Babylon, or the intricate terraced rice paddies of Asia – humans have always found ways to coax life from the land, even when the land is scarce.
Now, why would you want to grow cabbage in plastic bottles? Well, imagine this: you live in an apartment with a tiny balcony, or maybe your garden soil is just… not great. Perhaps you’re battling relentless slugs and snails that see your precious cabbage seedlings as an all-you-can-eat buffet. This method offers a fantastic solution! It provides a controlled environment, protects your plants from ground-level pests, and allows you to easily move your cabbages to chase the sun. Plus, it’s a fantastic way to recycle those plastic bottles and feel good about reducing waste. So, let’s dive in and learn how to create your own mini-cabbage patch, one bottle at a time!
Growing Cabbage in Plastic Bottles: A DIY Guide
Hey there, fellow gardening enthusiasts! I’m so excited to share this super cool and surprisingly effective method for growing cabbage – right in plastic bottles! Not only is it a fantastic way to recycle and reduce waste, but it’s also a great option for small spaces, balconies, or even just adding a quirky touch to your garden. Trust me, once you see how easy and rewarding this is, you’ll be hooked!
Why Grow Cabbage in Plastic Bottles?
Before we dive into the nitty-gritty, let’s talk about why this method is so awesome:
* Space-Saving: Perfect for apartment dwellers or anyone with limited garden space. You can hang them, stack them, or arrange them creatively.
* Recycling: Give those plastic bottles a new life instead of sending them to the landfill.
* Pest Control: Elevated bottles can help deter some ground-dwelling pests.
* Easy Monitoring: You can easily observe the soil moisture and root development.
* Fun and Educational: A great project for kids to learn about gardening and recycling.
Materials You’ll Need
Okay, let’s gather our supplies. Here’s what you’ll need to get started:
* Plastic Bottles: 2-liter soda bottles or larger water bottles work best. The more, the merrier!
* Cabbage Seeds or Seedlings: Choose your favorite cabbage variety. I personally love growing ‘Golden Acre’ for its compact size.
* Potting Soil: A good quality potting mix is essential for healthy growth.
* Scissors or Utility Knife: For cutting the plastic bottles. Be careful!
* Drill or Nail: To create drainage holes.
* Watering Can or Hose: For watering your cabbage plants.
* Optional: Twine or rope for hanging the bottles.
* Optional: Fertilizer (organic is best!) to give your cabbage a boost.
Preparing the Plastic Bottles
This is where we transform those discarded bottles into mini cabbage havens!
1. Clean the Bottles: Thoroughly wash the plastic bottles with soap and water to remove any residue. Rinse them well and let them dry completely. This is important to prevent any contamination that could harm your plants.
2. Cut the Bottles: There are a couple of ways you can cut the bottles, depending on how you want to use them:
* Option 1: Horizontal Cut (Hanging Bottles): Cut the bottle horizontally, about one-third of the way down from the top. This creates a trough-like container. You can use the top part as a small greenhouse cover initially.
* Option 2: Vertical Cut (Stacked Bottles): Cut the bottle vertically, almost in half, leaving a small section connected at the bottom. This creates two separate containers that can be stacked or placed side-by-side.
3. Create Drainage Holes: This is crucial! Cabbage doesn’t like soggy roots. Use a drill or a nail (heated with a lighter for easier piercing) to create several drainage holes in the bottom of each bottle. I usually make about 4-5 holes, spaced evenly.
4. Optional: Hanging Holes: If you’re planning to hang your cabbage bottles, drill or punch holes near the top of the bottle (on either side) to thread twine or rope through. Make sure the holes are strong enough to support the weight of the soil and plant.
Planting Your Cabbage
Now for the fun part – getting those cabbage seeds or seedlings into their new homes!
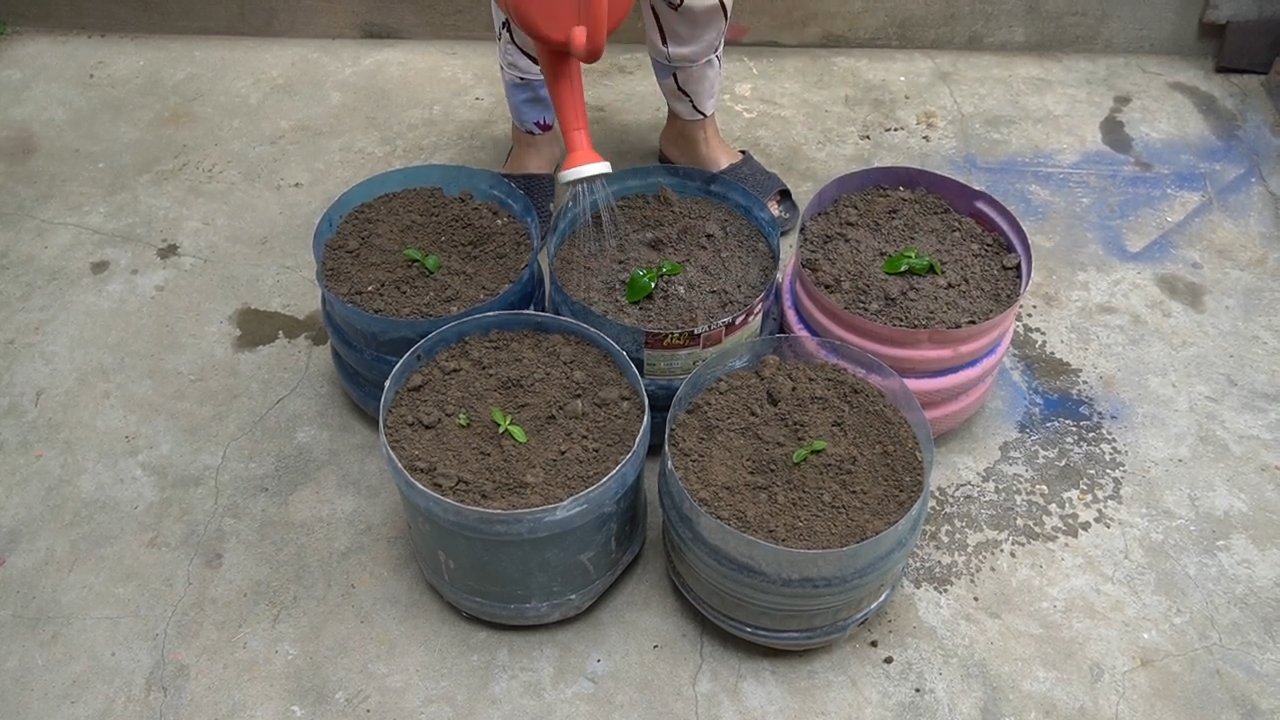
1. Fill with Potting Soil: Fill each prepared bottle with high-quality potting soil, leaving about an inch of space at the top. Gently pat down the soil to remove any air pockets.
2. Sowing Seeds (if using seeds): If you’re starting from seeds, sow 2-3 seeds per bottle, about half an inch deep. Cover them lightly with soil and gently water. Keep the soil consistently moist until the seeds germinate.
3. Transplanting Seedlings (if using seedlings): If you’re using seedlings, carefully remove them from their original containers. Gently loosen the roots and place one seedling in the center of each bottle. Make sure the top of the root ball is level with the soil surface. Fill in around the seedling with more potting soil and gently water.
4. Water Thoroughly: After planting, water the cabbage thoroughly until water drains out of the drainage holes. This helps settle the soil and ensures the roots are well-hydrated.
Caring for Your Cabbage
Cabbage is relatively easy to care for, but here are a few tips to ensure a bountiful harvest:
1. Sunlight: Cabbage needs at least 6 hours of sunlight per day. Place your bottle gardens in a sunny location. If you don’t have enough natural sunlight, you can supplement with grow lights.
2. Watering: Keep the soil consistently moist, but not waterlogged. Water when the top inch of soil feels dry to the touch. Check the moisture level regularly, especially during hot weather.
3. Fertilizing: Cabbage is a heavy feeder, so regular fertilization is important. Use a balanced organic fertilizer every 2-3 weeks. Follow the instructions on the fertilizer package. I like to use compost tea as a natural fertilizer.
4. Pest Control: Keep an eye out for common cabbage pests like cabbage worms, aphids, and slugs. Handpick any pests you see or use organic pest control methods like neem oil or insecticidal soap. The elevated bottles should help with some ground pests.
5. Support: As your cabbage grows, it may need some support, especially if it’s a larger variety. You can use stakes or twine to support the head and prevent it from falling over.
6. Rotation: If you’re growing cabbage in the same bottles year after year, it’s a good idea to rotate the soil to prevent nutrient depletion and the buildup of soilborne diseases.
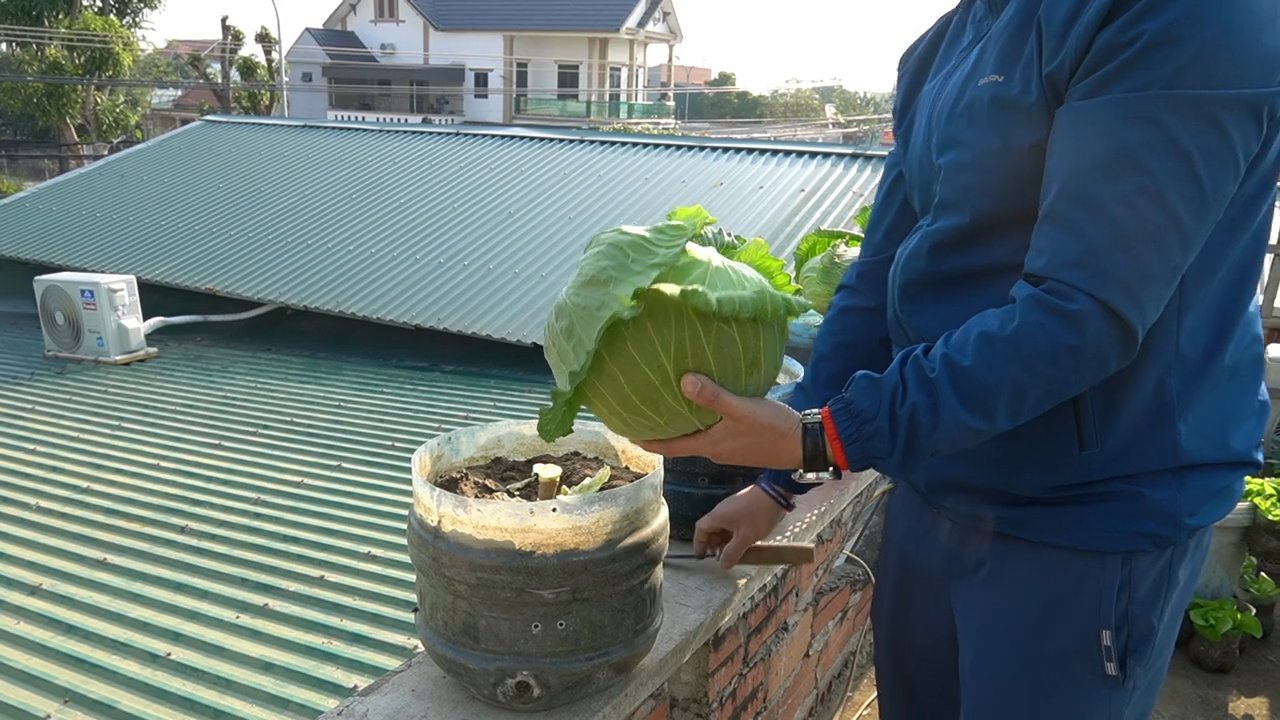
Harvesting Your Cabbage
The moment we’ve all been waiting for! Harvesting your homegrown cabbage is incredibly satisfying.
1. Check for Maturity: Cabbage is typically ready to harvest when the head is firm and compact. The size will vary depending on the variety.
2. Cut the Head: Use a sharp knife to cut the cabbage head from the stem, leaving a few outer leaves intact.
3. Enjoy Your Harvest: Now you can enjoy your delicious homegrown cabbage in salads, slaws, soups, or any other dish you like!
Troubleshooting
Even with the best care, you might encounter a few challenges. Here are some common issues and how to address them:
* Yellowing Leaves: Could be a sign of overwatering, underwatering, or nutrient deficiency. Adjust your watering schedule and fertilize if needed.
* Slow Growth: Could be due to lack of sunlight, poor soil, or pests. Ensure your cabbage is getting enough sunlight, use a good quality potting mix, and check for pests.
* Cabbage Worms: These little green caterpillars can wreak havoc on your cabbage. Handpick them off or use Bacillus thuringiensis (Bt), a natural insecticide.
* Bolting (Premature Flowering): This can happen if the cabbage is exposed to extreme temperature fluctuations. Try to provide consistent temperatures and protect your plants from frost.
Creative Ideas for Your Bottle Garden
* Vertical Garden: Hang multiple bottles from a wall or fence to create a stunning vertical cabbage garden.
* Stacked Garden: Stack the vertically cut bottles to create a tiered garden.
* Labeling: Use a permanent marker to label each bottle with the cabbage variety and planting date.
* Decoration: Paint the bottles with fun colors or designs to add a personal touch to your garden.
Growing cabbage in plastic bottles is a rewarding and eco-friendly way to enjoy fresh, homegrown produce. With a little bit of effort and creativity, you can transform discarded bottles into thriving mini gardens. So, grab some bottles, seeds, and soil, and get ready to grow your own delicious cabbage! Happy gardening!
Conclusion
So, there you have it! Transforming humble plastic bottles into miniature cabbage gardens is not just a quirky DIY project; it’s a sustainable, space-saving, and surprisingly effective way to cultivate fresh, delicious cabbage right at your doorstep. We’ve explored the simple steps, from preparing your bottles and soil to planting and nurturing your miniature cabbage patch. But why is this method a must-try?
Firstly, it’s incredibly eco-friendly. Repurposing plastic bottles reduces waste and gives these discarded items a new lease on life. In a world increasingly conscious of environmental impact, this is a small but significant step towards a more sustainable lifestyle. Secondly, it’s perfect for urban gardeners or anyone with limited space. Balconies, patios, even sunny windowsills can become thriving cabbage farms with this vertical gardening technique. Forget sprawling gardens; this method allows you to maximize your yield in a minimal footprint. Thirdly, it’s a fantastic learning experience, especially for children. Watching a tiny seed sprout and grow into a leafy cabbage head is a rewarding and educational process that fosters a connection with nature.
Beyond the basic method, there’s plenty of room for experimentation and personalization. Consider these variations to tailor the project to your specific needs and preferences:
* Cabbage Variety: Don’t limit yourself to green cabbage! Try red cabbage for a vibrant splash of color, or savoy cabbage for its delicate, crinkled leaves. Each variety offers a unique flavor and texture to your culinary creations.
* Companion Planting: Enhance your cabbage’s growth and deter pests by planting companion herbs like dill, rosemary, or thyme in the same bottle or nearby containers. These herbs not only add flavor to your cooking but also create a beneficial ecosystem for your cabbage.
* Fertilizer Options: While we recommended a balanced liquid fertilizer, you can also explore organic options like compost tea or worm castings. These natural fertilizers provide essential nutrients without the risk of chemical runoff.
* Bottle Size and Arrangement: Experiment with different bottle sizes to accommodate larger cabbage varieties or create tiered vertical gardens for a visually stunning display. You can also paint the bottles to match your decor or add drainage holes for better water management.
This DIY cabbage-in-plastic-bottles trick is more than just a gardening project; it’s a testament to the power of resourcefulness and creativity. It’s a chance to connect with nature, reduce waste, and enjoy the satisfaction of growing your own food.
So, what are you waiting for? Gather your plastic bottles, prepare your soil, and embark on this exciting gardening adventure. We’re confident that you’ll be amazed by the results. And most importantly, we want to hear about your experience! Share your photos, tips, and challenges in the comments below. Let’s build a community of bottle-cabbage enthusiasts and inspire others to embrace sustainable gardening practices. Let us know what kind of **cabbage** you grew!
Frequently Asked Questions (FAQ)
1. What type of plastic bottles are best for growing cabbage?
Ideally, you should use food-grade plastic bottles, such as those that previously contained water, juice, or soda. Avoid bottles that held harsh chemicals or cleaning products, as these may contaminate the soil and affect the cabbage’s growth. PET (Polyethylene Terephthalate) bottles, commonly marked with a “1” recycling symbol, are a good choice. Ensure the bottles are thoroughly cleaned with soap and water before use to remove any residue. The size of the bottle will depend on the variety of cabbage you intend to grow. Smaller varieties will thrive in smaller bottles, while larger varieties will require larger containers.
2. What kind of soil should I use for growing cabbage in plastic bottles?
A well-draining potting mix is essential for successful cabbage cultivation in plastic bottles. Avoid using garden soil, as it tends to compact and doesn’t provide adequate drainage. A good potting mix should consist of a blend of peat moss, perlite, and vermiculite. You can also add compost to enrich the soil with organic matter and nutrients. Ensure the soil is loose and airy to allow for proper root development. Consider adding a slow-release fertilizer to the soil mix to provide a steady supply of nutrients throughout the growing season.
3. How often should I water my cabbage plants in plastic bottles?
Watering frequency depends on several factors, including the weather, the size of the bottle, and the type of soil used. Generally, you should water your cabbage plants when the top inch of soil feels dry to the touch. Avoid overwatering, as this can lead to root rot. Ensure the bottles have adequate drainage holes to prevent water from accumulating at the bottom. During hot and dry weather, you may need to water more frequently. Check the soil moisture levels regularly and adjust your watering schedule accordingly.
4. How much sunlight do cabbage plants need when grown in plastic bottles?
Cabbage plants require at least 6 hours of direct sunlight per day to thrive. Choose a location that receives ample sunlight throughout the day. If you’re growing your cabbage indoors, consider using grow lights to supplement natural sunlight. Rotate the bottles regularly to ensure all sides of the plant receive adequate light. Insufficient sunlight can result in leggy growth and reduced yields.
5. How do I protect my cabbage plants from pests and diseases when grown in plastic bottles?
Cabbage plants are susceptible to various pests and diseases, including aphids, cabbage worms, and clubroot. Regularly inspect your plants for signs of infestation or disease. Handpick any pests you find or use insecticidal soap to control them. To prevent clubroot, ensure the soil is well-drained and avoid planting cabbage in the same location year after year. You can also use companion planting to deter pests. For example, planting marigolds near your cabbage plants can help repel nematodes.
6. How long does it take for cabbage to grow in plastic bottles?
The time it takes for cabbage to mature depends on the variety and growing conditions. Generally, it takes between 60 and 90 days from transplanting seedlings to harvest. Start your seeds indoors 6-8 weeks before the last expected frost. Once the seedlings are large enough, transplant them into the plastic bottles. Monitor the plants regularly and harvest when the heads are firm and compact.
7. Can I grow other vegetables in plastic bottles using the same method?
Yes, the plastic bottle gardening method can be adapted to grow a variety of other vegetables, including lettuce, spinach, herbs, and even tomatoes (smaller varieties). The key is to choose vegetables that are suitable for container gardening and provide them with the appropriate growing conditions. Ensure the bottles are large enough to accommodate the plant’s root system and provide adequate drainage.
8. What do I do with the plastic bottles after harvesting the cabbage?
After harvesting the cabbage, you can reuse the plastic bottles for another planting season. Simply clean them thoroughly and refill them with fresh potting mix. Alternatively, you can recycle the bottles or repurpose them for other gardening projects. Consider using them to start seeds or as containers for other plants.
9. Can I grow cabbage in plastic bottles during the winter?
Whether you can grow cabbage in plastic bottles during the winter depends on your climate. In mild climates, you may be able to grow cabbage outdoors throughout the winter. However, in colder climates, you will need to provide protection from frost and freezing temperatures. Consider moving the bottles indoors or using a greenhouse or cold frame. You may also need to supplement natural sunlight with grow lights.
10. What are some signs that my cabbage plant is not thriving in the plastic bottle?
Some signs that your cabbage plant is not thriving include yellowing leaves, stunted growth, wilting, and pest infestations. If you notice any of these signs, take action immediately to address the underlying problem. Check the soil moisture levels, ensure the plant is receiving adequate sunlight, and inspect for pests or diseases. Adjust your watering and fertilization schedule as needed.

Leave a Comment