

Grow Cauliflower Big Tasty Heads: Imagine sinking your teeth into a crisp, creamy, and utterly delicious cauliflower, grown right in your own backyard! Forget those bland, overpriced heads from the grocery store. This year, let’s embark on a journey to cultivate cauliflower so impressive, your neighbors will be green with envy.
For centuries, cauliflower has been a culinary staple, gracing tables from humble farmhouses to royal banquets. Its versatility and nutritional value have made it a beloved vegetable across cultures. But let’s be honest, achieving those picture-perfect, massive cauliflower heads can feel like a daunting task. That’s where these DIY tricks and hacks come in!
We all crave fresh, healthy produce, but the rising cost of groceries and concerns about pesticides make home gardening more appealing than ever. But growing cauliflower can be tricky. Many gardeners struggle with small, loose heads, or even worse, plants that bolt before producing anything worthwhile. That’s why I’m sharing my tried-and-true secrets to help you grow cauliflower big tasty heads, consistently and reliably. These simple, yet effective techniques will transform your gardening game, ensuring a bountiful harvest of cauliflower that’s bursting with flavor and goodness. Get ready to ditch the store-bought stuff and enjoy the satisfaction of growing your own amazing cauliflower!
Growing Giant Cauliflower: My Secrets for Massive, Delicious Heads
Okay, cauliflower lovers, listen up! I’m about to share my tried-and-true methods for growing cauliflower heads so big, you’ll need both hands to carry them. Forget those puny grocery store florets – we’re talking prize-winning, dinner-party-showstopper cauliflower. It takes a little planning and effort, but trust me, the reward is absolutely worth it.
Choosing the Right Variety
First things first, not all cauliflower is created equal. Some varieties are naturally smaller, while others are bred for size and heat tolerance. Here are a few of my favorites for growing truly massive heads:
* ‘Giant of Naples’: This heirloom variety lives up to its name. It produces huge, dense heads with excellent flavor. It’s a bit slower to mature, so plan accordingly.
* ‘Snowball Y Improved’: A classic for a reason! ‘Snowball Y Improved’ is reliable, produces beautiful white heads, and is relatively quick to mature. While not as gigantic as ‘Giant of Naples,’ it still delivers impressive size.
* ‘Amazing’: This hybrid variety is known for its heat tolerance and ability to produce large, well-formed heads even in warmer climates.
* ‘Cheddar’: If you want something different, try ‘Cheddar’ cauliflower. It produces vibrant orange heads and is packed with nutrients. It tends to be slightly smaller than the white varieties, but still worth growing.
Preparing the Soil: The Foundation for Success
Cauliflower is a heavy feeder, meaning it needs a lot of nutrients to grow properly. Poor soil is a recipe for small, disappointing heads. Here’s how I prepare my soil to give my cauliflower the best possible start:
* Soil Testing: Before you do anything, get your soil tested! This will tell you exactly what nutrients are lacking and allow you to amend accordingly. You can usually get a soil test done through your local agricultural extension office.
* Amending with Compost: Compost is my secret weapon for almost everything I grow. It improves soil structure, drainage, and provides a slow-release source of nutrients. I work in a generous amount of compost – at least 4 inches – into the top 12 inches of soil.
* Adding Fertilizer: Based on my soil test results, I add a balanced fertilizer (like 10-10-10) to the soil. Follow the instructions on the fertilizer package carefully to avoid over-fertilizing. I also like to add bone meal to provide extra phosphorus, which is essential for root development.
* Ensuring Good Drainage: Cauliflower hates soggy soil. Make sure your soil drains well. If you have heavy clay soil, consider adding sand or perlite to improve drainage. Raised beds are also a great option.
* pH Level: Cauliflower prefers a soil pH between 6.0 and 7.0. If your soil is too acidic, add lime to raise the pH. If it’s too alkaline, add sulfur to lower the pH.
Starting Seeds Indoors (Recommended)
While you can direct sow cauliflower seeds, I’ve found that starting them indoors gives them a head start and protects them from pests and diseases.
1. Timing is Key: Start your seeds about 4-6 weeks before the last expected frost in your area.
2. Use Seed Starting Mix: Don’t use garden soil for starting seeds. It’s too heavy and can harbor diseases. Use a sterile seed starting mix.
3. Sow Seeds: Sow the seeds about ¼ inch deep in small pots or seed trays.
4. Keep Moist: Keep the soil consistently moist, but not soggy. I use a spray bottle to gently water the seedlings.
5. Provide Light: Cauliflower seedlings need plenty of light. Place them under grow lights or in a sunny window. If using a window, rotate the seedlings regularly to prevent them from becoming leggy.
6. Harden Off: Before transplanting the seedlings outdoors, you need to harden them off. This means gradually exposing them to outdoor conditions over a period of about a week. Start by placing them outside for a few hours each day in a sheltered location, gradually increasing the amount of time they spend outdoors.
Transplanting Seedlings Outdoors
Once your seedlings are hardened off and the danger of frost has passed, it’s time to transplant them into the garden.
1. Choose a Sunny Location: Cauliflower needs at least 6 hours of sunlight per day.
2. Space Plants Properly: Give your cauliflower plants plenty of room to grow. Space them about 18-24 inches apart. For the ‘Giant of Naples’ variety, I even give them a bit more space – up to 30 inches.
3. Dig Holes: Dig holes that are slightly larger than the root balls of the seedlings.
4. Transplant Carefully: Gently remove the seedlings from their pots and place them in the holes. Make sure the top of the root ball is level with the soil surface.
5. Water Thoroughly: Water the seedlings thoroughly after transplanting.
6. Mulch: Apply a layer of mulch around the plants to help retain moisture, suppress weeds, and regulate soil temperature. I like to use straw or shredded leaves.
Watering and Fertilizing: Keeping Your Cauliflower Happy
Consistent watering and regular fertilization are crucial for growing large cauliflower heads.
1. Water Deeply and Regularly: Cauliflower needs consistent moisture, especially during head formation. Water deeply and regularly, aiming for about 1-1.5 inches of water per week. Use a soaker hose or drip irrigation to avoid wetting the foliage, which can lead to disease.
2. Side-Dress with Fertilizer: About 3-4 weeks after transplanting, side-dress the plants with a nitrogen-rich fertilizer. This will help promote leafy growth, which is essential for supporting a large head. I like to use fish emulsion or compost tea. Repeat this every 2-3 weeks.
3. Monitor for Nutrient Deficiencies: Keep an eye out for signs of nutrient deficiencies, such as yellowing leaves or stunted growth. If you notice any of these symptoms, amend the soil with the appropriate fertilizer.
Protecting Your Cauliflower from Pests and Diseases
Cauliflower is susceptible to a variety of pests and diseases. Here’s how I protect my plants:
* Cabbage Worms: These green caterpillars can quickly decimate cauliflower leaves. I use Bacillus thuringiensis (Bt), a natural insecticide, to control them. You can also handpick them off the plants.
* Cabbage Root Maggots: These tiny maggots feed on the roots of cauliflower plants, causing them to wilt and die. I use row covers to prevent the adult flies from laying their eggs near the plants.
* Aphids: These small, sap-sucking insects can weaken cauliflower plants. I use insecticidal soap or neem oil to control them.
* Clubroot: This fungal disease causes the roots of cauliflower plants to become swollen and distorted. To prevent clubroot, make sure your soil is well-drained and has a pH of 7.0 or higher. You can also rotate your crops to avoid planting cauliflower in the same spot year after year.
* Black Rot: This bacterial disease causes dark lesions on the leaves of cauliflower plants. To prevent black rot, use disease-free seeds and avoid overhead watering.
Blanching the Head (Optional, but Recommended)
Blanching is the process of covering the developing cauliflower head to protect it from sunlight. This helps to keep the head white and tender.
1. When to Blanch: When the head is about 2-3 inches in diameter, it’s time to blanch it.
2. How to Blanch: Gently pull the large outer leaves over the head and secure them with twine or rubber bands.
3. Check Regularly: Check the head regularly to make sure it’s not rotting or becoming discolored.
4. Harvest Time: The head should be ready to harvest in about 1-2 weeks after blanching.
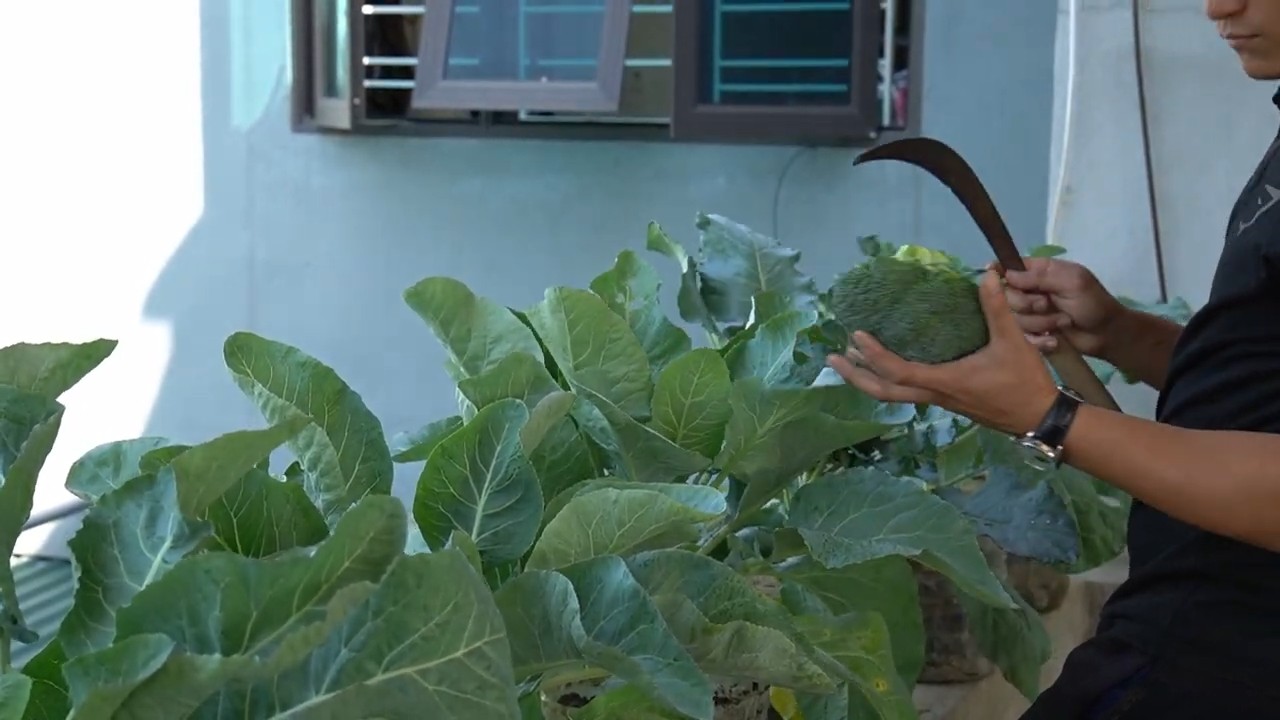
Harvesting Your Giant Cauliflower
Harvest your cauliflower when the head is firm, compact, and has reached the desired size.
1. Cut the Stem: Use a sharp knife to cut the stem just below the head.
2. Remove Outer Leaves: Remove the outer leaves from the head.
3. Store Properly: Store the cauliflower in the refrigerator for up to a week.
Troubleshooting Tips
* Small Heads: If your cauliflower heads are small, it could be due to a lack of nutrients, water, or sunlight. Make sure you’re providing your plants with adequate care.
* Loose Heads: Loose heads can be caused by hot weather or inconsistent watering. Choose heat-tolerant varieties and water deeply and regularly.
* Discolored Heads: Discolored heads can be caused by sunlight or disease. Blanch the heads to protect them from sunlight and use disease-resistant
Conclusion
So, there you have it! Unlocking the secret to growing cauliflower with big, tasty heads isn’t about magic; it’s about understanding the plant’s needs and employing a few simple, yet effective, DIY tricks. We’ve explored the importance of soil preparation, the power of consistent watering, and the crucial role of protecting your developing cauliflower head from the sun. These aren’t just suggestions; they’re the keys to transforming your cauliflower harvest from small and disappointing to impressive and delicious.
Why is this DIY approach a must-try? Because it puts you in control. You’re not relying on expensive fertilizers or complicated techniques. You’re empowering yourself with the knowledge to nurture your cauliflower plants and create the ideal environment for them to thrive. This method is not only cost-effective but also environmentally friendly, allowing you to avoid harsh chemicals and embrace a more sustainable gardening practice.
Think of the satisfaction of serving a roasted cauliflower, grown entirely by your own hand, with a flavor that surpasses anything you could buy in a store. Imagine the pride in sharing your bountiful harvest with friends and family. This isn’t just about growing cauliflower; it’s about connecting with nature, learning new skills, and enjoying the fruits (or vegetables!) of your labor.
But don’t stop there! Experiment with different varieties of cauliflower. Try growing purple or orange cauliflower for a vibrant and visually stunning addition to your meals. Consider companion planting to further enhance your cauliflower’s growth. Marigolds can deter pests, while herbs like rosemary and thyme can improve the flavor of your cauliflower. You can also explore different methods of blanching, such as using large leaves from other plants in your garden if you don’t have cauliflower leaves to spare. The possibilities are endless!
We’ve given you the foundation; now it’s time to build upon it. We wholeheartedly encourage you to try these DIY tricks for growing cauliflower with big, tasty heads. Don’t be afraid to get your hands dirty, to experiment, and to learn from your experiences. Gardening is a journey, and every plant, every season, offers a new opportunity for growth.
And most importantly, we want to hear about your success! Share your experiences, your tips, and your photos with us. Let us know what worked for you, what challenges you faced, and what delicious dishes you created with your homegrown cauliflower. Together, we can build a community of passionate gardeners, sharing knowledge and inspiring each other to grow the best cauliflower possible. So, grab your gardening gloves, prepare your soil, and get ready to witness the magic of growing cauliflower with big, tasty heads!
Frequently Asked Questions (FAQ)
1. What type of soil is best for growing cauliflower?
Cauliflower thrives in well-drained, fertile soil that is rich in organic matter. The ideal soil pH should be between 6.0 and 7.0. Before planting, amend your soil with compost, well-rotted manure, or other organic materials to improve drainage, fertility, and water retention. A soil test can help you determine if your soil is lacking any essential nutrients, such as nitrogen, phosphorus, or potassium. If necessary, you can add a balanced fertilizer to the soil before planting. Heavy clay soils can be improved by adding sand and organic matter.
2. How often should I water my cauliflower plants?
Consistent watering is crucial for growing cauliflower with big, tasty heads. Aim to keep the soil consistently moist, but not waterlogged. Water deeply and regularly, especially during dry periods. A good rule of thumb is to water when the top inch of soil feels dry to the touch. Mulching around your cauliflower plants can help retain moisture in the soil and reduce the need for frequent watering. Drip irrigation is an excellent way to deliver water directly to the roots of your plants, minimizing water waste and reducing the risk of fungal diseases.
3. When should I start blanching my cauliflower heads?
Blanching is the process of protecting the developing cauliflower head from sunlight to prevent it from turning yellow or brown. Start blanching when the head is about 2-3 inches in diameter. To blanch, simply fold the large leaves of the cauliflower plant over the head and secure them with twine, rubber bands, or clothespins. Check the head regularly and re-secure the leaves as needed. Blanching typically takes about 4-7 days, depending on the weather and the variety of cauliflower.
4. What are some common pests and diseases that affect cauliflower, and how can I control them?
Cauliflower is susceptible to several pests and diseases, including cabbage worms, aphids, flea beetles, clubroot, and black rot. To control pests, you can use row covers to protect your plants, handpick pests off the plants, or use insecticidal soap or neem oil. To prevent diseases, choose disease-resistant varieties of cauliflower, practice crop rotation, and ensure good air circulation around your plants. Avoid overhead watering, which can promote fungal diseases. If you notice signs of disease, remove the affected leaves or plants immediately.
5. How long does it take for cauliflower to mature?
The time it takes for cauliflower to mature depends on the variety and the growing conditions. Generally, cauliflower takes about 50-80 days from transplanting to harvest. Check the seed packet or plant tag for specific information on the maturity time for your chosen variety. You’ll know your cauliflower is ready to harvest when the head is firm, compact, and has reached the desired size.
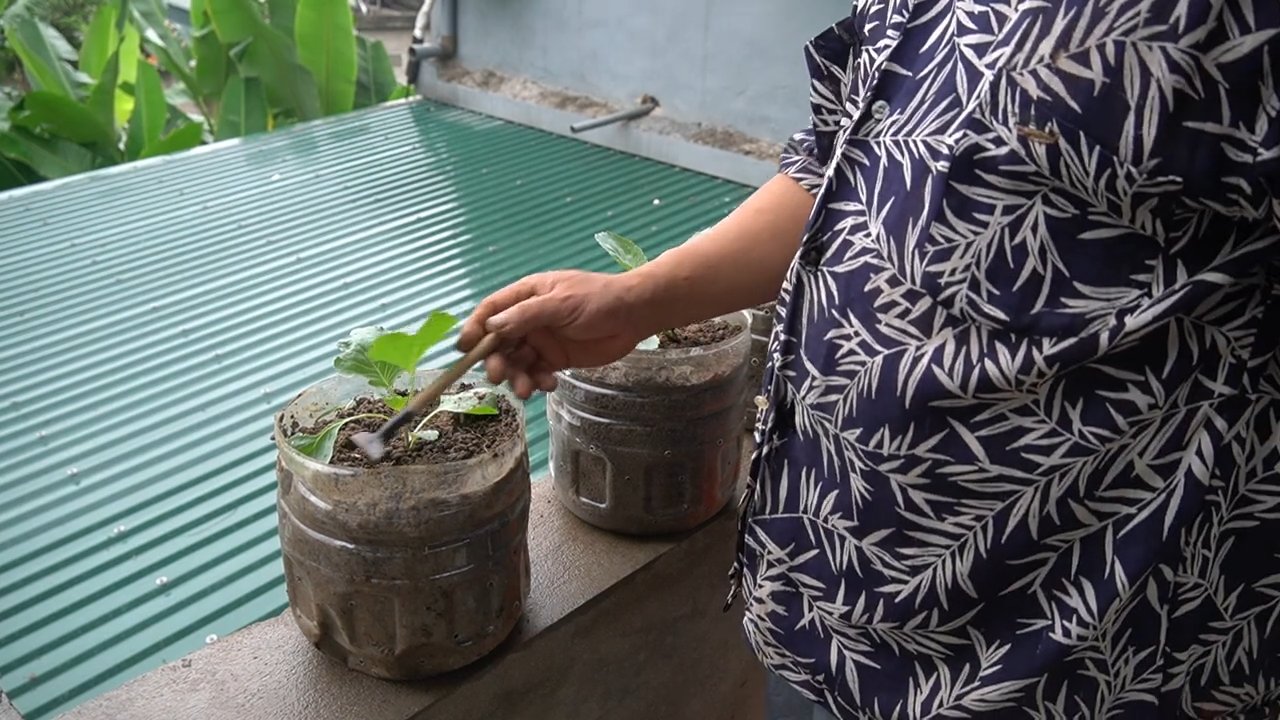
6. Can I grow cauliflower in containers?
Yes, you can grow cauliflower in containers, but you’ll need to choose a large container that is at least 18 inches in diameter and 12 inches deep. Use a well-draining potting mix and provide your cauliflower plants with plenty of sunlight and water. Container-grown cauliflower may require more frequent fertilization than cauliflower grown in the ground. Choose a compact or dwarf variety of cauliflower for container gardening.
7. What are some good companion plants for cauliflower?
Companion planting can help improve the growth and health of your cauliflower plants. Some good companion plants for cauliflower include:
* **Marigolds:** Deter pests like nematodes and cabbage moths.
* **Rosemary and Thyme:** Repel cabbage white butterflies and other pests.
* **Nasturtiums:** Attract aphids away from your cauliflower plants.
* **Garlic and Onions:** Repel pests and improve soil health.
* **Legumes (Beans and Peas):** Fix nitrogen in the soil, which benefits cauliflower growth.
8. How do I know when my cauliflower is ready to harvest?
The best time to harvest cauliflower is when the head is firm, compact, and has reached the desired size. The curds should be tightly packed together and free from blemishes. If the curds start to separate or the head becomes loose, it’s a sign that the cauliflower is overripe. To harvest, cut the stem of the cauliflower just below the head, leaving a few leaves attached to protect the head.
9. Can I freeze cauliflower?
Yes, you can freeze cauliflower, but it’s best to blanch it first to preserve its color, texture, and flavor. To blanch cauliflower, cut it into florets and boil them for 3-5 minutes. Then, immediately transfer the florets to an ice bath to stop the cooking process. Drain the florets thoroughly and spread them out on a baking sheet to freeze individually. Once frozen, transfer the florets to a freezer bag or container. Frozen cauliflower can be stored in the freezer for up to 12 months.
10. What are some creative ways to use homegrown cauliflower?
Homegrown cauliflower is incredibly versatile and can be used in a variety of dishes. Here are a few ideas:
* **Roasted Cauliflower:** Toss cauliflower florets with olive oil, salt, pepper, and your favorite spices, then roast them in the oven until tender and slightly browned.
* **Cauliflower Mash:** Steam or boil cauliflower until tender, then mash it with butter, milk, and seasonings for a healthy and delicious alternative to mashed potatoes.
* **Cauliflower Rice:** Pulse raw cauliflower florets in a food processor until they resemble rice, then sauté them in a pan with your favorite vegetables and seasonings.
* **Cauliflower Pizza Crust:** Combine riced cauliflower with cheese, eggs, and seasonings, then bake it into a pizza crust.
* **Cauliflower Soup:** Blend cooked cauliflower with broth, cream, and seasonings for a creamy and comforting soup.

Leave a Comment