

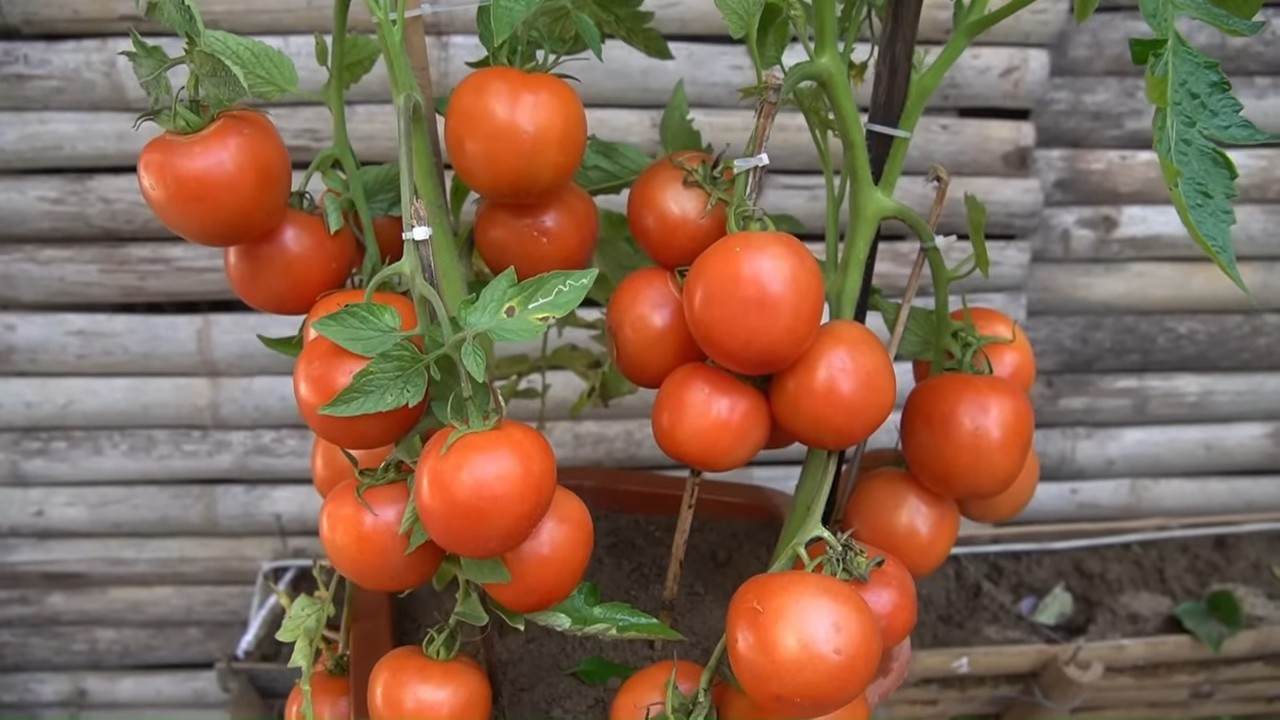
Vertical tomato gardening: it’s not just a trend, it’s a revolution in how we grow our favorite juicy red fruits! Imagine plucking sun-ripened tomatoes right from a towering vine on your patio, even if you only have a tiny balcony. Sounds like a dream, right? Well, get ready to turn that dream into a delicious reality with these simple, yet incredibly effective, DIY tricks and hacks.
For centuries, gardeners have sought ways to maximize their yields, often constrained by limited space. While the exact origins of vertical gardening are debated, cultures around the world, from the Hanging Gardens of Babylon to the ingenious terrace farming of the Incas, have demonstrated the power of growing upwards. Today, we’re bringing that ingenuity home, adapting it for the modern gardener who craves fresh, homegrown goodness without sacrificing precious square footage.
Why is vertical tomato gardening so essential now? Let’s face it, not everyone has a sprawling backyard. Many of us are living in apartments, condos, or homes with small outdoor spaces. But that doesn’t mean we have to miss out on the joy and satisfaction of growing our own food. Plus, growing tomatoes vertically offers a host of benefits beyond space-saving. It improves air circulation, reduces soil-borne diseases, and makes harvesting a breeze. I’m excited to share these easy-to-follow DIY projects that will transform your small space into a thriving tomato haven. Get ready to roll up your sleeves and let’s get gardening!
DIY Vertical Tomato Garden: Grow Up, Not Out!
Hey there, fellow gardening enthusiasts! Are you dreaming of juicy, sun-ripened tomatoes but short on space? Or maybe you’re just looking for a fun and unique gardening project? Well, you’ve come to the right place! I’m going to walk you through building your very own vertical tomato garden. It’s easier than you think, and the results are absolutely delicious. Plus, it looks pretty darn cool!
This project is perfect for balconies, patios, or even small backyards. We’ll be using a simple, inexpensive method that you can customize to fit your own style and space. Get ready to say goodbye to sprawling tomato plants and hello to a beautiful, space-saving vertical garden!
What You’ll Need: The Supply List
Before we dive in, let’s gather our supplies. Don’t worry, you probably have some of these lying around already!
* 5-gallon buckets (at least 3): These will be our planting containers. Make sure they’re clean and food-grade if possible.
* Potting mix: Choose a high-quality potting mix specifically formulated for vegetables. This is crucial for healthy tomato growth.
* Tomato seedlings: Select your favorite tomato varieties! I recommend determinate (bush) varieties for vertical gardening, as they tend to stay more compact. Indeterminate (vining) varieties can work too, but you’ll need to provide extra support.
* Drill with various sized drill bits: We’ll need this for drainage and creating a support system.
* Measuring tape or ruler: For accurate measurements.
* Utility knife or scissors: For cutting landscape fabric.
* Landscape fabric: This will help prevent soil from washing out of the drainage holes.
* PVC pipe (1-inch diameter, about 6-8 feet long): This will be the central support for our tomato plants.
* PVC pipe caps (2): One for the top and one for the bottom of the PVC pipe.
* Eye bolts (2-3): For hanging the vertical garden (optional, but recommended).
* Chain or rope: For hanging the vertical garden (optional, but recommended).
* S-hooks (2-3): For attaching the chain or rope to the eye bolts (optional, but recommended).
* Fertilizer: A slow-release granular fertilizer or a liquid tomato fertilizer.
* Gloves: To protect your hands.
* Safety glasses: To protect your eyes when drilling.
* Watering can or hose: For watering your tomato plants.
* Zip ties (optional): For extra support.
Step-by-Step Instructions: Building Your Vertical Tomato Garden
Alright, let’s get our hands dirty! Follow these steps carefully, and you’ll have your vertical tomato garden up and running in no time.
1. Prepare the Buckets: Drainage is Key!
* First, we need to create drainage holes in the bottom of each bucket. This is super important to prevent root rot.
* Using your drill and a large drill bit (about 1/2 inch), drill at least 5-6 holes evenly spaced around the bottom of each bucket.
* Next, cut pieces of landscape fabric slightly larger than the bottom of the buckets.
* Place the landscape fabric inside each bucket, covering the drainage holes. This will prevent soil from washing out when you water.
2. Assemble the Central Support System: PVC Power!
* Take your PVC pipe and measure its length.
* Attach a PVC pipe cap to the bottom of the pipe. This will prevent soil from entering the pipe and clogging it.
* Now, attach the other PVC pipe cap to the top of the pipe. This will give it a finished look.
* If you plan to hang your vertical garden, drill holes near the top of the PVC pipe for the eye bolts. Make sure the holes are large enough to accommodate the eye bolts.
* Insert the eye bolts into the holes and secure them tightly.
3. Stacking the Buckets: Building the Tower!
* This is where the magic happens! We’ll be stacking the buckets to create our vertical garden.
* Place the first bucket on the ground or on a sturdy surface.
* Carefully center the PVC pipe inside the first bucket.
* Now, add potting mix to the first bucket, filling it about two-thirds full.
* Place the second bucket on top of the first bucket, making sure it’s centered.
* Continue adding potting mix to the second bucket, again filling it about two-thirds full.
* Repeat this process for the remaining buckets, stacking them on top of each other and filling them with potting mix.
* Leave a few inches of space at the top of each bucket to allow for watering.
4. Planting Your Tomato Seedlings: Time to Grow!
* Now for the fun part: planting your tomato seedlings!
* Gently remove the tomato seedlings from their containers.
* Loosen the roots slightly to encourage them to grow outward.
* Plant one tomato seedling in each bucket, spacing them evenly around the bucket.
* Make sure the top of the root ball is level with the soil surface.
* Fill in the remaining space with potting mix, gently patting it down.
* Water the newly planted seedlings thoroughly.
5. Adding Support (If Needed): Keeping Them Upright!
* Depending on the variety of tomatoes you’ve chosen, you may need to provide additional support.
* For indeterminate (vining) varieties, you can use zip ties to attach the tomato stems to the PVC pipe.
* Alternatively, you can insert tomato cages or stakes into the buckets to provide support.
6. Hanging Your Vertical Garden (Optional): Taking it to New Heights!
* If you’ve installed eye bolts in the PVC pipe, you can now hang your vertical garden.
* Attach S-hooks to the eye bolts.
* Attach the chain or rope to the S-hooks.
* Hang the vertical garden from a sturdy support, such as a balcony railing or a strong hook.
* Make sure the vertical garden is level and secure.
7. Fertilizing Your Tomatoes: Feeding Time!
* Tomatoes are heavy feeders, so it’s important to fertilize them regularly.
* Apply a slow-release granular fertilizer to the soil according to the package directions.
* Alternatively, you can use a liquid tomato fertilizer every 1-2 weeks.
* Be sure to follow the instructions on the fertilizer label.
8. Watering Your Tomatoes: Hydration is Key!
* Water your tomato plants regularly, especially during hot, dry weather.
* Check the soil moisture by sticking your finger into the soil. If the top inch of soil is dry, it’s time to water.
* Water deeply, allowing the water to drain out of the drainage holes.
* Avoid overwatering, as this can lead to root rot.
9. Pruning Your Tomatoes: Shaping for Success!
* Pruning your tomato plants can help improve air circulation and encourage fruit production.
* Remove any suckers (small shoots that grow between the main stem and the branches) that appear below the first flower cluster.
* You can also remove any yellow or diseased leaves.
10. Harvesting Your Tomatoes: The Sweet Reward!
* The best part! Harvest your tomatoes when they are fully ripe and have a deep, rich color.
* Gently twist the tomatoes off the vine.
* Enjoy your homegrown tomatoes in salads, sauces, or simply eat them fresh off the vine!
Troubleshooting Tips: Addressing Common Issues
Even with the best planning, you might encounter a few challenges along the way. Here are some common issues and how to address them:
* Yellowing Leaves: This could be a sign of overwatering, underwatering, or nutrient deficiency. Check the soil moisture and adjust your watering schedule accordingly. Fertilize your plants with a balanced fertilizer.
* Blossom End Rot: This is caused by a calcium deficiency. Add calcium to the soil by mixing in crushed eggshells or bone meal. Ensure consistent watering, as fluctuations in soil moisture can also contribute to blossom end rot.
* Pests: Keep an eye out for common tomato pests like aphids, whiteflies, and tomato hornworms. Use insecticidal soap or neem oil to control these pests. You can also handpick tomato hornworms off the plants.
* Disease: Tomatoes are susceptible to various diseases, such as early blight and late blight. Choose disease-resistant tomato varieties. Ensure good air circulation around the plants. Remove any diseased leaves promptly.
Conclusion
So, there you have it! Transforming your gardening experience with vertical tomato gardening is not just a trend; it’s a practical, space-saving, and incredibly rewarding way to cultivate delicious, homegrown tomatoes. We’ve explored the simplicity and effectiveness of this method, highlighting how it can revolutionize even the smallest of outdoor spaces.
But why is this DIY trick a must-try? Beyond the obvious space-saving benefits, vertical tomato gardening offers a multitude of advantages. It improves air circulation around the plants, reducing the risk of fungal diseases that can plague traditional ground-level gardening. It also makes harvesting a breeze, eliminating the need to bend and strain your back. Plus, let’s be honest, a wall or tower overflowing with vibrant green foliage and ripening red tomatoes is simply stunning! It adds a touch of rustic charm and natural beauty to any balcony, patio, or garden.
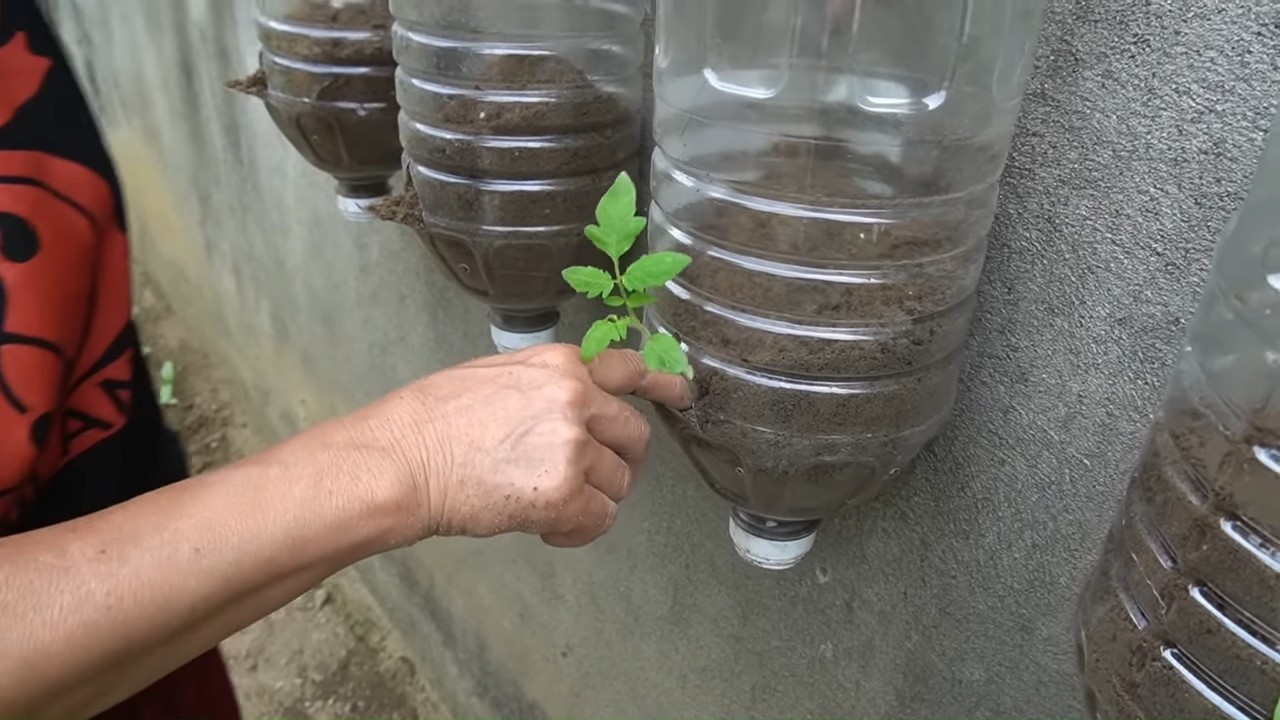
Now, let’s talk about variations. While we’ve focused on a simple, cost-effective approach, the possibilities are truly endless. Consider experimenting with different container types – from repurposed plastic bottles and buckets to stylish hanging baskets and tiered planters. You can also explore various support structures, such as trellises, cages, or even repurposed ladders. For those with limited sunlight, consider adding grow lights to ensure your tomatoes receive the necessary energy for optimal growth.
Another exciting variation is to incorporate companion planting into your vertical garden. Basil, for example, is a classic companion for tomatoes, known to improve their flavor and deter pests. Marigolds are another excellent choice, adding a splash of color while also repelling harmful insects. By strategically planting these companions alongside your tomatoes, you can create a thriving and self-sustaining ecosystem.
Don’t be afraid to get creative with your soil mix as well. While a standard potting mix will work just fine, you can enhance its nutrient content and drainage by adding compost, perlite, or vermiculite. Experiment with different combinations to find what works best for your specific climate and growing conditions.
Ultimately, the key to successful vertical tomato gardening is to experiment, learn, and adapt. Don’t be discouraged if you encounter challenges along the way. Every gardener faces setbacks, but the rewards of fresh, homegrown tomatoes are well worth the effort.
We wholeheartedly encourage you to give this DIY trick a try. Whether you’re a seasoned gardener or a complete beginner, vertical tomato gardening is an accessible and enjoyable way to connect with nature and enjoy the fruits (or vegetables!) of your labor.
Once you’ve embarked on your vertical tomato gardening adventure, we’d love to hear about your experience! Share your photos, tips, and challenges in the comments section below. Let’s build a community of vertical gardeners, sharing our knowledge and inspiring each other to grow the best tomatoes possible. Your insights could be invaluable to other readers, helping them to overcome obstacles and achieve their own gardening goals. So, get your hands dirty, embrace the challenge, and let’s grow some amazing tomatoes together!
Frequently Asked Questions (FAQ)
What are the best tomato varieties for vertical gardening?
Determinate or bush tomato varieties are generally better suited for vertical gardening, especially in containers. These varieties tend to be more compact and require less support than indeterminate or vining varieties. Some popular choices include Roma, Celebrity, and Patio tomatoes. However, with proper support and pruning, you can also grow smaller indeterminate varieties like cherry or grape tomatoes vertically. The key is to choose varieties that won’t become too large and unwieldy for your chosen container and support system. Consider the size of your space and the amount of sunlight available when making your selection.
How often should I water my vertical tomato garden?
Watering frequency depends on several factors, including the size of your containers, the type of soil, the weather conditions, and the stage of growth of your plants. In general, you should water your vertical tomato garden whenever the top inch of soil feels dry to the touch. During hot, sunny weather, you may need to water daily, or even twice a day. Conversely, during cooler or rainy periods, you may only need to water every few days. Be sure to water deeply, allowing the water to drain out of the bottom of the container. Avoid overwatering, as this can lead to root rot. A good rule of thumb is to water thoroughly until you see water draining from the bottom, then allow the soil to dry slightly before watering again.
What kind of fertilizer should I use for vertical tomato gardening?
Tomatoes are heavy feeders, so regular fertilization is essential for optimal growth and fruit production. Use a balanced fertilizer specifically formulated for tomatoes, following the instructions on the label. Look for a fertilizer with a higher phosphorus content (the middle number) to promote strong root development and abundant flowering. You can also supplement with organic fertilizers like compost tea or fish emulsion. Apply fertilizer every 2-3 weeks during the growing season. Be careful not to over-fertilize, as this can lead to excessive foliage growth and reduced fruit production. A slow-release fertilizer incorporated into the soil at planting time can also provide a steady supply of nutrients throughout the season.
How do I prevent pests and diseases in my vertical tomato garden?
Prevention is key when it comes to pests and diseases in your vertical tomato garden. Start by choosing disease-resistant tomato varieties. Ensure good air circulation around your plants by spacing them properly and pruning away any excess foliage. Regularly inspect your plants for signs of pests or diseases, such as aphids, whiteflies, or fungal spots. If you spot any problems, take action immediately. You can use organic pest control methods like insecticidal soap or neem oil to control pests. For fungal diseases, try a copper-based fungicide. Companion planting can also help to deter pests and diseases. For example, basil repels aphids and whiteflies, while marigolds deter nematodes. Maintaining healthy soil and providing adequate water and nutrients will also help to strengthen your plants and make them more resistant to pests and diseases.
How much sunlight do vertical tomato plants need?
Tomatoes need at least 6-8 hours of direct sunlight per day to thrive. Choose a location for your vertical tomato garden that receives plenty of sunlight. If you don’t have a sunny spot, you can supplement with grow lights. Position the grow lights close to the plants and keep them on for 12-16 hours per day. Rotate your plants regularly to ensure that all sides receive equal exposure to sunlight. Insufficient sunlight can lead to leggy growth, reduced flowering, and poor fruit production. Monitor your plants closely and adjust their position or the intensity of the grow lights as needed to ensure they are receiving adequate sunlight.
Can I grow tomatoes vertically indoors?
Yes, you can grow tomatoes vertically indoors, but it requires careful planning and attention to detail. You’ll need a sunny window or, more likely, strong grow lights to provide the necessary light. Choose compact, determinate varieties that are well-suited for container gardening. Use a well-draining potting mix and provide adequate support for the plants. Water regularly and fertilize every 2-3 weeks. Pollination can be an issue indoors, so you may need to hand-pollinate the flowers using a small brush. Monitor your plants closely for pests and diseases, and take action immediately if you spot any problems. With proper care, you can enjoy fresh, homegrown tomatoes even in the middle of winter.
What do I do if my tomato plant gets too tall for my vertical garden?
Pruning is essential for managing the size and shape of your vertical tomato plants. Regularly prune away any suckers (the small shoots that grow between the main stem and the branches) to encourage more fruit production. You can also prune away any yellowing or diseased leaves. If your tomato plant gets too tall for your support structure, you can top it off by cutting off the top of the main stem. This will encourage the plant to focus its energy on producing fruit rather than growing taller. Be sure to use clean, sharp pruning shears to avoid spreading diseases.

Leave a Comment