

Growing Butternut Squash in Tires might sound a little unconventional, but trust me, it’s a game-changer for your home garden! Are you tired of butternut squash vines sprawling everywhere, taking over your precious garden space? Or maybe you’re struggling with poor soil that just doesn’t seem to nurture those delicious, nutty squashes. Well, I’m here to tell you there’s a simple, cost-effective, and surprisingly stylish solution: repurposing old tires!
The concept of raised-bed gardening, in general, has been around for centuries, with evidence suggesting ancient civilizations used elevated plots to improve drainage and soil quality. While tires weren’t part of the original equation, the spirit of resourcefulness and adapting to available materials is deeply rooted in gardening history. Think of it as a modern twist on an age-old practice!
But why tires, you ask? Growing Butternut Squash in Tires offers several advantages. First, they act as mini raised beds, warming the soil faster in the spring and extending your growing season. Second, they provide excellent drainage, preventing root rot. And third, they contain the sprawling vines, keeping your garden neat and tidy. Plus, it’s a fantastic way to recycle and give those old tires a new lease on life. So, if you’re looking for a clever, eco-friendly way to boost your butternut squash harvest, keep reading! I’m going to walk you through everything you need to know to get started.
Growing Butternut Squash in Tires: A Fun and Productive DIY Project
Hey there, fellow gardening enthusiasts! I’m so excited to share this quirky and effective method for growing butternut squash – using old tires! It might sound a little unconventional, but trust me, it’s a fantastic way to maximize space, retain heat, and even add a bit of rustic charm to your garden. Plus, it’s a great way to recycle those old tires that are just sitting around. Let’s dive in!
Why Tires for Butternut Squash?
Before we get started, you might be wondering why tires are a good choice for growing butternut squash. Here’s the lowdown:
* Heat Retention: Tires absorb and retain heat from the sun, which is a huge benefit for butternut squash, as they thrive in warm conditions. This can extend your growing season, especially in cooler climates.
* Space Saving: Stacking tires creates a raised bed effect, allowing you to grow more squash in a smaller area. This is perfect if you have limited garden space.
* Improved Drainage: When properly prepared, tires provide excellent drainage, preventing waterlogged soil that can lead to root rot.
* Pest Control: The raised height can deter some ground-dwelling pests from reaching your precious squash plants.
* Recycling: It’s an eco-friendly way to repurpose old tires, keeping them out of landfills.
Materials You’ll Need
Okay, let’s gather our supplies. Here’s what you’ll need to get started:
* Old Tires: The number of tires depends on how many squash plants you want to grow. I recommend at least one tire per plant, but you can stack them for a deeper growing bed. Passenger car tires work best. Avoid using tires from heavy machinery, as they might contain more harmful chemicals.
* Utility Knife or Jigsaw: For cutting the sidewall of the tire (optional, but recommended for better drainage and root growth).
* Gloves: To protect your hands while working with the tires.
* Safety Glasses: To protect your eyes from debris when cutting.
* Heavy-Duty Landscape Fabric or Cardboard: To line the bottom of the tire and prevent soil from escaping.
* Well-Draining Soil: A mix of compost, topsoil, and potting mix is ideal. Butternut squash needs nutrient-rich soil.
* Butternut Squash Seeds or Seedlings: Choose your favorite variety!
* Watering Can or Hose: For watering your plants.
* Fertilizer (Optional): A balanced fertilizer can help boost growth.
* Mulch (Optional): To help retain moisture and suppress weeds. Straw, wood chips, or shredded leaves work well.
Preparing the Tires
This is a crucial step, so pay close attention!
1. Cleaning the Tires: Before you do anything else, thoroughly clean the tires with soap and water. This will remove any dirt, grime, or oil residue. Rinse them well and let them dry completely.
2. Cutting the Sidewall (Optional but Recommended): This step is optional, but I highly recommend it. Cutting out the inner sidewall of the top tire (if you’re stacking) will allow for better drainage and give the squash roots more room to spread.
* Safety First: Put on your safety glasses and gloves.
* Mark the Cut Line: Use a marker to draw a line around the inside of the tire sidewall, about 2-3 inches from the edge.
* Cut Carefully: Using a utility knife or jigsaw, carefully cut along the marked line. A utility knife will require multiple passes. A jigsaw is faster but requires more caution. Go slowly and steadily.
* Smooth the Edges: Once the sidewall is removed, use the utility knife to smooth any rough edges.
3. Choosing a Location: Select a sunny spot in your garden that receives at least 6-8 hours of direct sunlight per day. Butternut squash needs plenty of sun to thrive. Make sure the location has good drainage.
Building Your Tire Garden
Now for the fun part – assembling your tire garden!
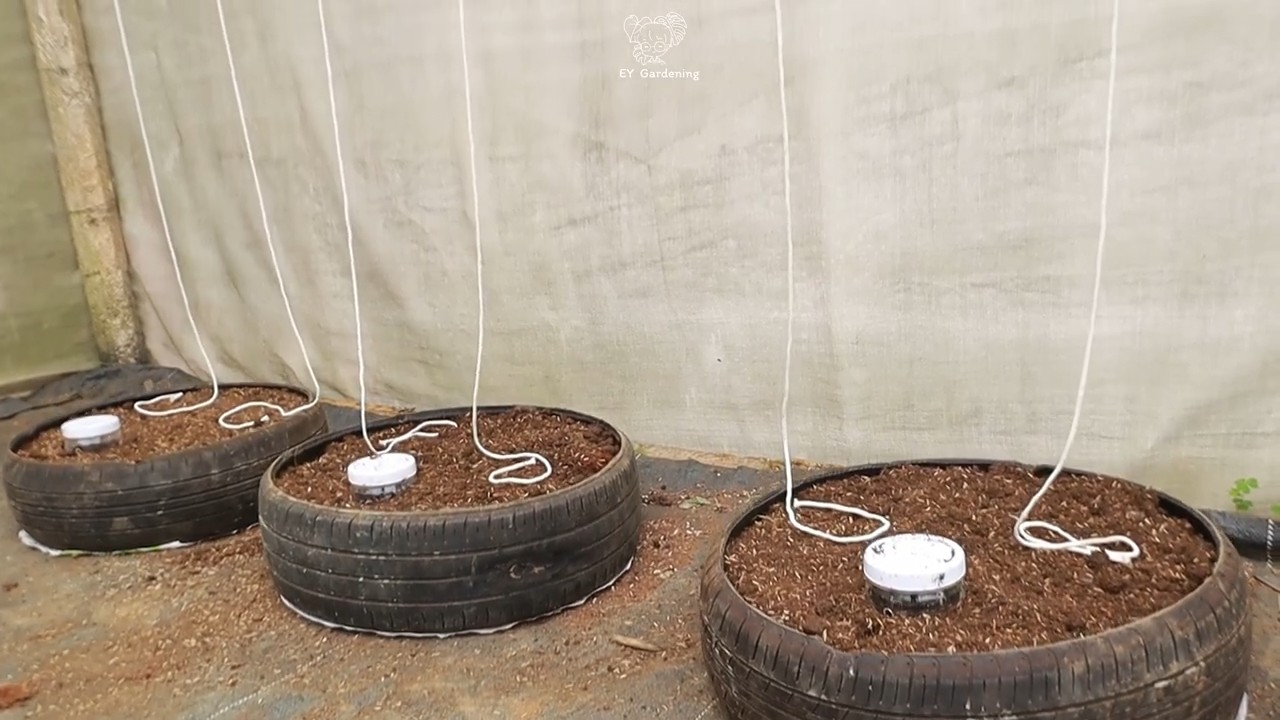
1. Positioning the Tires: Place the tires in your chosen location. If you’re stacking them, make sure they are stable and secure. You can stagger them slightly for a more visually appealing look.
2. Lining the Bottom: Line the bottom of each tire with heavy-duty landscape fabric or cardboard. This will prevent the soil from washing out and keep weeds from growing up from below. Overlap the edges of the fabric or cardboard and secure it with rocks or soil.
3. Filling with Soil: Fill the tires with your well-draining soil mixture. Leave a few inches of space at the top. Butternut squash needs rich soil, so don’t skimp on the compost!
4. Watering the Soil: Water the soil thoroughly to settle it. This will also help identify any areas that need more soil.
Planting Your Butternut Squash
Time to get those squash seeds or seedlings in the ground!
1. Starting from Seed: If you’re starting from seed, sow the seeds directly into the soil in the tire, about 1 inch deep and 2-3 seeds per planting hole. Space the planting holes about 12-18 inches apart. Once the seedlings emerge, thin them to one strong plant per hole.
2. Transplanting Seedlings: If you’re using seedlings, gently remove them from their containers and plant them in the soil, spacing them about 12-18 inches apart. Make sure the top of the root ball is level with the soil surface.
3. Watering After Planting: Water the newly planted seeds or seedlings thoroughly.
Caring for Your Butternut Squash
Now that your butternut squash is planted, it’s time to provide the care they need to thrive.
1. Watering: Butternut squash needs consistent moisture, especially during hot weather. Water deeply whenever the top inch of soil feels dry to the touch. Avoid watering the foliage, as this can lead to fungal diseases. Drip irrigation or soaker hoses are ideal.
2. Fertilizing: Butternut squash are heavy feeders, so fertilize them regularly with a balanced fertilizer. Follow the instructions on the fertilizer package. You can also side-dress the plants with compost or aged manure.
3. Weeding: Keep the area around your butternut squash plants free of weeds. Weeds compete with the squash for nutrients and water. Mulching can help suppress weeds.
4. Pest and Disease Control: Keep an eye out for common butternut squash pests, such as squash bugs, squash vine borers, and aphids. Handpick pests whenever possible. You can also use insecticidal soap or neem oil to control infestations. Powdery mildew is a common fungal disease that can affect butternut squash. To prevent powdery mildew, ensure good air circulation around the plants and avoid overhead watering. If powdery mildew does appear, treat it with a fungicide.
5. Pollination: Butternut squash requires pollination to produce fruit. If you’re not seeing any fruit developing, you may need to hand-pollinate the flowers. To hand-pollinate, use a small paintbrush to transfer pollen from the male flowers (which have a long, thin stem) to the female flowers (which have a small, immature fruit at the base).
Harvesting Your Butternut Squash
The moment you’ve been waiting for – harvesting your delicious butternut squash!
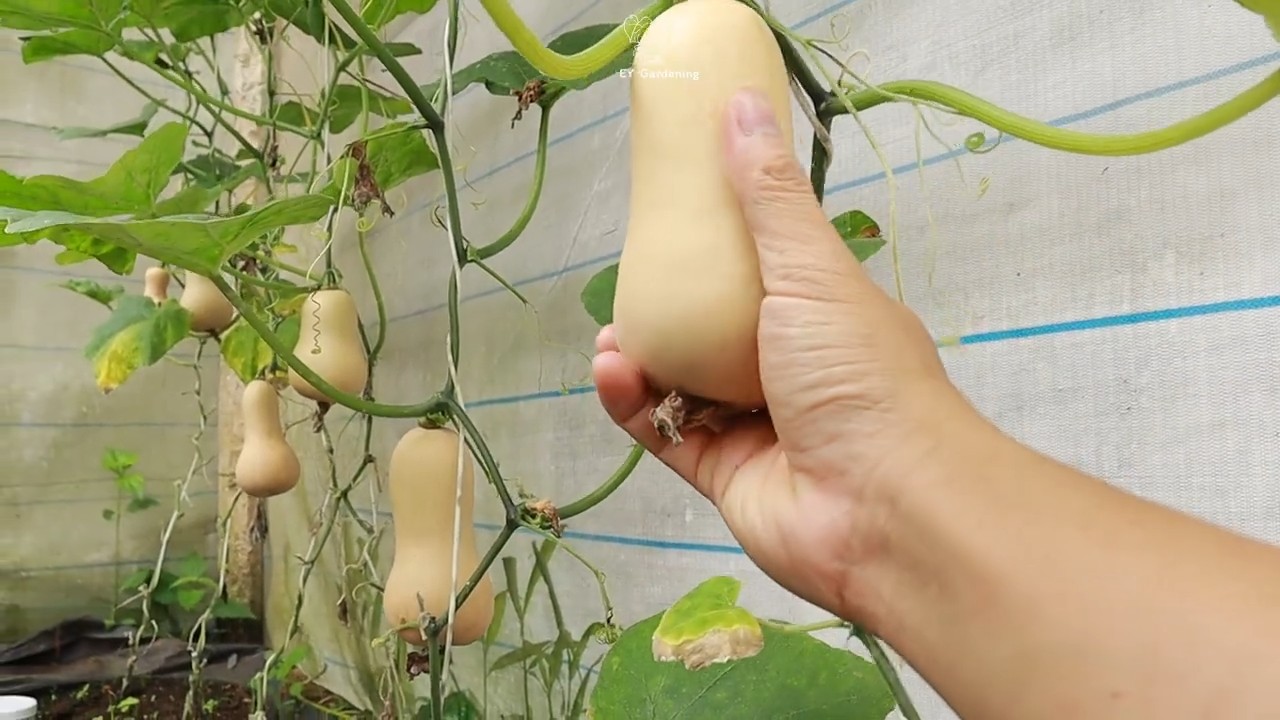
1. Determining Ripeness: Butternut squash is typically ready to harvest in the fall, about 90-100 days after planting. The squash should be a deep tan color and the skin should be hard and difficult to pierce with your fingernail. The stem should also be dry and brown.
2. Harvesting: Use a sharp knife or pruning shears to cut the squash from the vine, leaving about 2-3 inches of stem attached. Handle the squash carefully to avoid bruising.
3. Curing: Cure the butternut squash in a warm, dry place for about 1-2 weeks. This will help harden the skin and improve the flavor.
4. Storing: Store cured butternut squash in a cool, dry place, such as a basement or pantry. Properly stored butternut squash can last for several months.
Tips and Tricks for Success
Here are a few extra tips to help you grow the best butternut squash ever:
* Choose the Right Variety: Some butternut squash varieties are more compact and suitable for growing in containers.
* Provide Support: As the squash vines grow, they may need some support. You can use a trellis or stakes to keep the vines off the ground.
* Rotate Your Crops: Avoid planting butternut squash in the same spot year after year. Crop rotation helps prevent soilborne diseases.
* Enjoy Your Harvest: Butternut squash is incredibly versatile. Use it in soups, stews, roasted dishes, and even desserts!
Growing
Conclusion
So, there you have it! Growing butternut squash in tires isn’t just a quirky gardening hack; it’s a game-changer for maximizing space, improving soil conditions, and ultimately, yielding a bountiful harvest of delicious, homegrown squash. This method offers a multitude of benefits, from the passive solar heating provided by the tire’s dark surface, which accelerates growth, to the contained environment that helps retain moisture and nutrients. It’s a win-win for both you and your butternut squash!
But the beauty of this DIY trick lies in its adaptability. Feel free to experiment! Consider using different types of tires – larger tires will provide more space for root development, potentially leading to even larger squash. You could also try painting the tires a lighter color in hotter climates to prevent overheating. Another variation is to incorporate companion planting within the tire, such as marigolds to deter pests or basil to improve the overall health of your squash.
Don’t be afraid to get creative with your soil mix! While the recipe calls for a specific blend, you can adjust it based on your local soil conditions. If your soil is heavy clay, add more compost and perlite to improve drainage. If it’s sandy, incorporate more organic matter to help retain moisture. The key is to create a well-draining, nutrient-rich environment that will support the vigorous growth of your butternut squash.
Beyond the practical advantages, growing butternut squash in tires is simply a fun and rewarding experience. It’s a chance to connect with nature, get your hands dirty, and witness the miracle of life unfolding before your eyes. There’s nothing quite like the satisfaction of harvesting your own homegrown produce, knowing that you nurtured it from seed to table.
We wholeheartedly encourage you to give this DIY trick a try. It’s a simple, effective, and sustainable way to grow delicious butternut squash, even if you have limited space. And once you’ve experienced the joy of harvesting your own tire-grown squash, we’d love to hear about it! Share your photos, tips, and experiences in the comments below. Let’s create a community of tire-gardening enthusiasts and inspire others to embrace this innovative approach to growing their own food. Happy gardening!
Frequently Asked Questions (FAQ)
What are the benefits of growing butternut squash in tires compared to traditional gardening methods?
Growing butternut squash in tires offers several advantages. First, it provides a contained environment, which helps retain moisture and nutrients, leading to healthier and more productive plants. Second, the dark color of the tires absorbs heat from the sun, warming the soil and accelerating growth, especially in cooler climates. Third, it’s an excellent way to recycle old tires, reducing waste and promoting sustainability. Fourth, it elevates the plants, making them easier to tend to and harvest. Finally, it can be a great solution for gardeners with limited space or poor soil conditions, as you can create a customized growing medium within the tire.
What type of tires are best for growing butternut squash?
Ideally, you should use tires that are free from steel belts or have had them removed. Passenger car tires are generally a good size. Avoid using tires that are heavily damaged or have exposed steel wires. It’s also a good idea to clean the tires thoroughly before using them to remove any dirt, debris, or potential contaminants. Consider the size of the tire; larger tires will provide more space for root development, potentially leading to larger squash.
How do I prepare the tires before planting butternut squash?
First, thoroughly clean the tires with soap and water to remove any dirt or debris. If the tires have steel belts, you can attempt to remove them, but this can be challenging and may require specialized tools. If you choose to leave the steel belts in place, make sure they are not exposed and won’t pose a safety hazard. Once the tires are clean, you can paint them if desired. Painting them a lighter color can help prevent overheating in hotter climates. Finally, place the tires in your desired location and fill them with your prepared soil mix.
What kind of soil mix should I use for growing butternut squash in tires?
A well-draining, nutrient-rich soil mix is essential for growing healthy butternut squash. A good starting point is a mix of equal parts topsoil, compost, and perlite or vermiculite. The topsoil provides a base for the plants to grow in, the compost adds essential nutrients and improves soil structure, and the perlite or vermiculite improves drainage and aeration. You can also add other amendments, such as bone meal or blood meal, to provide additional nutrients. Adjust the mix based on your local soil conditions. If your soil is heavy clay, add more compost and perlite to improve drainage. If it’s sandy, incorporate more organic matter to help retain moisture.
How often should I water butternut squash grown in tires?
Butternut squash requires consistent moisture, especially during hot weather. Water deeply and regularly, aiming to keep the soil consistently moist but not waterlogged. Check the soil moisture regularly by sticking your finger into the soil. If the top inch or two feels dry, it’s time to water. The frequency of watering will depend on the weather conditions, soil type, and the size of the plants. In general, you may need to water daily during hot, dry weather.
What kind of fertilizer should I use for butternut squash grown in tires?
Butternut squash are heavy feeders and benefit from regular fertilization. Use a balanced fertilizer with an NPK ratio of 10-10-10 or 14-14-14. Apply the fertilizer according to the package directions, typically every 2-3 weeks. You can also supplement with organic fertilizers, such as compost tea or fish emulsion. Avoid over-fertilizing, as this can lead to excessive foliage growth and reduced fruit production.
How do I protect my butternut squash from pests and diseases when growing in tires?
Growing butternut squash in tires can help reduce the risk of pests and diseases, but it’s still important to take preventative measures. Regularly inspect your plants for signs of pests or diseases. Common pests that affect butternut squash include squash bugs, squash vine borers, and aphids. Common diseases include powdery mildew and squash mosaic virus. Use organic pest control methods, such as insecticidal soap or neem oil, to control pests. Ensure good air circulation around the plants to prevent diseases. Remove any infected leaves or plants promptly to prevent the spread of disease. Companion planting with marigolds can also help deter pests.
Can I grow other vegetables or herbs alongside butternut squash in the tires?
Yes, companion planting can be beneficial for butternut squash. Good companion plants include marigolds, basil, nasturtiums, and radishes. Marigolds deter pests, basil improves the overall health of the squash, nasturtiums attract beneficial insects, and radishes can help break up the soil. Avoid planting squash near potatoes or fennel, as they can inhibit growth.
How do I know when my butternut squash is ready to harvest?
Butternut squash is typically ready to harvest in the fall, about 90-100 days after planting. The squash should be a deep tan color and the skin should be hard and resistant to scratching. The stem should also be dry and brown. Use a sharp knife or pruners to cut the squash from the vine, leaving a few inches of stem attached.
How do I store butternut squash after harvesting?
Store butternut squash in a cool, dry place with good air circulation. A temperature of 50-55°F (10-13°C) is ideal. Do not store squash in the refrigerator, as this can cause them to rot. Properly stored butternut squash can last for several months.

Leave a Comment