

Hanging sweet potatoes harvest – the words alone conjure images of lush, cascading vines laden with earthy treasures! Have you ever dreamed of harvesting your own sweet potatoes, but thought you didn’t have the space? Or perhaps you’re simply looking for a unique and visually stunning way to grow your own food? Well, you’re in the right place! This DIY guide will unlock the secrets to a bountiful hanging sweet potatoes harvest, even if you’re a complete beginner.
The practice of growing sweet potatoes, a staple in many cultures, dates back thousands of years. Originating in Central and South America, these nutritious tubers have journeyed across continents, becoming a beloved ingredient in cuisines worldwide. While traditionally grown in the ground, innovative gardeners have discovered the joys and benefits of growing them vertically.
Why should you try this DIY trick? Because it’s a game-changer! Imagine maximizing your yield in a small space, deterring pests, and adding a touch of whimsical charm to your balcony, patio, or garden. Plus, harvesting sweet potatoes from hanging containers is significantly easier on your back! I’m excited to share my tried-and-true methods for creating the perfect hanging environment and ensuring a successful and delicious harvest. Let’s get started!
DIY Hanging Sweet Potato Harvest: A Step-by-Step Guide
Alright, fellow gardening enthusiasts! Get ready to ditch the back-breaking digging and embrace a super cool, space-saving, and frankly, just plain fun way to harvest your sweet potatoes: hanging them! I’m going to walk you through exactly how I do it, from prepping the container to the satisfying moment you pluck those gorgeous orange tubers. This method is perfect if you’re short on garden space, have poor soil, or just want to try something a little different. Let’s get started!
Choosing the Right Container and Soil
Before we even think about planting, we need to get our setup ready. This is crucial for a successful hanging sweet potato harvest.
* Container Size Matters: You’ll need a container that’s at least 10 gallons in size. I personally prefer using a 15-gallon grow bag. The larger the container, the more room your sweet potatoes have to develop. Think big!
* Drainage is Key: Sweet potatoes hate soggy feet! Make sure your container has excellent drainage. If you’re using a plastic container, drill plenty of holes in the bottom. Grow bags are naturally well-draining.
* Soil Selection: Don’t just grab any old dirt! Sweet potatoes thrive in well-draining, loose soil that’s rich in organic matter. I like to use a mix of equal parts compost, peat moss (or coconut coir), and perlite. This combination provides the perfect balance of nutrients, moisture retention, and drainage.
* Hanging Mechanism: You’ll need a sturdy way to hang your container. I use heavy-duty chain and S-hooks. Make sure whatever you choose can support the weight of a fully loaded container, which can get surprisingly heavy!
Planting Your Sweet Potato Slips
Now for the fun part – planting! You can’t just toss a sweet potato in the ground and expect it to grow (well, you *can*, but you won’t get the best results). We need to start with “slips.”
* What are Slips?: Slips are sprouts that grow from a sweet potato. You can buy them online or at your local garden center, or you can easily grow your own!
* Growing Your Own Slips (My Preferred Method): This is a super rewarding process!
1. Choose a Healthy Sweet Potato: Select a sweet potato that’s firm, free of blemishes, and preferably organic.
2. Suspend it in Water: Use toothpicks to suspend the sweet potato halfway in a jar or glass of water. The bottom half should be submerged.
3. Find a Sunny Spot: Place the jar in a warm, sunny location.
4. Be Patient: It can take several weeks for slips to start growing. Change the water every few days to prevent mold.
5. Wait for Roots and Leaves: Once the slips have several inches of roots and leaves, they’re ready to be planted.
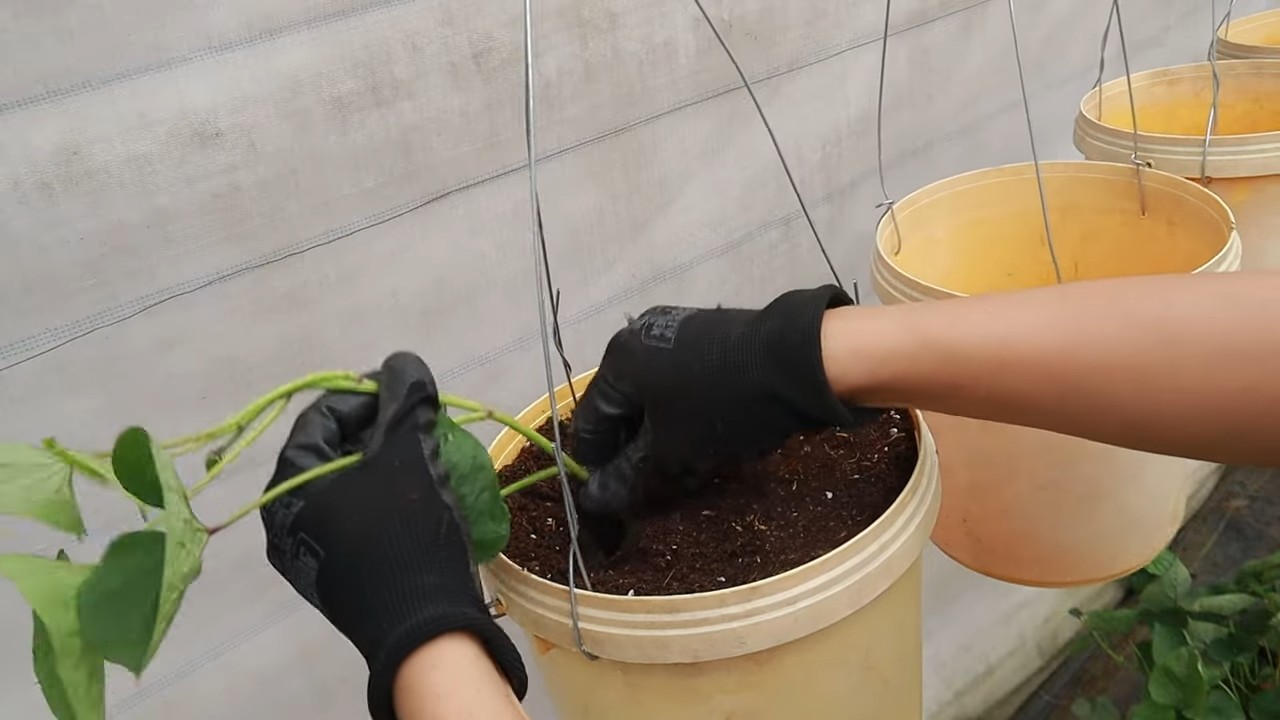
* Planting the Slips:
1. Fill Your Container: Fill your prepared container with your chosen soil mix, leaving a few inches of space at the top.
2. Water the Soil: Thoroughly water the soil before planting.
3. Gently Remove the Slips: Carefully detach the slips from the sweet potato. You can gently twist them off or use a sharp knife to cut them.
4. Plant the Slips: Dig small holes in the soil, about 4-6 inches apart. Plant the slips, burying the roots and the bottom part of the stem. Leave the leaves exposed.
5. Water Again: Gently water the newly planted slips.
Caring for Your Hanging Sweet Potato Plant
Okay, your sweet potato slips are planted. Now comes the ongoing care to ensure a bountiful harvest.
* Sunlight is Essential: Sweet potatoes need at least 6-8 hours of direct sunlight per day. Choose a location that gets plenty of sun.
* Watering: Keep the soil consistently moist, but not waterlogged. Water deeply when the top inch of soil feels dry. Remember, good drainage is crucial!
* Fertilizing: Sweet potatoes are heavy feeders. I like to fertilize them every 2-3 weeks with a balanced organic fertilizer. Look for one that’s specifically formulated for vegetables.
* Pest Control: Keep an eye out for common pests like aphids and spider mites. If you spot any, treat them with an organic insecticide like neem oil.
* Pruning (Optional): You can prune the vines if they get too long and unruly. This will encourage the plant to focus its energy on producing tubers.
Knowing When to Harvest
This is the moment we’ve all been waiting for! Knowing when to harvest your sweet potatoes is key to getting the best flavor and texture.
* Timing is Everything: Sweet potatoes typically take 90-120 days to mature. Check the seed packet or plant tag for the specific variety you’re growing.
* Look for Yellowing Leaves: A good indicator that your sweet potatoes are ready to harvest is when the leaves start to turn yellow and die back.
* The “Scratch Test”: Gently scratch around the base of the plant to see if you can feel any tubers. If they’re a good size, it’s time to harvest!
* Harvest Before Frost: It’s crucial to harvest your sweet potatoes before the first frost. Frost can damage the tubers and affect their flavor.
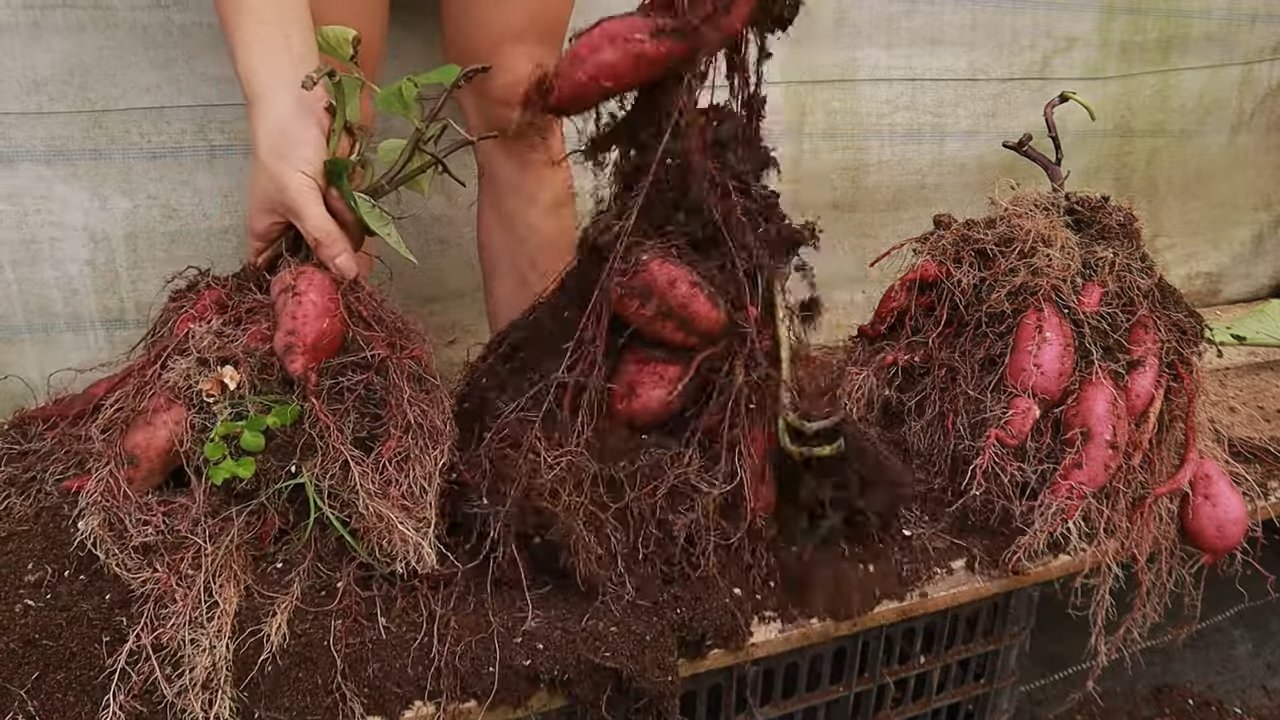
Harvesting Your Hanging Sweet Potatoes
Finally, the grand finale! This is where the hanging method really shines.
1. Prepare Your Area: Lay down a tarp or some newspaper to catch any falling soil.
2. Gently Tip the Container: Carefully tip the container over onto the tarp.
3. Loosen the Soil: Gently loosen the soil around the plant with your hands.
4. Unearth the Treasures: Start pulling out the sweet potatoes! They should be relatively easy to remove from the loose soil.
5. Brush Off the Dirt: Gently brush off any excess dirt from the sweet potatoes.
6. Curing Your Sweet Potatoes: This is a crucial step for improving the flavor and storage life of your sweet potatoes.
* Don’t Wash Them: Avoid washing the sweet potatoes after harvesting.
* Curing Process: Place the sweet potatoes in a warm, humid place (80-85°F and 85-90% humidity) for 7-10 days. A greenhouse or a warm, sunny room with a humidifier works well.
* Why Cure?: Curing allows the skins to harden and any minor cuts or bruises to heal, preventing rot and improving the flavor.
7. Storing Your Sweet Potatoes: After curing, store your sweet potatoes in a cool, dry, and dark place (55-60°F). They should last for several months.
Troubleshooting Common Issues
Even with the best planning, things can sometimes go wrong. Here are a few common issues you might encounter and how to deal with them.
* Yellowing Leaves Before Harvest Time: This could be a sign of nutrient deficiency. Try fertilizing with a balanced fertilizer. It could also be a sign of overwatering, so check the soil moisture.
* Small Sweet Potatoes: This could be due to insufficient sunlight, poor soil, or overcrowding. Make sure your plant is getting enough sun, fertilize regularly, and thin out the slips if necessary.
* Pest Infestation: Regularly inspect your plant for pests and treat them promptly with an organic insecticide.
* Rotting Sweet Potatoes: This is usually caused by overwatering or poor drainage. Make sure your container has excellent drainage and avoid overwatering. Also, ensure proper curing after harvest.
Why I Love Hanging Sweet Potatoes
Honestly, this method has completely changed the way I grow sweet potatoes. Here’s why I’m such a fan:
* Space-Saving: Perfect for small gardens, balconies, or patios.
* Easy Harvesting: No more back-breaking digging!
* Improved Drainage: Hanging containers naturally provide better drainage, preventing root rot.
* Pest Control: Easier to monitor and control pests when the plant is elevated.
* Just Plain Fun!: It’s a unique and rewarding gardening experience.
So there you have it! My complete guide to growing and harvesting sweet potatoes in hanging containers. Give it a try, and I promise you’ll be amazed at the results. Happy gardening!
Conclusion
So, there you have it! Transforming your sweet potato harvest into stunning, space-saving hanging displays is more than just a storage solution; it’s a celebration of your gardening efforts and a unique way to bring the beauty of nature indoors. We’ve explored the simple steps to cure and prepare your sweet potatoes, the best methods for creating sturdy and aesthetically pleasing hangers, and even touched upon the ideal conditions for long-term preservation.
Why is this DIY trick a must-try? Because it’s practical, beautiful, and sustainable. Instead of relegating your precious sweet potatoes to a dark corner of the pantry, you can showcase them as living art. Imagine the conversations sparked by these unusual hanging arrangements! Plus, by properly curing and storing your sweet potatoes in this manner, you’re significantly extending their shelf life, reducing food waste, and enjoying the fruits (or rather, the roots) of your labor for months to come.
But don’t stop there! Feel free to experiment with different hanger materials. While twine and rope offer a rustic charm, consider using colorful macrame cord for a more bohemian vibe. You can also incorporate decorative elements like beads, feathers, or even small air plants to personalize your hanging sweet potato displays. Think about the overall aesthetic of your home and tailor the hangers to complement your existing decor.
Another variation to consider is the size and arrangement of your sweet potatoes. Group smaller sweet potatoes together for a delicate, clustered effect, or showcase larger, more impressive specimens individually. You can even create multi-tiered hangers for a cascading display that maximizes vertical space. The possibilities are truly endless!
Ultimately, the success of this DIY project hinges on your willingness to embrace creativity and adapt the techniques to suit your specific needs and preferences. Don’t be afraid to experiment, learn from your mistakes, and most importantly, have fun!
We are confident that this method of hanging sweet potatoes will revolutionize the way you store and appreciate your harvest. It’s a simple, effective, and visually stunning way to preserve your hard work and add a touch of natural beauty to your home.
Now, it’s your turn! We wholeheartedly encourage you to try this DIY trick with your own sweet potato harvest. Share your creations with us! Post photos of your hanging sweet potato displays on social media using [Your Hashtag Here] and let us see your unique interpretations. We’re eager to learn from your experiences and celebrate your success. Happy hanging!
Frequently Asked Questions (FAQ)
1. What kind of sweet potatoes are best for hanging?
The best sweet potatoes for hanging are those that are free from blemishes, cuts, or bruises. Look for firm, healthy sweet potatoes that have a smooth skin. Varieties that tend to store well, such as Beauregard, Centennial, and Jewel, are excellent choices. Avoid using sweet potatoes that show signs of rot or decay, as these will not store well and could potentially contaminate the other sweet potatoes in your display. The size of the sweet potato is also a factor; medium to large sweet potatoes are generally easier to handle and create a more visually appealing display.
2. How long do sweet potatoes last when hung?
When properly cured and stored in a cool, dry, and well-ventilated environment, hanging sweet potatoes can last for several months, typically ranging from 4 to 7 months. The key is to ensure that the sweet potatoes are thoroughly cured before hanging, as this process helps to harden the skin and prevent rot. Regularly inspect your hanging sweet potatoes for any signs of spoilage, such as soft spots or mold. Remove any affected sweet potatoes immediately to prevent the spread of decay to the others. Maintaining consistent temperature and humidity levels is also crucial for extending the shelf life of your hanging sweet potatoes.
3. What is the ideal temperature and humidity for storing hanging sweet potatoes?
The ideal storage conditions for hanging sweet potatoes are a temperature between 55°F and 60°F (13°C and 16°C) and a relative humidity of 75% to 80%. These conditions help to slow down the respiration rate of the sweet potatoes, preventing them from sprouting or rotting prematurely. Avoid storing sweet potatoes in areas that are too warm or too cold, as extreme temperatures can damage the tubers. If you live in a particularly dry climate, you may need to increase the humidity levels in your storage area by using a humidifier or placing a container of water nearby.
4. Can I hang sweet potatoes that I bought from the grocery store?
Yes, you can hang sweet potatoes purchased from the grocery store, but it’s important to remember that they may not have been properly cured. To improve their storage potential, you can cure them yourself by placing them in a warm, humid environment (around 85°F and 90% humidity) for about a week. This will help to harden their skins and prevent rot. After curing, follow the same steps for hanging as you would with homegrown sweet potatoes. Keep in mind that grocery store sweet potatoes may not last as long as homegrown ones, as their storage history is unknown.
5. What are the signs that my hanging sweet potatoes are going bad?
Several signs indicate that your hanging sweet potatoes are going bad. These include:
* Soft spots or mushy areas on the skin
* Mold growth on the surface
* An unpleasant odor
* Sprouting (although a few small sprouts are normal, excessive sprouting indicates that the sweet potato is nearing the end of its storage life)
* Shriveled or wrinkled skin
If you notice any of these signs, remove the affected sweet potato immediately to prevent the spread of decay to the others.
6. Is it safe to eat sweet potatoes that have sprouted?
Yes, it is generally safe to eat sweet potatoes that have sprouted, as long as the sweet potato itself is still firm and free from rot. Simply remove the sprouts before cooking. However, keep in mind that sprouted sweet potatoes may not be as sweet or flavorful as those that have not sprouted. If the sweet potato is soft, mushy, or shows signs of rot, it is best to discard it.
7. Can I use any type of rope or twine for hanging sweet potatoes?
While you can technically use any type of rope or twine for hanging sweet potatoes, it’s important to choose a material that is strong, durable, and resistant to moisture. Natural fibers like jute, hemp, and cotton twine are popular choices for their rustic aesthetic, but they may be more susceptible to rot if exposed to high humidity. Synthetic materials like nylon or polypropylene rope are more resistant to moisture and may be a better option for long-term storage. Ensure that the rope or twine you choose is thick enough to support the weight of the sweet potatoes and that it is securely tied to prevent them from falling.
8. How do I prevent pests from infesting my hanging sweet potatoes?
To prevent pests from infesting your hanging sweet potatoes, start by thoroughly inspecting them for any signs of insects or damage before hanging. Store your sweet potatoes in a clean and well-ventilated area to discourage pests from taking up residence. You can also consider using natural pest repellents, such as bay leaves or cedar chips, to deter insects. Regularly inspect your hanging sweet potatoes for any signs of pests and take action immediately if you notice any problems.
9. Can I hang other root vegetables besides sweet potatoes?
While this method is particularly well-suited for sweet potatoes, you can potentially hang other root vegetables with similar storage requirements, such as potatoes or yams. However, it’s important to research the specific storage needs of each vegetable before attempting to hang them. Some root vegetables may require different temperature or humidity levels, or they may be more susceptible to rot. Always ensure that the vegetables are properly cured and stored in a suitable environment to maximize their shelf life.
10. What are some creative ways to display hanging sweet potatoes?
There are many creative ways to display hanging sweet potatoes! Consider using different types of hangers, such as macrame, wire baskets, or even repurposed materials like old belts or fabric scraps. You can also incorporate decorative elements like beads, feathers, or air plants to personalize your displays. Experiment with different arrangements, such as grouping smaller sweet potatoes together or showcasing larger specimens individually. Hang your sweet potatoes in a well-lit area where they can be admired, such as near a window or in a kitchen corner. Get creative and have fun with it!

Leave a Comment