

Balcony chili plant growing can feel like a daunting task, especially if you’re new to the world of urban gardening. But trust me, the satisfaction of harvesting your own fiery peppers just steps from your living room is absolutely worth it! Imagine adding a dash of homegrown heat to your favorite dishes, knowing you nurtured those chilies from tiny seedlings to vibrant, flavorful fruits.
For centuries, chilies have been cultivated and cherished across cultures, from their origins in South America to their widespread use in Asian and European cuisines. They represent not just a spice, but a symbol of warmth, flavor, and even good luck in some traditions. But why should you bother with the effort of growing them yourself? Well, store-bought chilies often lack the freshness and intense flavor of homegrown varieties. Plus, you have complete control over the growing process, ensuring they’re free from harmful pesticides and chemicals.
This DIY guide is your secret weapon to successful balcony chili plant growing. We’ll break down everything you need to know, from choosing the right variety for your space to troubleshooting common problems. I’ll share my favorite tips and tricks for maximizing your yield and keeping your plants healthy and thriving. So, grab your gardening gloves, and let’s get started on your journey to a bountiful balcony chili harvest!
Growing Chili on the Balcony: Your DIY Guide to a Fiery Harvest
Hello, chili lovers!
Dreaming of turning your balcony into a fiery little oasis? Then you’re in the right place! I’ll show you how to easily grow your own chili plants on your balcony – from sowing to harvesting. Don’t worry, it’s easier than you think!
What You’ll Need: The Right Equipment
Before we get started, let’s make sure you’ve got everything ready. Here’s a checklist for your chili balcony project:
- Chili seeds: Pick your favorite varieties – mild or super-hot, the choices are endless. Go for high-quality seeds.
- Seed-starting soil: Light, nutrient-poor soil that’s ideal for germination.
- Seed trays or small pots: Perfect for starting your seedlings.
- Larger pots or containers: For transplanting once the plants grow bigger. At least 10 liters per plant.
- Potting soil: High-quality, well-draining soil is key for healthy growth.
- Fertilizer: Chili or tomato fertilizer provides the nutrients your plants need.
- Watering can or spray bottle: To keep soil moist.
- Plant labels: To keep track of different chili varieties.
- Optional: Mini greenhouse or clear plastic wrap to speed up germination.
- Optional: Plant supports if you’re growing tall chili varieties.
Phase 1: Sowing – The Start of Your Chili Adventure
Sowing is the first and most important step. Here’s how to do it right:
- Prepare the seed pots: Fill with seed-starting soil and lightly press it down.
- Sow the seeds: Place 1–2 seeds per pot and cover with about 0.5 cm of soil.
- Water gently: Mist the soil with a spray bottle so it’s moist but not soggy.
- Create the right conditions: Keep them warm and bright (22–28°C is perfect). Use a mini greenhouse or cover with plastic wrap to boost humidity.
- Be patient: Germination can take 1–3 weeks depending on the variety. Keep the soil evenly moist during this time.
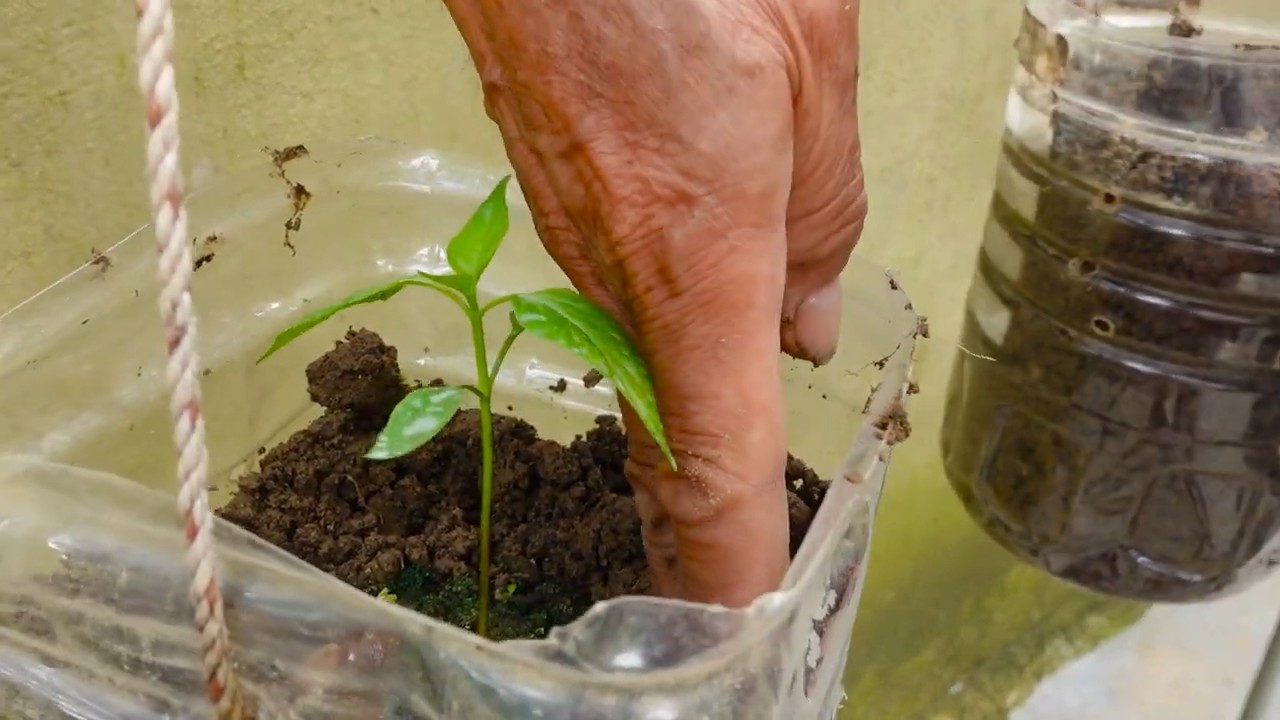
Phase 2: Transplanting – Giving Young Plants More Space
Once the seedlings develop their first true leaves, it’s time to transplant them into larger pots.
- Prepare larger pots: Fill with high-quality potting soil that drains well.
- Careful removal: Gently loosen the soil around the seedlings and lift them with a spoon or stick. Be careful not to damage the roots.
- Replant: Place seedlings into their new pots, slightly deeper than before to encourage stronger root growth.
- Firm and water: Press the soil around them lightly and water well.
- Provide good conditions: Place them in a bright, warm spot, but avoid direct sunlight for the first few days.
Phase 3: Care – Helping Your Chilis Thrive
Proper care is key to a spicy harvest. Keep these tips in mind:
- Watering: Keep the soil evenly moist. On hot days, daily watering may be needed. Avoid waterlogging.
- Fertilizing: Start feeding your plants 2–3 weeks after transplanting with chili or tomato fertilizer. Follow package directions.
- Sunlight: Chilis love the sun! Place them where they get at least 6 hours of direct sunlight daily.
- Protection: Shield plants from strong winds and heavy rain. A sheltered spot or cover helps.
- Pruning (optional): Remove side shoots (suckers) to encourage more fruit growth.
- Pollination: Chilis self-pollinate, but gently shaking flowers or using a brush can boost yields.
- Pest control: Watch out for aphids or spider mites. Use natural remedies if needed.
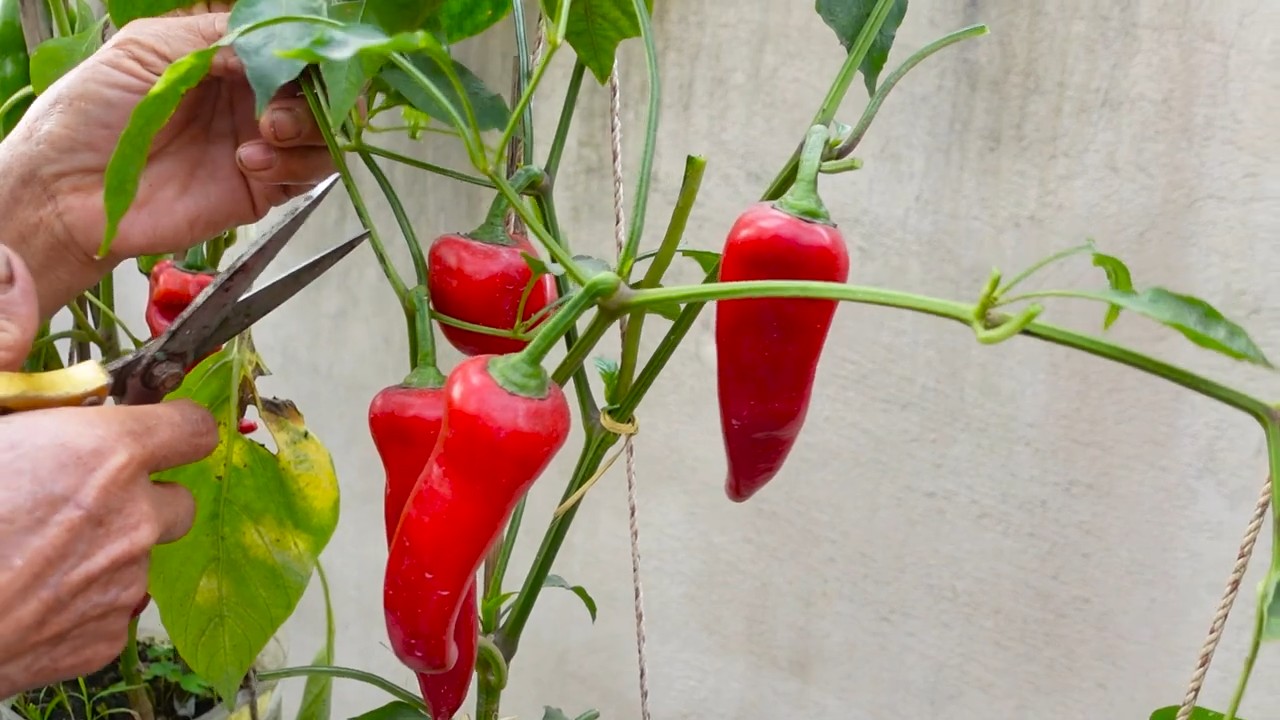
Phase 4: Harvest – The Reward for Your Effort
At last – your chilies are ready to pick!
- Spotting ripeness: Depending on the variety, chilies ripen from green to yellow, orange, red, or even brown. They’re ready when they’ve reached their final color and detach easily.
- Harvesting: Cut with scissors or a sharp knife. Wear gloves to avoid skin irritation.
- Use them: Fresh for cooking, drying, pickling, or turning into chili oil or powder.
Extra Tips for Balcony Chili Growing
- Choose compact varieties better suited for containers.
- Use pots of at least 10 liters per plant so the roots have enough space.
- Always go for high-quality, well-draining soil.
- Check regularly for pests and act quickly if you spot them.
- Most importantly: be patient. Chili growing takes time – don’t get discouraged if things move slowly at first.
Final Thoughts
I hope this guide helps you grow your own balcony chilis successfully. It’s a fun project, rewarding, and of course – deliciously spicy!
And remember: spice makes life happier!
Conclusion
So, there you have it! Transforming your balcony into a vibrant chili pepper paradise is not only achievable but also incredibly rewarding. This DIY trick for maximizing your balcony chili plant growing potential is a game-changer for anyone, regardless of their gardening experience. We’ve walked you through the essentials, from selecting the right chili varieties for container gardening to optimizing sunlight exposure and providing the perfect nutrient boost.
But why is this DIY approach a must-try? Because it empowers you to take control of your chili pepper production, ensuring you get the freshest, most flavorful peppers right at your doorstep. Forget relying on store-bought chilies that may have lost their zest during transportation and storage. With your own balcony chili garden, you’ll have a constant supply of fiery goodness, ready to spice up your meals whenever you desire.
Beyond the convenience and freshness, this DIY project offers a unique connection to nature. Nurturing your chili plants from seedlings to mature, fruit-bearing beauties is a deeply satisfying experience. You’ll witness the miracle of growth firsthand, learning about the intricate processes that sustain life. Plus, you’ll be contributing to a greener environment, even in a small way, by reducing your reliance on commercially grown produce.
Now, let’s talk about variations and suggestions. Feel free to experiment with different chili varieties to discover your personal favorites. From the mild jalapeños to the scorching habaneros, the possibilities are endless. You can also explore companion planting, adding herbs like basil or rosemary to your chili pots to deter pests and enhance flavor. Consider adding a small trellis or support structure as your plants grow taller and heavier with fruit. This will prevent branches from breaking and ensure optimal air circulation.
Don’t be afraid to get creative with your container choices. While terracotta pots are classic and breathable, plastic containers are lightweight and retain moisture better. You can even repurpose old buckets or baskets, adding a touch of rustic charm to your balcony garden. Just make sure your chosen containers have adequate drainage holes to prevent waterlogging.
Finally, remember that consistency is key. Regular watering, fertilizing, and pest control are essential for healthy chili plants. Keep a close eye on your plants, and address any issues promptly. With a little patience and dedication, you’ll be rewarded with a bountiful harvest of delicious chilies.
We wholeheartedly encourage you to try this DIY trick for balcony chili plant growing. It’s a fun, educational, and ultimately delicious project that will transform your balcony into a vibrant and productive space. And most importantly, share your experiences with us! We’d love to hear about your successes, challenges, and favorite chili varieties. Post photos of your balcony chili gardens on social media using #BalconyChiliGarden and tag us so we can see your amazing creations. Let’s build a community of balcony chili growers and inspire others to embrace the joys of urban gardening. Get your hands dirty, and let the chili adventures begin!
FAQ
Frequently Asked Questions About Balcony Chili Plant Growing
Q: What are the best chili varieties to grow on a balcony?
A: The best chili varieties for balcony growing are generally compact and productive. Some excellent choices include:
* Jalapeños: These are relatively easy to grow and produce a good yield of moderately spicy peppers.
* Serranos: Similar to jalapeños but slightly hotter, serranos are also well-suited for container gardening.
* Thai Chilies: These small, fiery peppers are perfect for adding a kick to Asian dishes and thrive in pots.
* Cayenne Peppers: These long, slender peppers are versatile and can be used fresh, dried, or powdered.
* Habaneros: If you’re looking for intense heat, habaneros are a great option, but be prepared for a challenge!
* Poblano: Milder and larger, these are great for stuffing or roasting.
Consider the size of your balcony and the amount of sunlight it receives when choosing your chili varieties. Also, think about your personal spice preference!
Q: How much sunlight do my balcony chili plants need?
A: Chili plants thrive in full sun, which means they need at least 6-8 hours of direct sunlight per day. If your balcony doesn’t receive that much sunlight, you can supplement with grow lights. Position your plants in the sunniest spot on your balcony, and rotate them regularly to ensure even exposure. If you live in a particularly hot climate, you may need to provide some afternoon shade to prevent your plants from getting scorched.
Q: What kind of soil should I use for my balcony chili plants?
A: Use a well-draining potting mix specifically formulated for container gardening. Avoid using garden soil, as it can become compacted in pots and restrict root growth. A good potting mix will provide adequate drainage, aeration, and nutrients for your chili plants. You can also amend your potting mix with compost or other organic matter to improve its fertility.
Q: How often should I water my balcony chili plants?
A: Water your chili plants regularly, especially during hot and dry weather. The frequency of watering will depend on the size of your pots, the type of soil you’re using, and the weather conditions. Check the soil moisture regularly by sticking your finger into the soil. If the top inch feels dry, it’s time to water. Water deeply, until water drains out of the bottom of the pot. Avoid overwatering, as this can lead to root rot.
Q: What kind of fertilizer should I use for my balcony chili plants?
A: Use a balanced fertilizer specifically formulated for vegetables or flowering plants. Look for a fertilizer with an NPK ratio (nitrogen, phosphorus, potassium) of around 10-10-10 or 14-14-14. Fertilize your chili plants every 2-4 weeks during the growing season, following the instructions on the fertilizer package. You can also use organic fertilizers, such as compost tea or fish emulsion.
Q: How do I protect my balcony chili plants from pests and diseases?
A: Regularly inspect your chili plants for pests and diseases. Common pests include aphids, spider mites, and whiteflies. You can control these pests with insecticidal soap, neem oil, or by handpicking them off the plants. Common diseases include powdery mildew and fungal leaf spots. Prevent these diseases by providing good air circulation, avoiding overwatering, and using a fungicide if necessary.
Q: When will my balcony chili plants start producing peppers?
A: The time it takes for your chili plants to start producing peppers will depend on the variety you’re growing and the growing conditions. Generally, you can expect to see peppers forming within 2-3 months of planting. Once the peppers reach their mature size and color, they’re ready to harvest.
Q: How do I harvest my balcony chili peppers?
A: Harvest your chili peppers when they reach their mature size and color. Use a sharp knife or scissors to cut the peppers from the plant, leaving a small stem attached. Be careful not to damage the plant when harvesting. Wear gloves when handling hot peppers to avoid skin irritation.
Q: Can I overwinter my balcony chili plants?
A: Yes, you can overwinter your balcony chili plants in a frost-free location. Before the first frost, prune your plants back to about 6 inches tall and move them indoors to a sunny window or under grow lights. Water sparingly during the winter months, and fertilize only occasionally. In the spring, gradually acclimate your plants to outdoor conditions before moving them back to your balcony.
Q: What if my chili plant is flowering but not producing fruit?
A: Several factors can contribute to a chili plant flowering but not producing fruit. These include:
* Lack of pollination: Chili plants are self-pollinating, but sometimes they need a little help. You can hand-pollinate your plants by gently shaking the flowers or using a small brush to transfer pollen from one flower to another.
* High temperatures: Extremely high temperatures can inhibit fruit set. Provide some afternoon shade during hot weather.
* Insufficient nutrients: Make sure your plants are getting enough fertilizer, especially phosphorus and potassium.
* Stress: Stressful conditions, such as drought or pest infestations, can also prevent fruit set. Address any underlying issues to help your plants thrive.
* Too much nitrogen: Excessive nitrogen can promote leafy growth at the expense of fruit production. Use a balanced fertilizer or one with a lower nitrogen content.

Leave a Comment