

Banana planting routine might sound intimidating, conjuring images of vast tropical plantations. But guess what? You don’t need acres of land to enjoy the sweet reward of homegrown bananas! I’m here to tell you that even with limited space, you can cultivate your own little slice of banana paradise.
For centuries, bananas have been a staple food and a symbol of prosperity in many cultures, from Southeast Asia to Latin America. Imagine bringing that rich history and vibrant energy right into your backyard! But let’s face it, the idea of growing bananas at home can feel daunting. Where do you even begin? What if you live in a climate that’s not exactly tropical?
That’s where this DIY guide comes in. I’m going to share some simple, effective tricks and hacks that will demystify the banana planting routine and empower you to grow your own bananas, no matter your experience level or location. From choosing the right variety to optimizing your soil and protecting your plants from pests, I’ve got you covered. So, ditch the store-bought bananas and get ready to embark on a fun and rewarding gardening adventure. Trust me, the taste of a homegrown banana is unlike anything you’ve ever experienced!

Grow Your Own Banana Paradise: A Beginner’s Guide to Planting Bananas at Home
Hey there, fellow plant enthusiasts! Ever dreamed of strolling into your backyard and plucking a ripe, delicious banana straight from the tree? Well, dream no more! Growing your own bananas is totally achievable, even if you don’t live in the tropics. I’m going to walk you through everything you need to know to get started, from choosing the right variety to nurturing your banana plant into a fruit-bearing beauty. Let’s get our hands dirty!
Choosing the Right Banana Variety
Before we dive into the planting process, it’s crucial to pick a banana variety that suits your climate and space. Not all bananas are created equal! Some are giants that need tons of room, while others are more compact and cold-hardy.
* Consider your climate: If you live in a warm, humid area (zones 9-11), you have a wider range of options. If you’re in a cooler climate, you’ll need to choose a cold-hardy variety or plan to grow your banana plant in a container that you can bring indoors during the winter.
* Think about space: Banana plants can get pretty big! Dwarf varieties are perfect for smaller gardens or containers.
* Popular varieties for home gardens:
* Dwarf Cavendish: A classic choice, known for its sweet fruit and manageable size (around 8-10 feet tall). It’s relatively cold-hardy.
* Grand Nain: Another popular variety, similar to Dwarf Cavendish but slightly larger.
* Ice Cream (Blue Java): This variety produces bananas with a unique vanilla-like flavor and a bluish tint when unripe. It’s also relatively cold-hardy.
* Raja Puri: A smaller, faster-growing variety that’s well-suited for containers.
* Orinoco: A very cold-hardy variety, tolerating temperatures down to the low 20s (Fahrenheit) for short periods. The fruit is starchy and best cooked.
Preparing for Planting: Location, Soil, and More
Okay, you’ve chosen your banana variety. Now, let’s get everything ready for planting! Proper preparation is key to a happy and productive banana plant.
* Sunlight: Bananas are sun-worshippers! They need at least 6-8 hours of direct sunlight per day. Choose a location that gets plenty of sunshine.
* Soil: Bananas thrive in rich, well-draining soil. They’re heavy feeders, so the soil should be fertile and full of organic matter.
* Drainage: Good drainage is essential. Banana plants don’t like to sit in soggy soil, which can lead to root rot.
* Wind protection: Banana leaves are large and can be easily damaged by strong winds. Choose a location that’s sheltered from strong gusts.
* Soil pH: Bananas prefer a slightly acidic to neutral soil pH (between 6.0 and 7.0).
* Amend the soil: Before planting, amend the soil with plenty of compost, well-rotted manure, or other organic matter. This will improve drainage, fertility, and water retention.
Planting Your Banana Plant: A Step-by-Step Guide
Alright, the moment we’ve been waiting for! Let’s get that banana plant in the ground (or container).
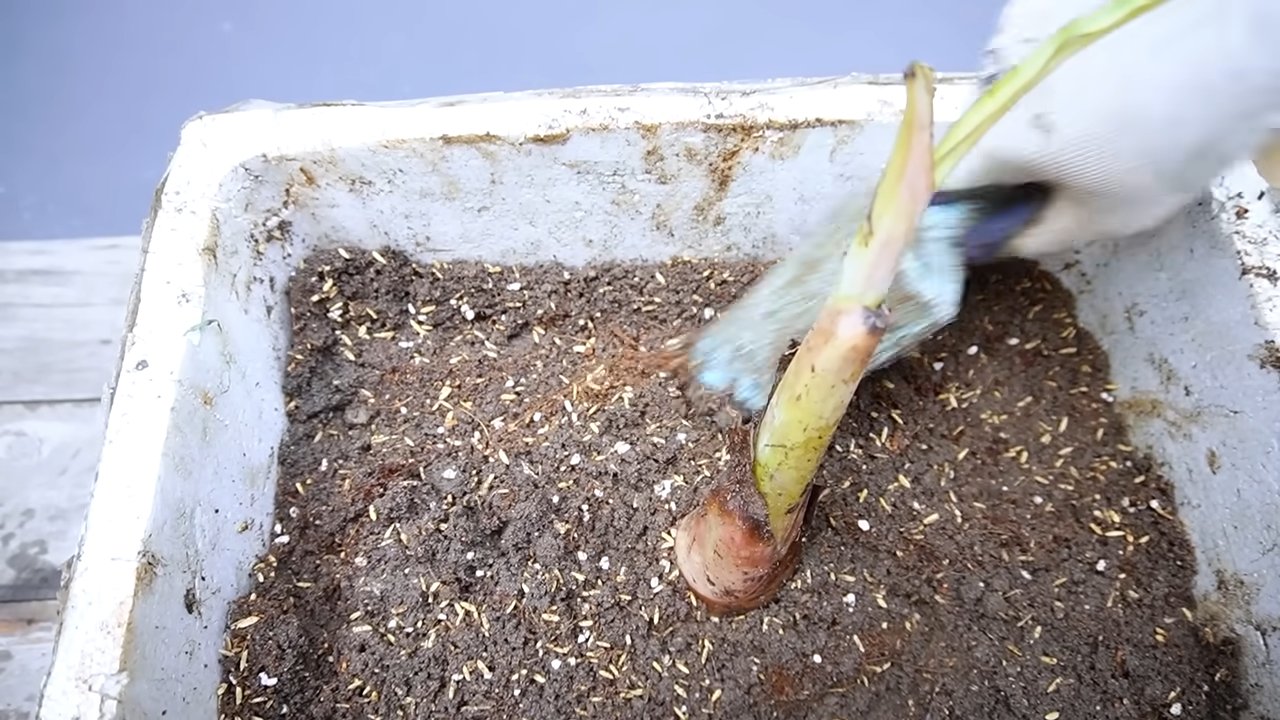
1. Choose your planting material: You can plant bananas from pups (small offshoots that grow from the base of the mother plant) or from rhizomes (underground stems). Pups are generally easier to work with.
2. Dig the hole: Dig a hole that’s twice as wide and as deep as the root ball of your pup or rhizome.
3. Prepare the planting hole: Mix some compost or well-rotted manure into the soil at the bottom of the hole.
4. Position the plant: Carefully place the pup or rhizome in the hole, making sure the top of the root ball is level with the surrounding soil.
5. Backfill the hole: Gently backfill the hole with soil, tamping it down lightly as you go.
6. Water thoroughly: Water the newly planted banana plant thoroughly to settle the soil and provide moisture.
7. Mulch: Apply a layer of mulch around the base of the plant to help retain moisture, suppress weeds, and regulate soil temperature. Use organic mulch like straw, wood chips, or shredded leaves.
Caring for Your Banana Plant: Watering, Fertilizing, and More
Planting is just the beginning! Now, we need to nurture our banana plant to ensure it grows strong and produces delicious fruit.
* Watering: Banana plants need consistent moisture, especially during the growing season. Water deeply whenever the top inch of soil feels dry to the touch. Avoid overwatering, which can lead to root rot.
* Fertilizing: Bananas are heavy feeders and need regular fertilization to thrive. Use a balanced fertilizer (e.g., 10-10-10) every 2-3 months during the growing season. You can also supplement with organic fertilizers like compost tea or fish emulsion.
* Pruning: Remove any dead or damaged leaves regularly. Also, remove any suckers (small offshoots) that grow from the base of the plant, unless you want to propagate new plants.
* Pest and disease control: Keep an eye out for pests like aphids, spider mites, and nematodes. Treat infestations promptly with insecticidal soap or neem oil. Banana plants can also be susceptible to diseases like Panama disease and black Sigatoka. Choose disease-resistant varieties and practice good sanitation to prevent these problems.
* Support: As your banana plant grows taller, it may need support to prevent it from toppling over, especially when it starts to produce fruit. Use stakes or a trellis to provide support.
* Winter protection (for cooler climates): If you live in a cooler climate, you’ll need to protect your banana plant from frost and freezing temperatures. You can wrap the trunk with burlap or blankets, or you can dig up the plant and store it indoors in a cool, dark place until spring. If you’re growing your banana plant in a container, simply bring it indoors before the first frost.
Harvesting Your Bananas: The Sweet Reward
After months of care and patience, the moment of truth arrives: harvesting your own homegrown bananas!
* Timing: Bananas are typically ready to harvest about 90-150 days after the flower appears. The exact timing depends on the variety and the climate.
* Signs of ripeness: The bananas will become plump and rounded, and the ridges on the fruit will become less prominent. The color of the skin will also change, depending on the variety.
* Harvesting: Cut the entire bunch of bananas from the plant using a sharp knife or machete.
* Ripening: Bananas are typically harvested green and allowed to ripen off the plant. You can ripen them at room temperature, or you can speed up the process by placing them in a paper bag with an apple or banana.
* Enjoy! Once the bananas are ripe, enjoy the sweet taste of your homegrown fruit!
Propagating Banana Plants: Expanding Your Banana Patch
Once you’ve successfully grown one banana plant, you might want to expand your banana patch! The easiest way to propagate banana plants is by dividing the pups that grow from the base of the mother plant.
1. Wait for pups to develop: Allow the pups to grow to a size of about 1-2 feet tall.
2. Carefully dig up the pup: Use a sharp shovel to carefully dig up the pup, making sure to get as much of the root system as possible.
3. Separate the pup from the mother plant: Use a sharp knife or pruning shears to separate the pup from the mother plant.
4. Plant the pup: Plant the pup in a pot or directly in the ground, following the same planting instructions as above.
5. Water and care for the pup: Water the pup regularly and provide it with the same care as a mature banana plant.
Troubleshooting Common Banana Plant Problems
Even with the best care, you might encounter some problems along the way. Here are some common issues and how to address them:
* Yellowing leaves: This can be caused by a variety of factors, including overwatering, underwatering, nutrient deficiencies, or pests. Check the soil moisture, fertilize regularly, and inspect for pests.
* Brown leaf tips: This is often caused by dry air or salt buildup in the soil. Increase humidity around the plant and flush the soil with water periodically.
* Slow growth: This can be caused by insufficient sunlight, poor soil, or nutrient deficiencies. Make sure your banana plant is getting enough sunlight, amend the soil with compost, and fertilize regularly.
* Root rot: This is
Conclusion
So, there you have it! Transforming your banana planting routine with this simple yet effective DIY trick is more than just a gardening hack; it’s an investment in a healthier, more productive banana plant and a more rewarding gardening experience. We’ve walked you through the steps, highlighting the benefits at each stage, and hopefully, dispelled any doubts you might have had about its feasibility.
Why is this DIY trick a must-try? Because it addresses several key challenges that banana plants often face. It improves drainage, preventing root rot, a common killer of banana plants. It enriches the soil with organic matter, providing a slow-release source of nutrients that fuels vigorous growth. And it creates a more aerated environment for the roots, allowing them to breathe and absorb nutrients more efficiently. Ultimately, this translates to a stronger, healthier plant that is more resistant to pests and diseases and, most importantly, produces more delicious bananas.
But don’t just take our word for it! The beauty of this DIY approach lies in its adaptability. Feel free to experiment with variations to suit your specific needs and resources. For instance, if you don’t have access to coffee grounds, you can substitute them with other nitrogen-rich materials like grass clippings or composted manure. If you’re planting in a particularly heavy clay soil, consider adding more perlite or sand to improve drainage even further. You could also incorporate slow-release fertilizer pellets into the planting hole for an extra boost of nutrients. The possibilities are endless!
Remember, gardening is all about experimentation and learning. Don’t be afraid to tweak the recipe and find what works best for you and your banana plant. The key is to understand the underlying principles 鈥?good drainage, rich soil, and adequate aeration 鈥?and then adapt the technique to your specific circumstances.
We are confident that this DIY banana planting routine will make a significant difference in the health and productivity of your banana plants. It’s a simple, cost-effective, and environmentally friendly way to give your plants the best possible start in life.
Now, it’s your turn! We encourage you to try this DIY trick and see the results for yourself. We’re eager to hear about your experiences. Did you notice a difference in growth rate? Did your plant produce more bananas? Did you encounter any challenges along the way? Share your stories, tips, and photos in the comments section below. Let’s learn from each other and create a community of thriving banana growers! Your insights could be invaluable to other gardeners who are just starting out. Let’s all work together to improve our banana planting routine.
Don’t delay, start planting today!
Frequently Asked Questions (FAQ)
Q: What type of banana plant is this DIY planting routine best suited for?
A: This DIY planting routine is beneficial for virtually all types of banana plants, from dwarf varieties grown in containers to larger varieties planted in the ground. The principles of improved drainage, nutrient-rich soil, and good aeration apply universally. However, you may need to adjust the quantities of materials used based on the size of the planting hole and the specific needs of your banana variety. For example, a dwarf banana plant in a container will require less organic matter than a large Cavendish banana planted in the ground.
Q: Can I use this DIY planting routine for other types of plants besides bananas?
A: Yes, absolutely! The core principles of this DIY planting routine 鈥?improved drainage, nutrient-rich soil, and good aeration 鈥?are beneficial for many other types of plants, especially those that prefer well-drained soil and a slightly acidic pH. Plants like citrus trees, berries (blueberries, raspberries), and even some vegetables (tomatoes, peppers) can benefit from this technique. Just be sure to research the specific needs of the plant you’re growing and adjust the recipe accordingly. For example, some plants may prefer a more alkaline soil, in which case you would want to avoid adding too much acidic material like coffee grounds.
Q: How often should I fertilize my banana plant after using this DIY planting routine?
A: While this DIY planting routine provides a good initial boost of nutrients, it’s still important to fertilize your banana plant regularly to maintain healthy growth and fruit production. The frequency of fertilization will depend on the type of fertilizer you’re using and the specific needs of your banana variety. A general guideline is to fertilize every 2-3 months during the growing season with a balanced fertilizer that is specifically formulated for banana plants. You can also supplement with organic fertilizers like compost tea or fish emulsion. Always follow the instructions on the fertilizer label and avoid over-fertilizing, as this can damage the plant.
Q: What if I don’t have access to all the ingredients listed in the DIY planting routine?
A: Don’t worry! The beauty of this DIY approach is that it’s flexible and adaptable. If you don’t have access to all the ingredients, you can substitute them with other similar materials. For example, if you don’t have coffee grounds, you can use grass clippings, composted manure, or even shredded leaves. If you don’t have perlite, you can use sand or vermiculite to improve drainage. The key is to understand the purpose of each ingredient and find a suitable alternative that serves the same function. The most important thing is to ensure that the planting hole has good drainage and is filled with nutrient-rich soil.
Q: My banana plant’s leaves are turning yellow. Is this DIY planting routine the solution?
A: Yellowing leaves can be a sign of several different problems, including nutrient deficiencies, overwatering, underwatering, pests, or diseases. While this DIY planting routine can help address nutrient deficiencies and improve drainage, it may not be the sole solution to your problem. First, check the soil moisture to ensure that you’re not overwatering or underwatering. Then, inspect the plant for any signs of pests or diseases. If you suspect a nutrient deficiency, consider conducting a soil test to determine which nutrients are lacking. You may need to supplement with additional fertilizer or amend the soil with specific nutrients. If the problem persists, consult with a local gardening expert for further assistance.
Q: How long will it take to see results after using this DIY planting routine?
A: The time it takes to see results will vary depending on several factors, including the size and health of the plant, the growing conditions, and the specific banana variety. However, you should start to notice improvements in growth rate and overall health within a few weeks to a few months. Keep in mind that banana plants are relatively fast-growing, so you should see noticeable progress over time. Be patient and consistent with your care, and you’ll be rewarded with a thriving banana plant and delicious fruit.
Q: Can I use this DIY planting routine when transplanting a banana plant?
A: Yes, this DIY planting routine is especially beneficial when transplanting a banana plant. Transplanting can be stressful for plants, so it’s important to provide them with the best possible start in their new location. Using this technique will ensure that the plant has access to plenty of nutrients and good drainage, which will help it recover from the transplant shock and establish itself quickly. Be sure to water the plant thoroughly after transplanting and provide it with some shade for the first few days to help it adjust.
Q: Is this DIY planting routine safe for organic gardening?
A: Yes, this DIY planting routine can be easily adapted for organic gardening. Simply use organic materials like compost, coffee grounds, and organic fertilizers. Avoid using synthetic fertilizers or pesticides, as these can harm the environment and the beneficial microorganisms in the soil. Organic gardening is a sustainable and environmentally friendly way to grow healthy and delicious bananas.
Q: What are the best companion plants to grow with banana plants after using this DIY planting routine?
A: Companion planting can be a great way to improve the health and productivity of your banana plants. Some good companion plants for bananas include legumes (beans, peas), which fix nitrogen in the soil, and herbs like basil and mint, which can help repel pests. You can also plant flowers like marigolds and nasturtiums, which attract beneficial insects. Avoid planting aggressive plants that will compete with the banana plant for resources.
Q: Can this DIY banana planting routine help with cold weather protection?
A: While this planting routine primarily focuses on soil health and nutrient availability, a healthy and robust banana plant is inherently more resilient to environmental stressors, including cold weather. A well-nourished plant can better withstand temperature fluctuations. However, this routine alone won’t provide complete cold weather protection. In colder climates, you’ll still need to take additional measures to protect your banana plant from frost and freezing temperatures, such as wrapping the trunk with insulation, mulching heavily around the base, or even moving the plant indoors if it’s in a container. Remember, a strong foundation built with this DIY planting routine sets the stage for a more resilient plant overall.
Leave a Comment