

Bigger Onion Harvest Tip: Dreaming of pulling up plump, juicy onions from your own backyard? I know I am! There’s something incredibly satisfying about growing your own food, and onions are a staple in so many dishes. But let’s be honest, sometimes our onion harvests can be a little…underwhelming. We’ve all been there, right?
For centuries, onions have been cultivated across the globe, from ancient Egypt where they were revered and even used as currency, to the humble kitchen gardens of today. Their pungent flavor and versatility have made them a culinary cornerstone. But maximizing your yield? That’s where the real magic happens.
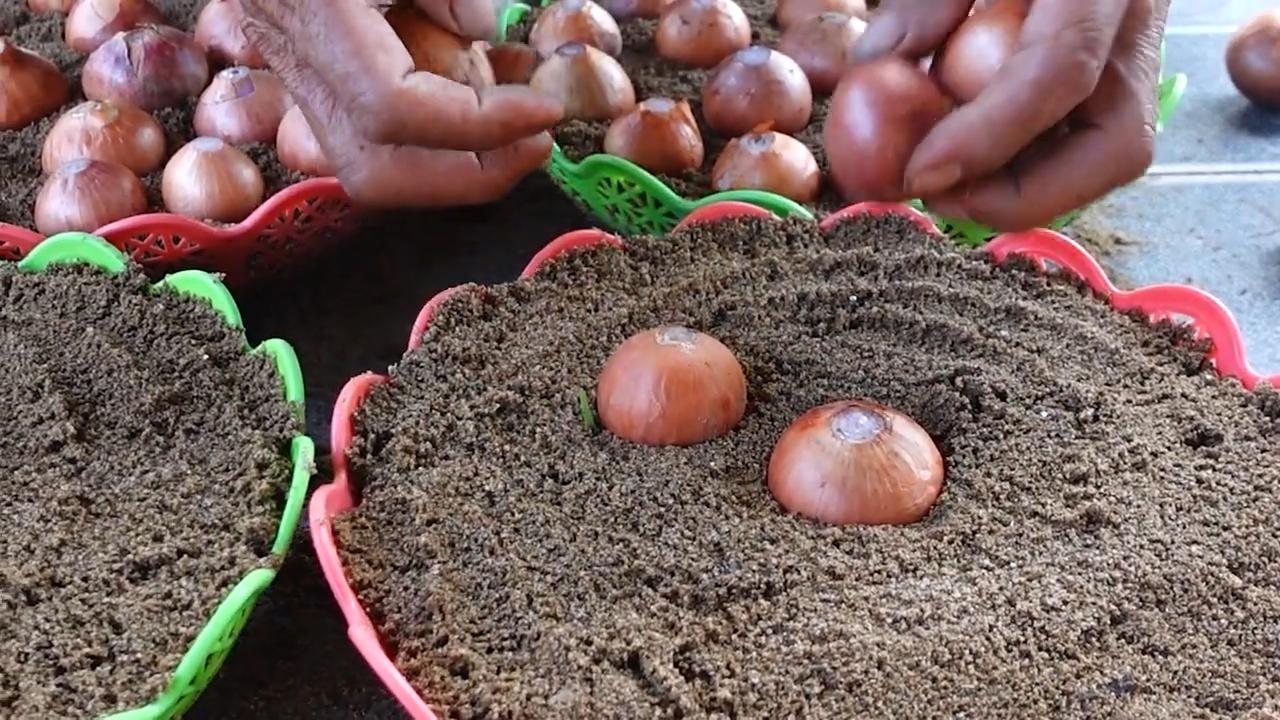
That’s why I’m so excited to share this simple, yet incredibly effective, bigger onion harvest tip with you. Forget complicated gardening techniques or expensive fertilizers. This DIY trick is easy to implement, uses materials you probably already have at home, and can significantly boost the size and quality of your onion crop. Imagine the delicious meals you can create with your bountiful harvest! Ready to unlock the secret to bigger, better onions? Let’s get started!

So erntest du riesige Zwiebeln: Mein DIY-Geheimnis für eine Monster-Ernte!
Ich liebe Zwiebeln! Egal ob roh im Salat, karamellisiert zu Fleisch oder als Basis für eine herzhafte Suppe – sie sind einfach unverzichtbar in meiner Küche. Aber was noch besser ist als Zwiebeln essen? Sie selbst anzubauen! Und ich habe über die Jahre ein paar Tricks gelernt, mit denen meine Zwiebeln jedes Jahr größer und saftiger werden. Heute teile ich mein bestgehütetes Geheimnis mit dir, damit auch du eine Monster-Zwiebel-Ernte einfahren kannst.
Die Grundlagen: Was Zwiebeln wirklich wollen
Bevor wir ins Detail gehen, lass uns kurz die Grundlagen klären. Zwiebeln sind relativ pflegeleicht, aber sie haben bestimmte Bedürfnisse, die du erfüllen musst, um wirklich große Exemplare zu ernten.
* Sonne: Zwiebeln lieben die Sonne! Mindestens 6 Stunden direkte Sonneneinstrahlung pro Tag sind ein Muss.
* Boden: Der Boden sollte locker, gut durchlässig und reich an organischen Stoffen sein. Staunässe ist der absolute Feind!
* Nährstoffe: Zwiebeln sind hungrig! Sie brauchen eine gute Versorgung mit Stickstoff, Phosphor und Kalium.
* Wasser: Regelmäßige Bewässerung ist wichtig, besonders während der Wachstumsphase. Aber Vorsicht vor Überwässerung!
* Konkurrenz: Unkraut raubt den Zwiebeln Nährstoffe und Platz. Halte dein Zwiebelbeet sauber!
Mein Geheimnis: Der “Zwiebel-Booster”
Okay, jetzt kommt der Clou! Mein Geheimnis für riesige Zwiebeln ist ein selbstgemachter “Zwiebel-Booster”, den ich während der Wachstumsphase regelmäßig anwende. Er ist super einfach herzustellen und besteht aus Zutaten, die du wahrscheinlich schon zu Hause hast.
Was du brauchst:
* 10 Liter Wasser (Regenwasser ist ideal!)
* 1 Tasse Urin (Ja, richtig gelesen! Urin ist ein fantastischer Stickstoffdünger. Keine Sorge, es stinkt nicht, wenn es verdünnt ist.)
* 1/2 Tasse Holzasche (Liefert Kalium und andere wichtige Spurenelemente.)
* 1 Esslöffel Bittersalz (Magnesiumsulfat, fördert das Wachstum und die Chlorophyllbildung.)
* Optional: Eine Handvoll Beinwellblätter (Beinwell ist reich an Kalium und anderen Nährstoffen. Du kannst ihn auch durch Komposttee ersetzen.)
Warum diese Zutaten?
* Urin: Stickstoff ist entscheidend für das Blattwachstum. Je mehr Blätter die Zwiebel hat, desto größer wird die Knolle.
* Holzasche: Kalium stärkt die Zellwände und macht die Zwiebeln widerstandsfähiger gegen Krankheiten.
* Bittersalz: Magnesium ist wichtig für die Photosynthese und hilft den Zwiebeln, Nährstoffe besser aufzunehmen.
* Beinwell: Ein natürlicher Kalium-Booster, der das Wachstum zusätzlich ankurbelt.
Schritt-für-Schritt-Anleitung: So bereitest du den Zwiebel-Booster zu
1. Sammle deine Zutaten: Stelle sicher, dass du alle Zutaten bereit hast, bevor du beginnst.
2. Mische alles zusammen: Gib alle Zutaten in einen Eimer mit 10 Litern Wasser.
3. Gut umrühren: Rühre die Mischung gründlich um, bis sich das Bittersalz und die Holzasche aufgelöst haben.
4. Ziehen lassen: Lass die Mischung am besten über Nacht ziehen. So können sich die Nährstoffe besser entfalten.
5. Filtern (optional): Wenn du Beinwellblätter verwendet hast, kannst du die Mischung vor der Anwendung filtern, um Verstopfungen in deiner Gießkanne zu vermeiden.
Anwendung: So gibst du deinen Zwiebeln den Extra-Kick
1. Verdünnen: Verdünne den Zwiebel-Booster im Verhältnis 1:10 mit Wasser. Das bedeutet, auf einen Liter Zwiebel-Booster kommen zehn Liter Wasser.
2. Gießen: Gieße deine Zwiebeln alle zwei Wochen mit der verdünnten Lösung. Achte darauf, dass du den Boden gut durchfeuchtest.
3. Blattdüngung (optional): Du kannst die Zwiebeln auch zusätzlich mit der verdünnten Lösung besprühen. Das sorgt für eine schnellere Nährstoffaufnahme. Aber Achtung: Sprühe nur an bewölkten Tagen oder am Abend, um Verbrennungen zu vermeiden.
4. Zeitpunkt: Beginne mit der Anwendung des Zwiebel-Boosters, sobald die Zwiebeln etwa 15 cm hoch sind. Setze die Anwendung bis etwa vier Wochen vor der Ernte fort.
Zusätzliche Tipps für eine erfolgreiche Zwiebelernte
Neben dem Zwiebel-Booster gibt es noch ein paar andere Dinge, die du beachten solltest, um eine wirklich beeindruckende Ernte zu erzielen.
* Die richtige Sorte wählen: Nicht alle Zwiebelsorten sind gleich. Informiere dich, welche Sorten in deiner Region gut wachsen und große Knollen bilden.
* Der richtige Zeitpunkt für die Aussaat oder Pflanzung: Der Zeitpunkt hängt von deiner Region und der gewählten Sorte ab. Informiere dich, wann der beste Zeitpunkt für die Aussaat oder Pflanzung in deiner Gegend ist.
* Regelmäßiges Hacken und Jäten: Halte dein Zwiebelbeet sauber und locker. Das fördert die Belüftung des Bodens und verhindert, dass Unkraut den Zwiebeln Nährstoffe raubt.
* Schutz vor Schädlingen und Krankheiten: Beobachte deine Zwiebeln regelmäßig auf Schädlinge und Krankheiten. Bei Bedarf kannst du natürliche Schädlingsbekämpfungsmittel einsetzen.
* Die richtige Erntezeit: Zwiebeln sind erntereif, wenn das Laub zu welken beginnt und sich auf den Boden legt. Grabe die Zwiebeln vorsichtig aus und lasse sie an einem trockenen, luftigen Ort trocknen, bevor du sie einlagerst.
Häufige Fehler vermeiden
Auch wenn Zwiebeln relativ pflegeleicht sind, gibt es ein paar Fehler, die du vermeiden solltest, um eine erfolgreiche Ernte zu erzielen.
* Zu dichter Stand: Zwiebeln brauchen Platz, um sich zu entwickeln. Achte auf einen ausreichenden Abstand zwischen den Pflanzen.
* Überwässerung: Staunässe ist der absolute Feind der Zwiebeln. Achte darauf, dass der Boden gut durchlässig ist und gieße nur, wenn der Boden trocken ist.
* Falsche Düngung: Eine Überdüngung mit Stickstoff kann dazu führen, dass die Zwiebeln zu viel Laub bilden und die Knollen klein bleiben. Halte dich an die empfohlene Dosierung des Zwiebel-Boosters.
* Vernachlässigung der Unkrautbekämpfung: Unkraut raubt den Zwiebeln Nährstoffe und Platz. Halte dein Zwiebelbeet sauber!
* Zu frühe oder zu späte Ernte: Ernte die Zwiebeln zum richtigen Zeitpunkt, um eine optimale Lagerfähigkeit zu gewährleisten.
Zusätzliche Tipps und Tricks
* Zwiebeln vorziehen: Du kannst Zwiebeln auch in Töpfen vorziehen und sie dann später ins Beet pflanzen. Das gibt ihnen einen Wachstumsvorsprung.
* Zwiebeln aus Steckzwiebeln ziehen: Steckzwiebeln sind kleine, vorgezogene Zwiebeln, die du einfach ins Beet pflanzen kannst. Das ist eine einfache Möglichkeit, schnell eine Zwiebelernte zu erzielen.
* Zwiebeln in Mischkultur anbauen: Zwiebeln vertragen sich gut mit vielen anderen Gemüsesorten, wie zum Beispiel Karotten, Salat und Tomaten. Eine Mischkultur kann helfen, Schädlinge abzuwehren und den Boden zu verbessern.
* Zwiebeln lagern: Lagere deine Zwiebeln an einem kühlen, trockenen und dunklen Ort. So halten sie sich mehrere Monate.
Fazit
Mit diesen Tipps und Tricks, insbesondere meinem selbstgemachten Zwiebel-Booster, wirst du garantiert eine beeindruckende Zwiebelernte einfahren. Es ist wirklich erstaunlich, wie viel Unterschied ein bisschen zusätzliche Pflege und die richtigen N
Conclusion
So, there you have it! This simple, yet incredibly effective DIY trick for a bigger onion harvest is more than just a gardening tip; it’s a game-changer. We’ve explored how a little preparation and attention to detail can significantly impact the size and quality of your onion crop. Forget meager, disappointing yields – imagine pulling plump, robust onions from your garden, enough to fill your pantry and share with friends and family.
Why is this a must-try? Because it’s accessible, affordable, and yields tangible results. You don’t need expensive equipment or specialized knowledge. This method focuses on optimizing the growing environment for your onions, ensuring they receive the nutrients and space they need to thrive. It’s about working *with* nature, not against it.
But don’t just take our word for it. We encourage you to experiment and adapt this technique to your specific gardening conditions. For example, if you live in an area with particularly acidic soil, consider adding lime to balance the pH before planting. Or, if you’re growing onions in containers, ensure you choose a pot size that allows for ample root development. You can also try different varieties of onions to see which ones respond best to this method in your region. Some gardeners have found success by incorporating companion planting, such as carrots or marigolds, to deter pests and further enhance onion growth.
Remember, gardening is a journey of discovery, and every season brings new opportunities to learn and refine your techniques. This DIY trick for a bigger onion harvest is just one tool in your gardening arsenal. The key is to observe your plants, pay attention to their needs, and adapt your approach accordingly.
We’re confident that by implementing this simple strategy, you’ll see a noticeable improvement in your onion yield. But the real reward comes from the satisfaction of growing your own food, knowing that you’ve nurtured these plants from seed to harvest.
So, grab your gardening gloves, prepare your soil, and get ready to experience the joy of a bountiful onion harvest. We can’t wait to hear about your results! Share your experiences, photos, and any variations you’ve tried in the comments below. Let’s build a community of gardeners who are passionate about growing the best onions possible! Let us know what worked for you, what didn’t, and any tips you’ve discovered along the way. Your insights could help other gardeners achieve their own onion-growing dreams. Happy gardening!
Frequently Asked Questions (FAQ)
Q: What kind of soil is best for growing onions using this DIY trick?
A: Onions thrive in well-drained, fertile soil that is rich in organic matter. Ideally, the soil should have a slightly acidic to neutral pH, around 6.0 to 7.0. Before planting, amend your soil with compost, well-rotted manure, or other organic materials to improve its structure and nutrient content. This will provide your onions with the essential elements they need for healthy growth and a bigger harvest. If your soil is heavy clay, consider adding sand or perlite to improve drainage.
Q: How often should I water my onions after planting?
A: Consistent watering is crucial for onion growth, especially during the early stages. Water deeply and regularly, ensuring the soil remains consistently moist but not waterlogged. Aim for about 1 inch of water per week, either through rainfall or irrigation. During hot, dry periods, you may need to water more frequently. As the onions mature and the bulbs begin to swell, you can gradually reduce watering to prevent rot. Monitor the soil moisture levels regularly and adjust your watering schedule accordingly.
Q: What kind of fertilizer should I use for onions?
A: Onions are heavy feeders and require a balanced fertilizer to support their growth. A fertilizer with a higher phosphorus content (the middle number in the N-P-K ratio) is particularly beneficial for bulb development. You can use a granular fertilizer or a liquid fertilizer, following the instructions on the product label. Apply fertilizer at planting time and then again every few weeks during the growing season. Avoid over-fertilizing, as this can lead to excessive foliage growth at the expense of bulb development. Organic options like bone meal and fish emulsion are also excellent choices.
Q: How far apart should I plant my onion sets or seedlings?
A: Proper spacing is essential for allowing onions to develop to their full potential. Plant onion sets or seedlings about 4 to 6 inches apart in rows that are 12 to 18 inches apart. This spacing provides adequate room for the bulbs to expand and prevents overcrowding, which can lead to smaller onions and increased disease risk. If you’re growing onions in containers, ensure each plant has enough space to thrive.
Q: What are some common pests and diseases that affect onions, and how can I prevent them?
A: Onions are susceptible to several pests and diseases, including onion maggots, thrips, and fungal diseases like downy mildew and onion rot. To prevent these problems, practice good garden hygiene, such as removing plant debris and weeds that can harbor pests and diseases. Rotate your crops each year to avoid building up pest and disease populations in the soil. Use insecticidal soap or neem oil to control pests, and apply fungicides if necessary to prevent or treat fungal diseases. Ensure good air circulation around your plants to reduce humidity and minimize the risk of fungal infections. Companion planting with carrots can also help deter onion maggots.
Q: When is the best time to harvest my onions?
A: Onions are typically ready to harvest when the tops begin to fall over and turn yellow or brown. This usually occurs in late summer or early fall, depending on the variety and your climate. Once the tops have fallen over, stop watering the onions and allow them to dry out in the ground for a few days. Then, carefully dig up the bulbs, being careful not to damage them. Cure the onions by laying them out in a warm, dry, well-ventilated place for several weeks until the necks are completely dry and the outer skins are papery. This curing process helps to prevent rot and extends the storage life of your onions.
Q: Can I grow onions from seed instead of sets?
A: Yes, you can grow onions from seed, but it requires a longer growing season and more attention. Start onion seeds indoors about 8 to 10 weeks before the last expected frost. Transplant the seedlings outdoors after the danger of frost has passed. Growing onions from seed allows you to choose from a wider variety of onion types, but it also requires more patience and effort.
Q: What are some good companion plants for onions?
A: Onions benefit from companion planting with several other vegetables and herbs. Carrots are a classic companion plant for onions, as they deter onion maggots. Other good companions include chamomile, marigolds, rosemary, and summer savory. Avoid planting onions near beans or peas, as they can inhibit each other’s growth.
Q: How do I store my harvested onions properly?
A: Proper storage is essential for extending the shelf life of your harvested onions. After curing, store the onions in a cool, dry, well-ventilated place, such as a basement or pantry. You can braid the onion tops together and hang them, or store the bulbs in mesh bags or crates. Avoid storing onions near potatoes, as they can cause each other to spoil more quickly. Properly stored onions can last for several months.
Q: What if my onions don’t get as big as I expected?
A: Several factors can contribute to small onion size, including poor soil, inadequate watering, insufficient fertilization, overcrowding, and pest or disease problems. Review your growing practices and address any potential issues. Ensure your onions are planted in well-drained, fertile soil, watered regularly, and fertilized appropriately. Thin out overcrowded plants and take steps to control pests and diseases. With a little attention and care, you can improve your chances of a bigger onion harvest next time.
Leave a Comment