

Bottle Mushroom Growing: Unlock the Secrets to a Thriving Indoor Garden!
Have you ever dreamed of harvesting fresh, delicious mushrooms right from your own kitchen? Imagine the satisfaction of adding homegrown gourmet flavors to your meals, knowing exactly where your food comes from. Well, dream no more! This DIY guide will walk you through the surprisingly simple and rewarding process of bottle mushroom growing, transforming ordinary plastic bottles into miniature mushroom farms.
Cultivating mushrooms has a rich history, dating back centuries in various cultures. From ancient Chinese medicinal practices to European culinary traditions, mushrooms have always held a special place. Today, with a growing interest in sustainable living and self-sufficiency, home mushroom cultivation is experiencing a major resurgence.
Why should you try this DIY trick? Because it’s not only a fun and educational project, but it’s also incredibly practical. Store-bought mushrooms can be expensive and often lack the freshness and flavor of homegrown varieties. Plus, this method is perfect for small spaces, making it ideal for apartment dwellers or anyone with limited gardening space. I’m excited to show you how to recycle those plastic bottles and turn them into a source of delicious, healthy food. Let’s get started and explore the wonderful world of bottle mushroom growing!
DIY Bottle Mushroom Growing: A Fun and Sustainable Project
Hey there, fellow DIY enthusiasts! Ever thought about growing your own mushrooms? It’s easier than you think, and you can do it right in your own home using recycled plastic bottles! This project is not only a fun and rewarding experience, but it’s also a great way to reduce waste and enjoy fresh, homegrown mushrooms. I’m going to walk you through the entire process, step-by-step, so you can successfully cultivate your own little mushroom farm.
What You’ll Need
Before we dive in, let’s gather all the necessary materials. This will make the process smoother and more enjoyable.
* Plastic Bottles: You’ll need a few clean, empty plastic bottles. 2-liter bottles work great, but any size will do. Just make sure they’re thoroughly cleaned and sanitized.
* Mushroom Spawn: This is the “seed” of your mushrooms. Oyster mushroom spawn is a great choice for beginners because they’re relatively easy to grow and quite delicious. You can find mushroom spawn online or at your local garden center.
* Substrate: This is the material the mushrooms will grow on. Straw, coffee grounds, and sawdust are all excellent options. I personally prefer straw because it’s readily available and provides a good growing medium.
* Lime: Hydrated lime (calcium hydroxide) is used to pasteurize the straw, killing off any competing organisms.
* Large Pot or Container: You’ll need a large pot or container to pasteurize the straw.
* Drill or Knife: To create ventilation holes in the bottles.
* Spray Bottle: For misting the mushrooms to maintain humidity.
* Gloves: To keep everything clean and prevent contamination.
* Rubbing Alcohol: For sanitizing your work area and tools.
* Optional: Micropore tape to cover the ventilation holes.
Preparing the Substrate
The substrate is the foundation of your mushroom farm, so it’s crucial to prepare it properly. This involves pasteurizing the straw to eliminate any unwanted bacteria or fungi that could compete with your mushroom spawn.
1. Chop the Straw: Using scissors or a knife, chop the straw into smaller pieces, about 2-3 inches long. This will make it easier to pack into the bottles and will increase the surface area for the mushroom mycelium to colonize.
2. Lime Bath: In your large pot or container, mix the chopped straw with water and hydrated lime. The ratio should be about 1 part lime to 10 parts water. Make sure the straw is completely submerged in the lime water. The lime will raise the pH of the water, creating an environment that’s unfavorable for most competing organisms.
3. Soak the Straw: Let the straw soak in the lime water for at least 12-24 hours. This will give the lime enough time to effectively pasteurize the straw. I usually let mine soak overnight.
4. Drain the Straw: After soaking, drain the straw thoroughly. You want it to be damp, but not dripping wet. You can use a colander or a large strainer to remove the excess water.
Preparing the Bottles
Now that the substrate is ready, let’s prepare the bottles to become our miniature mushroom farms.
1. Clean and Sanitize: Thoroughly clean the plastic bottles with soap and water. Rinse them well to remove any soap residue. Then, sanitize the bottles with rubbing alcohol to kill any remaining bacteria or fungi.
2. Drill Ventilation Holes: Using a drill or knife, create several small ventilation holes around the bottle. These holes will allow for air exchange, which is essential for mushroom growth. I usually drill about 6-8 holes, evenly spaced around the bottle. Make sure the holes are small enough to prevent the substrate from falling out.
3. Optional: Cover the Holes: You can cover the ventilation holes with micropore tape. This will help to maintain humidity inside the bottle while still allowing for air exchange.
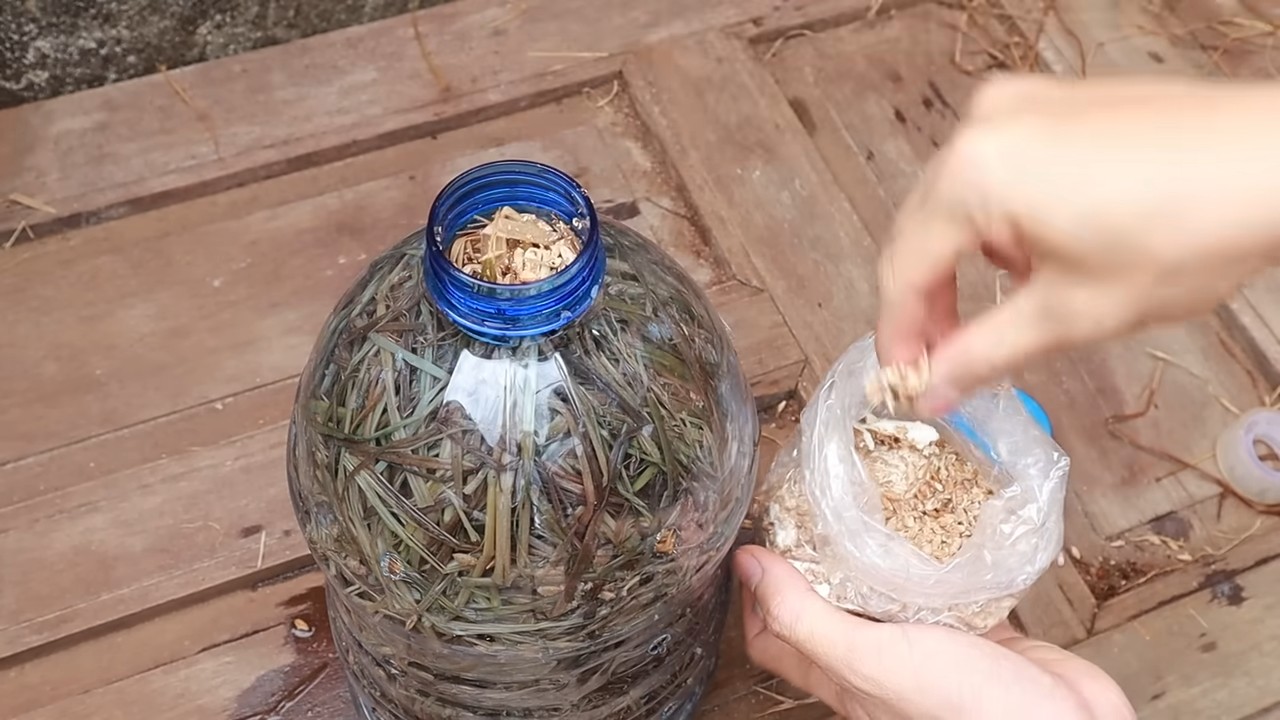
Inoculating the Bottles
This is where the magic happens! We’re going to introduce the mushroom spawn to the prepared substrate, allowing it to colonize and eventually produce mushrooms.
1. Layering: Start by placing a layer of the pasteurized straw at the bottom of the bottle. Then, sprinkle a layer of mushroom spawn over the straw. Repeat this process, layering straw and spawn, until the bottle is almost full. Make sure the final layer is straw.
2. Packing: Gently pack the straw and spawn into the bottle. You don’t want to pack it too tightly, but you want to ensure good contact between the spawn and the substrate.
3. Incubation: Place the inoculated bottles in a dark, humid location. The ideal temperature for incubation is around 70-75°F (21-24°C). A basement, closet, or even a cardboard box can work well.
4. Monitoring: Check the bottles regularly for signs of colonization. You should start to see white, fuzzy mycelium (the vegetative part of the mushroom) spreading throughout the straw within a few days.
Fruiting the Mushrooms
Once the mycelium has fully colonized the substrate, it’s time to initiate fruiting, which is the process of encouraging the mushrooms to grow.
1. Increase Humidity: Mushrooms need high humidity to fruit. Mist the bottles regularly with water to keep the substrate moist. You can also place the bottles in a humidity tent or cover them with a plastic bag to trap moisture.
2. Increase Light: While mushrooms don’t need a lot of light, they do need some light to fruit properly. Move the bottles to a location with indirect light. Avoid direct sunlight, as this can dry out the substrate.
3. Maintain Temperature: The ideal temperature for fruiting oyster mushrooms is around 60-70°F (15-21°C).
4. Ventilation: Ensure good ventilation around the bottles. This will help to prevent the growth of mold and other unwanted organisms.
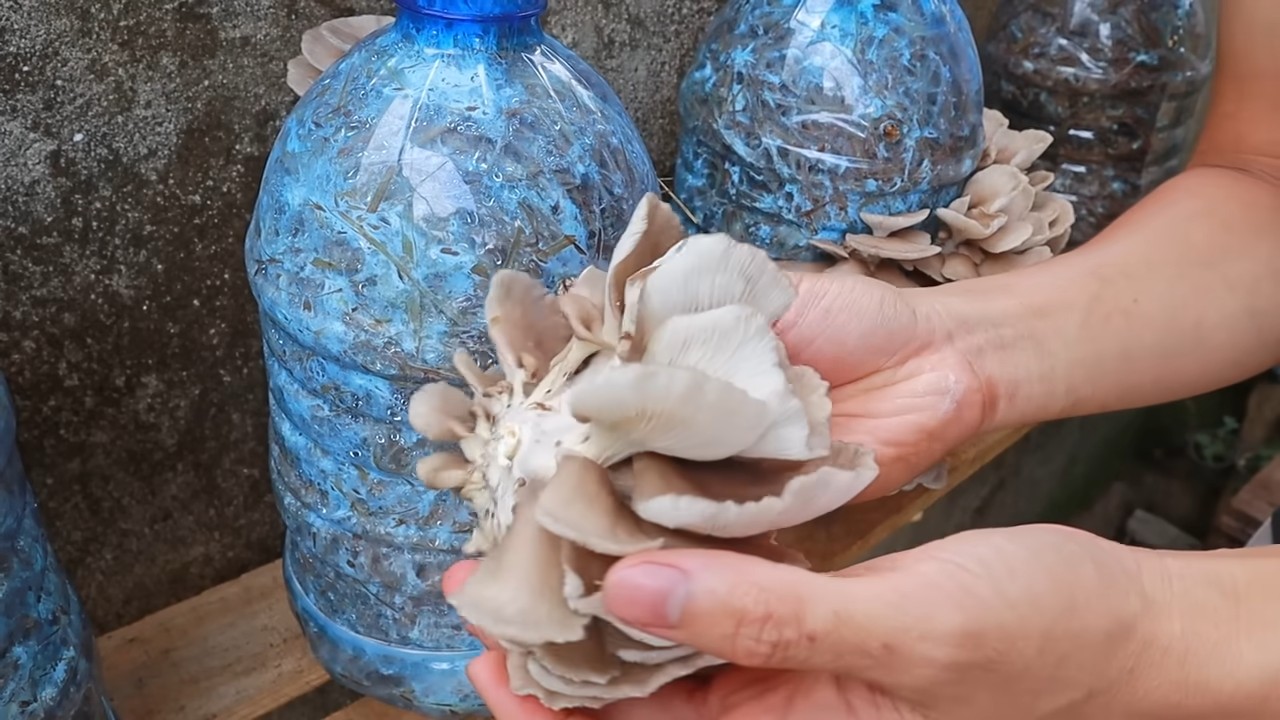
5. Harvesting: After a few days, you should start to see small mushroom pins forming. These pins will grow rapidly into mature mushrooms. Harvest the mushrooms when the caps are fully developed but before they start to release spores. To harvest, simply twist or cut the mushrooms off the substrate.
Troubleshooting
Even with the best preparation, you might encounter some challenges along the way. Here are a few common problems and how to address them:
* Mold: If you see mold growing on the substrate, it’s important to address it quickly. Remove the affected area and spray the remaining substrate with a diluted hydrogen peroxide solution. Ensure good ventilation to prevent further mold growth.
* Slow Colonization: If the mycelium is colonizing slowly, it could be due to low temperature or low humidity. Increase the temperature and humidity around the bottles to encourage faster colonization.
* No Fruiting: If the mushrooms are not fruiting, it could be due to low humidity, low light, or improper temperature. Adjust these factors to create a more favorable environment for fruiting.
* Small Mushrooms: If the mushrooms are small, it could be due to insufficient nutrients in the substrate. Try adding a small amount of coffee grounds to the substrate to provide additional nutrients.
Tips for Success
Here are a few extra tips to help you succeed in your bottle mushroom growing adventure:
* Start Small: Begin with just a few bottles to get a feel for the process. Once you’re comfortable, you can expand your operation.
* Be Patient: Mushroom growing takes time and patience. Don’t get discouraged if you don’t see results immediately.
* Keep it Clean: Maintaining a clean environment is crucial for preventing contamination. Sanitize your work area and tools regularly.
* Experiment: Don’t be afraid to experiment with different substrates and growing conditions. You might discover new and innovative ways to grow mushrooms.
* Enjoy the Process: Growing your own mushrooms is a rewarding experience. Take the time to appreciate the process and enjoy the fruits (or mushrooms!) of your labor.
Growing mushrooms in bottles is a fantastic way to recycle, learn, and enjoy fresh, delicious food. I hope this guide has inspired you to give it a try. Happy growing!
Conclusion
So, there you have it! Transforming a simple bottle into a thriving mushroom farm is not just a fun project; it’s a sustainable and rewarding way to enjoy fresh, homegrown mushrooms right in your own home. We’ve walked you through the process, highlighting the simplicity and accessibility of this method. Forget complicated setups and expensive equipment. With a little patience and our easy-to-follow guide, you can cultivate delicious mushrooms using materials you likely already have.
Why is this DIY bottle mushroom growing trick a must-try? Because it empowers you to take control of your food source, reduces your reliance on store-bought produce (often shipped from afar), and minimizes waste by repurposing plastic bottles. It’s an eco-friendly, budget-conscious, and incredibly satisfying endeavor. Imagine the pride of serving a dish featuring mushrooms you nurtured from spore to plate!
But the beauty of this method lies in its adaptability. Feel free to experiment with different mushroom varieties. Oyster mushrooms are a fantastic starting point, known for their rapid growth and forgiving nature. However, once you’ve mastered the basics, you can explore other options like shiitake or even lion’s mane, adjusting the substrate and environmental conditions accordingly. Consider adding coffee grounds to your substrate mix for an extra nitrogen boost, which some mushroom varieties thrive on. You can also experiment with different bottle sizes and shapes to see what works best for your space and the type of mushroom you’re growing.
Don’t be afraid to get creative! You could even turn this into a family project, teaching children about the life cycle of fungi and the importance of sustainable living. Imagine the excitement of watching those tiny pins emerge and develop into fully formed mushrooms!
We understand that venturing into the world of mushroom cultivation can seem daunting at first, but we assure you, it’s much simpler than you might think. The key is to maintain a clean environment, provide adequate moisture, and be patient. Remember to monitor your mushrooms regularly and adjust the conditions as needed.
We are confident that you’ll find this DIY bottle mushroom growing project to be both enjoyable and rewarding. So, gather your supplies, follow our instructions, and prepare to be amazed by the magic of mycology.
Now, we want to hear from you! Have you tried growing mushrooms in a bottle before? What challenges did you face, and what successes did you celebrate? Share your experiences, tips, and photos in the comments below. Let’s build a community of bottle mushroom growers and learn from each other. Your insights could inspire others to embark on this exciting journey. We can’t wait to see what you create!
Frequently Asked Questions (FAQ)
What type of bottle is best for growing mushrooms?
The best type of bottle for growing mushrooms is a clear plastic bottle, such as a soda or water bottle. The clarity allows you to monitor the mushroom growth, and the plastic is durable and easy to clean. Ensure the bottle is thoroughly cleaned and sanitized before use to prevent contamination. Avoid using bottles that have contained harsh chemicals or pesticides. A 2-liter bottle is a good starting point, but you can experiment with different sizes depending on the space you have available and the type of mushroom you’re growing.
What substrate should I use for bottle mushroom growing?
A suitable substrate is crucial for successful mushroom cultivation. A common and effective substrate for bottle mushroom growing is a mixture of pasteurized straw, coffee grounds, and vermiculite. The straw provides the primary food source for the mushrooms, the coffee grounds add nitrogen, and the vermiculite helps retain moisture. You can also use other materials like sawdust, cardboard, or even shredded paper, depending on the mushroom species you’re cultivating. Remember to pasteurize the substrate to kill any competing organisms before introducing the mushroom spawn.
How do I pasteurize the substrate?
Pasteurization is essential to eliminate harmful bacteria and fungi that could compete with your mushroom culture. There are several ways to pasteurize your substrate. One common method is to submerge the substrate in hot water (around 160-180°F or 71-82°C) for 60-90 minutes. You can use a large pot on the stove or a heat-safe container with a sous vide immersion circulator. Another method is to steam the substrate in a pressure cooker or steamer for a similar duration. After pasteurization, allow the substrate to cool completely before inoculating it with mushroom spawn.
How do I inoculate the substrate with mushroom spawn?
Inoculation is the process of introducing mushroom spawn (the “seeds” of the mushroom) to the prepared substrate. Ensure your hands and work area are clean to prevent contamination. Mix the mushroom spawn thoroughly with the cooled, pasteurized substrate. The amount of spawn needed will depend on the size of the bottle and the type of mushroom, but a general guideline is to use about 5-10% spawn by weight of the substrate. Pack the inoculated substrate loosely into the bottle, leaving some space at the top for air circulation.
What are the ideal environmental conditions for bottle mushroom growing?
Mushrooms thrive in specific environmental conditions. Generally, they require a humid environment (80-90% humidity), moderate temperatures (60-75°F or 15-24°C), and indirect light. You can maintain humidity by misting the inside of the bottle regularly with water or by placing the bottle in a humidity tent or a plastic bag with ventilation holes. Avoid direct sunlight, as it can overheat the mushrooms and dry out the substrate. Proper ventilation is also crucial to prevent the buildup of carbon dioxide.
How long does it take for mushrooms to grow in a bottle?
The time it takes for mushrooms to grow in a bottle varies depending on the mushroom species, the substrate used, and the environmental conditions. Oyster mushrooms are known for their relatively fast growth, often fruiting within 2-3 weeks after inoculation. Other species, like shiitake, may take longer, sometimes several weeks or even months. Be patient and monitor the bottle regularly for signs of mushroom growth, such as the appearance of small white pins (primordia).
What if I see mold growing in the bottle?
Mold contamination is a common issue in mushroom cultivation. If you see mold growing in the bottle, it’s essential to take action immediately to prevent it from spreading. If the mold is localized, you can try to carefully remove the affected area with a clean spoon or knife. However, if the mold is widespread, it’s best to discard the entire bottle to avoid contaminating other cultures or your growing area. To prevent mold contamination, ensure you use clean materials, pasteurize the substrate properly, and maintain good hygiene throughout the process.
Can I reuse the substrate after harvesting mushrooms?
After harvesting a flush of mushrooms, the substrate will be depleted of nutrients. However, you can often get multiple flushes from the same substrate. To encourage a second flush, soak the substrate in water for a few hours and then drain it thoroughly. Return the bottle to its growing environment and continue to monitor it. If you don’t see any new growth after a few weeks, the substrate may be exhausted. At that point, you can compost the spent substrate and use it to enrich your garden soil.
What are some common problems and solutions for bottle mushroom growing?
Some common problems include slow growth, mold contamination, and small or deformed mushrooms. Slow growth can be caused by insufficient humidity, temperature fluctuations, or poor substrate quality. Mold contamination can be prevented by using clean materials and pasteurizing the substrate properly. Small or deformed mushrooms can be a result of inadequate ventilation or nutrient deficiencies. By carefully monitoring your mushrooms and adjusting the environmental conditions as needed, you can overcome these challenges and enjoy a successful harvest.
Is bottle mushroom growing sustainable?
Yes, bottle mushroom growing is a highly sustainable practice. It repurposes plastic bottles that would otherwise end up in landfills, reduces the carbon footprint associated with transporting store-bought mushrooms, and utilizes organic waste materials like coffee grounds and straw. By growing your own mushrooms in a bottle, you’re contributing to a more circular and environmentally friendly food system. Furthermore, the spent substrate can be composted and used to improve soil health, closing the loop and minimizing waste.
Leave a Comment