

Bush Beans in Pots: Imagine stepping outside your door and harvesting fresh, crisp beans for dinner, all grown right on your patio! It sounds idyllic, right? Well, it’s totally achievable, even if you don’t have acres of land. For centuries, container gardening has allowed people to cultivate food in limited spaces, from ancient rooftop gardens in Babylon to modern-day urban balconies.
Growing bush beans in pots is a fantastic way to enjoy the taste of homegrown vegetables without the commitment of a large garden. I know what you’re thinking: “Gardening is hard!” But trust me, with a few simple tricks and DIY hacks, you can be enjoying a bountiful harvest in no time. This article is your ultimate guide to successfully growing bush beans in pots, offering easy-to-follow instructions and insider tips to ensure your success.
Why do you need this DIY trick? Because fresh, homegrown produce tastes infinitely better than anything you can buy at the store! Plus, gardening is a fantastic stress reliever and a rewarding hobby. So, let’s ditch the grocery store beans and get our hands dirty! I’m excited to share my favorite tips and tricks for growing delicious bush beans right in your own backyard (or balcony!).
Growing Bush Beans in Pots: A Complete DIY Guide
Hey there, fellow gardening enthusiasts! I’m so excited to share my experience with growing bush beans in pots. It’s a surprisingly easy and rewarding project, perfect for anyone with limited space or who just wants to enjoy fresh, homegrown beans right on their patio or balcony. Trust me, there’s nothing quite like the taste of beans you’ve nurtured yourself!
Choosing the Right Bush Bean Variety
Before we dive into the nitty-gritty, let’s talk about bean varieties. Not all beans are created equal, especially when it comes to container gardening. We’re focusing on *bush* beans, not pole beans. Pole beans are climbers and need a trellis, which isn’t ideal for pots. Bush beans, on the other hand, stay compact and bushy, making them perfect for containers.
Here are a few of my favorite bush bean varieties for pots:
* Blue Lake Bush: A classic choice, known for its excellent flavor and high yields.
* Contender: An early producer, great if you’re impatient like me! It’s also very heat-tolerant.
* Provider: Another reliable variety that’s disease-resistant and produces abundant crops.
* Derby: A stringless variety, which means less work for you when preparing them for cooking.
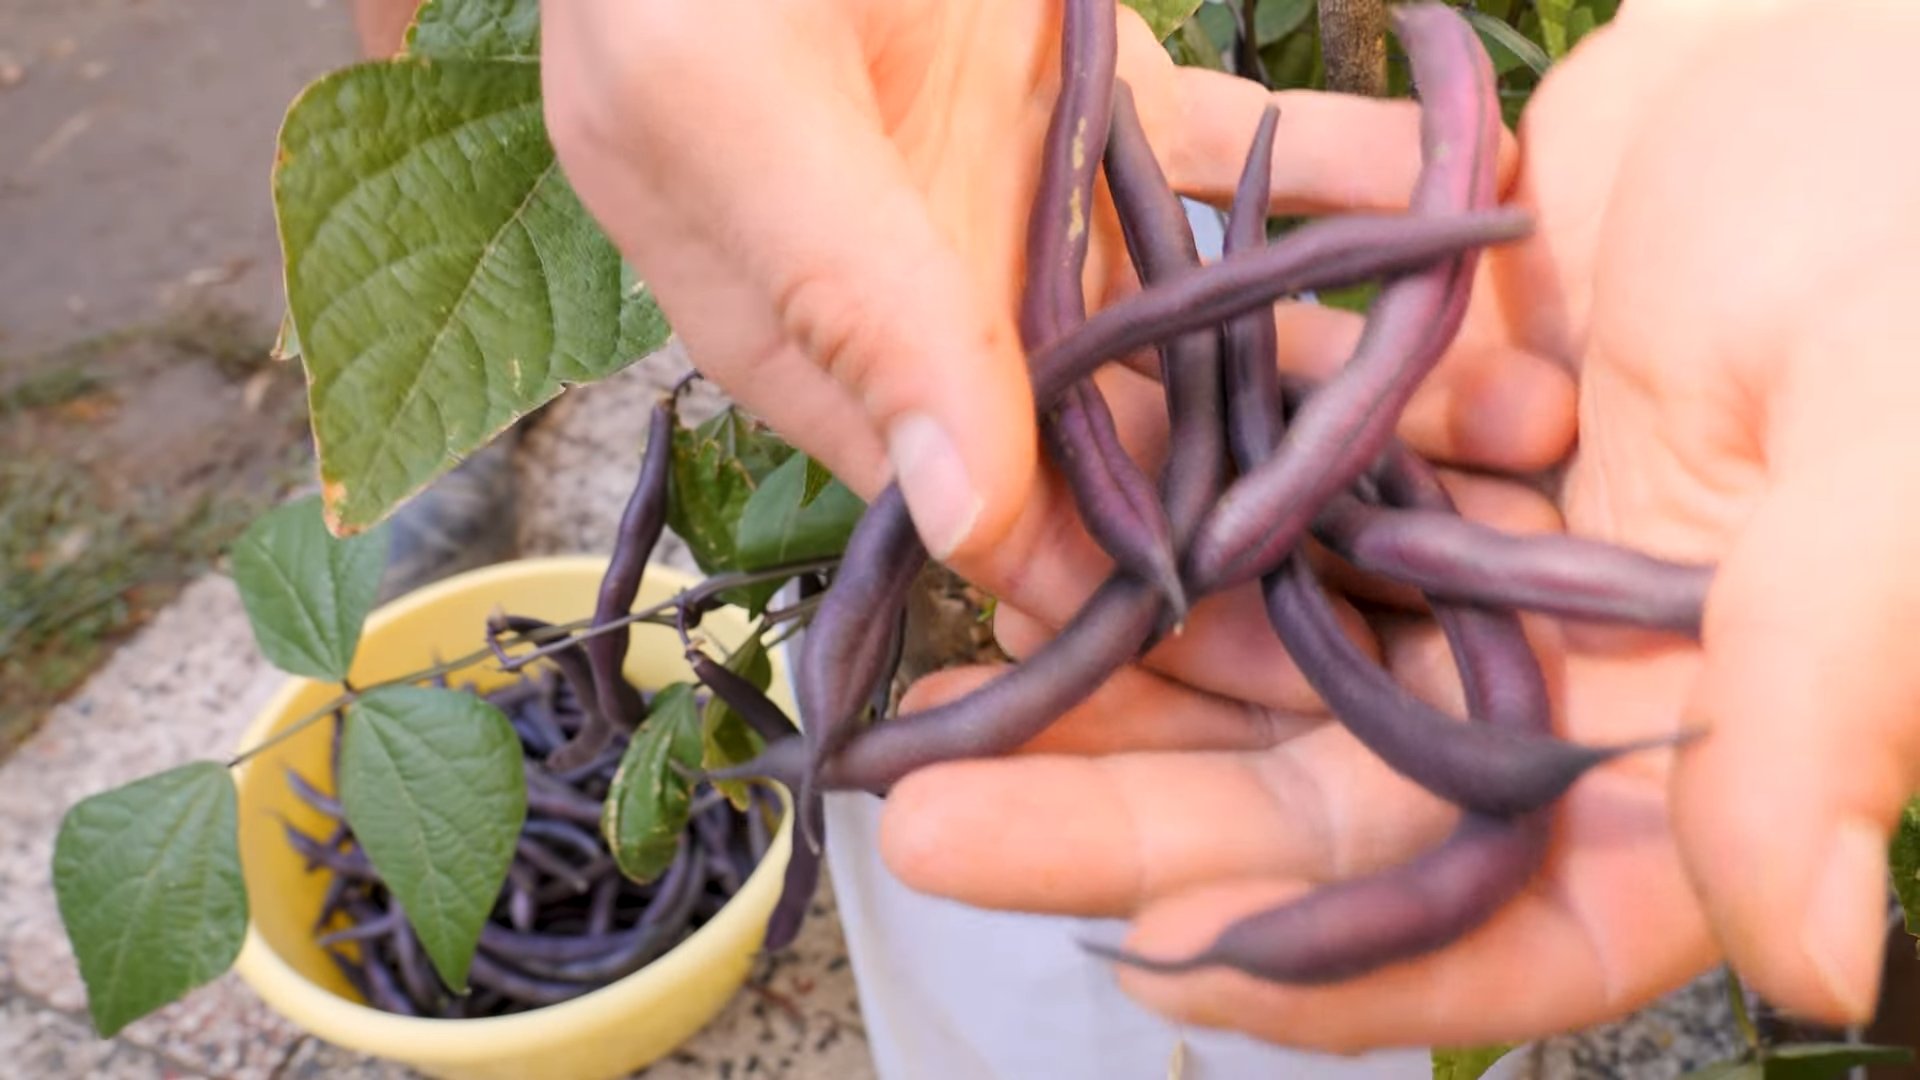
* Royal Burgundy: A beautiful purple bean that turns green when cooked. Adds a pop of color to your garden!
Gathering Your Supplies
Okay, now that we’ve picked our bean variety, let’s gather our supplies. Here’s what you’ll need:
* Pots: Choose pots that are at least 12 inches in diameter and 12 inches deep. Bush beans need room for their roots to grow. I prefer using fabric pots because they allow for better drainage and aeration, but plastic or terracotta pots will work too.
* Potting Mix: Don’t use garden soil! It’s too heavy and compacts easily in pots. Instead, opt for a high-quality potting mix that’s lightweight and well-draining. I like to use a mix that contains peat moss, perlite, and vermiculite.
* Bean Seeds: Obviously! Make sure you’re buying seeds from a reputable source and that they’re relatively fresh.
* Watering Can or Hose: For watering your beans, of course.
* Fertilizer (Optional): A balanced, slow-release fertilizer can help your beans thrive, but it’s not strictly necessary. I sometimes use a liquid fertilizer diluted to half strength every few weeks.
* Small Trowel or Shovel: For planting the seeds.
* Mulch (Optional): Mulch helps retain moisture in the soil and suppress weeds. I like to use straw or shredded bark.
Planting Your Bush Beans
Alright, let’s get our hands dirty! Here’s how to plant your bush beans in pots:
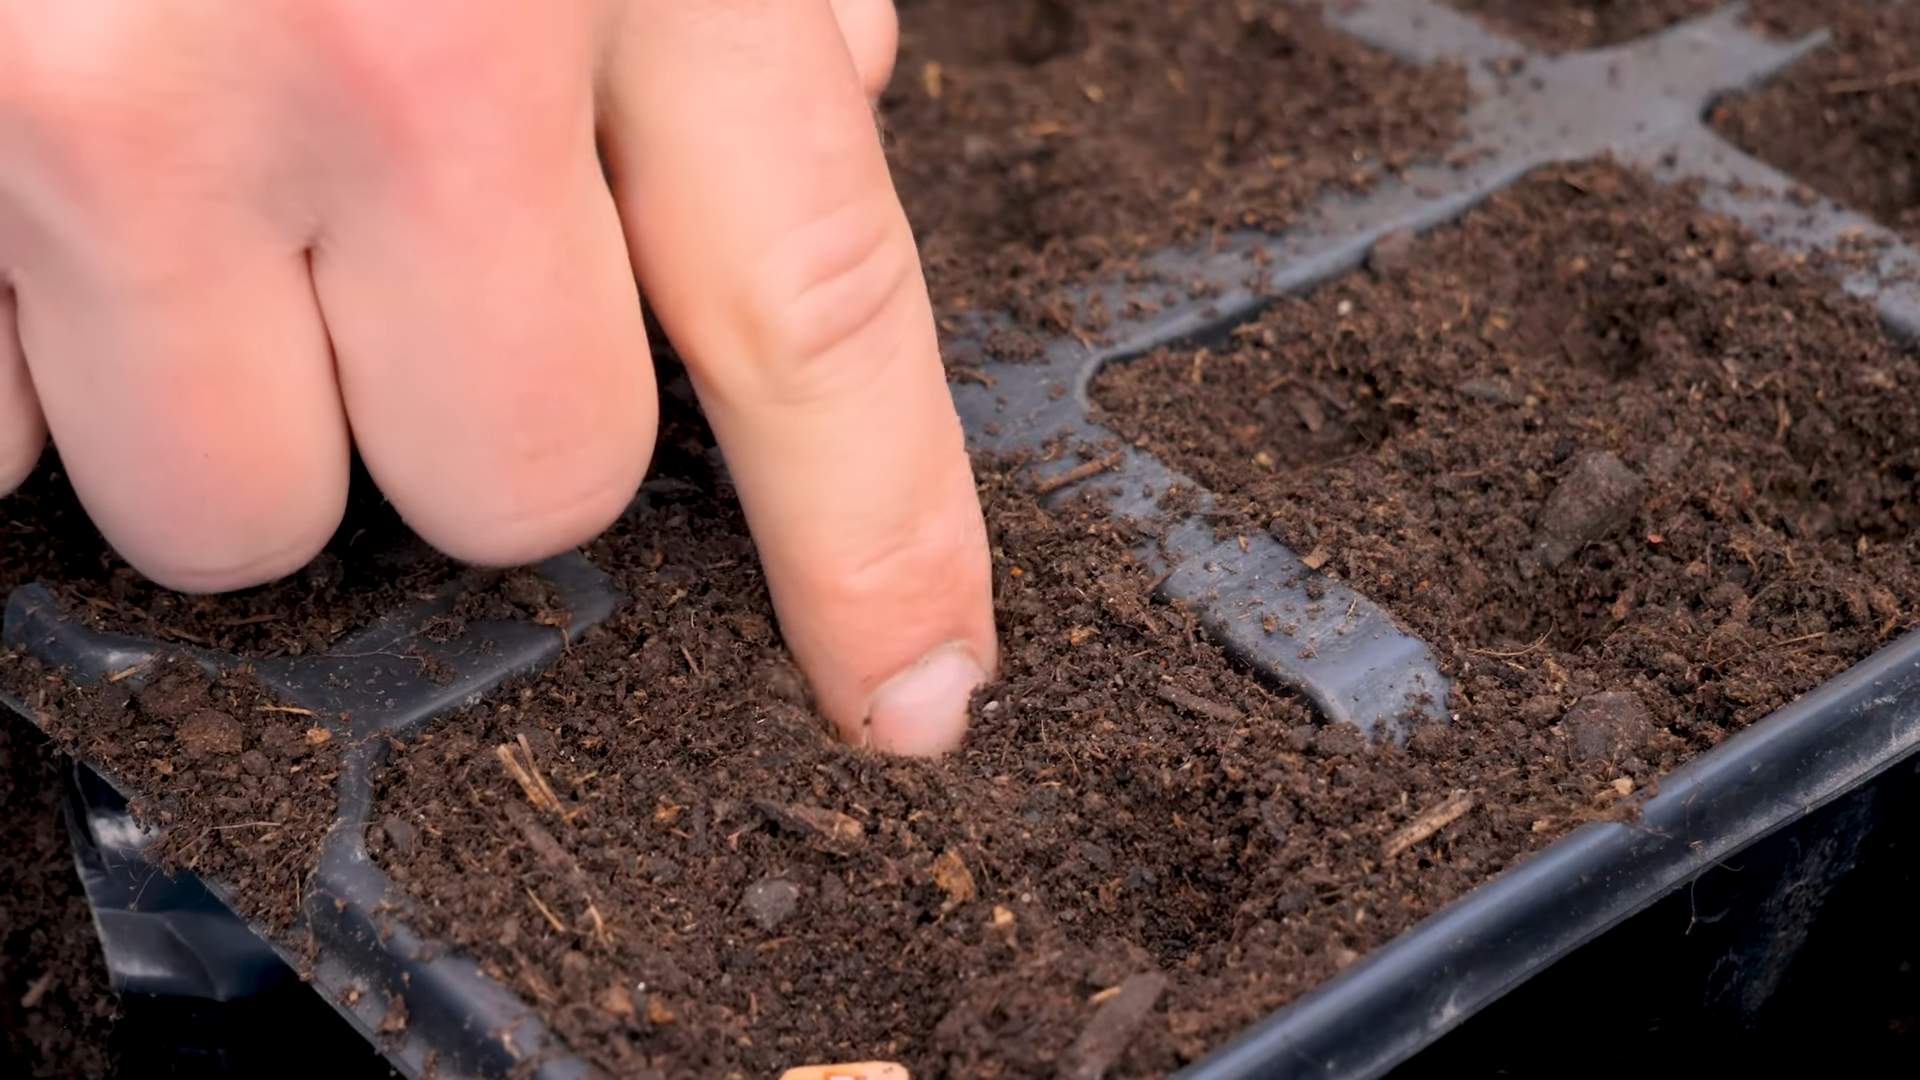
1. Fill the Pots: Fill your pots with potting mix, leaving about an inch or two of space at the top.
2. Sow the Seeds: Plant the bean seeds about 1 inch deep and 2-3 inches apart. I usually plant 3-4 seeds per pot to ensure good germination.
3. Water Gently: Water the soil gently until it’s evenly moist but not soggy.
4. Choose a Sunny Spot: Place the pots in a location that receives at least 6-8 hours of sunlight per day. Bush beans need plenty of sun to thrive.
5. Mulch (Optional): Add a layer of mulch around the base of the plants to help retain moisture and suppress weeds.
Caring for Your Bush Beans
Now that your beans are planted, it’s time to take care of them. Here’s what you need to do:
1. Water Regularly: Bush beans need consistent moisture, especially during hot weather. Water deeply whenever the top inch of soil feels dry to the touch. Avoid overwatering, as this can lead to root rot.
2. Fertilize (Optional): If you’re using fertilizer, apply it according to the package directions. I usually fertilize every few weeks with a diluted liquid fertilizer.
3. Watch for Pests and Diseases: Keep an eye out for common bean pests like aphids, bean beetles, and spider mites. If you spot any pests, you can try spraying them with insecticidal soap or neem oil. Also, watch for diseases like powdery mildew and bean rust. Ensure good air circulation around the plants to prevent fungal diseases.
4. Support (Optional): While bush beans are generally self-supporting, you may want to provide some support if they start to get top-heavy, especially after a heavy rain. You can use small stakes or a tomato cage to support the plants.
5. Weed Regularly: Remove any weeds that pop up in the pots to prevent them from competing with your beans for nutrients and water.
Harvesting Your Bush Beans
The best part! Harvesting your beans is so satisfying. Here’s how to do it:
1. Harvest Time: Bush beans are typically ready to harvest about 50-60 days after planting. The pods should be firm, plump, and snap easily when bent.
2. Pick Regularly: Harvest the beans regularly to encourage continued production. The more you pick, the more they’ll produce!
3. Harvesting Technique: Gently snap the beans off the plant, being careful not to damage the stems.
4. Enjoy Your Harvest: Eat your beans fresh, or store them in the refrigerator for a few days. You can also freeze or can them for longer-term storage.
Troubleshooting Common Problems
Even with the best care, you might encounter some problems while growing bush beans in pots. Here are a few common issues and how to address them:
* Yellowing Leaves: This could be a sign of overwatering, underwatering, or nutrient deficiency. Check the soil moisture and adjust your watering accordingly. If the soil is consistently moist, you may be overwatering. If it’s dry, you need to water more often. You can also try fertilizing with a balanced fertilizer.
* Lack of Flowers or Beans: This could be due to insufficient sunlight, poor pollination, or nutrient deficiency. Make sure your beans are getting enough sunlight. You can also try hand-pollinating the flowers by gently shaking the plants. Fertilizing with a fertilizer that’s high in phosphorus can also help.
* Pests: As mentioned earlier, keep an eye out for common bean pests and treat them accordingly.
* Diseases: Ensure good air circulation around the plants to prevent fungal diseases. If you spot any signs of disease, remove the affected leaves and treat the plants with a fungicide.
Extending Your Bean Harvest
Want to keep those beans coming? Here are a few tips for extending your bean harvest:
* Succession Planting: Plant a new batch of beans every few weeks to ensure a continuous harvest throughout the growing season.
* Choose Heat-Tolerant Varieties: If you live in a hot climate, choose heat-tolerant varieties like Contender or Provider.
* Provide Shade: During the hottest part of the day, provide some shade for your beans to prevent them from getting stressed. You can use shade cloth or move the pots to a shadier location.
* Water Deeply: Water deeply and regularly to keep the soil moist and cool.
* Mulch: Mulch helps retain moisture in the soil and keep the roots cool.
Additional Tips and Tricks
Here are a few extra tips and tricks that I’ve learned over the years:
* Soak the Seeds: Soaking the bean seeds in water for a few hours before planting can help them germinate faster.
* Use Companion Planting: Plant beans alongside other vegetables like carrots, cucumbers, and marigolds. These plants can help deter pests and improve the overall health of your bean plants.
* Rotate Your Crops: If you’re growing beans in the same pots year after year, rotate your crops to prevent soilborne diseases.
* Save Your Seeds: If you want to save your bean seeds for next year, allow a few pods to dry completely on the plant. Then, remove the seeds and store them in a cool, dry place.
Enjoying Your Homegrown Beans
Growing bush beans in pots is a fantastic way to enjoy fresh, homegrown vegetables, even if you don’t have a lot of space. With a little bit of care and attention, you can have a bountiful harvest of delicious beans right at your fingertips. So, get out there, get your hands dirty, and start growing! You won’t regret it! And remember, even if things don’t go perfectly the first time, don’t give up! Gardening is all about learning and experimenting. Happy gardening!
Conclusion
So, there you have it! Growing bush beans in pots is not just a possibility; it’s a pathway to fresh, delicious beans right outside your door, even if you’re short on space. This DIY trick transforms even the smallest balcony or patio into a miniature farm, offering a rewarding gardening experience and a constant supply of homegrown goodness.
Why is this a must-try? Because it’s accessible, adaptable, and incredibly satisfying. Forget the store-bought beans that have traveled miles and lost their peak flavor. Imagine stepping outside and harvesting crisp, tender bush beans just minutes before adding them to your salad, stir-fry, or side dish. The difference in taste and texture is remarkable. Plus, you control the growing environment, ensuring your beans are free from unwanted chemicals and pesticides.
But the benefits extend beyond just taste. Gardening, even on a small scale, is therapeutic. It connects you with nature, reduces stress, and provides a sense of accomplishment. Watching your bush beans sprout, grow, and produce is a truly rewarding experience. And let’s not forget the educational aspect – it’s a fantastic way to teach children (and adults!) about where their food comes from.
Ready to take your bush bean journey to the next level? Consider these variations:
* Succession Planting: Plant new seeds every few weeks to ensure a continuous harvest throughout the growing season.
* Companion Planting: Plant marigolds or nasturtiums near your bush beans to deter pests. Basil is another excellent companion plant that can improve the flavor of your beans.
* Vertical Gardening: While bush beans are naturally compact, you can still provide some support with small trellises or stakes to keep the plants upright and improve air circulation.
* Different Varieties: Experiment with different varieties of bush beans, such as Blue Lake, Contender, or Provider, to find your favorites. Each variety offers a unique flavor and texture.
* Container Size: While we’ve recommended a specific size, don’t be afraid to experiment. Larger containers will generally require less frequent watering.
Don’t be intimidated if you’re a beginner gardener. Growing bush beans in pots is relatively easy, and the rewards are well worth the effort. With a little bit of sunlight, water, and care, you’ll be enjoying fresh, homegrown beans in no time.
We’re confident that you’ll love this DIY trick. So, grab your pots, soil, and seeds, and get started today! We can’t wait to hear about your experience. Share your photos, tips, and questions in the comments below. Let’s create a community of potted bush bean enthusiasts! Tell us what variety you planted, what challenges you faced, and what successes you celebrated. Your experiences will help others learn and grow, too. Happy gardening!
Frequently Asked Questions (FAQs)
What is the best type of pot to use for growing bush beans?
The ideal pot for growing bush beans should be at least 12 inches in diameter and 12 inches deep. This provides enough space for the roots to develop properly. Choose a pot made from a breathable material like terracotta or fabric, as this will help prevent the soil from becoming waterlogged. Make sure the pot has drainage holes to allow excess water to escape. Plastic pots are also suitable, but be mindful of overwatering.
How much sunlight do bush beans need when grown in pots?
Bush beans thrive in full sunlight, which means they need at least 6-8 hours of direct sunlight per day. If you don’t have a spot that receives full sun, try to find the sunniest location possible. You can also supplement with grow lights if necessary, especially if you live in an area with limited sunlight. Rotate the pots regularly to ensure even sun exposure on all sides of the plants.
What type of soil is best for growing bush beans in containers?
Use a well-draining potting mix specifically formulated for containers. Avoid using garden soil, as it can become compacted in pots and hinder drainage. A good potting mix will contain a blend of peat moss, perlite, and vermiculite, which provides the right balance of moisture retention and drainage. You can also amend the potting mix with compost to add nutrients and improve soil structure.
How often should I water bush beans grown in pots?
Water your bush beans regularly, especially during hot, dry weather. The soil should be kept consistently moist but not waterlogged. Check the soil moisture by sticking your finger about an inch into the soil. If it feels dry, it’s time to water. Water deeply, until water drains out of the drainage holes. Avoid overhead watering, as this can promote fungal diseases.
Do bush beans grown in pots need fertilizer?
Yes, bush beans benefit from regular fertilization. Use a balanced fertilizer (e.g., 10-10-10) or a fertilizer specifically formulated for vegetables. Follow the instructions on the fertilizer package for application rates and frequency. You can also use organic fertilizers, such as compost tea or fish emulsion. Fertilize every 2-3 weeks during the growing season.
What are some common pests and diseases that affect bush beans, and how can I prevent them?
Common pests that affect bush beans include aphids, bean beetles, and spider mites. To prevent pest infestations, inspect your plants regularly and remove any pests you find. You can also use insecticidal soap or neem oil to control pests. Common diseases that affect bush beans include powdery mildew and bean rust. To prevent diseases, ensure good air circulation around your plants and avoid overhead watering. If you notice signs of disease, remove the affected leaves and treat the plants with a fungicide.
How long does it take for bush beans to mature and be ready for harvest?
Bush beans typically mature in 50-60 days from planting. You can start harvesting the beans when they are about 4-6 inches long and still tender. Harvest regularly to encourage continued production. The more you pick, the more the plants will produce.
Can I grow bush beans indoors?
While it’s possible to grow bush beans indoors, it can be challenging to provide them with the amount of sunlight they need. If you want to try growing them indoors, choose a sunny location near a south-facing window and supplement with grow lights. Make sure the plants have good air circulation and are watered regularly.
What do I do with my bush bean plants at the end of the growing season?
Once the plants have stopped producing beans, you can remove them from the pots and compost them. The soil can be reused for other plants, but it’s a good idea to amend it with compost or other organic matter to replenish nutrients. Clean the pots thoroughly before storing them for the winter.
Can I save seeds from my bush bean plants to plant next year?
Yes, you can save seeds from your bush bean plants to plant next year. Allow some of the beans to mature fully on the plants and dry out. Once the pods are dry and brittle, remove the seeds and store them in a cool, dry place. Be aware that if you grew a hybrid variety, the seeds may not produce plants that are true to type.

Leave a Comment