

Butternut Squash Growing Tips: Ever dreamt of harvesting your own creamy, sweet butternut squash right from your backyard? I know I have! There’s something incredibly satisfying about nurturing a tiny seed into a bountiful vegetable, especially one as delicious and versatile as butternut squash. But let’s be honest, sometimes gardening feels more like a battle against pests, diseases, and unpredictable weather than a peaceful pastime.
For centuries, squash has been a staple crop for indigenous communities across the Americas, providing sustenance and playing a vital role in cultural traditions. Today, growing your own butternut squash connects us to that rich history and offers a sustainable way to enjoy fresh, healthy food. But why struggle with common gardening woes when you can unlock the secrets to a thriving butternut squash patch?
That’s where these DIY tricks and hacks come in! I’m sharing my tried-and-true methods to help you avoid common pitfalls and maximize your harvest. Whether you’re a seasoned gardener or just starting out, these Butternut Squash Growing Tips will empower you to cultivate a flourishing garden and enjoy the sweet rewards of your labor. Get ready to roll up your sleeves and transform your garden into a butternut squash paradise!
Butternut Squash Growing Tips: From Seed to Supper!
Okay, butternut squash lovers, gather ’round! I’m going to walk you through everything I’ve learned about growing these delicious, versatile veggies right in your own backyard. It’s easier than you might think, and the reward of a homegrown butternut squash is totally worth the effort. Let’s get started!
Choosing Your Butternut Squash Variety
Before we even think about planting, let’s talk varieties. While “butternut squash” is the general term, there are actually a few different cultivars you can choose from.
* Waltham Butternut: This is a classic, reliable choice. It produces medium-sized squash with a consistent shape and excellent flavor. It’s also known for good storage.
* Early Butternut: As the name suggests, this variety matures earlier than Waltham, making it a good option for shorter growing seasons.
* Butterscotch PMR: This is a smaller, more compact variety, perfect if you’re short on space. It’s also powdery mildew resistant (PMR), which is a huge plus!
* Honey Nut: This is a newer variety that’s gaining popularity. It’s smaller than Waltham, with a sweeter, more concentrated flavor.
I usually go with Waltham because it’s readily available and I know what to expect. But don’t be afraid to experiment and find your favorite!
Starting Your Butternut Squash Seeds
You have two options here: direct sowing or starting indoors. I prefer starting indoors because it gives my plants a head start and protects them from pests and unpredictable weather early on.
Starting Seeds Indoors:
This is my preferred method, especially if you live in an area with a shorter growing season.
1. Gather Your Supplies: You’ll need seed starting trays or small pots (I like using peat pots because they’re biodegradable), seed starting mix (don’t use regular potting soil!), butternut squash seeds, a spray bottle, and a warm, sunny location or a grow light.
2. Fill Your Trays/Pots: Fill each cell or pot with seed starting mix, leaving about half an inch of space at the top.
3. Sow the Seeds: Plant two seeds per cell or pot, about an inch deep. This increases your chances of germination.
4. Water Gently: Use a spray bottle to moisten the soil. You want it damp, but not soggy.
5. Provide Warmth and Light: Butternut squash seeds need warmth to germinate. Aim for a soil temperature of 70-80°F (21-27°C). Place your trays in a warm, sunny location or under a grow light. If using a grow light, keep it a few inches above the soil surface.
6. Keep the Soil Moist: Check the soil daily and water as needed to keep it consistently moist. Don’t let it dry out!
7. Thin Seedlings (If Necessary): Once the seedlings emerge (usually in 5-10 days), thin them to one plant per cell or pot. Choose the strongest, healthiest-looking seedling and snip off the other one at the soil line. Don’t pull it out, as this can disturb the roots of the remaining seedling.
8. Harden Off Seedlings: About a week before you plan to transplant your seedlings outdoors, you’ll need to “harden them off.” This means gradually exposing them to outdoor conditions to acclimate them to the sun, wind, and temperature changes. Start by placing them outside in a sheltered location for an hour or two each day, gradually increasing the amount of time they spend outdoors over the course of a week.
Direct Sowing:
If you have a long growing season, you can sow your butternut squash seeds directly into the garden.
1. Wait for Warm Weather: Butternut squash seeds need warm soil to germinate. Wait until the soil temperature is consistently above 60°F (16°C) before planting.
2. Prepare the Soil: Choose a sunny location with well-drained soil. Amend the soil with compost or well-rotted manure to improve its fertility and drainage.
3. Sow the Seeds: Plant the seeds about an inch deep, spacing them 18-24 inches apart in rows that are 4-6 feet apart.
4. Water Gently: Water the soil thoroughly after planting.
5. Protect from Pests: If you’re concerned about pests, you can cover the seeds with netting or row covers until they germinate.
Preparing Your Garden Bed
Butternut squash are heavy feeders, so preparing your garden bed properly is crucial for a successful harvest.
1. Choose a Sunny Location: Butternut squash needs at least 6-8 hours of direct sunlight per day.
2. Amend the Soil: As I mentioned earlier, butternut squash thrives in rich, well-drained soil. Amend your soil with plenty of compost or well-rotted manure. I like to dig in a generous amount of compost a few weeks before planting.
3. Check the Soil pH: Butternut squash prefers a soil pH of 6.0-7.0. You can test your soil pH with a soil testing kit or send a sample to your local extension office for testing. If your soil is too acidic, you can add lime to raise the pH. If it’s too alkaline, you can add sulfur to lower the pH.
4. Consider Raised Beds: If you have poor soil drainage, consider planting your butternut squash in raised beds. This will help to improve drainage and prevent root rot.
Transplanting Your Seedlings (If You Started Indoors)
Once your seedlings have developed a few sets of true leaves and the weather is warm enough, it’s time to transplant them into the garden.
1. Choose a Cloudy Day: Transplanting on a cloudy day will help to reduce stress on the seedlings.
2. Dig Holes: Dig holes that are slightly larger than the root balls of your seedlings, spacing them 18-24 inches apart in rows that are 4-6 feet apart.
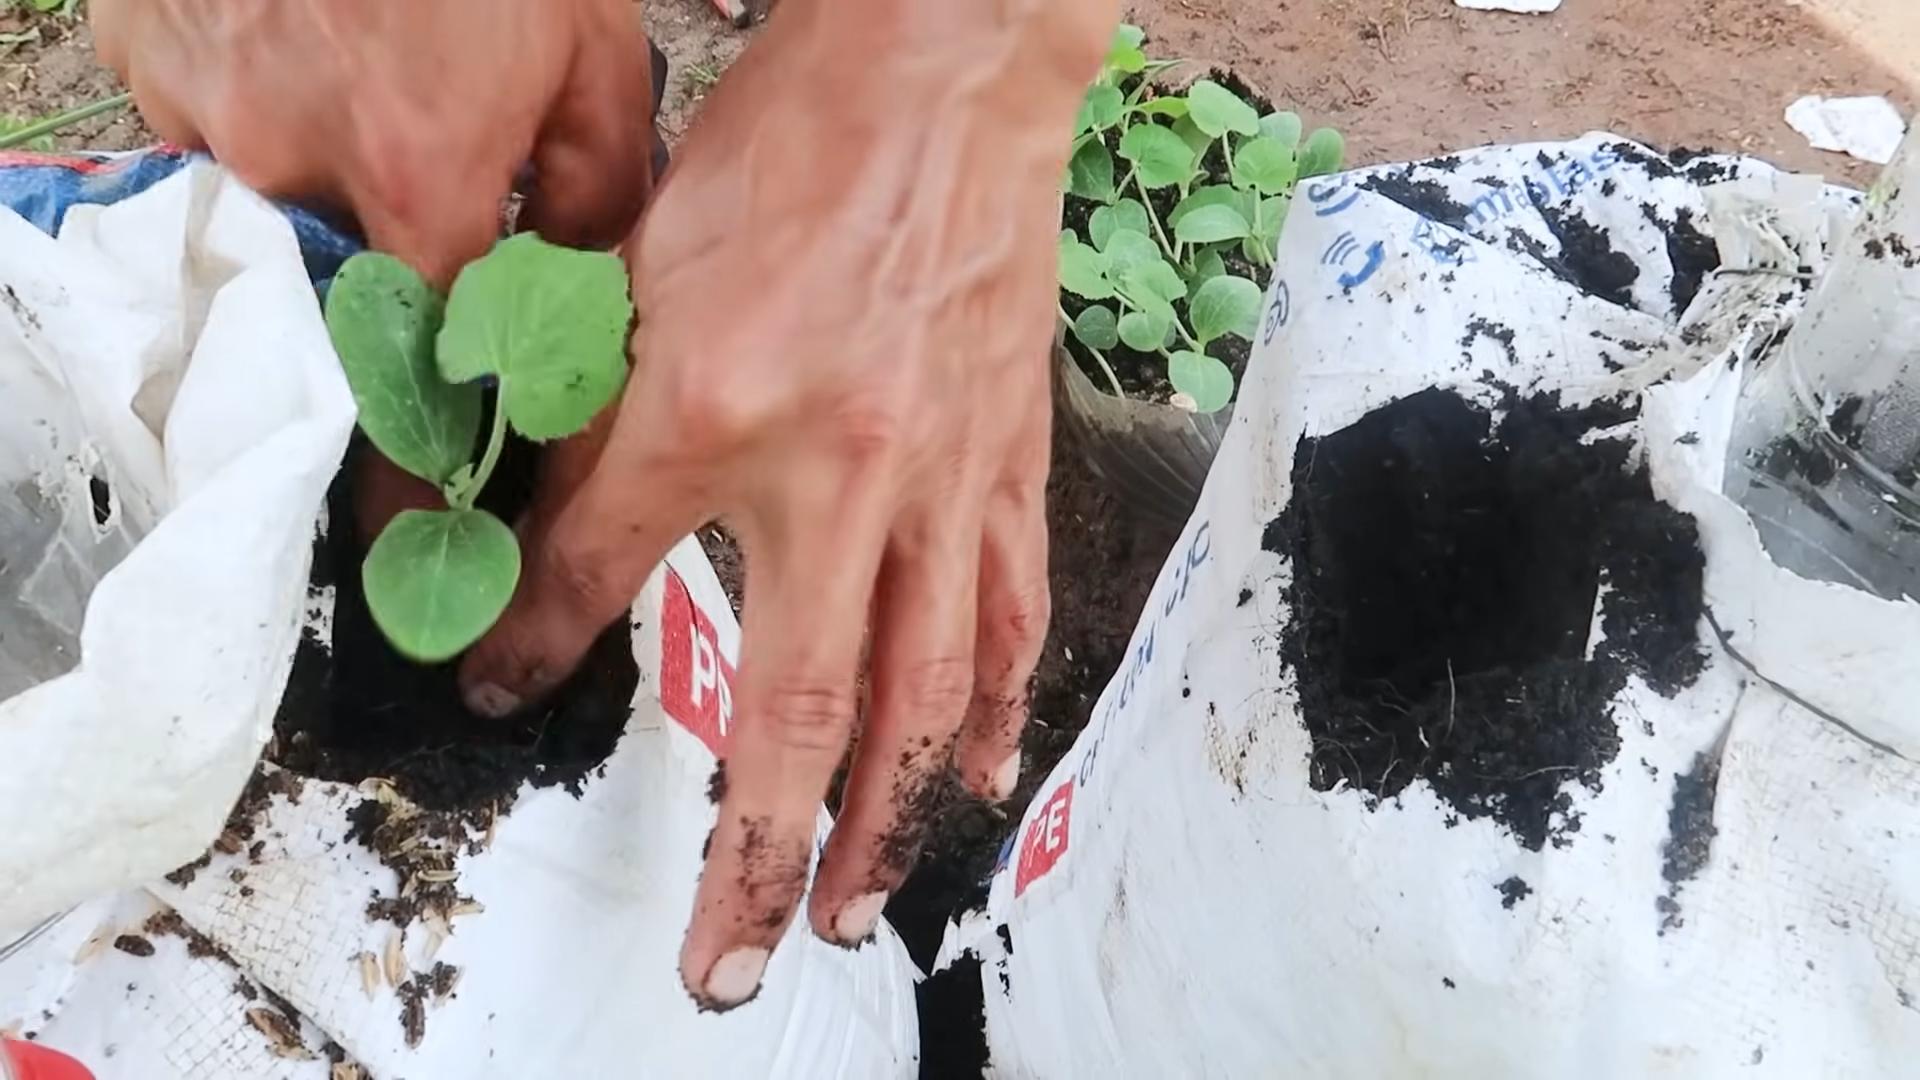
3. Carefully Remove Seedlings: Gently remove the seedlings from their trays or pots. If you used peat pots, you can plant the entire pot directly into the ground. Just make sure to tear off the top edge of the pot to allow the roots to grow freely.
4. Place Seedlings in Holes: Place the seedlings in the holes and backfill with soil, gently firming the soil around the base of the plants.
5. Water Thoroughly: Water the seedlings thoroughly after transplanting.
6. Mulch: Apply a layer of mulch around the plants to help retain moisture, suppress weeds, and regulate soil temperature. I like to use straw or shredded leaves.
Caring for Your Butternut Squash Plants
Now that your butternut squash plants are in the ground, it’s time to give them the care they need to thrive.
1. Water Regularly: Butternut squash needs consistent moisture, especially during hot, dry weather. Water deeply and regularly, aiming to keep the soil consistently moist but not waterlogged. Avoid watering the foliage, as this can promote fungal diseases. Drip irrigation or soaker hoses are ideal for watering butternut squash.
2. Fertilize: Butternut squash are heavy feeders, so they benefit from regular fertilization. I like to use a balanced fertilizer (like 10-10-10) every few weeks. You can also side-dress with compost or well-rotted manure.
3. Weed Regularly: Keep the area around your butternut squash plants free of weeds. Weeds compete with the plants for water and nutrients.
4. Watch for Pests and Diseases: Butternut squash can be susceptible to a variety of pests and diseases, including squash bugs, squash vine borers, powdery mildew, and squash mosaic virus. Inspect your plants regularly for signs of pests or diseases and take action promptly if you notice any problems.
* Squash Bugs: These pests suck the sap from the leaves and stems of butternut squash plants. You can handpick them off the plants or use insecticidal soap.
* Squash Vine Borers: These pests bore into the stems of butternut squash plants, causing them to wilt and die. You can prevent squash vine borers by wrapping the stems of your plants with aluminum foil or row covers.
* Powdery Mildew: This fungal disease causes a white, powdery coating on the leaves of butternut squash plants. You can prevent powdery mildew by providing good air circulation and avoiding overhead watering. If you see signs of powdery mildew, you can treat it with a fungicide.
* Squash Mosaic Virus: This viral disease causes mottled leaves and stunted growth in butternut squash plants. There is no cure for squash mosaic virus, so it’s important to prevent it by controlling aphids, which can transmit the virus.
5. Prune (Optional): Some gardeners like to prune their butternut squash plants to encourage larger fruit. If you
Conclusion
So, there you have it! Mastering butternut squash growing doesn’t have to be a daunting task. By implementing these simple yet effective tips, you’re well on your way to harvesting a bountiful crop of delicious, homegrown butternut squash. We’ve covered everything from seed starting and soil preparation to pollination and pest control, giving you a comprehensive guide to success.
But why is this DIY approach a must-try? Because nothing beats the flavor and satisfaction of eating produce you’ve nurtured from seed to table. Store-bought butternut squash simply can’t compare to the rich, sweet taste of a squash grown with your own two hands. Plus, you have complete control over the growing process, ensuring your squash is free from harmful chemicals and pesticides. You’re not just growing food; you’re cultivating a healthier lifestyle.
Beyond the basics, there’s plenty of room for experimentation and personalization. Consider trying different varieties of butternut squash, such as ‘Waltham’ for its classic flavor or ‘Honeynut’ for a smaller, sweeter option. You can also explore companion planting to deter pests and improve soil health. Marigolds, for example, are known to repel squash bugs, while nasturtiums attract aphids away from your squash plants.
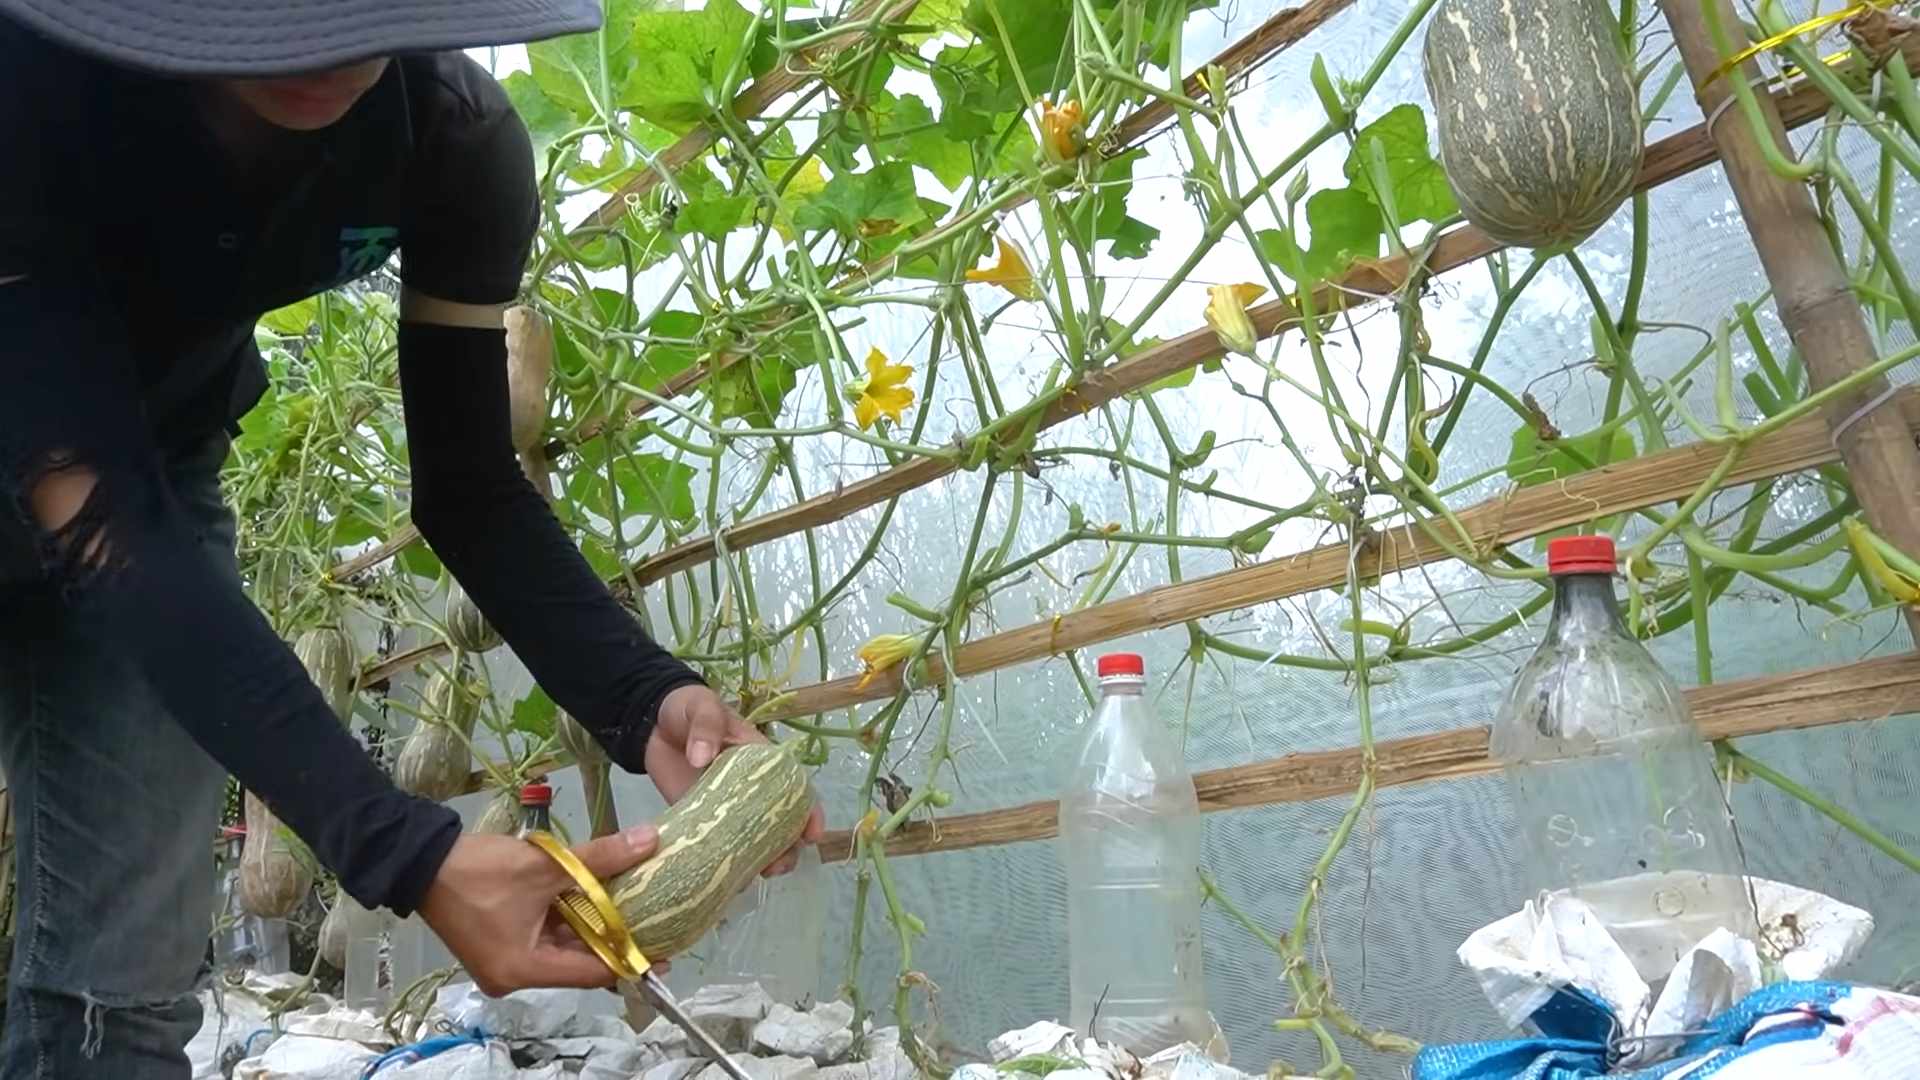
Another exciting variation is to experiment with vertical gardening. If you’re short on space, train your butternut squash vines to climb a trellis or fence. This not only saves space but also improves air circulation, reducing the risk of fungal diseases. Just be sure to provide adequate support for the heavy fruits as they develop.
Don’t be afraid to get your hands dirty and embrace the learning process. Gardening is a journey, and there will be challenges along the way. But with patience, persistence, and a little bit of know-how, you can overcome any obstacle and reap the rewards of a successful harvest.
We are confident that these **butternut squash growing** tips will empower you to cultivate a thriving garden. Now, it’s your turn! We encourage you to put these tips into practice and share your experiences with us. Did you try a particular variety of butternut squash? Did you find a unique solution to a common pest problem? We’d love to hear your stories and learn from your successes (and even your failures!). Share your photos, tips, and questions in the comments below. Let’s build a community of butternut squash enthusiasts and help each other grow the best squash possible! Happy gardening!
Frequently Asked Questions (FAQ)
1. When is the best time to plant butternut squash?
Butternut squash is a warm-season crop, so it’s crucial to wait until the soil has warmed up and the risk of frost has passed before planting. In most regions, this means planting in late spring or early summer, typically from late May to early June. You can start seeds indoors about 3-4 weeks before the last expected frost to get a head start. If you live in a warmer climate with a longer growing season, you may be able to plant butternut squash directly in the ground in early spring. Always check your local frost dates and adjust your planting schedule accordingly.
2. What kind of soil is best for growing butternut squash?
Butternut squash thrives in well-drained, fertile soil that is rich in organic matter. The ideal soil pH is between 6.0 and 7.0. Before planting, amend your soil with compost, aged manure, or other organic materials to improve its fertility and drainage. If your soil is heavy clay, consider adding sand or perlite to improve drainage. Butternut squash also benefits from a soil that retains moisture, so mulching around the plants can help conserve water and suppress weeds. A soil test can help you determine the specific nutrient needs of your soil and guide your fertilization strategy.
3. How much sunlight does butternut squash need?
Butternut squash requires at least 6-8 hours of direct sunlight per day to produce a good harvest. Choose a planting location that receives full sun throughout the day. If your garden is partially shaded, try to plant your butternut squash in the area that receives the most sunlight. Insufficient sunlight can lead to weak plants, reduced fruit production, and increased susceptibility to diseases.
4. How often should I water butternut squash plants?
Butternut squash plants need consistent moisture, especially during fruit development. Water deeply and regularly, aiming to keep the soil consistently moist but not waterlogged. Water at the base of the plants to avoid wetting the foliage, which can increase the risk of fungal diseases. During hot, dry weather, you may need to water daily. Mulching around the plants can help retain moisture and reduce the need for frequent watering. Use a moisture meter or simply stick your finger into the soil to check the moisture level before watering.
5. How do I know when my butternut squash is ripe?
Determining when a butternut squash is ripe is crucial for optimal flavor and storage. Look for these signs:
* **Hard rind:** The rind should be hard and resistant to scratching with your fingernail.
* **Deep tan color:** The squash should have a deep, uniform tan color.
* **Dry stem:** The stem should be dry and corky.
* **Sound:** When you tap the squash, it should sound hollow.
Harvest your butternut squash before the first frost. Use pruning shears or a sharp knife to cut the squash from the vine, leaving a 2-3 inch stem attached. Handle the squash carefully to avoid bruising, which can shorten its storage life.
6. What are some common pests and diseases that affect butternut squash?
Butternut squash is susceptible to several pests and diseases, including:
* **Squash bugs:** These pests suck sap from the leaves and can weaken or kill plants. Handpick them off the plants or use insecticidal soap.
* **Squash vine borers:** These pests bore into the stems of the plants, causing them to wilt and die. Wrap the stems with aluminum foil or row covers to prevent infestation.
* **Powdery mildew:** This fungal disease causes a white, powdery coating on the leaves. Improve air circulation and use a fungicide if necessary.
* **Downy mildew:** This fungal disease causes yellow spots on the leaves. Improve air circulation and use a fungicide if necessary.
Regularly inspect your plants for signs of pests and diseases and take action promptly to prevent them from spreading.
7. Can I save seeds from my butternut squash to plant next year?
Yes, you can save seeds from your butternut squash, but keep in mind that if you grew multiple varieties of squash in your garden, there is a chance that they may have cross-pollinated. This means that the seeds may not produce plants that are true to type. To save seeds, allow a few of your best squash to fully mature on the vine. Then, scoop out the seeds, rinse them thoroughly, and dry them completely before storing them in an airtight container in a cool, dark place.
8. How long can I store butternut squash?
Butternut squash can be stored for several months if properly cured and stored. To cure butternut squash, leave it in a warm, dry place for about 1-2 weeks after harvesting. This allows the skin to harden and helps to prevent spoilage. Store cured butternut squash in a cool, dry, and well-ventilated place, such as a basement or pantry. The ideal storage temperature is between 50 and 60 degrees Fahrenheit. Check the squash regularly for signs of spoilage, such as soft spots or mold.
9. What are some creative ways to use butternut squash?
Butternut squash is a versatile ingredient that can be used in a variety of dishes. Here are a few ideas:
* **Roasted butternut squash:** Simply roast cubed butternut squash with olive oil, salt, and pepper for a delicious and healthy side dish.
* **Butternut squash soup:** Blend roasted butternut squash with broth, cream, and spices for a creamy and comforting soup.
* **Butternut squash risotto:** Add roasted butternut squash to risotto for a flavorful and colorful dish.
* **Butternut squash ravioli:** Fill homemade or store-bought ravioli with a mixture of roasted butternut squash, ricotta cheese, and spices.
* **Butternut squash pie:** Use butternut squash puree in place of pumpkin puree in your favorite pie recipe.
Don’t be afraid to experiment and try new recipes! Butternut squash pairs well with a variety of flavors, including cinnamon, nutmeg, ginger, maple syrup, and brown sugar.
10. What are the nutritional benefits of butternut squash?
Butternut squash is a nutritional powerhouse, packed with vitamins, minerals, and antioxidants. It is an excellent source of vitamin A, vitamin C, potassium, and fiber. Vitamin A is important for vision, immune function, and cell growth. Vitamin C is an antioxidant that helps protect against cell damage. Potassium helps regulate blood pressure. Fiber promotes digestive health and helps you feel full and satisfied. Butternut squash is also low in calories and fat, making it a healthy and delicious addition to your diet.
Leave a Comment